

How to add a microphone to Raspberry Pi?
One of the first things that surprised me when I received my Raspberry Pi was that it didn’t have a microphone jack.
This port seemed useful for many things, so I did some research and tests on the subject. And now I’m able to tell you more about it with this article.
There is no microphone on the Raspberry Pi, and no input jack. It’s however possible to use the USB ports or Bluetooth to connect an external microphone to it.
As you read the article, you will understand:
– Why there is no microphone directly integrated
– How to add a microphone to the Raspberry Pi
– How to check it’s working and use it in a basic way
– Why would a microphone be useful for your future projects
By the way, if you are really interested in improving your skills on Raspberry Pi, I highly recommend to check out my e-book here. It’s a 30-days challenge from beginner to master, with step-by-step tutorials and many projects to practice along the way.
Why is there no microphone on a Raspberry Pi?
The basic concept of Raspberry Pi is to create a “computer” with these 3 criteria:
- a small size
- an affordable price
- important possibilities of upgrades
The Raspberry Pi Foundation tries to keep the price of their products as low as possible, and don’t add any non-essential components to their device. Especially, if it’s possible to add it later using the existing components.
That’s the same reasoning regarding the microphone.
They included a speaker jack output (as explained here), but not a microphone output.
And you’ll see that it’s not that complicated to add one, and at least it will totally fit your needs if you buy it separately.
How to add a microphone to the Raspberry Pi
The easiest way to add a microphone on a Raspberry Pi is to plug a USB microphone on one USB port, or to use a jack to USB adapter for a traditional microphone.
The first thing to do before installing a microphone is to ask yourself what you want to do with it.
First choose a microphone that fits your needs, without looking whether it will be compatible or not.
Assume that everything is possible.
You have made your choice or already have one that you want to install?
Let’s see how to install it for the three most frequent cases.
USB Microphone

The first possibility, which is probably the simplest, is to connect a USB microphone (check the price on Amazon).
If you’re looking for a cheap solution to do some tests with, a USB microphone is perfect for you. Very affordable, no driver issues and a discrete format.
If you are lost in all these new words and abbreviations, request my free Raspberry Pi glossary here (PDF format)!
Download now
The advantage of USB is that generally your microphone will be detected automatically by Raspberry Pi OS, it’s plug & play.
In my case, I plugged it into a free USB port, and the sound controller peripherals immediately detected the microphone, and added in the list.
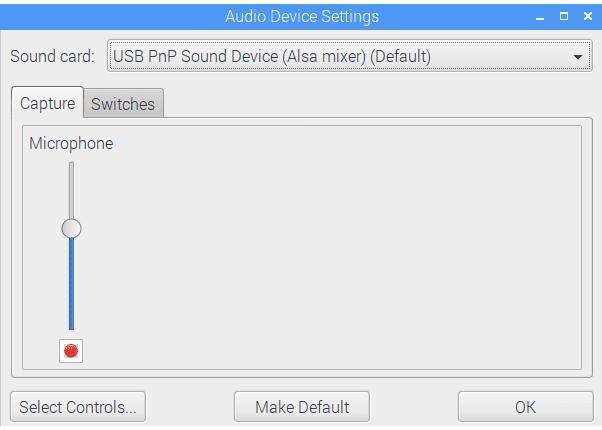
If you see your microphone in this place that’s it! You will have to adjust the amplification, and it’s ready to be used.
Bluetooth Microphone
If you have a Bluetooth microphone (headphones or other), there are two cases that can occur:
- Your Raspberry Pi model is equipped with Bluetooth, and your microphone is detected.
- You are not lucky :-).
Bluetooth microphone detected automatically
I did the test using a Bluetooth headset with mic, and I was lucky that it was very well recognized by the Raspberry Pi, so I could easily pair it.

Join Our Community!
Connect, learn, and grow with other Raspberry Pi enthusiasts. Support RaspberryTips and enjoy an ad-free reading experience. Get exclusive monthly video tutorials and many other benefits.
Learn more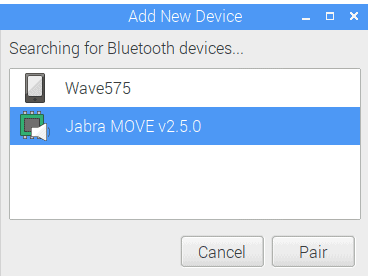
Then the sound switched automatically to the headphones, and I recorded my voice with the headset microphone.
However, I couldn’t adjust the output parameters (especially volume) via the GUI. I had to go through alsamixer:alsamixer
Bluetooth not detected
If your Bluetooth microphone is not detected, the microphone manufacturer will generally provide a USB adapter with it, so you can use it,
Maybe it’s possible to install additional drivers or at least do something to help the Bluetooth recognize your microphone, but I admit I have not encountered this case, so I didn’t look into it more.
Then you go back to the chapter “USB Microphone” and follow the same steps.
Jack Microphone
This solution is the most complicated, so it’s better to have a good reason to want to install a microphone jack at any price.
Indeed, since there is no integrated connector, you will need to add an extension to your Raspberry Pi.
This solution is to buy and install a sound card, which will allows, among other things, to connect a microphone jack.
There are mainly two types of sound cards, and in both cases, it means that you will have to buy an additional component (either a USB soundcard or a Hat soundcard).
USB Soundcard
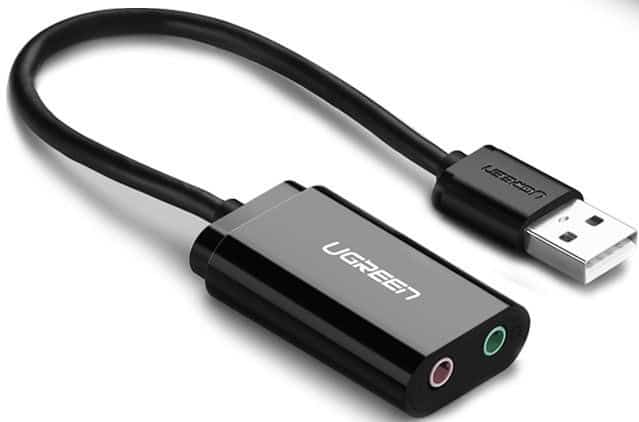
I think this is probably the most straightforward way to add a jack microphone if that’s what you want.
If you are lost in all these new words and abbreviations, request my free Raspberry Pi glossary here (PDF format)!
Download now
For a cheap solution, you can find this USB to jack adapter on Amazon, which allows you to connect a USB headset and microphone to your Raspberry Pi. If you have a correct headset or microphone using jack ports, it’s the best solution for you.
The configuration will be the same as the one indicated at the beginning of this post.
Raspberry Pi OS will detect the adapter and you will only have to configure your microphone.
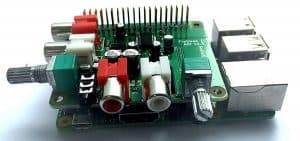
Hat Soundcard
For DIYers or those who need a better sound quality, there are real sound cards, very close to those that can be found in conventional computers.
For a decent price, you can install this “Hat” sound card via the GPIO ports of Raspberry Pi and enjoy a professional product for advanced projects (all details on Amazon). Once you have it, you can start any audio project without any doubt on the sound part, it will work!
How to test a microphone on Raspberry Pi
To test a microphone on Raspberry Pi OS, you can either use a command line (arecord) or install a sound editor application like Audacity.
In a terminal
If you want to be sure that your microphone works well, the easiest way is to do a recording test.
To do this, open a terminal and type the following command:arecord -D plughw:1,0 test.wav
Then open the sound file with your favorite audio player to check that the microphone recorded your voice correctly.
For example:omxplayer test.wav
Are you a bit lost in the Linux command line? Check this article first for the most important commands to remember and a free downloadable cheat sheet so you can have the commands at your fingertips.
From the desktop
Graphically, there are lots of applications that you can use to test your mic or manage your audio recordings. The one I recommend is Audacity.
Just install it with:apt-get install audacity
You can also install it with the Add/Remove software tool if you prefer.
Start it by going to the start menu, then Sound & Video, and you’ll find Audacity there.
The interface is very intuitive.
You have to click on the red “Record” button to start your recording.
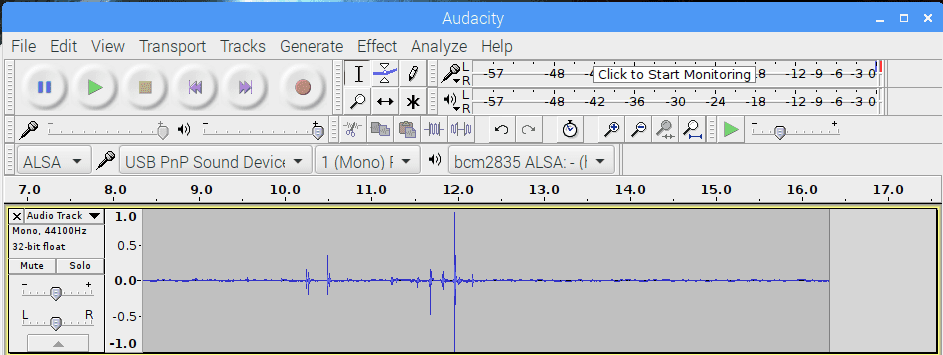
You can then check the sound by simply clicking on Play.
Audacity allows a lot of editing to your raw sound. For example, you can amplify it, change the frequency of sampling or add various effects. I use it a lot on my computer, but it also works well on Raspberry Pi.
It's a free PDF guide containing every Raspberry Pi Linux command you should know!
Download now
Raspberry Pi projects with a microphone
There are tons of possible projects with a Raspberry Pi, and for some of them, the microphone quality will be essential.
Now that you have a functional mic, maybe you can think about this kind of projects. I give you 2 or 3 examples to give you some ideas.
Home assistant
Siri, Alexa, Google assistants… Have you ever heard of them?
Personal assistants are taking up more and more place in our lives and can help us with many things.
Did you know that it was possible to transform a Raspberry Pi in Amazon Echo?
Well, yes, there are many projects on the web allowing you to run the home assistant of your choice on your Raspberry Pi, and thus customize it according to your desires.
This project is relatively simple and inexpensive.
With your microphone, you already have 50% of the necessary material.
A speaker, some coding, and your Raspberry Pi will become the home assistant of your choice.
Baby Monitor
It is a project that can be a little more complicated if we go to the end of things, but that can be interesting.
Indeed, it is possible to add the following elements on a Raspberry Pi:
– Microphone for listening to the baby
– A camera to monitor it
– A temperature and humidity sensor to make sure your room is nice
– A speaker to play a lullaby
What do you want more?
For less than $50 you will replace expensive accessories while having fun!
It's a free PDF guide containing every Raspberry Pi Linux command you should know!
Download now
Reminder: Remember that all the members of my community get access to this website without ads, exclusive courses and much more. You can become part of this community for as little as $5 per month & get all the benefits immediately.
Conclusion
Here it is, I hope this article will help you understand why there is no microphone port in the Raspberry Pi and how to add one easily whatever your need is.
You also got a glimpse of the possibilities you can explore with a microphone connected to your Raspberry Pi.
If you have issues installing your microphone, please leave a comment in the community, and I will try to help you.
You may also be interested in this article to fix all kinds of audio issues: How To Fix Sound Issues On Raspberry Pi: Easy Solutions
Whenever you’re ready, here are other ways I can help you:
The RaspberryTips Community: If you want to hang out with me and other Raspberry Pi fans, you can join the community. I share exclusive tutorials and behind-the-scenes content there. Premium members can also visit the website without ads.
Master your Raspberry Pi in 30 days: If you are looking for the best tips to become an expert on Raspberry Pi, this book is for you. Learn useful Linux skills and practice multiple projects with step-by-step guides.
The Raspberry Pi Bootcamp: Understand everything about the Raspberry Pi, stop searching for help all the time, and finally enjoy completing your projects.
Master Python on Raspberry Pi: Create, understand, and improve any Python script for your Raspberry Pi. Learn the essentials step-by-step without losing time understanding useless concepts.
You can also find all my recommendations for tools and hardware on this page.
When I plug my earphones into my raspberry pi via the included audio jack in the Raspberry Pi B+ the audio input is not detected
The audio jack include on the Pi does not support audio input. Sorry 🙁
I tried to connect Bluetooth mike am getting an error when I enter the (arecord -D plughw:1,0 test.wav) has
alsa lib pcm_hw.c1713:(_snd_pcm_hw_open) invalid for card
arecord :main:788: audio open error :no such or no such directry
Sorry, in english now:
Hello
How to associate sound, via a microphone to a video sequence. Either save a person who is talking in front of a camera (Pi camera).
Thank you
Hello/Bonjour fagol,
I’m not sure to understand what you want to do but it depends on the software you use for the camera I think
It should be possible to record the sound at the same time
If you want to use it for a security camera, maybe Motio can help you: https://motion-project.github.io/motion_config.html
If not, you have to explain what you want to do
Maybe someone could help you
Good luck
Hi,
Thanks for this article. Want to connect professional usb mike to raspberry 3, will be recording piano practice. Do you think I’ll need extra power. Can sound recorder be used with this? Just want a small program.
Hello,
It probably depends on the mic you want to use, just try it?
For the software, Audacity is probably ok, but I don’t know if there are professional tools for Raspberry Pi
Is it possible to synch both audio and video recording ?
Thank you for doing this! Now i’m newer into looking for these kinds of specs and stuff thus I’m still learning the important points of the audio world. Yet I was on the fence concerning dropping the money for this mic but you’ve helped me out there! I actually will use two of these different recording modes and this was very helpful!
It’s incredible how complicated it is to have a simple mic working properly in raspbian pi 3! I have gone through various instructions 2 days and all leading deeper and deeper in the nowhere…
***
What I need:
Have a videoconference where I could use a webcam & integrated microphone on it.
-> There simply isn’t simple instructions for that. I first need to get trained a Linux programmer before that is possible. Damn.
Hi,
If you can give us more details on your problem, maybe we could help
Did you follow the tutorial? Where are you stuck?
Patrick
Before I did something wrong, I could click on the taskbar at the top of my screen and easily switch between a set of headphones and the speakers built into my Samsung HDMI display.
BUT now when I right click my mouse while hovering over the speaker symbol, when I click on either “Analog” or “HDMI”, yes, the selection will switch between either one but the output is on my headset. Is there any way to kick my system in the can to make the choices work properly?
Also, no videos will play. Is this related or not but the timing seems suspicious.
I really REALLY do not want to reformat my SD card and do a complete reinstall.
Any advice?
Thank you.
Terry Thomas
Atlanta, Georgia USA