
Raspberry Pi 4 – Argon One M.2 Honest Review: Who is it for?
On paper, the Argon One M.2 case for the Raspberry Pi 4 looks like the perfect one. Passive cooling with a fan if you need more, SSD support with an M.2 slot, two full-sized HDMI ports, etc.
I bought the case a while ago and will share my thoughts on it. It’s a good case, but it’s not for everyone, as you’ll see in my review.
Let’s start with a further introduction of the case for Raspberry Pi 4, just in case you haven’t already read 20 pages about it.
If you need help getting started on Raspberry Pi, I have an entire course to guide you through your first steps. I’ll help you use the perfect hardware, plug everything in and install your first system. You’ll also do your first projects with me, just to make sure you are ready for the next level. Get all the information on this page if you are interested.
Argon One M.2 Overview
First impressions
I love the Argon40 brand, they build nice products with a great design. This Argon One M.2 is not an exception.
This case is a bit bigger than the other Raspberry Pi 4 cases I have, but there is a reason for that. As you can see on this picture, you have all the ports on the back of it. The USB and Ethernet ports on the right are the same as a Raspberry Pi board, and there is extra space on the left for two full HDMI ports, the USB-C power supply and the jack audio output.
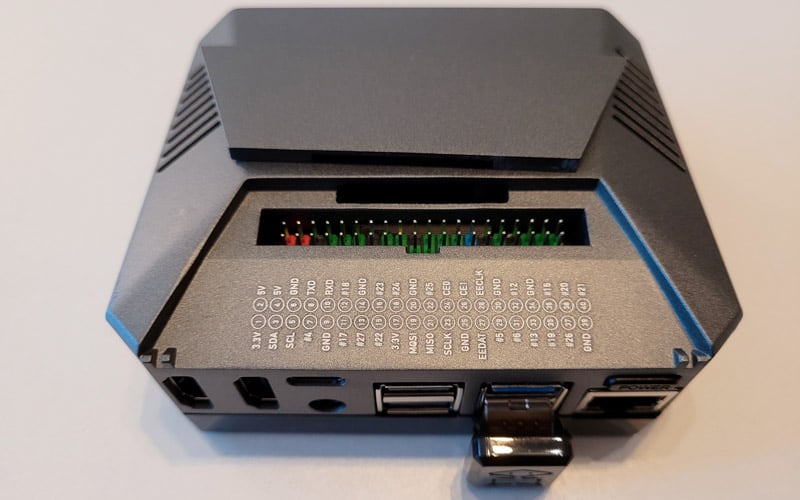
You can also have access to the GPIO pins directly from the top of the case. It has a nice removable lid and some indications about the port numbers.
What we don’t see in the picture is that there is space under the Raspberry Pi to put an M.2 SSD. We’ll get back to this later, but it’s connected to your Pi via the USB thing you can see plugged in the picture. Basically, there is an additional USB port on the back to access the SSD content.
There is also a power button just above the Ethernet port. You can use it to start the Raspberry Pi, and once configured to stop it properly.
Pricing
The official price of the Argon One M.2 case is $55, which is pretty expensive for a Raspberry Pi case.
As a comparison, there are other great cases that are way cheaper. The Flirc case and the Argon Neo are ones that I use a lot and are both available for around $15.
If you are lost in all these new words and abbreviations, request my free Raspberry Pi glossary here (PDF format)!
Download now
These cases don’t have the same features, but it’s worth considering before spending as much on your case as on your Raspberry Pi.
Cooling system
To cool down a Raspberry Pi 4, there are several options, depending on your overall use of it:
- Nothing: should be enough for basic use on a limited time.
- Heat sinks: to keep the CPU temperature at a decent level.
- Passive case: slight improvement of the heat sinks option.
- Fan: a bit noisy, but should be enough for almost anything.
- Big fan: for extreme users. The ICE Tower is an example of this.
If you are not familiar with these technologies, you should read my guide about the Raspberry Pi temperature (limits, monitoring and things you should do to keep it cool).
The Argon One M.2 uses a combo of a passive case with a fan. The top of the case acts like a giant heat sink that touches the CPU once assembled. And there is also a fan that you can program to turn on when the temperature gets too high.
I tested this, so we’ll get back to it later, but overall, it’s a good system.

Join Our Community!
Connect, learn, and grow with other Raspberry Pi enthusiasts. Support RaspberryTips and enjoy an ad-free reading experience. Get exclusive monthly video tutorials and many other benefits.
Learn moreOther info
There is a similar product, named Argon One V2, which costs almost half the price. If you order one, make sure to pick the one you want. The V2 version has a similar design and features, but it doesn’t have an SSD support built in, nothing under the Raspberry Pi.
Another thing to know, is that the Argon One M.2 isn’t compatible with any SSD on the market. First, it has to be an M2 SSD (it looks like a RAM module, not an external drive), and it’s only compatible with B-key or B+M key. You need to have 6 pins on one side, if there are only 5 it won’t fit (this is the one I used for example).
It's a free PDF guide containing every Raspberry Pi Linux command you should know!
Download now
Argon One M.2 Review
Let’s take a look at what you get when you receive your order. A few things I already introduced will become more clear.
Unboxing
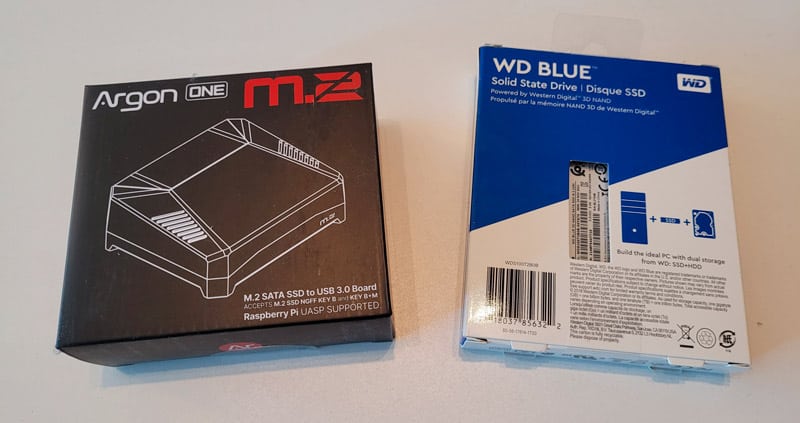
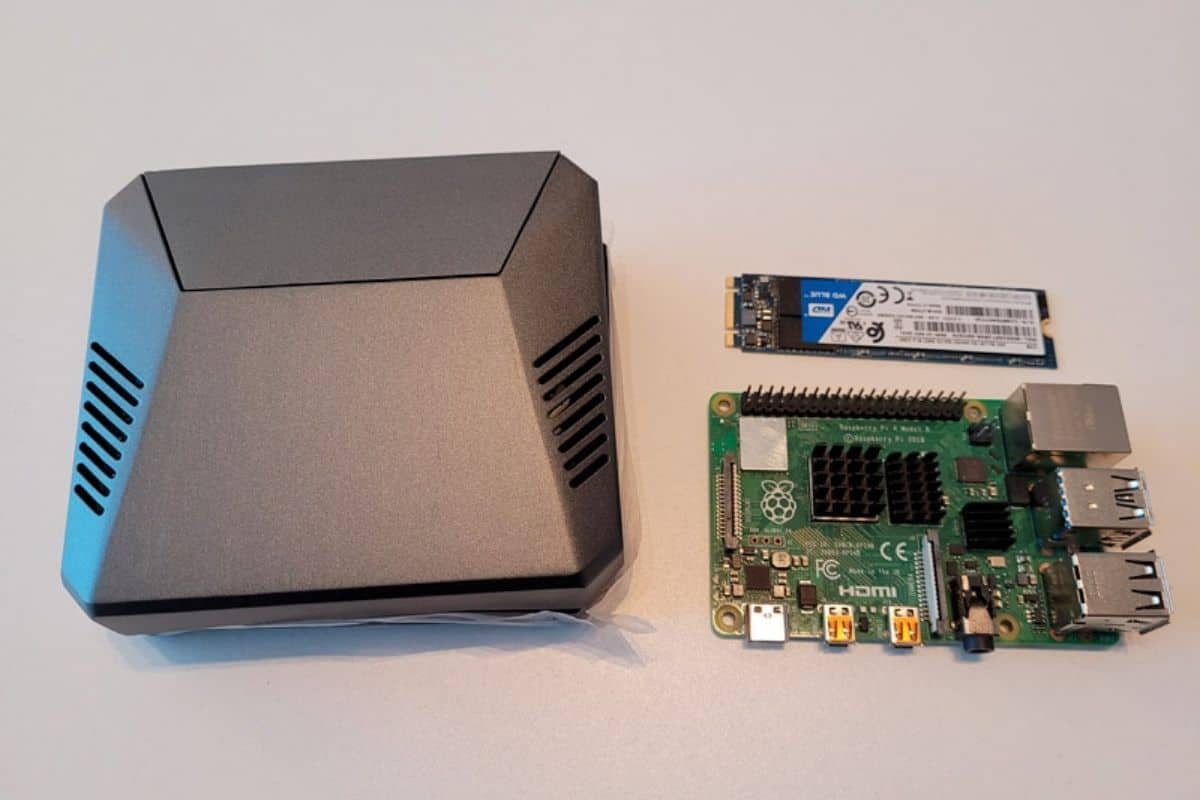
I ordered the Argon One M.2 case with a WD Blue SSD. I already had one M.2 SSD, but it wasn’t compatible with this case. The case comes with a few pieces:
- The case itself, in two parts, with the fan built-in.
- The expansion board, with the two HDMI ports and Jack output.
- The USB dongle, to connect your Raspberry Pi to the M.2 slot.
- A thermal pad for the CPU and a few screws to assemble everything.
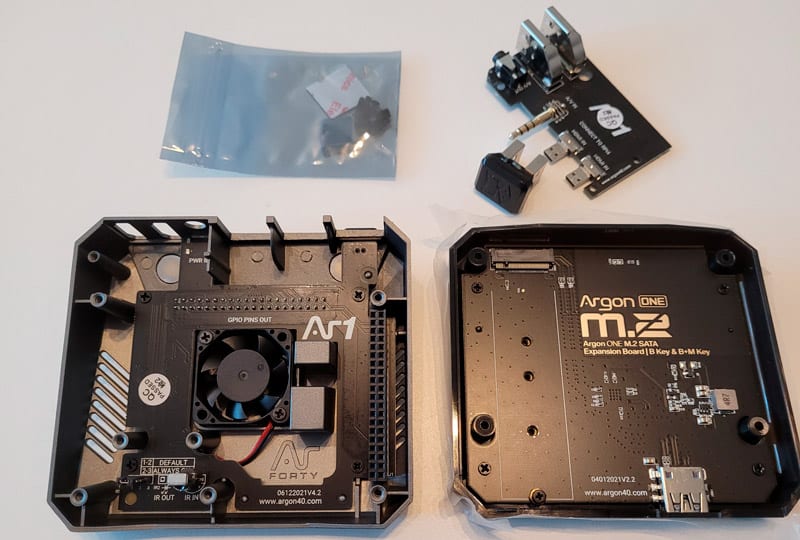
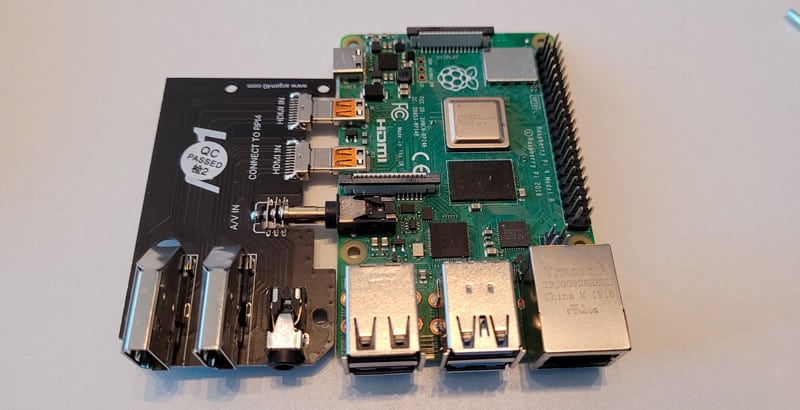
The assembly is not complicated, but it’s also not very intuitive. There is no guide, so I started installing my Raspberry Pi in it before understanding that you need to plug the expansion board first. So, the first step is to get something like:
And only then you can put everything in the case, plugging the GPIO ports gently:
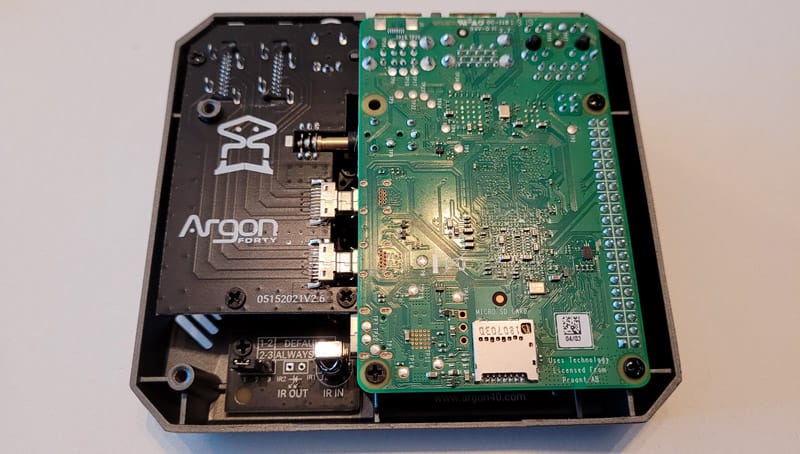
By the way, I also put screws on in this picture, but it was a mistake, as you have to put the bottom of the case on first. The screws are used to attach the Pi AND the case together. As I told you, not straightforward, but once you get the idea, it’s not that complicated (maybe I’m just stupid).
Two things to note on the previous picture, though:
If you are lost in all these new words and abbreviations, request my free Raspberry Pi glossary here (PDF format)!
Download now
- The SD card slot will become inaccessible once the case is assembled. This is pretty bad. They could have put a slot on the expansion board, like on the RasPad 3 that I tested previously, or maybe found a way to keep it accessible. I know we’ll use the SSD, but not all systems are compatible. So, if you want to use an SD card, plug it before closing the case.
- There is a jumper for the fan in the bottom left of my photo. There are two positions: “Default” or “Always on”.
By default, the fan is not activated. You can control it with a script provided by Argon 40, but you need to install it first. The script will adjust the fan speed depending on the CPU temperature.
If you move the jumper to “Always on”, the fan will turn at 100% all the time. No need to install the script, but you won’t have any silence if you don’t.
Cooling results
As always in my reviews, I did a CPU stress test for a few minutes (putting all cores at 100%) and logged the CPU temperature. Here are the results:
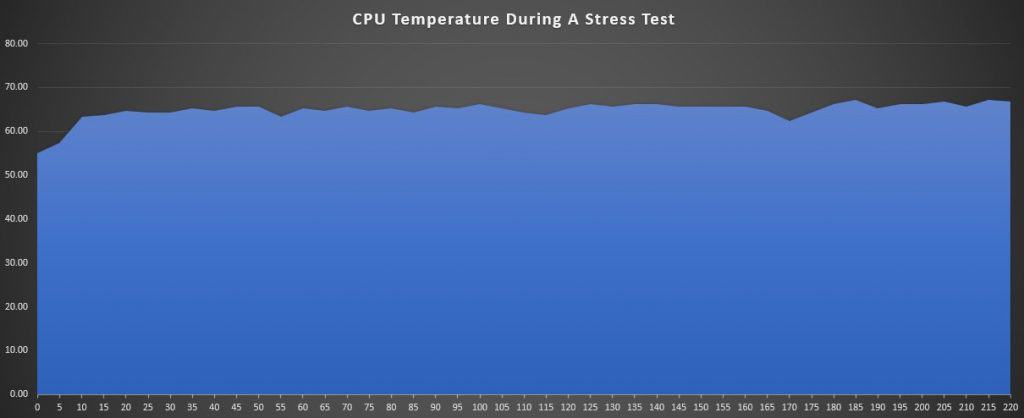
As you can see, the temperature picked up at the beginning of the test, passing quickly from 55 °C to 65 °C. But thanks to the fan and the passive case, the temperature stayed around the same level, below 70 °C.
As a reminder, the CPU on a Raspberry Pi will start to slow down around 85 °C. So, it shouldn’t be an issue with this case. Even after a few minutes at 100%, the temperature stayed stable.
I did this test with the fan script enabled. The default settings ensure the fan works like:
- Below 55 °C: Fan disabled
- Between 55 °C and 60 °C: Fan running at 10%
- Between 60 °C and 65 °C: Fan running at 55%
- Over 65 °C: Fan running at 100%
It explains the graph. As soon as the CPU temperature goes over 65 °C, the fan will run at 100% and keep it around this value.
However, I had another issue. After a few minutes, I received a low voltage error on my screen. I was using a good power supply for my Raspberry Pi, but I think it wasn’t enough to keep the CPU at 100% with an SSD and a fan running at 100% too. That’s why I ended the test after only 3-4 minutes.
The CPU was probably slowed down, not by the temperature, but by a lack of power.
I think this might be an issue depending on how you plan to use the case. I didn’t test their power supply, so I can’t say if it works, but they sell it as the solution. That’s likely another cost to add to the total price of this case if you want to avoid under voltage issues.
Wi-Fi signal
I experienced some issues with Wi-Fi reception when testing aluminum cases (the Flirc case, for example), so I’m now adding this test to all my reviews.
The results with the Argon One M.2 are not as bad, but you’ll still lose a bit of Wi-Fi quality by using that type of aluminum case. Wavemon shows me 80% link quality:
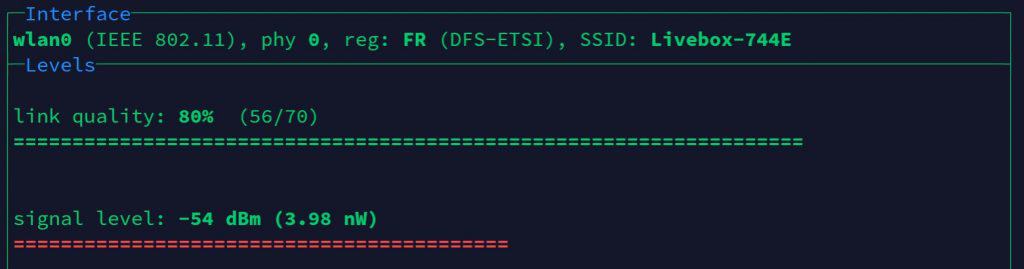
It’s a bit lower than my results with the Argon One, but it’s not that bad. I’m more concerned with the “rx rate” I get with this tool:rx rate: 39.0 Mbit/sIn theory, I should be a 72 Mbit/s. And if I use Speedtest to check my Internet speed, I can see that speed is affected:

So, expect to lose part of your Internet and network speed while using this case. It’s not horrible (I was around 3 Mbps with the Flirc case), but it’s something to consider.
As an example, I received better results with the Argon Neo (around 50 Mbps with Speedtest).
Using a cheap external Wi-Fi adapter can solve this, so it isn’t a big deal, just something to keep in mind when you make your choice.
It's a free PDF guide containing every Raspberry Pi Linux command you should know!
Download now
Reminder: Remember that all the members of my community get access to this website without ads, exclusive courses and much more. You can become part of this community for as little as $5 per month & get all the benefits immediately.
In a nutshell
Now that you have a better idea of what to expect with this case, let’s summarize my thoughts after using it for a few weeks. As I told you, there are some great features with this product, but it isn’t perfect.
Argon One M.2 Pros & Cons
| Pros | Cons |
|---|---|
| Built-in M.2 SSD slot | Inaccessible SD card slot |
| Full HDMI ports | Full HDMI ports |
| Power button | No USB/USB cable |
| GPIO access | No user manual |
| Nice design | Wi-Fi signal affected |
| Power supply issues |
Let me explain a few things:
- I put the full HDMI ports on both side. I’m now used to having micro-HDMI ports and cables, and using this case means using different cables. If you only have one Raspberry Pi and case, it’s probably a good thing, as you can stick with the regular full-size HDMI cable. If you switch between several Pis and hardware, it adds another thing to your desk.
- The only way to flash the SSD once installed is to plug it directly to your computer with a USB/USB cable. They could have included this cable in the package. Like the hidden SD card slot, it seems they didn’t think about convenience for users like me, that are switching OS all the time.
I already explained the other points. The power supply issues are not really their fault, but it’s something to consider before buying this case, so I included it. The lack of instructions is not a big deal, but I learned by chance the existence of a script to manage the fan, which is a bit of a shame.
Who is it for?
Well, most of the issues listed in the previous section can be worked around easily. To fix everything, you’ll probably have to buy a USB cable, another power supply and maybe a Wi-Fi adapter. The main issue that remains (except the total price) is that you can’t switch SD cards easily with this case.
Overall, the Argon One M.2 case is good if you have a large budget and plan to use an SSD for one main project (typically for desktop usage). Using it will keep everything tied into one case, that you can easily plug into a traditional monitor or TV.
But if you are often switching from one OS to another, and especially if you need the SD card slot, this is not really a great fit. For example, I prefer using the Argon Neo, which best suits my needs (SD card is accessible, passive cooling is enough for short tests).
Interested? Order your Argon One M.2 at the best price on Amazon.
Still unsure?
If you are not yet convinced that the Argon One M.2 is the best option for you, you can read this other article I wrote on RaspberryTips: I tested all the most popular Raspberry Pi cases and compare them. You should have a better overview of the possibilities after that.
I also tested the Pironman from SunFounder recently, you can click on the link to read my review. It’s a great alternative to the Argon One if you are looking for something more fancy (LEDs & stuff ^^).
Whenever you’re ready, here are other ways I can help you:
The RaspberryTips Community: If you want to hang out with me and other Raspberry Pi fans, you can join the community. I share exclusive tutorials and behind-the-scenes content there. Premium members can also visit the website without ads.
Master your Raspberry Pi in 30 days: If you are looking for the best tips to become an expert on Raspberry Pi, this book is for you. Learn useful Linux skills and practice multiple projects with step-by-step guides.
The Raspberry Pi Bootcamp: Understand everything about the Raspberry Pi, stop searching for help all the time, and finally enjoy completing your projects.
Master Python on Raspberry Pi: Create, understand, and improve any Python script for your Raspberry Pi. Learn the essentials step-by-step without losing time understanding useless concepts.
You can also find all my recommendations for tools and hardware on this page.


Argons own PSU works very well for this case.
I have two Argon V2s running kodi and so far no power problems. One running from a flash drive and one with a standard SSD in the Argon adapter
Even in the hot weather we’re having in the IUK there are no over heating problems with either case.
Interesting review, Keep up the good work.
P.S.
I never use SD cards. so I prefer not having slot.