
The Ultimate Guide to Backup and Restore your Raspberry Pi
If, like me, you make regular changes on your Raspberry Pi, or keep important files on it, it might be a good idea to create backups. And what’s even better is to make sure backups are recoverable :).
But then, how to back up a Raspberry Pi and recover it? That what we’ll see in this complete guide.
The easiest way to create a full copy of a Raspberry Pi is to create an image of the entire SD card with a tool like SD card copier (included by default on Raspberry Pi). Other options are possible, like backing up only the important files to another storage drive or NAS.
As often, there is not only one way to do this. It highly depends on how you use your Raspberry Pi, and what is available on your network to store the backups.
It this tutorial, I will guide you through several solutions:
- Back up only important files (configuration, documents, MySQL databases).
- Make a complete image of the SD card on another computer.
- Or do a full backup of a Raspberry Pi while running.
We will now see in detail how to do each one.
If you’re looking to quickly progress on Raspberry Pi, you can check out my e-book here. It’s a 30-day challenge where you learn one new thing every day until you become a Raspberry Pi expert. The first third of the book teaches you the basics, but the following chapters include projects you can try on your own.
Backup only the important files
The first method you can use if you have a simple installation is to back up only the needed files.
For example, if you use your Raspberry Pi for a security camera, once you back up the configuration file, it’s ok, you don’t need more. It’ll be the most efficient method, you don’t need to keep a 16GB image file for just this.
In the following, I’ll show you :
- How to create a script to do that.
- How to schedule it if the files are modified.
- How to send the file to another computer (in the script or manually).
- And finally, how to restore the files.
Script
Before starting to create the script, you have to identify the files you need to save.
In my script, I’ll use a file and a folder that you can adapt to your needs:
- /etc/app1/file1.conf
- /etc/app2
Then we need to create a backup folder to store the files:mkdir /home/pi/backups
I’m using “/home/pi” everywhere, but you probably have to adjust this with your username (/home/pat for example).
Use nano to create the script:nano /usr/local/bin/backup.sh
And finally, the first version of a simple script could look like this:
#!/bin/bash
/bin/cp /etc/app1/file1.conf /home/pi/backups
/bin/cp /etc/app2 /home/pi/backups/ -r

Save your changes and exit nano.
Then add the permission to execute the script with:chmod +x /usr/local/bin/backup.shAnd you can try it with:/usr/local/bin/backup.sh
Use sudo if needed (if the goal is to back up system files, you probably need sudo).
As you can see, it’s a basic script, that will overwrite the old backup each time.
So now we’ll improve this script on several points.
Are you a bit lost in the Linux command line? Check this article first for the most important commands to remember and a free downloadable cheat sheet so you can have the commands at your fingertips.
Use variables
The first good practice we’ll use to improve the scripts is to add variables.
For example, let’s say you have 200 files to backups to /home/pi/backups and tomorrow you want to save them in /media/nas/pi/.
You’ll have to edit 200 lines in your script to change the destination folder.
Not that smart.
A better way to do this is to create a variable at the beginning with the destination folder path and use it for each line.
I’ll also do the same for the “cp” command, so if you want to change it to use rsync or another command, you’ll have only one line to edit.

Join Our Community!
Connect, learn, and grow with other Raspberry Pi enthusiasts. Support RaspberryTips and enjoy an ad-free reading experience. Get exclusive monthly video tutorials and many other benefits.
Learn moreHere’s a better script:
#!/bin/bash
DEST_FOLDER='/home/pi/backups/'
BACKUP_CMD='/bin/cp'

$BACKUP_CMD /etc/app1/file1.conf $DEST_FOLDER
$BACKUP_CMD /etc/app2 $DEST_FOLDER -r
The result will be the same, but it will be easier to update.
If you want to use a different destination, you just have to update the variable at the beginning.
Compress files
Most of the time, we use compression for backup or at least archive files.
I’ll use tar to archive all files in one and gzip to compress this file.
Here is the new script:
It's a free PDF guide containing every Raspberry Pi Linux command you should know!
Download now
#!/bin/bash

DEST_FOLDER='/home/pi/backups/'
DEST_FILE='backup.tar'
BACKUP_CMD='/bin/tar -rvf'

/bin/rm $DEST_FOLDER/$DEST_FILE.gz
$BACKUP_CMD $DEST_FOLDER/$DEST_FILE /etc/app1/file1.conf
$BACKUP_CMD $DEST_FOLDER/$DEST_FILE /etc/app2
/bin/gzip $DEST_FOLDER/$DEST_FILE
I add a new variable DEST_FILE to store the file name of the backup.
“tar -rvf” allows you to append several files to one tar file.
“gzip” allows you to compress the whole tar file.
Stop overwriting files
As you can see in the last script, we delete the previous backup each time.
It’s not a good thing to do. If there is an issue with the backup, you’ll not be able to get an older version.
The good practice is to name the backup file with the current date time, like this:
#!/bin/bash

DEST_FOLDER='/home/pi/backups/'
DEST_FILE="backup-$(date +'%F_%R').tar"
BACKUP_CMD='/bin/tar -rvf'
$BACKUP_CMD $DEST_FOLDER/$DEST_FILE /etc/app1/file1.conf
$BACKUP_CMD $DEST_FOLDER/$DEST_FILE /etc/app2
/bin/gzip $DEST_FOLDER/$DEST_FILE
Nothing changed except we add the date in the DEST_FILE variable, so that we stop deleting the previous backup.

Each time the script run, it will now create a new file and keep all the previous versions.
Schedule backups
Once we have created our script, following the previous steps, most of the work is done.
We only need to schedule our script so that it starts every day automatically.
For that, we will use the crontab:
- Open the user’s crontab:
crontab -e - Paste this line at the end of the file:
0 0 * * * /usr/local/bin/backup.sh
This cron will run your backup script each day at midnight, but you can change it if you want. - Save and quit (CTRL+O, Enter, CTRL+X)
If you back up files with privilege access needed, don’t forget to schedule the script in the root crontab (sudo crontab -e).
If you are not comfortable with this, do not hesitate to read my tutorial on scheduling tasks on Raspberry Pi. And you can also use this tool to give you the line to put in the crontab for a different schedule.
Delete old files
As you can see, each day a new file will be created, and we never delete it.
What you can do to free disk space is to delete files older than eight days (or more if needed).
To configure this, you can add this command at the end of the script:/usr/bin/find $DEST_FOLDER -mtime +8 -delete
By adding this, you’ll have at anytime only eight backup files of history in your destination folder.
Feel free to change the number of files you want to keep.
It’s always a good idea to keep several days of history.
You can’t be sure to see the issue with your files on the first day.
Send backup over the network
We now have a backup with a few days of history on the SD card, but it’s not enough.
If tomorrow your SD card doesn’t work anymore, it will not help to have backup files on it.
We need to put the files safe on another computer to avoid this kind of problems.
To a Linux computer or a NAS
If you have another computer on Linux (or a NAS), you can transfer backup files on it to keep them safe.
This method will work for macOS too.
Personally, I’m using a 4 bay Synology NAS like this one on Amazon, which is great to save high volumes of critical data. It’s a bit expensive, but you have redundancy and security that is difficult to get on a standard computer (and also many tools included).
For less important data, you can also turn another Raspberry Pi into a NAS and sync your files to it (check my tutorial if you want to try). You can’t install FreeNAS on Raspberry Pi, but other great options are available.
Manually
The first way to do this is manually.
If your files never change or if they are not so critical, you can do this once a week or a month to be safe.
To transfer the files from the Raspberry Pi to the Linux computer, we’ll use rsync.
So you need to install it on both machines:sudo apt-get install rsync
Then create a backup folder on your computer:mkdir /home/[USER]/backups_pi
Then you have two ways to transfer files:
- From your computer:
rsync -auzr pi@[RASPBERRY_IP]:/home/pi/backups/* /home/[USER]/backups_pi/ - From the Raspberry Pi:
rsync -auzr /home/pi/backups/* [USER]@[COMPUTER_IP]:/home/[USER]/backups_pi/
Don’t forget to replace the variables with the Raspberry Pi IP address and your username.
And feel free to delete old files before or after the transfer on your computer.
Automatically
As when saving on the Raspberry Pi, it’s always a good idea to automate this kind of task.
The problem you might have seen is that a password is required when the transfer starts.
To avoid this, you must first make an exchange of SSH keys between the two machines.
For this step, I’ll assume it’s your computer that triggers the transfer.
If you prefer to transfer in the other direction, you have to do the opposite (generate the keys on the Raspberry Pi and allow them on the PC).
Key exchange
- Firstly start by generating a key on your computer (if you have already one, it’s ok, go to next step):
ssh-keygen -t rsa
Press Enter to each question, leave the passphrase empty. - Then transfer the public key on the Raspberry Pi:
rsync ~/.ssh/id_rsa.pub pi@[RASPBERRY_IP]:/home/pi/
Last time you need to enter your password. - On the Raspberry Pi, add the public key to the allowed keys:
cat ~/id_rsa.pub >> ~/.ssh/authorized_keys - Try to connect in ssh now. It shouldn’t ask you a password:
ssh pi@[RASPBERRY_IP]
Script example
So, now you should be able to put the rsync command in a script that will not ask for a password.
The script should look like this:
#!/bin/bash
rsync -auzr pi@[RASPBERRY_IP]:/home/pi/backups/* /home/[USER]/backups_pi/
find /home/[USER]/backups_pi -mtime +8 -delete
Then schedule the script by adding it to your crontab as explained previously.
To Windows computer
If your computer is on Windows, you can also send your backup to it, manually or automatically.
Manually
To manually transfer files from the Raspberry Pi to your Windows computer, the easiest way is to install WinSCP on Windows.
It’s a free software to transfer files with SSH:
- Once installed, start WinSCP
- Add a new site with the Raspberry Pi information
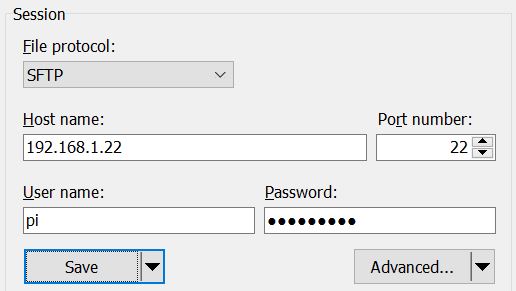
- Click Save, and connect to this new site
- On the right, you’ll see the Raspberry Pi files, and on the left, your computer files.
You can now transfer files from one to the other with a drag & drop.
Go to /home/pi/backups on the Raspberry Pi and download one or all files.
Then you can remove the older files on your computer to keep only the last eight days for example.
Automatically
There is no way to schedule a transfer with WinSCP. And it’s not easy to install SSH on Windows (to use it in a script at least).
So we have to find another method.
What I suggest you is to share a folder on Windows and access it from the Raspberry Pi.
Share a folder
Follow these steps to share a folder on Windows:
- Create a new folder to store your backups
- Right-click on this folder and choose Properties in the context menu
- Go on the Sharing tab and click on the Share button
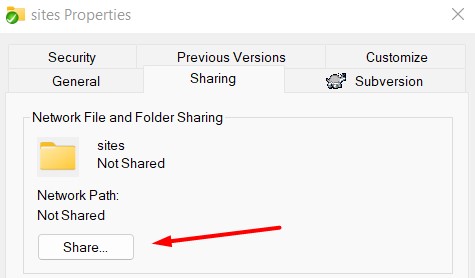
- By default, your user will have access to this share, but you can add other users if you want.
You’ll need a user with a password.
If your main user doesn’t have any password, you need to set one.
If you prefer you can create another account with a password. - When it’s ok, click on the Share button
- It’s OK. You are now sharing the folder on the local network
Keep the network path to use it on the next step
For me, it was something like this: \\[COMPUTER-NAME]\Users\[USER]\Desktop\share
Mount the share on the Raspberry Pi
It's a free PDF guide containing every Raspberry Pi Linux command you should know!
Download now
Now we need to connect the Raspberry Pi to the share.
To do this permanently, follow these steps:
- Create a new folder to host the share:
sudo mkdir /media/share - Edit the /etc/fstab file:
sudo nano /etc/fstab
This file manages all drives and shares on the Raspberry Pi. - Paste this line:
//[COMPUTER-NAME]/Users/[USER]/Desktop/share /media/share cifs username=[USER],password=[PASSWORD],iocharset=utf8 0 0
You need to replace all variables with your environment values.
You may also need to replace the folder name in the first value.
Note that we use / and not \ in the network path. Save and quit (CTRL+O, Enter, CTRL+X)
Mount the share once:
sudo mount /media/share
Your shared folder is now accessible in /media/share and if you create a file in this folder, the file will be available on your Windows computer:sudo touch /media/share/test
Script example
Now that the share is available, you can create and schedule a script to copy backup files to this folder each day for example:
#!/bin/bash
cp /home/pi/backups/* /media/share/
find /media/share -mtime +8 -delete
Restore
This backup is the easiest one to restore.
You only need to extract files from the archive and send them back to the original folder.
From Linux
On Linux, you can use the default archive software from your distribution.
For example, on Ubuntu, double-click on the backup file to open it and see files in it.
And then click “Extract”.
Once you get the needed files, send them back to the Raspberry Pi with rsync as seen above.
From Windows
On Windows, I’m not certain that the default tool can open a .tar.gz file, but you can try.
If not, you have to install a free application like 7zip.
Extract the files with this tool and transfer them to the Raspberry Pi with WinSCP as seen above.
Try it
It’s a good idea to follow this restore procedure at least once.
So, you can be sure that it works and that you know how to do it.
Monitoring
With this method, it’s easy to check that your backup is well done each day as expected.
You could create a script to check that you have recent files in your backups folder.
Something like this:
#!/bin/bash

if [[ $(find /home/pi/backups -type f -mtime -1) ]]; then
    echo "Backup OK"
    //DO NOTHING
else
    echo "Backup KO"
    //DO SOMETHING (MAIL ?)
fi
Export MySQL data
If you have MySQL databases on your Raspberry Pi, the procedure is a bit different.
Backup
The best practice for MySQL data backup is to first export and then save this export.
Export database with this command line:mysqldump -uroot -p[PASSWORD] [DATABASE-NAME] > export-[DATABASE-NAME].sql
This command will create a file with all SQL queries needed to recreate the database from scratch.
You can follow the same steps as seen previously to:
- create a script
- schedule it
- transfer files to another computer
If you have more than one database to back up, put as many lines as needed in your script and change the database name and the file name on each line.
Restore
To recover a lost database you have to follow the same steps as for files backup.
Once the .sql file back on the Raspberry Pi, you can use this command to import data to a fresh database:mysql -uroot -p[PASSWORD] [DATABASE-NAME] < [BACKUP-FILE].sql
The database must be empty to start the import.
So depending on the situation, you must follow one of these two methods:
- Import the backup into a database with another name (and then copy only what you are interested in)
- OR rename the corrupt database, recreate it (empty) and then import the backup file
As with file backup, consider testing this procedure at least once.
If you use another database management system (like SQLite, PostgreSQL or other solutions), you should have a similar command that you can use to dump the data and backup it.
Create an image of the SD card
So we saw in the previous paragraphs how to save some files on a Raspberry Pi.
Now, how to do if you have a complex installation that you want to fully back up?
Backup
The goal of this backup method is to create an image with all your Raspberry Pi files in it.
Then you can flash this image back to another SD card to recover the Raspberry Pi in the same state.
With this first method, you need to stop the Raspberry Pi and get the SD card on your computer. If you can’t do this, skip it and check the last option in this article (hot backup).
From a Linux computer
On Linux, you can use the dd command to create an image of a device:
- Take the SD card out from the Raspberry Pi
- Insert the SD card on your computer
- Find the device name:
sudo fdisk -l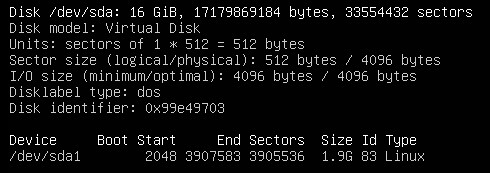
This command will display all the storage devices of your computer.
You should see your hard drive, and somewhere at the end of the list your SD card.
Note the name of the device (generally /dev/sdX or /dev/mmcblk0). - Create the image (replace the device name) :
sudo dd bs=4M if=/dev/mmcblk0 of=backup.img
After a few minutes, you’ll get the full backup image from your Raspberry Pi.
This command should also work on macOS, replace 4M with 4m in the last command.
From a Windows computer
On Windows, the best tool to do this is Win32 Disk Imager:
- Download Win 32 Disk Imager, install it and launch it
- You should get a window like this
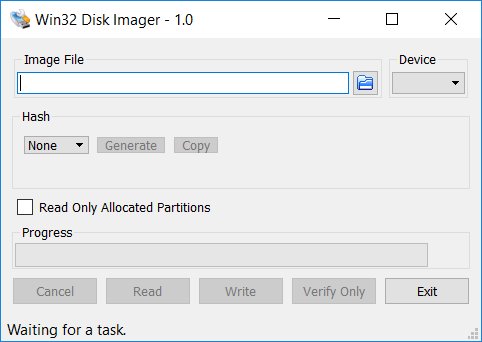
- Enter the image destination folder and file name (.img)
- Select the SD card letter in the device list
- Click on “Read”
- This tool will create the image in the selected folder
Restore
The easiest way to restore this backup is to flash the image on another SD card with Etcher:
- Download Etcher from the official website
- Install and run it
- Choose your backup image on the left
- Choose your SD card
- Click on the “Flash” button
You’ll get a new SD card with the system in the same state as during the backup.
You can also use Raspberry Pi Imager, and choose “Custom” in the OS list. Etcher is faster, but you don’t need to install it if you never use it the rest of the time.
On Linux / Mac you can also use the same dd command to flash the SD card (reverse if and of):sudo dd bs=4M if=backup.img of=/dev/mmcblk0
If you have an empty SD card, feel free to try this procedure to be sure it’s working in your case.
And check my full article on this topic here if you need more details:
How to Create an Image of a Raspberry Pi SD Card? (Win/Linux/Mac)
Clone a Raspberry Pi in operation (hot backup)
This last method is the same idea as the previous one, but for a critical installation.
If you can’t stop your Raspberry Pi to make the full backup into an image, you have to follow this procedure.
Related tutorial: Clone Your Raspberry Pi SD Card: 3 Simple Methods
Prerequisites
I will introduce you two ways to do a full backup of your Raspberry Pi in operation (from a desktop tool or with command lines).
In both cases, you’ll need to plug a second SD card in the Raspberry Pi to copy the running SD card to another.
If you don’t have one already, I recommend buying a cheap USB adapter on Amazon like this one.
Prefer an adapter with a short cable (long cable is not needed, and USB key format may obstruct access to other plugs). So, the one I link is perfect for this.
If you need more details, I explain how to use a USB SD card reader on your Raspberry Pi in this article.
PiClone (Desktop version)
If your Raspberry Pi is running the Desktop version, there is a tool called PiClone you can use for this.
The name in the main menu is “SD Card Copier”.
You can find it in the Accessories submenu.
The use of this software is simple: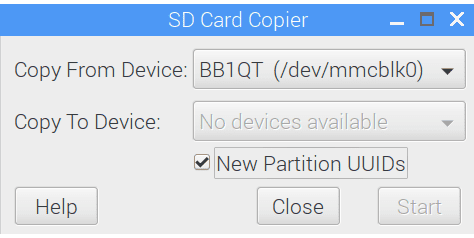
- Choose your main SD card in the “Copy From Device” list
- Choose your backup SD card in the “Copy To Device” list
- Press Start to start the transfer
- Wait a few minutes and extract the backup SD card
Feel free to try this backup SD card in another Raspberry Pi to check it’s working properly.
I have a full video on my YouTube channel to explain how to use this if you need more guidance:
Script (Lite version)
If you are running the Raspberry Pi OS Lite version or if you want to create a script, there is a shell script available to do this.
I will explain the basics to use this script.
But you can find all the information on the Github page if you need more.
- You’ll need to install Git to download the files:
sudo apt-get install git - Start by downloading and installing the script:
cd ~/Downloads
git clone https://github.com/billw2/rpi-clone.git
cd rpi-clone
sudo cp rpi-clone rpi-clone-setup /usr/local/sbin - Then use fdisk to get the backup SD card name:
sudo fdisk -lYou should see the current SD card: sda or mmcblk0 most of the time.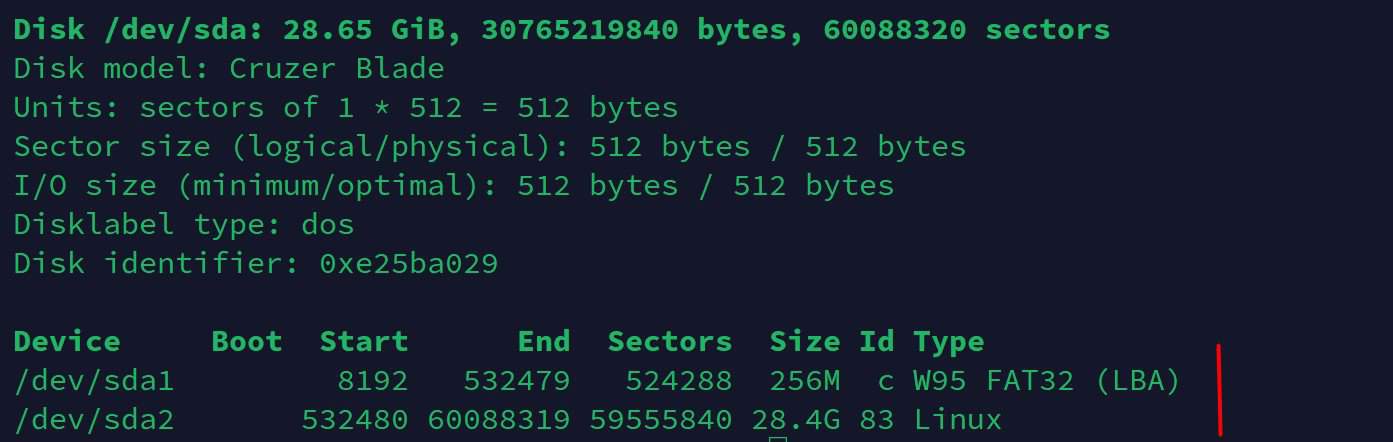
- And below the backup SD card: sdb or mmcblk1 generally
- And finally, use rpi-clone:
sudo rpi-clone sdb -v
Replace sdb with your backup SD card name.
Hardware recommendations
To give you a quick summary of my recommendations, here is the hardware I use and recommend, to have solid backups:
- An SD card adapter with a bunch of spare SD cards: Ideally, you have the adapter plugged all the time, and do a full backup of your system once a week on 4 different SD cards. This way, you are safe, whatever happened to the Raspberry Pi.
- A NAS with storage redundancy is a must. Your data will be on a separate device, that run all the time, and can’t be damaged by your own usage (like your computer, that will also be disconnected or in sleep mode regularly).
- An external USB drive is a minimum. If you don’t have the budget for a NAS, try at least to keep your important file on an external USB drive (and avoid keeping it plugged to the Raspberry Pi, or in the same room if possible). You don’t need anything fancy or fast for this, get the cheapest option with enough space.
Remember that scripts, scheduled tasks and network backups will fail sometimes. Doing a manual full backup of your SD card regularly is a smart decision. Even if it’s only once a month, or even only once after the initial setup that took you days, it’s already that, that you’ll never have to do again.
It's a free PDF guide containing every Raspberry Pi Linux command you should know!
Download now
Related questions
How to check disk corruption or file system errors on Raspberry Pi?
The command “fsck” can be used to quickly test the consistency of a file system, like the SD card on a Raspberry Pi. Raspberry Pi will do it automatically and regularly on boot, but it can be forced on the next reboot with: sudo shutdown -F -r now.
You can then check the results in the /var/log/syslog file, you should get something like that:
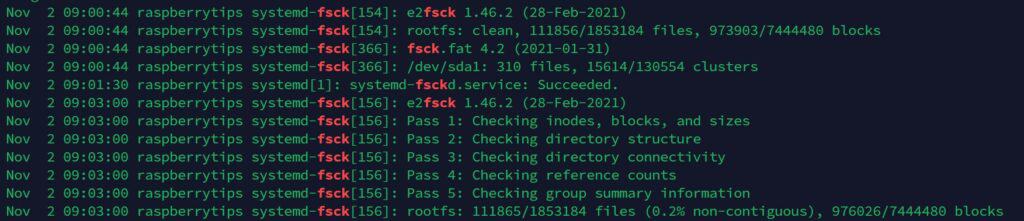
You can’t use “fsck” directly when the system is mounted and running, but you can plug the SD card to a Linux computer (or another Raspberry Pi) and use it directly with various options.
Is there any good backup software on Raspberry Pi OS?
Tools like “luckybackup” or “deja-dup” provide a GUI to rsync and can be easier to use than the command line on Desktop versions of Raspberry Pi OS. They offer a nice interface with all the features to schedule regular backups of your Raspberry Pi.
I don’t have much experience with them, but you can give it a try if you are looking for something more user-friendly.
It's a free PDF guide containing every Raspberry Pi Linux command you should know!
Download now
Want to chat with other Raspberry Pi enthusiasts? Join the community, share your current projects and ask for help directly in the forums.
Conclusion
That’s it.
You know how to make backups of your Raspberry Pi in several ways.
Try to schedule them or if it’s not possible, try to do them regularly.
Also, try to check them from time to time.
There is nothing worse than a backup that hasn’t worked or is unusable because you have never tested that it worked as expected.
Whenever you’re ready, here are other ways I can help you:
The RaspberryTips Community: If you want to hang out with me and other Raspberry Pi fans, you can join the community. I share exclusive tutorials and behind-the-scenes content there. Premium members can also visit the website without ads.
Master your Raspberry Pi in 30 days: If you are looking for the best tips to become an expert on Raspberry Pi, this book is for you. Learn useful Linux skills and practice multiple projects with step-by-step guides.
The Raspberry Pi Bootcamp: Understand everything about the Raspberry Pi, stop searching for help all the time, and finally enjoy completing your projects.
Master Python on Raspberry Pi: Create, understand, and improve any Python script for your Raspberry Pi. Learn the essentials step-by-step without losing time understanding useless concepts.
You can also find all my recommendations for tools and hardware on this page.


No way to use rpi-clone to backup straight to an image file on a mounted volume? It would be handy to be able to schedule hot backups to go to a NAS..
I also would like to see if there’s a way to do this ^
Hi,
Yes, could be cool 🙂
I don’t know if there is another script to do this, but rpi-clone goal is only to copy your system to a SD card
I don’t see anything like this in the documentation: https://github.com/billw2/rpi-clone
Can you explain why for the local system you use time +8 and on the remote system you use time -8?
Does that mean that only the oldest file gets moved to the remote system?
Hi John,
I think the -8 was an error, I have changed this.
We want to delete the old files, not the new ones.