How to Set Up Wi-Fi on Debian (3 ways)
Configuring a wireless connection on Linux, especially if you don’t have a desktop interface, is particularly challenging. I recently tried using it on Debian, and it was a mess, with drivers missing and obsolete commands. I did find a solution, so I thought it would be a good idea to share everything with you in this article.
With a desktop environment, a Debian system can be connected to Wi-Fi via the network settings. There is a list of wireless networks available. By clicking on one of them and filling in the correct password, the computer will be connected to it directly.
But that’s the ideal situation. If you don’t have a Desktop environment, or even worse, if your drivers are not available on Debian, there are a few more steps. I’ll list the 3 main cases on how to effectively configure your Wi-Fi on Debian, so keep reading for all the details.
Note: If you are following this tutorial for Ubuntu or any Ubuntu-based distribution, I would recommend checking my other article instead, there are some slight differences.
Configure the Wi-Fi connection during the installation
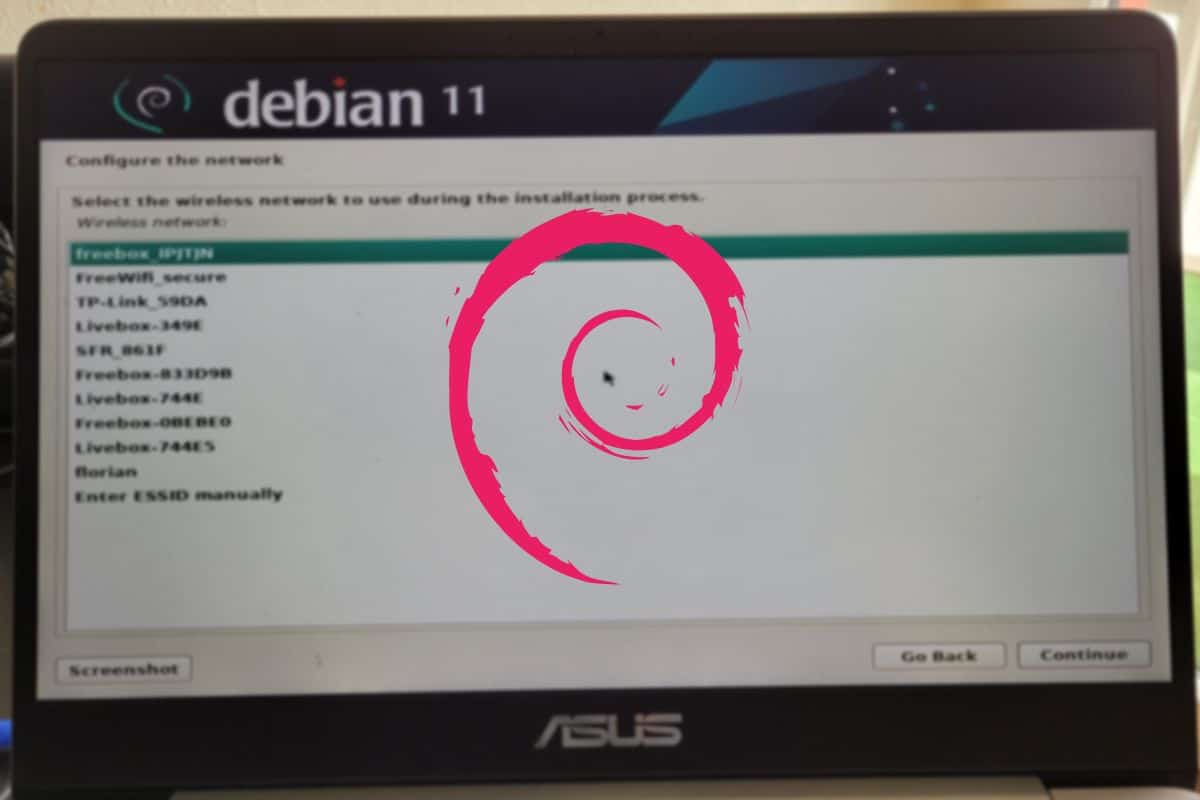
In theory, the network is configured during the Debian installation. If a wireless adapter is detected, and you don’t use an Ethernet connection, the wizard will ask you to pick a wireless network in a list.

Join Our Community!
Connect, learn, and grow with other Raspberry Pi enthusiasts. Support RaspberryTips and enjoy an ad-free reading experience. Get exclusive monthly video tutorials and many other benefits.
Learn moreThis step looks like this:
Download your exclusive free PDF containing the most useful Linux commands to elevate your skills!
Download now
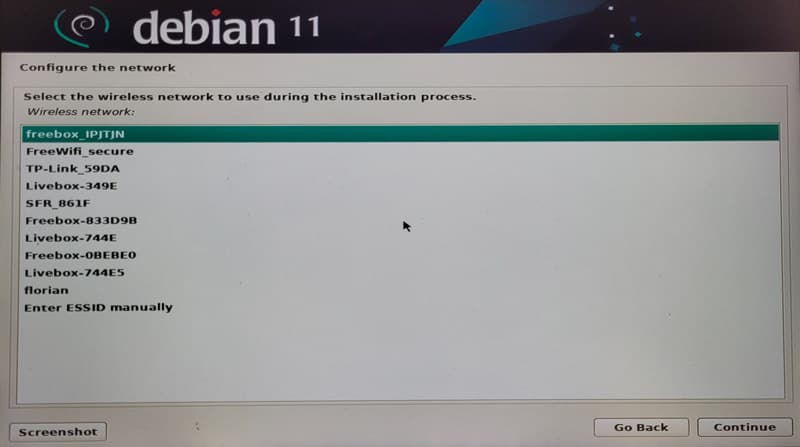
From there, you just have to pick your own wireless network. Click “Continue” and set the password for the connection. In most cases, your DHCP server will assign an IP address to your computer (or the wizard will ask for it), and you’ll be ready to access the Internet.
When I tried it on my laptop, I wasn’t that lucky as no network adapters were detected. I got an error, saying that some drivers were missing and that I needed to install them manually to use the network. I was stuck there, as it was a network installation image.
You can download the drivers from another computer, put them on a USB drive and load them to continue the installation. But I didn’t have much success with this. Finding the files was not easy, and it didn’t end up asking for more.
The easiest solution I think is to use the “non-free” installation image (download it from there). Restart the installation with it, and your network adapters will be properly detected.
Another idea you can try is to start with an Ethernet cable (if your adapter is installed) and install the drivers later, once in the Debian environment.
Configure the Wi-Fi from the desktop environment
Configuring the Wi-Fi connection from the desktop environment on Debian is straightforward:
- Click on the network icon in the top-right corner to access the system settings.
It might be slightly different depending on the environment but go to the settings anyway. - You’ll then get a list with all the detected networks:
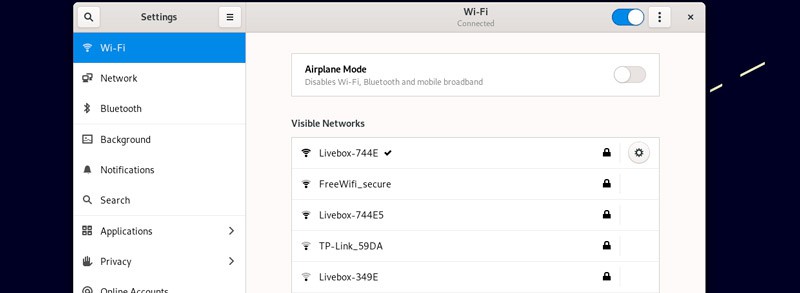
If you don’t have any networks listed, make sure the Wi-Fi is enabled in the top-right corner of this window. The airplane mode also needs to be disabled. - Click on the one you want to use, and type the password:
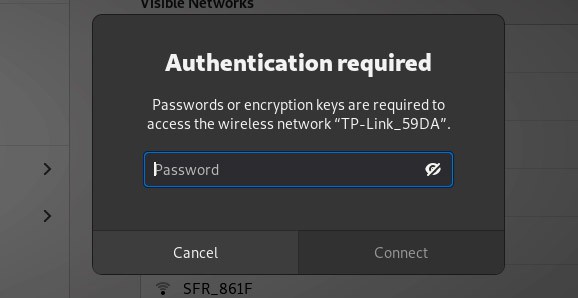
- If everything goes well, you should be connected to it a few seconds later.
With most routers, the IP address is assigned to your computer automatically. You can click the configuration icon if you need to change anything manually to the default configuration.
Download your exclusive free PDF containing the most useful Linux commands to elevate your skills!
Download now
Configure the Wi-Fi manually (command line)
Configuring the Wi-Fi in the command line when you don’t have a desktop environment is more challenging, as you have to edit the network configuration file manually.
Note: this procedure only works on a server edition of Debian. When a desktop environment is installed, wpa_supplicant takes care of this, and shouldn’t be configured manually. Go back to the previous section.
The first step is to scan the available wireless networks. You can do this with this command:sudo iwlist scan
Download your exclusive free PDF containing the most useful Linux commands to elevate your skills!
Download now
The list includes many details that we don’t need, so you can filter the output with:sudo iwlist scan | grep SSID
(check my explanations about the grep command here)
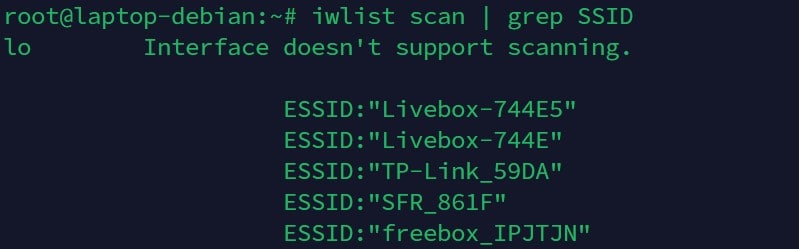
The good news is that our wireless adapter is working and detecting wireless networks.
If it doesn’t work, you may need to install additional drivers for it. You can either use a “non-free” image of Debian, or install them manually (check dmesg for more details about the missing files, and enable the “non-free” repository in apt sources).
I know, installing drivers from the repository when you don’t have Internet access yet is not easy :-). That’s why I switched to the non-free image during my installation.
The second step is to edit the network configuration file (/etc/network/interfaces) to set the Wi-Fi configuration. Open it with:sudo nano /etc/network/interfaces
And paste the following lines:allow-hotplug wlp2s0
iface wlp2s0 inet dhcp
wpa-ssid SSID
wpa-psk YOUR_PASSWORD
Note: I’m using sudo in my command to make sure they will work on your side, but feel free to switch to the administrator account (root) to do this without it if needed:su
wlp2s0 is the name of my network adapter (I think it’s now the default on Debian), you can see it in iwlist (without the grep command), or by using “ifconfig” or “ip a”.
Replace the SSID and password in this file with your own configuration, and bring the Wi-Fi interface up:sudo ifup wlp2s0
Start the connection:sudo iw wlp2s0 link

You should be connected.
Check that you got an IP address:ip a
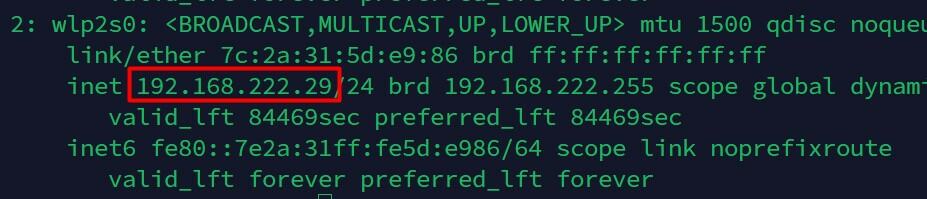
That’s it, you are now connected, well done!
I hope this tutorial was useful and helped you to configure the Wi-Fi on your Debian system.
I was surprised that it wasn’t easier, even on an “old” laptop. After using Ubuntu for a while, I quickly forgot these missing drivers were still a thing on Debian.
Anyway, you are now ready to do anything on your new Debian system, so feel free to check my other tutorials on the topic:
- The Easiest Way To Install GNOME on Debian (3 Steps)
- 57 Linux Commands that Everyone Should Know
- Do You Need an Antivirus on Linux? (And how to install it)
Download your exclusive free PDF containing the most useful Linux commands to elevate your skills!
Download now
Want to chat with other Raspberry Pi enthusiasts? Join the community, share your current projects and ask for help directly in the forums.
Additional Resources
Overwhelmed with Linux commands?
My e-book, “Master Linux Commands”, is your essential guide to mastering the terminal. Get practical tips, real-world examples, and a bonus cheat sheet to keep by your side.
Grab your copy now.
VIP Community
If you just want to hang out with me and other Linux fans, you can also join the community. I share exclusive tutorials and behind-the-scenes content there. Premium members can also visit the website without ads.
More details here.
Need help building something with Python?
Python is a great language to get started with programming on any Linux computer.
Learn the essentials, step-by-step, without losing time understanding useless concepts.
Get the e-book now.