How To Change DNS Settings On Ubuntu Servers (Commands)
Setting up a specific DNS server on Ubuntu Server (without a desktop interface) is often one of the first steps of the initial configuration, but it’s not as intuitive as it could be. I’m used to editing the resolv.conf file to do this, but it’s no longer the right method. I did a few tests and, in this article, will share the exact procedure to change the DNS server on your system.
On recent Ubuntu versions, the DNS configuration is now saved in the /etc/netplan folder. A default configuration file is created during the installation and can be edited with a different DNS server, according to the network infrastructure.
Don’t worry, I’ll guide you through all the steps. Let’s start by checking your current configuration, learning how to update it and choosing a good DNS server you can use.
Where is the DNS configured in Ubuntu Server?
Historically, the DNS configuration on most Linux distributions was saved in the /etc/resolv.conf file. On Ubuntu Server, there is a new service (systemd-resolved) that replaces this. The main network configuration is stored under /etc/netplan.
If you try to open the /etc/resolv.conf file on a recent Ubuntu Server version, you’ll read something like this: “Do no edit”. You shouldn’t change anything in this file, it will be overwritten.

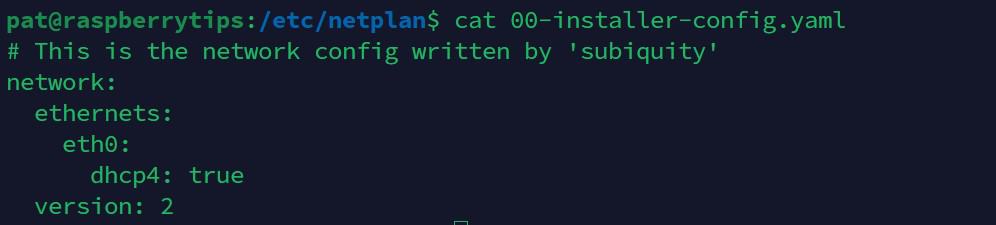
The current network configuration on Ubuntu Server is stored under /etc/netplan, where you’ll find a YAML file, probably named something like “00-installer-config.yaml”. It looks like that by default, for a standard DHCP configuration:
It may be different if you set a static IP address during the installation or even chose a specific DNS server in the installation wizard.
In this typical example, I don’t have anything set up manually. I just get everything from the DHCP server, so I don’t even see in this file what is my current DNS server.
Download your exclusive free PDF containing the most useful Linux commands to elevate your skills!
Download now
Related: How to Set Static IP Address on Ubuntu Server (Step-by-step)
How to see the current DNS server on Ubuntu Server?
To get the IP address of the current DNS server on Ubuntu Server, the command “sudo resolvectl status” can be used. It will show the configuration for all the network interfaces.
So, you can use:sudo resolvectl status
And you’ll get something like:
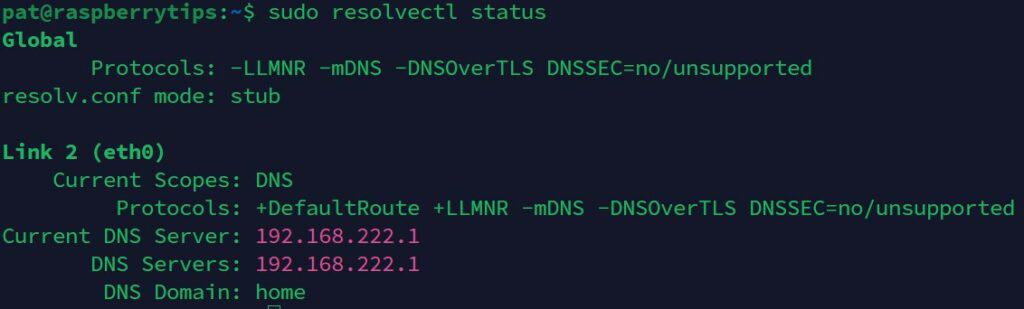
In my case, I only have one DNS server setup (192.168.222.1, which is my Internet router).
You may have several IP addresses on the “DNS servers” line, the other ones are used as a backup.

Join Our Community!
Connect, learn, and grow with other Raspberry Pi enthusiasts. Support RaspberryTips and enjoy an ad-free reading experience. Get exclusive monthly video tutorials and many other benefits.
Learn moreNow that we know how to check the current configuration, let’s see how to update it.
How to change the DNS server in the command line
When systemd-resolved is installed, the DNS server can be changed by editing the configuration file located under /etc/netplan. On old systems installations, editing /etc/resolv.conf might be enough.
I’ll show you both methods, but most likely, you only need the first one.
Method 1: Update /etc/netplan
- Find the current configuration file name:
sudo ls /etc/netplan - Open the configuration file located under /etc/netplan:
sudo nano /etc/netplan/00-installer-config.yamlChange the file name if needed, or create a new one if there is none. - Update the file content to look like:
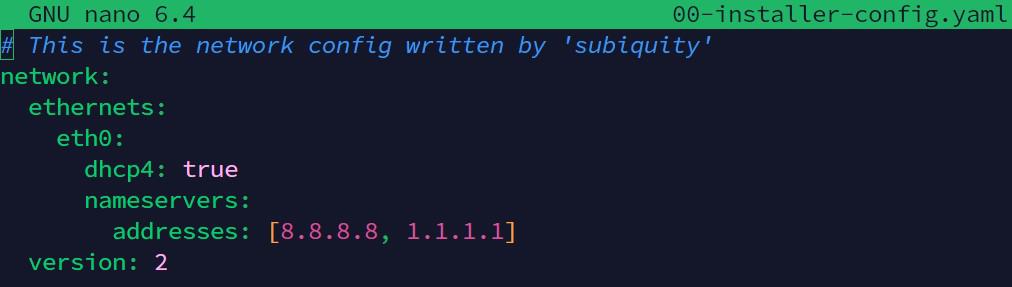
So, I kept the DHCP configuration for the IP address, mask and gateway (dhcp4: true).
I only added the nameservers part:nameservers:
addresses: [IP_1, IP_2] - Save the file and exit (CTRL+O, CTRL+X).
To update the current network configuration, you can use:sudo netplan apply
If anything goes wrong, you can add the verbose option to get more details:sudo netplan --verbose apply
You can then use “resolvectl” again to check that the configuration has been updated:sudo resolvectl status
And check that the “DNS servers” line is now using your new configuration.

As I kept a DHCP configuration in my example, my router IP address is still listed here, but it will use the ones I set in the configuration first.
Method 2: Update /etc/resolv.conf
On old Ubuntu versions, some other Linux distributions, or just for a temporary test, you can still edit /etc/resolv.conf to use a different DNS server.
Download your exclusive free PDF containing the most useful Linux commands to elevate your skills!
Download now
The file content is generally really short, with generally one to three lines, including the current DNS server IP address:

Just open the file with your favorite editor to change the IP address. sudo nano /etc/resolv.confThe server used should be updated immediately.
But, what should you use for your DNS server anyway? Is it mandatory to use the one from your Internet provider, or is there anything better?
What are the best DNS servers for Linux?
Google, OpenDNS, Cloudflare or Quad9 are the most popular choices for public DNS servers. They are faster, more reliable and provide increased security for the end-user.
Sometimes, you need to use a specific DNS server. For example, if you have Pi-Hole running at home, or work in a company where there is an Active Directory, you don’t have a choice, you need to use it to get all the benefits.
But most of the time, you can benefit from switching from your current Internet provider DNS server to something better. In this case, trust and performances are important factors to consider (if the server is down you no longer have Internet access, if it’s loaded, you have slow Internet).
I tend to rely on the bigger ones, even if I know some of you won’t necessarily like to use Google DNS for your personal browsing, I use it a lot and rarely get any issues.
Here are some of the most popular DNS servers you can try on Linux:
- Google:
- Primary: 8.8.8.8
- Secondary: 8.8.4.4
- OpenDNS (now owned by Cisco):
- Primary: 208.67.222.222
- Secondary: 208.67.220.220
- Cloudflare:
- Primary: 1.1.1.1
- Secondary: 1.0.0.1
- Quad9:
- Primary: 9.9.9.9
- Secondary: 149.112.112.112
There are tools and websites that will show you the fastest option in your area if you like, but I guess it should change frequently (check DNS Perf for example).
Download your exclusive free PDF containing the most useful Linux commands to elevate your skills!
Download now
How to test if the DNS is working on Linux
Once the DNS server is set up, the command “nslookup” can be used to send any DNS request and check the answer from the server.
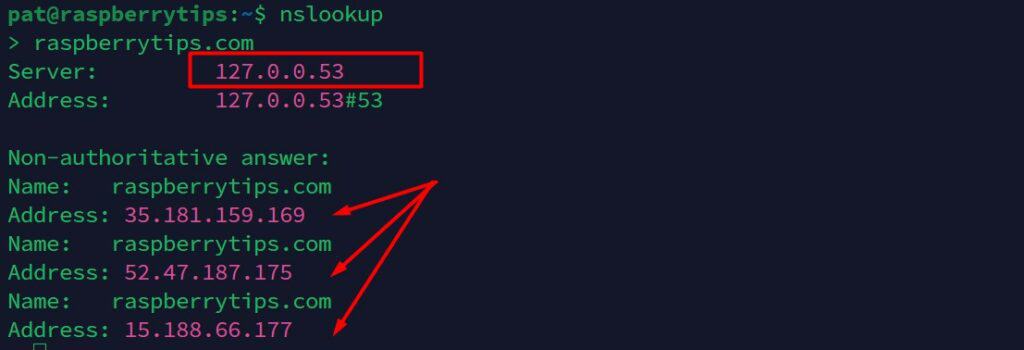
Let’s take an example. Just type this command:nslookupThen, type a domain name, for example:raspberrytips.com
You’ll get something like that:
The first thing it will tell you is the server that is being used. In my example, we don’t know exactly each one, as there is the local systemd-resolved service running. Use the resolvectl command if you have any doubts:sudo resolvectl status
Anyway, you then get the answer from the primary DNS server. In this case, it returns 3 different IP addresses (because I use a CDN for the website). It’s working!
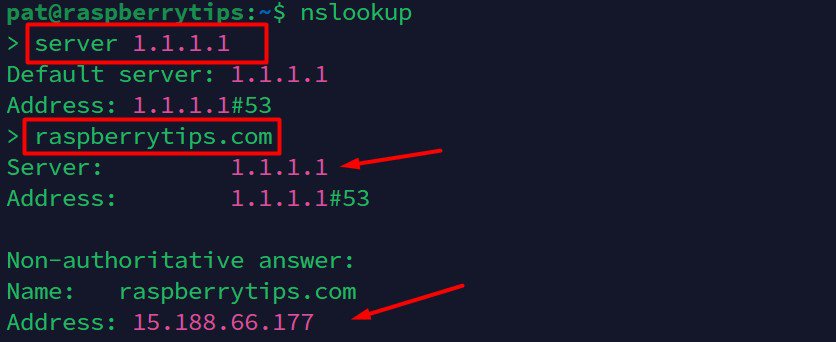
You can specify a different DNS server (for a test or to check the secondary for example), just use:server <IP-ADDRESS>For example:server 1.1.1.1
And repeat the same test with a domain name:
That’s it! I think you now know everything to check the current configuration, update your DNS server and make sure it’s working properly.
If you liked this tutorial, make sure to check my other articles on the website, for example:
- 5 Most Effective Ways to Free Disk Space on Ubuntu Server
- 17 Security Tips From A Pro To Protect Your Linux Server
- The Complete Beginner’s Guide to The Ubuntu Hosts File
Download your exclusive free PDF containing the most useful Linux commands to elevate your skills!
Download now
Want to chat with other Raspberry Pi enthusiasts? Join the community, share your current projects and ask for help directly in the forums.
Additional Resources
Overwhelmed with Linux commands?
My e-book, “Master Linux Commands”, is your essential guide to mastering the terminal. Get practical tips, real-world examples, and a bonus cheat sheet to keep by your side.
Grab your copy now.
VIP Community
If you just want to hang out with me and other Linux fans, you can also join the community. I share exclusive tutorials and behind-the-scenes content there. Premium members can also visit the website without ads.
More details here.
Need help building something with Python?
Python is a great language to get started with programming on any Linux computer.
Learn the essentials, step-by-step, without losing time understanding useless concepts.
Get the e-book now.