How To Install EndeavourOS On Raspberry Pi (Beginner Guide)
EndeavourOS is a new Linux distribution available for Raspberry Pi. Based on Arch Linux, the installation is a bit different and less straightforward for beginners. Even for me, it took me a lot of time to get it right, but I learned a lesson and will share my tips with you in this step-by-step guide.
There is no image of EndeavourOS available for Raspberry Pi. The first step is to boot on EndeavourOS for PC to install a base image of Arch Linux on an SD card. Then scripts are available to install EndeavourOS on top of it.
The official documentation is not very clear for beginners, but don’t worry, I’ll explain all the steps in detail throughout this tutorial ad you’ll get it running on your Pi in no time!
If you’re looking to quickly progress on Raspberry Pi, you can check out my e-book here. It’s a 30-day challenge where you learn one new thing every day until you become a Raspberry Pi expert. The first third of the book teaches you the basics, but the following chapters include projects you can try on your own.
Hardware Requirements
I don’t want you to waste time in the first steps if you don’t have anything ready to go. Before going further, here is what you need to follow this tutorial entirely:
- A Raspberry Pi 4 or 400.
It also works with some Odroid models (N2, N2+, XU4) but no other Raspberry Pi models. - A computer with a SD card reader (not the Raspberry Pi).
You can use a cheap USB adapter if you don’t have one (like this one on Amazon). - A USB key to boot EndeavourOS on this PC.
I’m now using this model for most of my Raspberry Pi projects because I love the brand, but any model will do. - A micro-SD card (or a second USB key) to install EndeavourOS on the Raspberry Pi.
Here is my current recommendation for the best performances, but any model will do if it’s just a test.
Do you have all that? Congrats, you can start the installation!
Step 1 – Boot on EndeavourOS Live
The first step, which is not obvious in the official documentation, is that the easiest way to install EndeavourOS on your Raspberry Pi is to have it running on your PC first. You don’t need to install it on the PC, but you will have to at least boot on it.
I tried several times to find a workaround, like using Raspberry Pi OS to do the same thing, but without much success, so I think you should follow these steps – it’ll help you save time overall.
- Go to the main EndeavourOS website (not the ARM one).
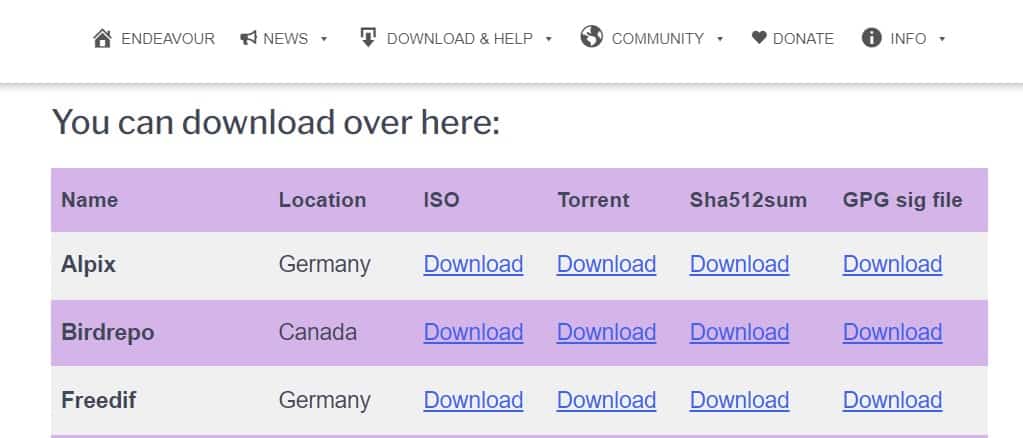
- Scroll down to a table with a list of servers.
- Download the ISO file from a server close to you.
- You can then flash it on a USB key.
Use Raspberry Pi Imager and choose “Use Custom” in the OS list. Or you can also use Balena Etcher or any other tool.
Once done, you’ll need to reboot your computer and boot on the USB key. You won’t lose anything as it’s a live system, but make sure to prepare a bit before doing it:
- Take note of this tutorial URL (you’ll need it for the next steps).
- Make sure you have your Wi-Fi password ready if you don’t use an Ethernet cable.
- You may also need to do some research to find how to boot on a USB key with your computer.
In general, you have to press a key at the beginning of the boot (something like F2, F12 or DEL), but it’s different with every manufacturer or even with every PC model. This is why I can’t give you the exact procedure for your computer.
Once ready, plug your USB key with EndeavourOS into your computer and boot on it. You’ll get an overview of the system we try to install on the Raspberry Pi, and will follow the next steps from there:
It's a free PDF guide containing every Raspberry Pi Linux command you should know!
Download now
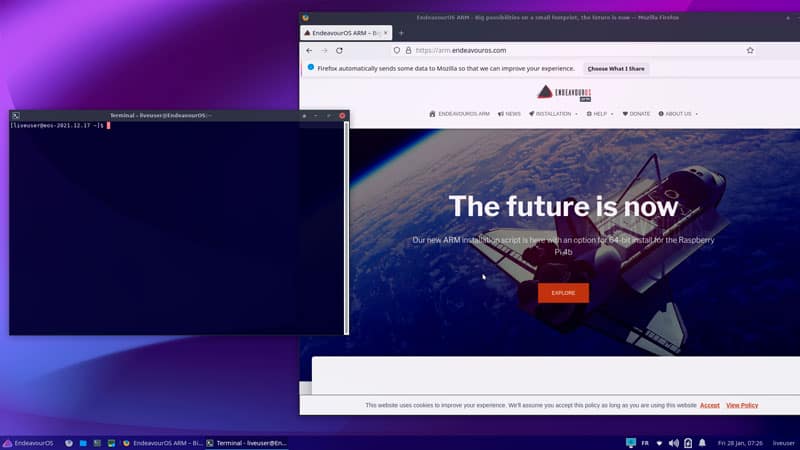
Don’t install anything, we don’t want to mess with your usual operating system. You just need to open the terminal and follow the next steps to install EndeavourOS on your Raspberry Pi.
Step 2 – Install the base system on your SD card
Once EndeavourOS is on the PC, you can use it to clone the GitHub project for EndeavourOS ARM and flash the base system on the SD card.
Start by making sure the Internet connection is working on your live system, and insert the SD card into your computer. Then type the following commands:
- Create a temporary directory for the installation:
mkdir temp
cd temp - Download the installation script from their GitHub project:
git clone https://github.com/endeavouros-arm/image-install.git - Run the script with:
sudo ./install-image-V2.5.sh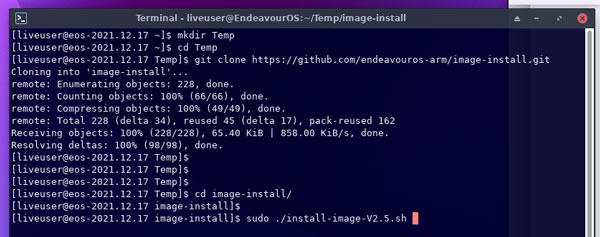
I guess the script version will change overtime, so if it doesn’t work, check the current version with:ls - A wizard will show up with a few questions, like your Raspberry Pi model.
One important step is to choose the correct device for the installation: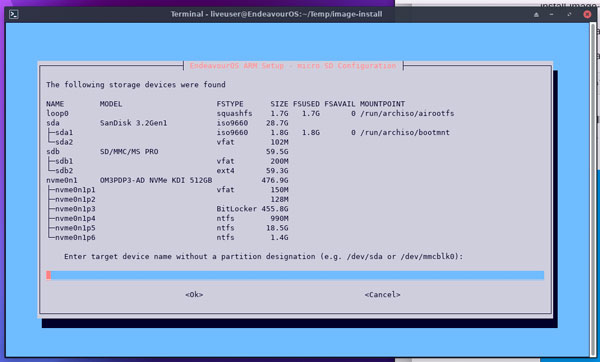
It may vary depending on your hardware and the different disks plugged into your computer.
In my case, it was /dev/sda with the Live System, but it could be /dev/sdb or even /dev/mmcblk0 if you are using Arch on your computer. Use the model name, file system type and size to find the matching device. - If the script tells you there is already a file system on the SD card, and wants confirmation to replace it, answer “Y” to continue.
Note: you can also use another USB key there if you prefer, just plug it in before running the script and pick the corresponding device in the list.
Join Our Community!
Connect, learn, and grow with other Raspberry Pi enthusiasts. Support RaspberryTips and enjoy an ad-free reading experience. Get exclusive monthly video tutorials and many other benefits.
Learn moreFrom there, the script will work automatically to download the latest build of Arch Linux for ARM and flash it on your SD card. It will take more or less time depending on your SD card performance and Internet connection speed (I tested on a normal/slow connection, and it took between 10 and 15 minutes).
Once done, you can safely eject the SD card and insert it into your Raspberry Pi. On the computer, you can reboot on your usual operating system or stay on EndeavourOS for a while, as you want, we don’t need it anymore.
Are you a bit lost in the Linux command line? Check this article first for the most important commands to remember and a free downloadable cheat sheet so you can have the commands at your fingertips.
It's a free PDF guide containing every Raspberry Pi Linux command you should know!
Download now
Step 3 – Install all the packages for EndeavourOS
Once Arch Linux ARM is installed, the Raspberry Pi will boot on a black prompt. You’ll need to log in with root to continue the EndeavourOS installation. The default password is also “root”.
Parallel downloads & kernel
In the home directory, you’ll find another script you need to run:./RPi4-test-kernel-2
Another wizard will show up, with another batch of questions:
- Use mirrors close to your location for faster download speed.
- Enable parallel downloads to download all the packages faster (a value between 4 and 8 should be fine).
- Keep the original kernel for an SD card installation, or install the other option if you want to try USB boot.
After that, the script will configure a few things and ask you to reboot the Raspberry Pi. It will also download the installation script on the Raspberry Pi for the next step.
Once done, we can continue with the desktop installation.
EndeavourOS desktop installation
Once again, login with “root / root”. A new folder should be available in your home directory, switch to it and run the EndeavourOS installation script:
It's a free PDF guide containing every Raspberry Pi Linux command you should know!
Download now
cd install-script
ls
./endeavour-ARM-install-V2.6.sh
The same thing as previously, the version will probably change with each update they do to this script, to make sure to use the one you get with the “ls” command.

We are almost done! The last installation wizard will show up to configure your desktop environment:
- Choose to install one (or this step is completely useless ^^).
- Set your timezone, hostname, username and passwords.
- You can then select your desktop environment, EndeavourOS supports most of them.
Read my rankings of the best desktop environments for Raspberry Pi if you don’t know which one to pick.
Once done, the script will download a bunch of packages to have a system ready to use. This step may take more time, even with a good Internet connection, as it will download and install all the packages and dependencies.
After the installation, press a key to reboot the Raspberry. You’ll finally get a graphic interface, with a login screen where you can use the password you set during the installation:

Great job! This wasn’t easy, but you did it!
It's a free PDF guide containing every Raspberry Pi Linux command you should know!
Download now
Reminder: Remember that all the members of my community get access to this website without ads, exclusive courses and much more. You can become part of this community for as little as $5 per month & get all the benefits immediately.
Using EndeavourOS & going further
From there, you should get something similar to what you had on the computer at the beginning of this installation. Here is a quick overview of this system and a few tips for you.
Interface overview
The graphic interface will be different depending on your desktop environment choice in the previous step. But whatever you chose, a welcome wizard will try to guide you:
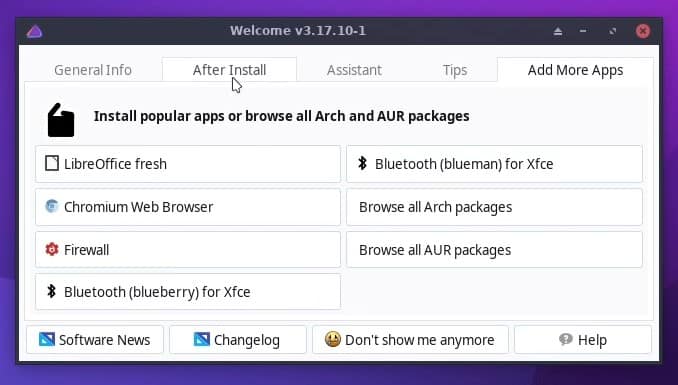
Like many things on this system (including the documentation), it’s not beginner-friendly at all. It seems like shortcuts for people that already know everything but don’t want to type the commands and is more than a beginner tool.
Anyway, you can at least use this tool to install additional apps (Chromium is recommended on Raspberry Pi, as explained here) or do the system updates.
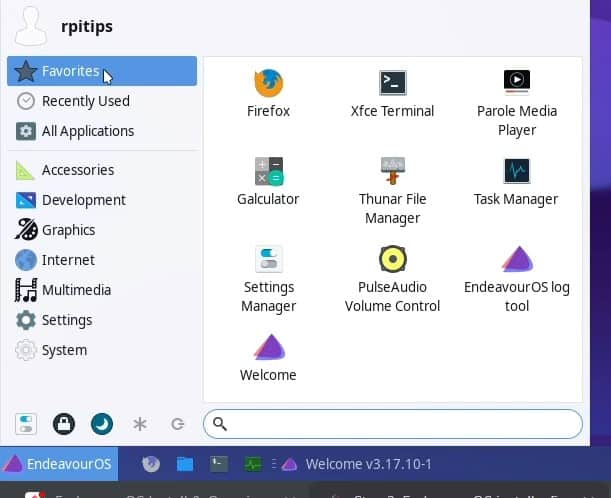
Then, you’ll find the default apps in the main menu. There isn’t much by default, so you’ll need to install most of them, I will explain how in the next part.
I tried XFCE, and there is not really a unified control center, like on KDE or Gnome, all the configuration tools are under “Settings”. It’s a bit messy, but you should find easily how to configure the network, keyboard, or system appearance.
Installing new apps on EndeavourOS
EndeavourOS is, like most Arch distributions, not made for beginners. For example, there is no “app store” or even package manager on this system by default. And even if you are ready to install one, I haven’t found a great one.
Pacman is the package manager in the command line (like APT on Debian), here is how to use it:
- Update all packages:
sudo pacman -Syu
It’s the same thing as:sudo apt update & sudo apt upgradeon a Debian-based system. It does the two commands in one. - Find a package name:
sudo pacman -Ss <string>It’s the equivalent of:sudo apt search <string>Many other options are available, check the link below for more details. - Install a new package:
sudo pacman -S <package>As you know, it’s the same thing as:sudo apt install <package>on Debian.
Here are a few links to help you:
- Pacman documentation
- Packages list: that might be easier if you are used to a graphic package manager. Use this website to find the packages name, and install them with the previous command.
I tried to find a package manager that could be easier for a beginner. The only one I successfully installed is tkPacman. It’s a minimalist app that will give you a list of compatible packages, and help you to install them, it looks like this:

Use pacman in the command line to install it:pacman -S tkpacman
Final Thoughts
Overall, it’s nice to see some new distributions becoming available on Raspberry Pi, especially ones that aren’t Debian-like, as we already have a lot of them, and it becomes harder and harder to make a choice. But EndeavourOS is probably limited to users that love Arch Linux and are using it on their computer.
If you want to try Arch Linux for the first time, Manjaro will be a way better choice. It’s available in Raspberry Pi Imager, the setup is straightforward, the configuration is easier and there is an app store to easily install new apps (even simpler than on Raspberry Pi OS).
I will keep an eye on their progress and keep you updated. EndeavourOS is also new on PC, so maybe it’s just a beta version of something better coming in the next years, we’ll see. You can also find my video about it on the YouTube channel if you want to see it in action:
If you are seeking better options, make sure to check these other articles:
- What’s the Best Operating System for Beginners on Raspberry Pi?
- How to Install Manjaro on Raspberry Pi?
- 15 Best Operating Systems for Raspberry Pi (with pictures)
- Raspberry Pi OS vs Ubuntu: What’s the Best for Desktop Usage?
Whenever you’re ready, here are other ways I can help you:
The RaspberryTips Community: If you want to hang out with me and other Raspberry Pi fans, you can join the community. I share exclusive tutorials and behind-the-scenes content there. Premium members can also visit the website without ads.
Master your Raspberry Pi in 30 days: If you are looking for the best tips to become an expert on Raspberry Pi, this book is for you. Learn useful Linux skills and practice multiple projects with step-by-step guides.
The Raspberry Pi Bootcamp: Understand everything about the Raspberry Pi, stop searching for help all the time, and finally enjoy completing your projects.
Master Python on Raspberry Pi: Create, understand, and improve any Python script for your Raspberry Pi. Learn the essentials step-by-step without losing time understanding useless concepts.
You can also find all my recommendations for tools and hardware on this page.


