7 Easy Ways to Find your Raspberry Pi IP Address
Finding the IP address on a Raspberry Pi is often one of the first steps to take after any fresh installation, or maybe even after a reboot. Unfortunately, it’s not the easiest thing to do, especially if you are new to this or don’t have a display. Let’s see how to do this.
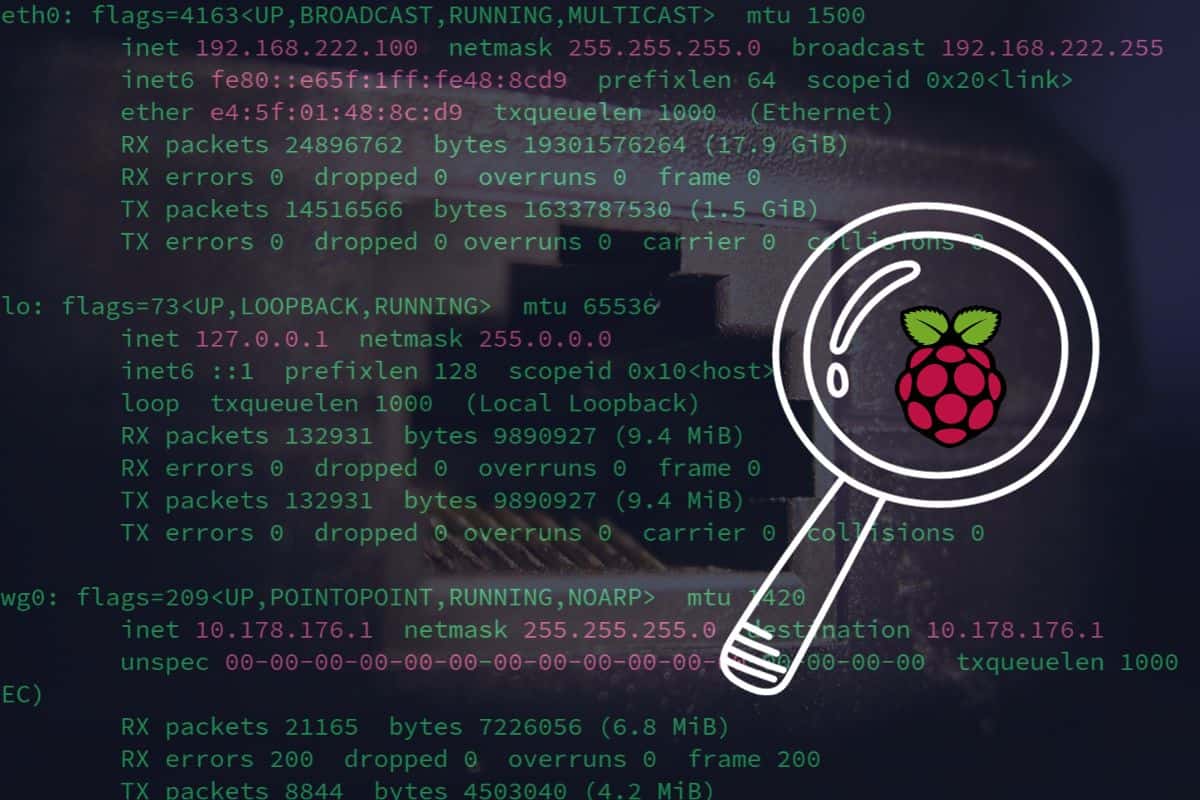
In the terminal, type the command “ip a”. The IP address is mentioned just after the keyword “inet” for the corresponding interface (eth0 for Ethernet and wlan0 for the Wi-Fi).
This is not the only way, and not necessarily the easiest one, so don’t worry. In this article, I’ll cover all the options you can use to quickly find your Raspberry Pi IP address: desktop interface, commands, network scan or even your Internet router.
If you need help getting started on Raspberry Pi, I have an entire course to guide you through your first steps. I’ll help you use the perfect hardware, plug everything in and install your first system. You’ll also do your first projects with me, just to make sure you are ready for the next level. Get all the information on this page if you are interested.
Get The Current IP Address With A Monitor
If the Raspberry Pi is connected to a monitor, you can quickly get the IP address from the desktop interface or the command line. Here is how to do this.
View the IP address in the interface
If you use Raspberry Pi OS with a desktop environment, the easiest way to get the IP address is to mouse over the network icon, in the top-right corner, near the clock.
You will get something like this :
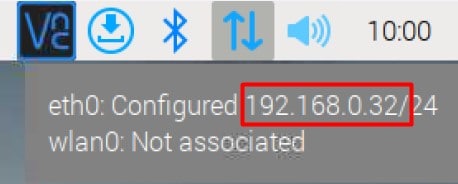
You may get two lines, one per network interface:
- eth0: RJ45 cable (Ethernet) = 192.168.0.32 in this example
- wlan0: Wi-Fi (not associated here)
In the command line
Whether a desktop environment is installed or not on the Raspberry Pi, a quick way to get the IP address is to use the command “ipconfig” or “ip a”.

Join Our Community!
Connect, learn, and grow with other Raspberry Pi enthusiasts. Support RaspberryTips and enjoy an ad-free reading experience. Get exclusive monthly video tutorials and many other benefits.
Learn moreYou will get something like this:
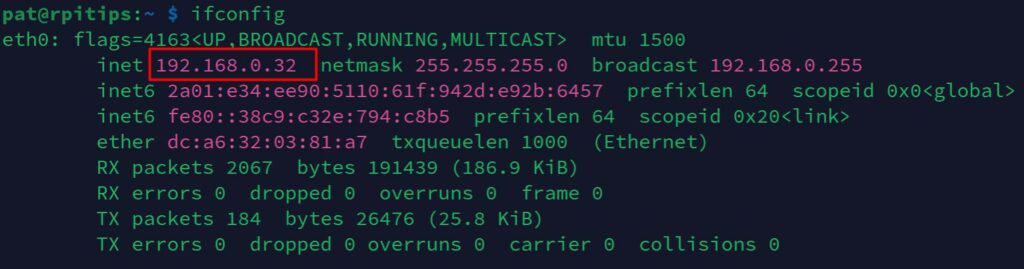
The paragraph starting with “eth0” corresponds to the Ethernet cable (wired), and the one starting with “wlan0” is for the Wi-Fi network interface (not on my screenshot, as it isn’t configured).
If you are lost in all these new words and abbreviations, request my free Raspberry Pi glossary here (PDF format)!
Download now
In this example, the IP address for my RJ45 interface is then 192.168.0.32.
Note: “ifconfig” is deprecated with most distributions, or even no longer available by default.
You can generally use “ip a” instead to get a similar result:ip a
Check this article to see how to do the same thing on Ubuntu and other distributions.
Are you a bit lost in the Linux command line? Check this article first for the most important commands to remember and a free downloadable cheat sheet so you can have the commands at your fingertips.
Find The Raspberry Pi IP Address From Another Computer
It’s possible to do a network scan or check the DHCP server interface to quickly find the Raspberry Pi IP address, without having to open a session on it (which is pretty convenient when you don’t have a display or keyboard).
Do a network scan from a Windows computer
A network scan will detect all devices on the local network, and list their names and IP addresses. It’s a convenient solution to quickly find the Raspberry Pi.
If you have a computer on Windows, I recommend using a free tool, named “Advanced IP Scanner” that can scan an entire network or just a portion of it.
The interface is very intuitive, and it might be useful for other projects.
I put you a screenshot here so that you can get an idea of it, and you can download it on their official website.
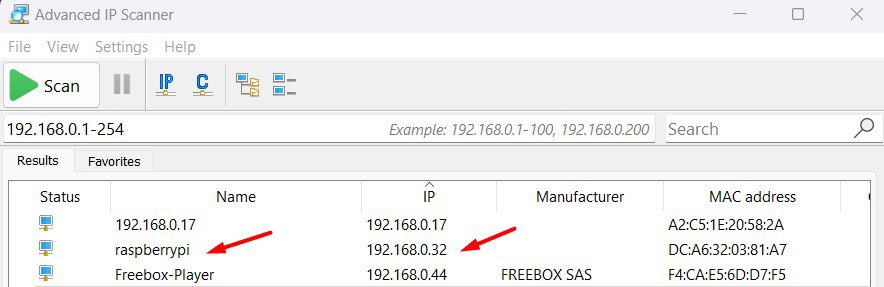
Basically, you set a range of IPs (keep the default value if you don’t know this range), and it will try to ping each of them. If there is an answer, it will give you the host name, IP address and a few other information.
In my screenshot, you can see the Raspberry Pi on the second line, with the IP 192.168.0.32. I don’t even have to do anything on the Raspberry Pi, and if SSH or VNC is enabled, I can directly access it.
Quick tip: If you keep the default hostname value when you use Raspberry Pi Imager (in the advanced options, as explained here), it will be “raspberrypi”. If you only have one Raspberry Pi on the network, you can try to connect to it directly (instead of the IP address), sometimes it will save you :-).
Find the Raspberry Pi IP from a Linux/Mac PC :
Arp cache
Remove the grep command if you want to show everything.

The command exists on Windows, but you don’t get the hostname, so it’s a bit less useful.
Nmap
Nmap is a network scanner that can be used to list all the devices connected to a specific network.
That’s exactly what we want!
You may need to install it with this command (for a Debian-based system):sudo apt install nmap
If you are lost in all these new words and abbreviations, request my free Raspberry Pi glossary here (PDF format)!
Download now
Then you can use Nmap to scan the network and display all results :sudo nmap -sP 192.168.1.0/24 | grep raspberry
Make sure to replace the network subnet and hostname to fit your current settings.
For example:
The same thing here, the grep command is not mandatory.
Ping
I’ll mention this as a bonus because. It can help with some systems where the previous tools are not available, but it’s not as efficient.
Ping is a popular tool to test if an IP address answers (and therefore if it’s connected to the network).
There is a lesser-known option that allows you to ping your entire network, and collect responses.
You will get the list of used IP addresses and can find which one corresponds to your Raspberry Pi.
Do this command and wait:ping -b 192.168.1.255
If you only have a few devices connected, it might help to narrow down the list of possible IP addresses, but it’s not magical.
Read the Raspberry Pi IP Address On Your Router Interface
In most cases, the DHCP server for a home network is managed by the Internet router. And most of the time, there is a web interface, where you can see a list of all the devices connected to it, with their IP address.
If you have a router like that, with access to this interface, that might be a great option to consider. No command required, nothing to install, and no need to have a display on the Raspberry Pi.
The issue is that there are many different routers, from different brands, so I can’t give you detailed instructions. You’ll have to check your router’s instructions to know exactly how to do this.
As an example, if I access mine, I get something like that on the default page:
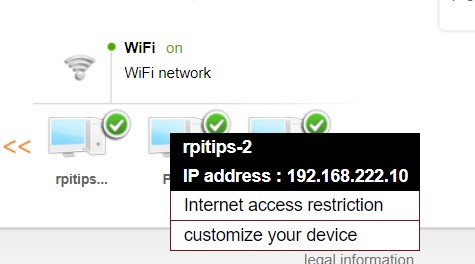
It’s not the best interface, but I can quickly see which devices are connected, with their IP address.
How to Set a Static IP on Raspberry Pi (LAN or WLAN)
Ok, so this time we managed to find the Raspberry Pi on the network, but it would be better to set a static IP address.
By doing this, you won’t have to do the same thing each time you start or Raspberry Pi, it will automatically get the same IP address, all the time.
You can even configure it on your router, so the Raspberry Pi always gets the same IP, even on a fresh new installation. That’s what I do, as I reinstall my Pi almost every day.
I have a full guide about this on the website, so you can refer to it if you need help to configure it on your network: 3 Easy Ways To Set A Static IP Address On Raspberry Pi.
Video
It's a free PDF guide containing every Raspberry Pi Linux command you should know!
Download now
FAQ
Why is my Raspberry Pi not getting an IP address?
If the Raspberry Pi doesn’t get an IP address assigned, it’s most likely that there is an issue with your network connection. Check the cable or Wi-Fi configuration (especially the Wi-Fi country must be set).
How to use the Raspberry Pi IP address for remote access over Internet?
The Raspberry Pi IP address won’t be reachable from outside the network. There is a difference between the local IP address and the public IP address (your router’s IP on the Internet).
To access your Raspberry Pi remotely (over the Internet), you need to set up port forwarding from your public address to the Raspberry Pi. This can generally be done on your router. More details here.
How to connect to the Raspberry Pi once I know its IP address?
You can connect to a Raspberry Pi with SSH or a remote access tool like VNC once you know its IP address.
Click on the links to learn more about these solutions.
How to find the public IP address of my Raspberry Pi?
The public address is generally the same for all devices on your local network, it’s defined on your Internet router. You can use a tool like this one to find it from your computer or Raspberry Pi.
If you want it to redirect to your Raspberry Pi local IP address (the one I talk about in this article), you’ll need to enable port forwarding or some kind of NAT on your router. I explain this in more details in this other article.
How do I access my Raspberry Pi from my router?
Routers will generally list all the devices connected to it, so you can use this interface to find the current IP address of a Raspberry Pi. But, most of the time, routers don’t have remote access features. Use a computer to remote access the Raspberry Pi.
How to make Raspberry Pi visible on network?
Raspberry Pi are visible on the network by default. If you can detect it, make sure the Wi-Fi is enabled and configured or an Ethernet cable is plugged to your network.
Plug a monitor and check the interface directly on the Raspberry Pi screen to troubleshooting this issue. It can be that the system hasn’t boot already, or is stuck somewhere during the boot process.
It's a free PDF guide containing every Raspberry Pi Linux command you should know!
Download now
If you are looking for exclusive tutorials, I post a new course each month, available for premium members only. Join the community to get access to all of them right now!
What’s next?
That’s it! We have listed many ways to find your Raspberry Pi on a network, and how to assign a static IP, so you will never look for it again!
You may have even learned some basic networking concepts and are now ready to go further and try new projects:
- 5 ways to remote desktop on Raspberry Pi (Windows/Linux/Mac)
- Install Webmin and configure your system without any command
- 3 ways to use Spotify on your Raspberry Pi (even remotely)
Whenever you’re ready, here are other ways I can help you:
The RaspberryTips Community: If you want to hang out with me and other Raspberry Pi fans, you can join the community. I share exclusive tutorials and behind-the-scenes content there. Premium members can also visit the website without ads.
Master your Raspberry Pi in 30 days: If you are looking for the best tips to become an expert on Raspberry Pi, this book is for you. Learn useful Linux skills and practice multiple projects with step-by-step guides.
The Raspberry Pi Bootcamp: Understand everything about the Raspberry Pi, stop searching for help all the time, and finally enjoy completing your projects.
Master Python on Raspberry Pi: Create, understand, and improve any Python script for your Raspberry Pi. Learn the essentials step-by-step without losing time understanding useless concepts.
You can also find all my recommendations for tools and hardware on this page.