

How to Install Fonts on Raspberry Pi? (An Illustrated Guide)
If you use your Raspberry Pi as a desktop computer, installing new fonts on it can be pretty useful. Unlike on other systems, doing so is not straightforward, so let me explain the main steps.
It’s possible to download new fonts online (.ttf or .otf file), and copy these files to the “.fonts” folder in the home directory to make them available on the whole system. It’s also possible to use the package manager to install packs of common fonts.
In this tutorial, I’ll introduce different ways to install and manage fonts on Raspberry Pi OS. But let’s start with some basic theory before moving forward.
If you’re feeling lost in all the Raspberry Pi jargon, I’ve got something to help you out. I’ve created a free glossary that explains all the essential terms and abbreviations in a way that’s easy to understand. It’s a great resource to have by your side. Get your free copy here.
What Are Fonts? Why Would You Need More?
A font is a graphic representation of a text, with different shapes, accentuation, or thicknesses of characters.

Fonts are used in our everyday tools. If you create a text document, PowerPoint presentation, website or infographic, you will use different fonts (common fonts are Arial, Times New Roman, Verdana, etc.).
Fonts are distributed as a font file (.ttf for example), which includes all elements to make it look the same on any device.
It can be useful to install new fonts on Raspberry Pi so you can:
- View websites as intended.
- Create pictures with a beautiful font.
- Participate in collaborative projects with people who are not using Linux without losing the fonts they have chosen.
You can’t use Microsoft Office on your Raspberry Pi (and you don’t need it most of the time), but you at least need to install the same fonts to make Windows users happy.
How to Install New Fonts on Raspberry Pi
To install new fonts for your Raspberry Pi, you can either install specific fonts or install a font package to get many fonts at once. Let’s go over how to do each method.
You can get answers from real experts in minutes.
Get help with your setup
Installing a Specific Font
If you have a specific font you want to install (e.g., Verdana), all you have to do is download the font file and install it on your system.
Download a Font File
To download a new font, you can look for websites that offer a catalog of fonts.
Bonus tip: When I started, the hardest part wasn’t the setup, it was figuring out what to build next. I ended up creating a list of 75+ project ideas with links and difficulty, so it’s easier to just pick something and try it. Grab the list here.

If you want a clearer path than jumping from tutorial to tutorial, my book gives you a step-by-step roadmap to really understand your Raspberry Pi.
Check the book hereFor example, the following links provide this kind of service:
Once you’ve picked your favorite website, follow these steps to add a font to your Raspberry Pi:
Check this: The Raspberry Pi I'd actually buy today
- Choose a font that interests you.
- Download the corresponding file.
I will install “Source Sans Pro” as an example.
Install a Font
Once the file is downloaded, follow these steps to install it on your Raspberry Pi:
- Unzip the file.
It most likely comes compressed in a ZIP file format, so you need to extract it first.- Either with the graphical tool:
- Go to your Downloads folder and right-click the downloaded file.
- Select Extract Here and you’ll see a bunch of new files appear.
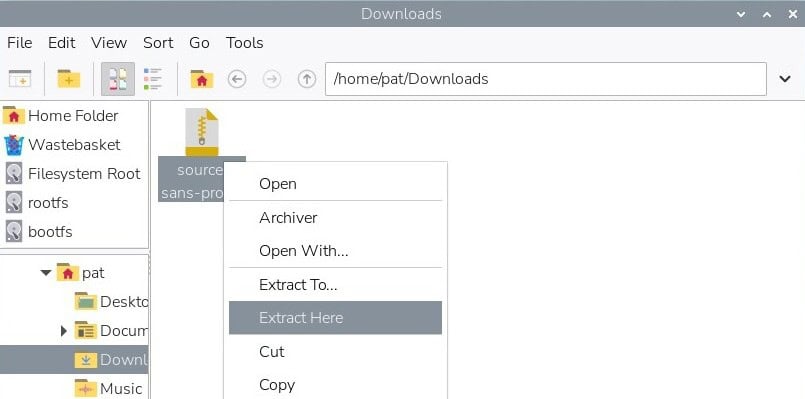
- Or extract the files from the command line:
cd ~/Downloads
unzip source-sans-pro.zip
- Either with the graphical tool:
- Next, go to your home directory in the file explorer.
- Create a new folder and name it “.fonts”.
Right-click > Create new > Folder and type “.fonts”.
Press CTRL+H to unhide it (Folder names starting with “.” are hidden).
- Then go back to the Downloads folder and copy all the .otf and .ttf files there.
- Paste these font files into the “.fonts” folder you just created.
- That’s it, your fonts are ready to use:

So it’s basically downloading files and putting them into the right location. The system will automatically detect them and make them available in all applications.
If you prefer the command line, you can also do this:cd ~/Downloads/source-sans-pro/
cp *.otf ~/.fonts/
cp *.ttf ~/.fonts/
fc-cache -v -f
These commands will move and install all the fonts you’ve extracted immediately.
Tip: Command lines can be a pain to memorize. I put the essential Linux commands on a printable cheat sheet so you don't have to keep googling them. You can grab the PDF here if you want to save some time.
Installing Font Packages
If you’re looking for more compatibility with fonts on other systems (Windows, for example), you should know that there are already several font packages available in the repositories.
The most popular one allows you to install the default fonts from Windows, and are therefore often useful for reading documents or websites that wouldn’t normally work natively on Raspberry Pi.
For example, if you open a document that uses the familiar Times New Roman font, it’s not available on Raspberry Pi by default, so it will look different than it would on a Windows PC.
To install a font package, follow these steps (adapt according to the package you want):
- Refresh the packages available:
sudo apt update - Install the package:
sudo apt install ttf-mscorefonts-installer
After a few moments, the package will be installed, and the Windows fonts are now available on your Raspberry Pi.
If you are not comfortable with the command line, you can go to the Pi menu > Preferences > Add/Remove Software, and look for the same package.

How to Use Fonts Once Installed?
Now that you have installed your new fonts, how do you use them?
Bonus tip: When I started, the hardest part wasn’t the setup, it was figuring out what to build next. I ended up creating a list of 75+ project ideas with links and difficulty, so it’s easier to just pick something and try it. Grab the list here.
Well, it’s effortless, in most cases there is nothing else to do. You install the fonts, and they are available immediately in all software.
If the software was already open, you will need to restart it, or possibly reboot the Raspberry Pi.
But otherwise, it’s already functional.
You might also like: 7 Hidden Raspberry Pi Features You Should Be Using
As you can see below in my LibreOffice Writer, I already have all the new fonts available:

Still stuck after following this guide? Drop your question in the RaspberryTips Community — real Pi users answer fast. Post your question here.
A Tool to Manage Fonts on Raspberry Pi
If you need a graphical tool to manage your fonts, know that there is the Font Manager package. This tool allows you to see the fonts installed on the Raspberry Pi and to search for one corresponding to your needs using different criteria.
The interface looks like this:

You can use this tool, for example, to filter fonts by:
- Family
- Spacing
- Slant
- Weight
- Width
- Filetype
- License
- Vendor
To install it, look for the font-manager package, you can find it from the Pi menu > Preferences > Add/Remove Software, or use APT from the command line:sudo apt install font-manager
There are many other functions that I’ll let you try, such as disabling fonts, comparing fonts, or customizing the display colors to understand better how it will look on your final support.
The good news is that once installed, you can install new fonts directly by opening the .otf or .ttf file (double-click on it, and click on “Install fonts”) or via the “+” symbol in the top menu with the manager open.
You might also like: The Raspberry Pi projects that pay for themselves
Want more tutorials about Raspberry Pi OS as a desktop computer? You should probably check my other posts on the topic:
- How to Change The Desktop Appearance on Raspberry Pi?
- 17 Best Apps to Use a Raspberry Pi as a Desktop PC
- Can a Raspberry Pi 4 really Replace your Desktop PC? (I Tried)
Whenever you’re ready, here are other ways I can help you:
Test Your Raspberry Pi Level (Free): Not sure why everything takes so long on your Raspberry Pi? Take this free 3-minute assessment and see what’s causing the problems.
The RaspberryTips Community: Need help or want to discuss your Raspberry Pi projects with others who actually get it? Join the RaspberryTips Community and get access to private forums, exclusive lessons, and direct help.
Master your Raspberry Pi in 30 days: If you are looking for the best tips to become an expert on Raspberry Pi, this book is for you. Learn useful Linux skills and practice multiple projects with step-by-step guides.
Master Python on Raspberry Pi: Create, understand, and improve any Python script for your Raspberry Pi. Learn the essentials step-by-step without losing time understanding useless concepts.
Master Linux Commands: Overwhelmed with Linux commands? This book is your essential guide to mastering the terminal. It includes practical tips, real-world examples, and a bonus cheat sheet to keep by your side.
You can also find all my recommendations for tools and hardware on this page.




It did not work: I do not have neither the .fonts directory or the font manager.
Hi,
Try to create the .fonts folder manually: mkdir ~/.fonts
And then paste the file into
Thankss for sharing
use the font manager
sudo apt-get install font-manager
Absolutely doesn’t work the way you described it here. If I double click a .ttf file I see a pop up that asks me which application I want to use to open said file. Tested with a fresh install of rasbian 10. No option to click install.
Hi Banjo,
Ok, thanks for your feedback
I have to check this on Buster and update the post
+1 to Banjo’s comment
Hello,
I have just updated this post
So on Raspbian Buster you have two choices:
– either copy the font files manually to /home/pi/.fonts (and create the folder if needed)
– or install font-manager to make it work the same way as on Stretch (open the ttf file and click “Install fonts”)
Let me know if you still have a problem about this
Excellent, thank you!
Thanks for your feedback 🙂
It works for me. Thank you.
Thank you for this tutorial! The font manager works like a charm.