The Easiest Way To Get Minecraft Java On Raspberry Pi (2024)
Even though Minecraft is the most popular game of all time, with over 200M copies sold, it isn’t easy to install on all devices. As a Raspberry Pi owner, you use Linux on a specific architecture that isn’t supported by the developers. So, how do you get Minecraft on your Pi?
The official Minecraft launcher is not available for ARM architectures running Linux, like the Raspberry Pi. One of the several unofficial launchers can be used instead to run Minecraft Java on the Raspberry Pi.
There are many ways to do this, and different solutions you can use. In this article, I’ll show you the easiest way. So keep reading to get the full Minecraft Java on your Raspberry Pi in a few minutes.
If you’re looking to quickly progress on Raspberry Pi, you can check out my e-book here. It’s a 30-day challenge where you learn one new thing every day until you become a Raspberry Pi expert. The first third of the book teaches you the basics, but the following chapters include projects you can try on your own.
Step 1: Install Pi-Apps
Pi-Apps is a free tool that simplifies the installation of some apps that aren‘t directly available for the Raspberry Pi. When many steps are required, Pi-Apps can generally install the desired application in one click.
For example, not all Minecraft launchers are supported on Raspberry Pi, and different prerequisites are required for each of them (like a specific Java version). Pi-Apps includes a few of them and will take care of the prerequisites for you.

Join Our Community!
Connect, learn, and grow with other Raspberry Pi enthusiasts. Support RaspberryTips and enjoy an ad-free reading experience. Get exclusive monthly video tutorials and many other benefits.
Learn moreSo, if you don’t have it yet, I highly recommend installing Pi-Apps on your system. It’ll be useful to install Minecraft, but you can also use it for many other applications.
It's a free PDF guide containing every Raspberry Pi Linux command you should know!
Download now
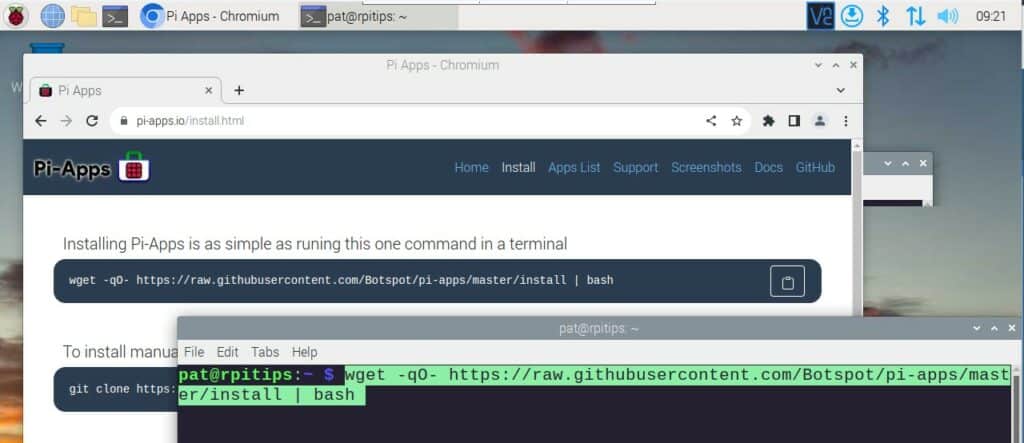
- Go to the official website here.
- Open a terminal.
- Copy the first command in your terminal:
wget -qO- https://raw.githubusercontent.com/Botspot/pi-apps/master/install | bash - It will add a repository to your system, do the system updates and add Pi-Apps on your desktop and in the main menu.
That’s it, you are ready to move to the next step, to install Minecraft Java on your Raspberry Pi.
Step 2: Install a Minecraft Launcher
Playing Minecraft requires a launcher that will manage the authentication process and start the game (a Java program). The official launcher is incompatible with the Raspberry Pi, but other solutions are available.
Follow these steps to install one of the launchers on your Raspberry Pi:
- Start Pi-Apps.
An icon should be on your desktop, but you can also find it in the main menu.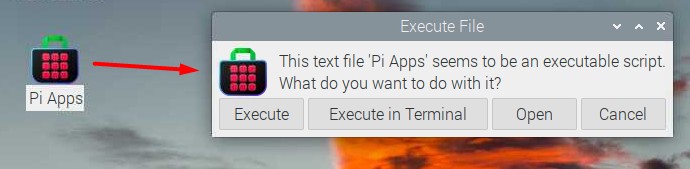
- Click on “Execute” when asked.
- A list of applications shows up, sorted by categories.
Open the “Games” section. - You’ll find several applications related to Minecraft.
Our goal here is to install one of the launchers.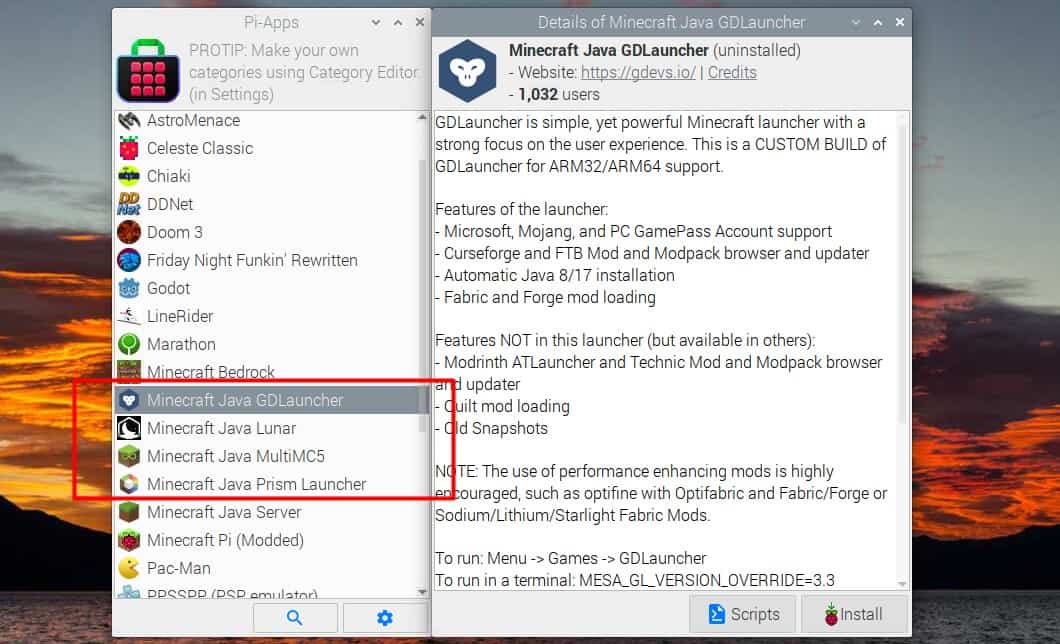
- I’m testing this with GDLauncher, but you can try another one if you prefer.
- Click on the launcher name in the list, and then click on “Install” to start the installation.
Pi-apps will do everything for you. You will get a terminal window showing what’s going on.
You may get a few warnings like in the screenshot below, but don’t stress, I got them and it worked anyway.
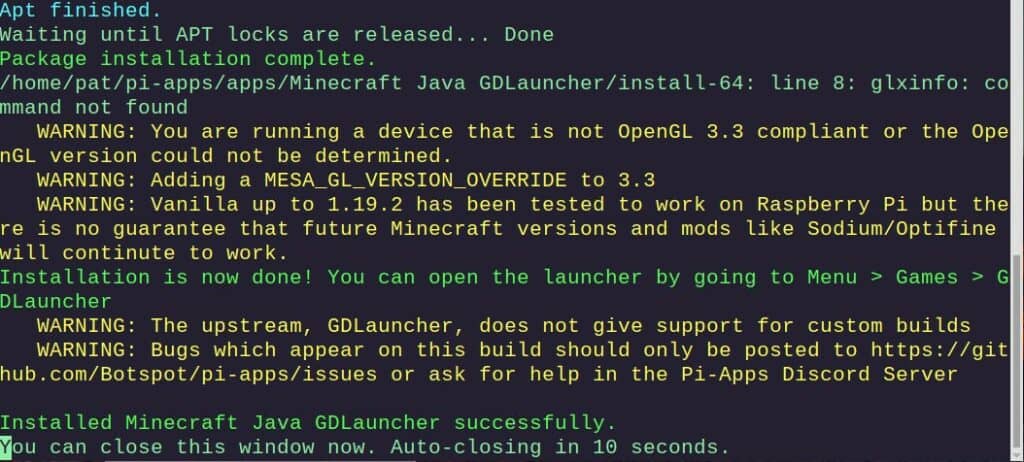
If the installation is completed successfully (as shown in this screenshot), you can move to the next step to start Minecraft.
It's a free PDF guide containing every Raspberry Pi Linux command you should know!
Download now
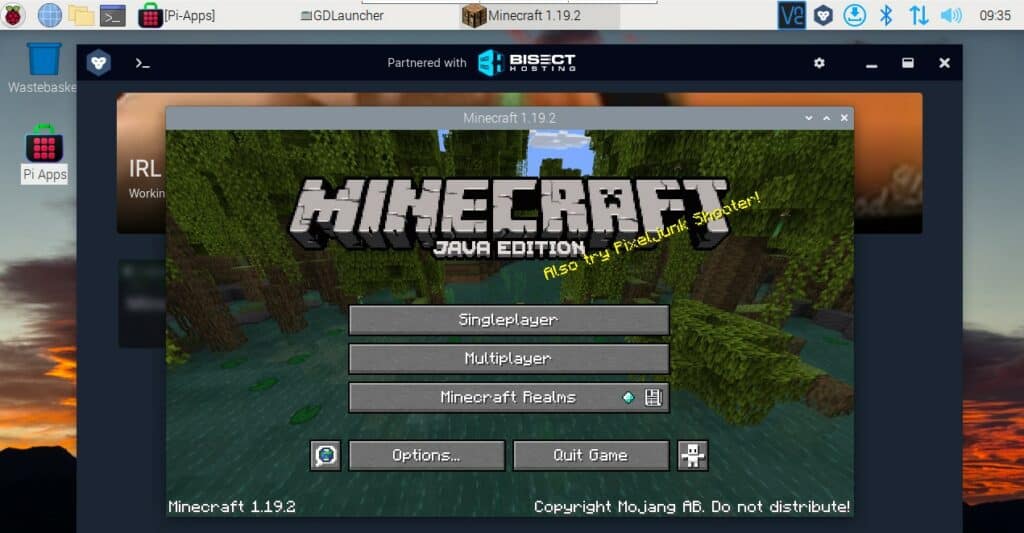
Step 3: Start playing Minecraft on Raspberry Pi
Now that the launcher is installed, you are almost ready to play the full version of Minecraft on your Raspberry Pi. Some Java requirements might be necessary if you don’t have them yet, and you’ll need to log in with your Microsoft account (Minecraft is a paid game).
First start
You’ll find the launcher you just installed in the main menu, probably in the “Games” category.
If you installed GD Launcher like me, it will tell you if Java is missing. You will likely get the following window (or something similar) on your first start:
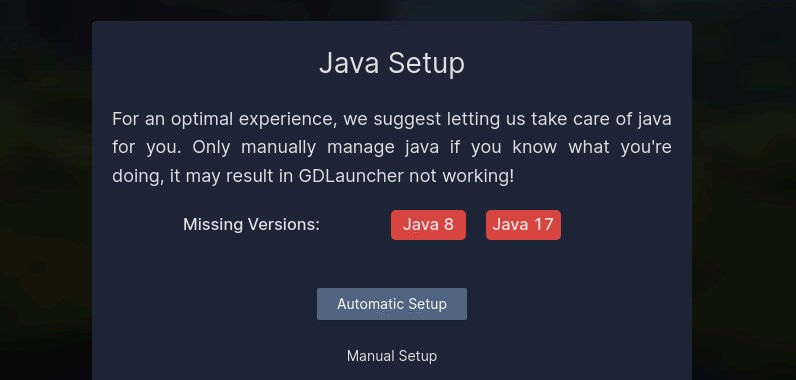
Just click on “Automatic Setup” and wait a few minutes, the launcher will install everything for you.
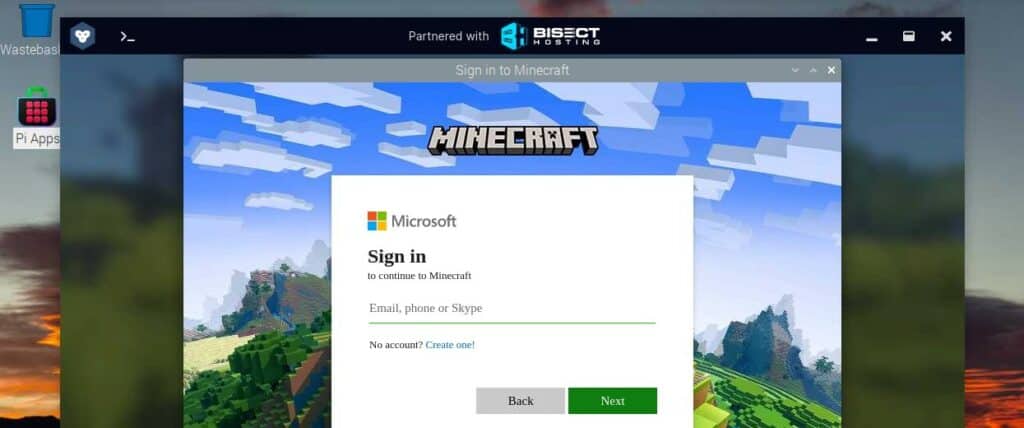
Log in with your Microsoft account
The next step is to sign in. Several options are available, but in most cases, you should use the “Microsoft login”, as most Minecraft accounts are now linked to your Microsoft account.
You’ll get a screen like this, where you need to enter your Microsoft email and password:
It's a free PDF guide containing every Raspberry Pi Linux command you should know!
Download now
You’re almost done, the next step is finally related to Minecraft, and you’ll need to choose the game version.
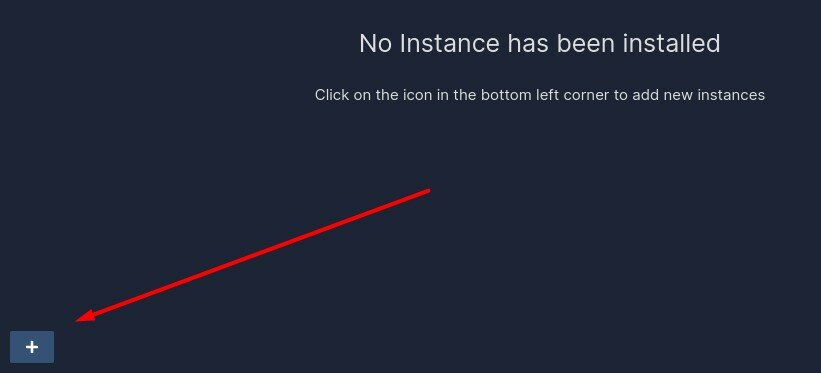
Create an instance
As on the official launcher, you have to create a configuration profile before playing your first game.
With GD Launcher, it’s named an instance.
Click on the “+” symbol in the bottom-left corner to add one.
You’ll have many options there. I recommend testing with Vanilla in the latest version first.
The other solutions allow you to install mods, but it’s probably not a good idea on a Raspberry Pi. The normal game is already pretty slow, adding mods to it will most likely be unplayable.
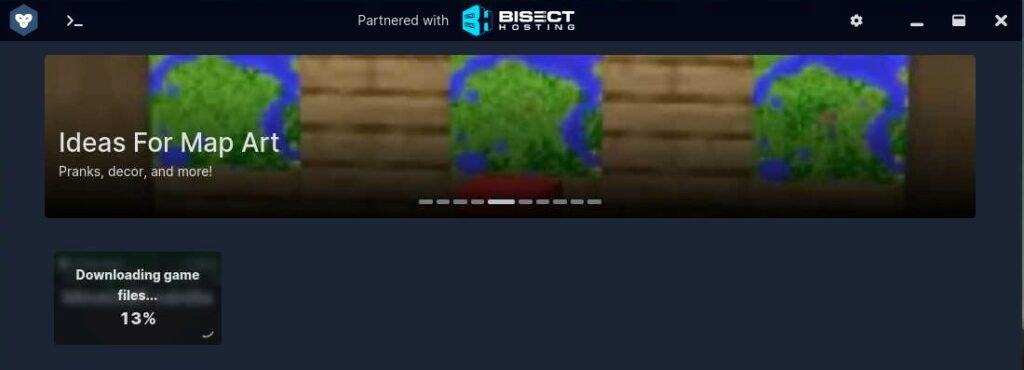
Once the game version is selected, the launcher will start downloading the game files. It might take a while, just be patient.
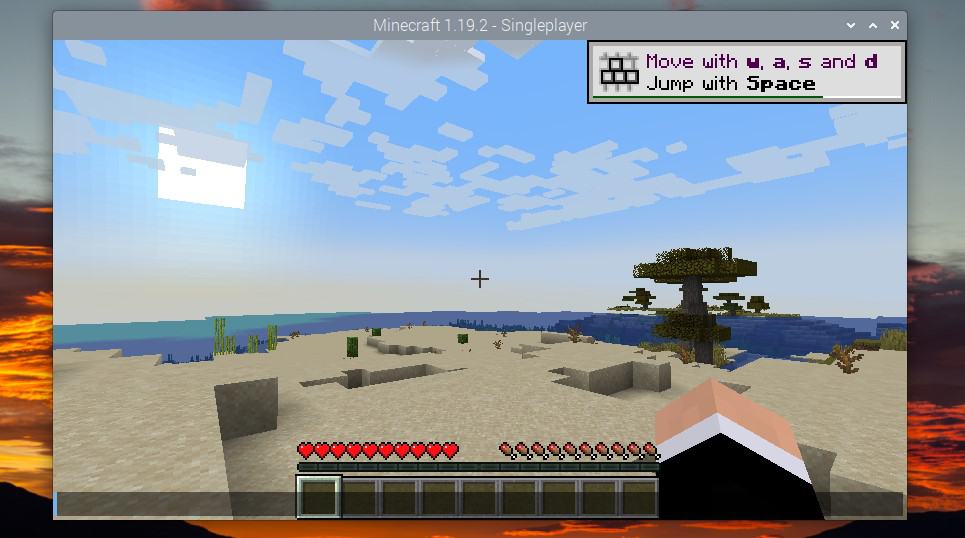
Start the game
After downloading and installing the Minecraft files in your launcher, the game is ready to play.
Double-click on the game version to start Minecraft. You’ll get the famous application, like on any other platform:
From there, you probably don’t need my help anymore. Go to the options to adjust the video and control settings if needed, and you can then start your game in Single-player (might be a bit slow on a Raspberry Pi) or Multi-player (playing on a server).
In single-player mode, the world generation took a while (maybe 10 minutes on a Raspberry Pi 4), but I was then ready to play the full game (complete inventory, all items available, etc.).
It's a free PDF guide containing every Raspberry Pi Linux command you should know!
Download now
If you are looking for exclusive tutorials, I post a new course each month, available for premium members only. Join the community to get access to all of them right now!
FAQ
Can you play Minecraft Java on a Raspberry Pi?
The official Minecraft launcher is not available for Raspberry Pi, but it’s possible to play Minecraft Java on it by using third-party launchers, like GD Launcher.
What performances can you expect with Minecraft Java on a Raspberry Pi?
In short, Minecraft Java can run on a Raspberry Pi, but don’t expect great performance. Everything works and all the play modes and options are available, but everything is pretty slow.
A Raspberry Pi 4 or 400 is recommended, as the CPU will be the main limit. For example, I took a screenshot of the system usage during the world generation, and it’s pretty obvious that the processor is overwhelmed:
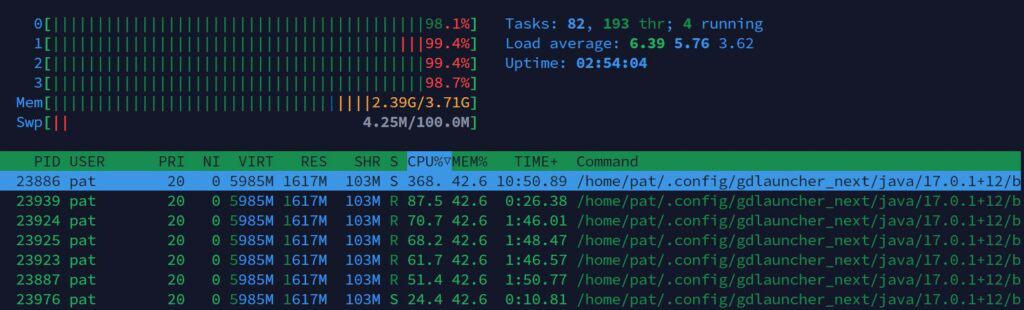
The memory isn’t full, so I guess even a Raspberry Pi 4 with 2 GB can perform almost the same as an 8 GB edition, but in the long term, the more RAM you can have the better (Related article: Raspberry Pi 4 : Do you really need 8 GB? (vs 4 GB)).
How to improve Raspberry Pi’s performance?
The main limitation to the performance when playing Minecraft on a Raspberry Pi is the processor. Using the most powerful model is recommended, and overclocking the CPU can be an option to improve the results.
Other things like using an SSD or a better power supply can help, but the processor is the main limiter here. You can check this article to learn more about how to improve your Raspberry Pi performance:
How Can you Make your Raspberry Pi Run Faster? (8 tips)
By the way, if you are a Minecraft fan, I have a few articles on this website that might be interesting for you:
- How to set up a Minecraft server on Raspberry Pi?
- How to program Minecraft with Python on a Raspberry Pi?
- How To Install Minecraft Forge On Linux? (Illustrated Guide)
- How to Get Roblox on Raspberry Pi (Tips & Alternatives)
Whenever you’re ready, here are other ways I can help you:
The RaspberryTips Community: If you want to hang out with me and other Raspberry Pi fans, you can join the community. I share exclusive tutorials and behind-the-scenes content there. Premium members can also visit the website without ads.
Master your Raspberry Pi in 30 days: If you are looking for the best tips to become an expert on Raspberry Pi, this book is for you. Learn useful Linux skills and practice multiple projects with step-by-step guides.
The Raspberry Pi Bootcamp: Understand everything about the Raspberry Pi, stop searching for help all the time, and finally enjoy completing your projects.
Master Python on Raspberry Pi: Create, understand, and improve any Python script for your Raspberry Pi. Learn the essentials step-by-step without losing time understanding useless concepts.
You can also find all my recommendations for tools and hardware on this page.