How To Install NordVPN On Ubuntu (Beginner’s Guide)
Using a VPN on your computer, even as an individual, is a good practice to protect your data and your activity online. But using a VPN on Linux is still a challenge with most providers, as they don’t always fully support this operating system. In this article, I’ll show you how to use NordVPN (one of the most popular VPN solutions) on Ubuntu, and Linux in general.
NordVPN offers a Debian package for Linux users, that can be installed on Ubuntu or any Debian-based distribution. There is no graphic interface for their client, but it can be controlled from a terminal with a few command lines.
So, at least they have a solution for us. We would prefer to have the same application as Windows with all the features, but not all providers have a penguin on their website. Let’s start by creating an account and see how to install it on your system (with a desktop environment or not).
Create an account on NordVPN
If you don’t have one yet, the first step is to create your account on NordVPN.
It’s a paid subscription, but it’s pretty inexpensive. They have promotions running all the time, and the longer you engage, the less you pay.
There is a 30-day money-back guarantee, so you don’t take any risk. You can test it to see how it runs on your system, and ask for a refund if it doesn’t work as you expected.
Anyway, here is how to create your account:
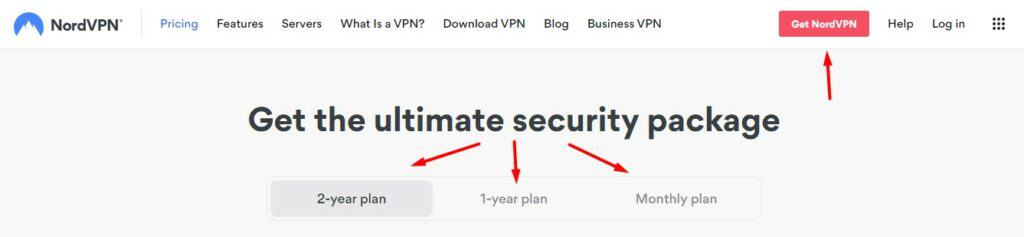
- Go to the NordVPN website.
- Click on “Get NordVPN” in the top-right corner.
- Choose your engagement duration (the more you engage, the less you pay)
Then they now have 3 solutions:
- Standard: VPN only. Might be enough in most cases.
- Plus: With a password manager and data breach scanner.
- Complete: With 1 TB cloud storage. Interesting if you want to back up your files with them because it isn’t much more expensive than the other tiers.
I ordered the “Complete” solution without paying attention, as it’s the default one, so make sure to pick the one you really want here. Then click on “Get Complete”, “Get Plus” or “Get Standard” for the engagement you want, and complete the payment process.
All payment methods are accepted (Credit or debit card, PayPal, Google and Amazon pay, and even cryptocurrencies) and the process is straightforward. You can cancel at any time (no question asked), and there is a 30-day money-back guarantee (tested), so you can safely give it a try and see how it goes for you.

Once your account is activated, you are ready to use it on your Linux computer. I’ll show you the procedure for Ubuntu, but it should be really close to any Linux distribution.
It's a free PDF guide containing every Raspberry Pi Linux command you should know!
Download now
Install NordVPN On Ubuntu Desktop
Here are the required steps to install NordVPN on Ubuntu with a desktop environment:
- Download the NordVPN Debian package from the official website.
- Install it on Ubuntu with the package manager to add the new repository.
- Use APT to complete the NordVPN installation.
Let’s see how to do this in more detail.
Download the NordVPN Debian package
- Log in to your account in your web browser.
- Go to “Downloads” in the left menu.
- Find the “Desktop apps” section:
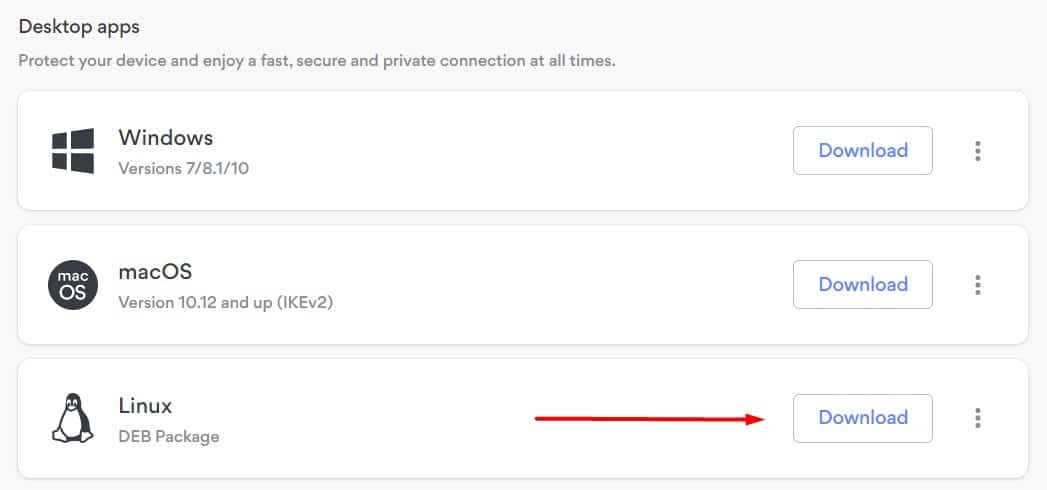
- Click on “Download” in front of the Linux icon.
It’s a .deb file, compatible with all architectures, so it should work on any Debian-based distribution (I even installed it on a Raspberry Pi, for example). But it looks like there is no official solution for other Linux distributions (OpenVPN might work in those cases, but I didn’t test it).

Join Our Community!
Connect, learn, and grow with other Raspberry Pi enthusiasts. Support RaspberryTips and enjoy an ad-free reading experience. Get exclusive monthly video tutorials and many other benefits.
Learn moreAdding the NordVPN repository
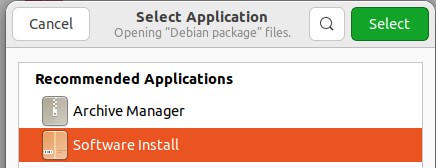
Once the file is downloaded, double-click on it to install the package on your system.
If it opens with the archive manager, right-click and choose “Open with other application”, and then “Software install”:
The Ubuntu Software app shows up, and invites you to install NordVPN:
Click on “Install”, and type your password to confirm the installation.
This package is a bit misleading, as it will only add the NordVPN repository to your system. You’ll then have to install the app from the repository.
Install NordVPN client
To complete the NordVPN installation, make sure to then use the new repository and get the application from there:
- Open a terminal.
- Use apt update to sync the packages available:
sudo apt update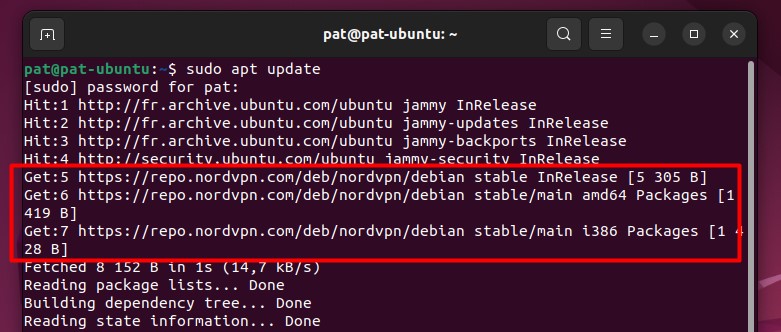
As you can see, APT is now connected to a new repository, added by the NordVPN package. - Install NordVPN with:
sudo apt install nordvpn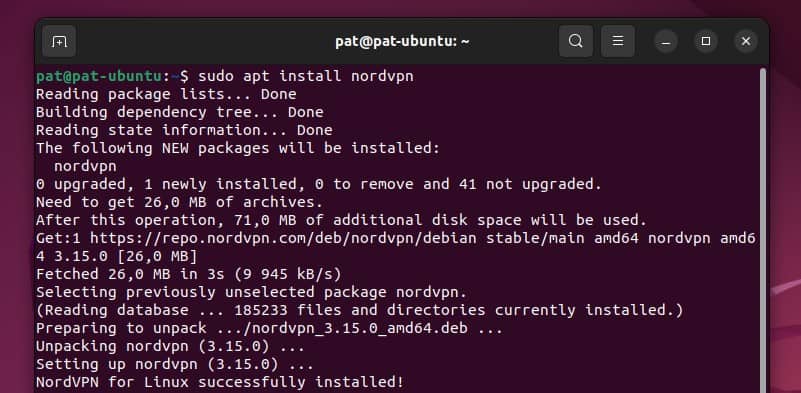
That’s it, NordVPN is now installed, and the different commands are available.
You can skip the next part and read the last one to know how to use it from there.
The good news is that as you installed NordVPN with APT, it will stay up-to-date with each new version automatically when you do your system updates.
Are you a bit lost in the Linux command line? Check this article first for the most important commands to remember and a free downloadable cheat sheet so you can have the commands at your fingertips.
Install NordVPN On Ubuntu Server
Installing NordVPN on Ubuntu Server is not that different from the Desktop installation, you just need to do everything in command lines, including downloading the file and adding the repository.
It's a free PDF guide containing every Raspberry Pi Linux command you should know!
Download now
Get the NordVPN package link
It looks like they never change the link to the Debian package, but just in case, you can check it in your account:
- From your computer, open your web browser and log in to your account.
- Go to “Downloads” in the left menu.
- Find the “Desktop apps” section:
- Right-click on “Download” and copy the link.
It should be something like this:https://repo.nordvpn.com/deb/nordvpn/debian/pool/main/nordvpn-release_1.0.0_all.debWith probably a few extra parameters that you can remove.
Installing NordVPN on Ubuntu Server
Once you have the link, connect to your Ubuntu Server (via SSH, for example) and follow these steps:
- Download the NordVPN package with wget:
wget https://repo.nordvpn.com/deb/nordvpn/debian/pool/main/nordvpn-release_1.0.0_all.deb
Change the link if you noticed something different in the previous step. - Install the downloaded package with:
sudo dpkg -i nordvpn-release_1.0.0_all.deb - Complete the installation with:
sudo apt update
sudo apt install nordvpn
That’s it, it’s even faster with the command lines (as usual, when you know them ^^).
Using it will be similar on Ubuntu Server or Ubuntu Desktop, so you can follow the last part to try it now.
It's a free PDF guide containing every Raspberry Pi Linux command you should know!
Download now
Getting started with NordVPN on Ubuntu
NordVPN doesn’t have a desktop application, so using it is basically the same if you are on Ubuntu Desktop or Server. After a quick configuration step to link your computer to your NordVPN account, you’ll just need a few commands to manage the connection.
User permissions
Before anything else, you need to allow the current user to use NordVPN.
Managing the VPN connection on Linux requires special permissions, so you need to add your current user to the NordVPN group.
You can do this with this command:sudo usermod -aG nordvpn $USER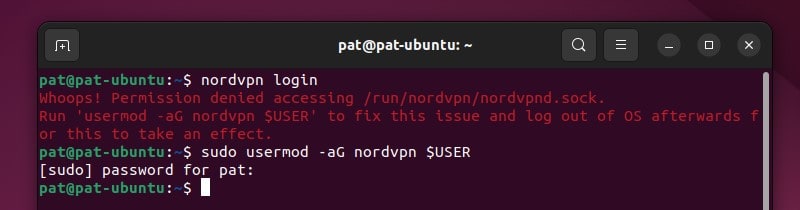
$USER is a system variable, it will be replaced by the current user when you execute the command.
If you have several accounts, replace them with any username you want to allow using NordVPN, for example:sudo usermod -aG nordvpn patrick
sudo usermod -aG nordvpn john
sudo usermod -aG nordvpn mike
After that, a reboot is required to update the permissions. So, restart your computer and get back to the terminal.
Activating NordVPN on Ubuntu
You only need to do this once, but before connecting to any NordVPN server, you need to tell the NordVPN client what your account is, so it can verify that you have an active subscription.
To link your account from Ubuntu with a desktop environment, just use:nordvpn login
It will give you a link. Open the link in your browser and sign in:
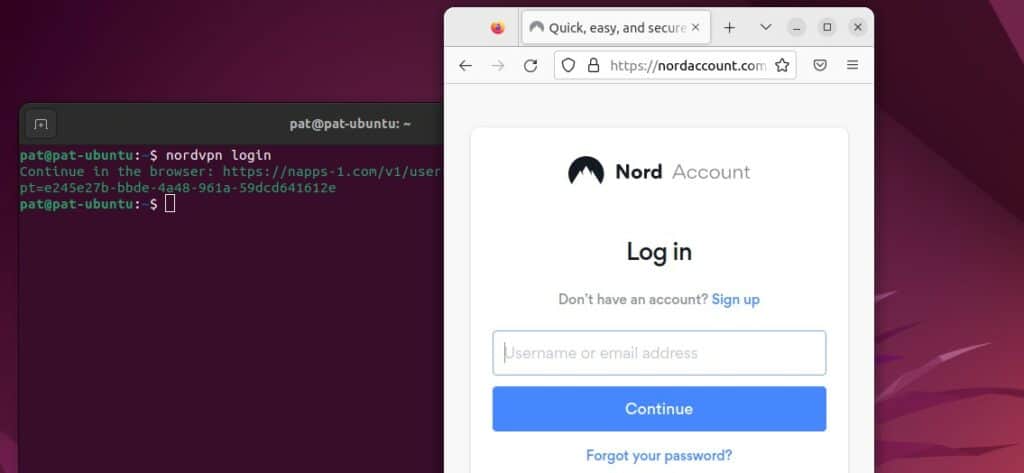
Once logged in, the browser will ask to open a system link, it will briefly open another terminal and link your account to your computer. You have nothing else to do after that.
On a server without a desktop environment, the browser login won’t work. I don’t know if there are other ways, but I switched to the old login system with:nordvpn login --legacyAnd then typed my email and password to link my server to my NordVPN account.

Whatever the solution, you can then use the same command on the server and desktop, and check the next section to connect for the first time.
NordVPN: basic usage
Once the account is connected, you can use this simple command to get connect to a NordVPN server:nordvpn connect
That’s it, I’m connected to a server close to me and my IP address has changed:
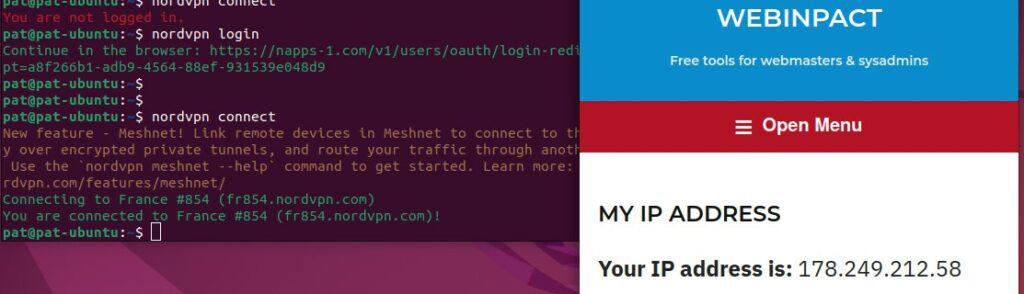
I use this website to get my public IP address in real-time, but there are many other options available. Whatever server you get connected to, your IP address should change, that’s the goal of a VPN.
NordVPN commands list
From there, using NordVPN, even if it’s in a command line, is not that complicated.
In most cases, using “connect” and “disconnect” should be enough. But here are the most important commands to remember if you want to try something else:
- Stop the current connection:
nordvpn disconnect - Connect to a specific server:
nordvpn connect Australia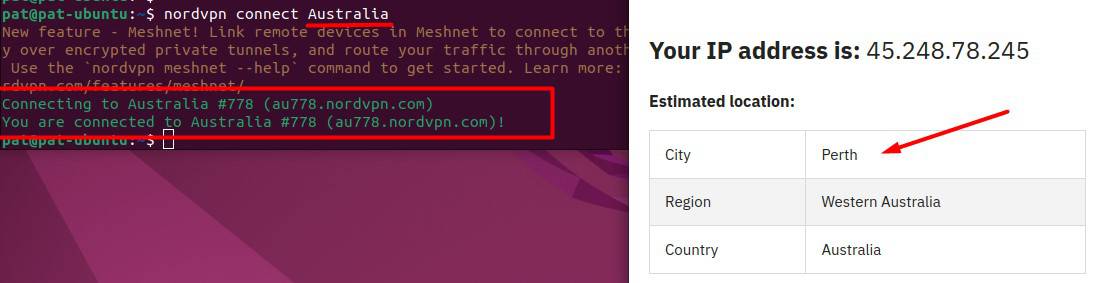
- List available countries:
nordvpn countries - List of available cities in a country:
nordvpn cities <country>For example:nordvpn cities France - Lost? Use –help to get more information about the base command or a specific command:
nordvpn --help
nordvpn whitelist --help
If you need more, you can get the full list here. For example, there is an autoconnect feature that you can use if you want to be connected automatically on boot:nordvpn set autoconnect onOr even with a specific server, like:nordvpn set autoconnect on us2435
That’s one feature I really liked when I tested ExpressVPN on my Raspberry Pi, it looks like NordVPN offers the same one :-).
It's a free PDF guide containing every Raspberry Pi Linux command you should know!
Download now
Want to chat with other Raspberry Pi enthusiasts? Join the community, share your current projects and ask for help directly in the forums.
Additional Resources
Overwhelmed with Linux commands?
My e-book, “Master Linux Commands”, is your essential guide to mastering the terminal. Get practical tips, real-world examples, and a bonus cheat sheet to keep by your side.
Grab your copy now.
VIP Community
If you just want to hang out with me and other Linux fans, you can also join the community. I share exclusive tutorials and behind-the-scenes content there. Premium members can also visit the website without ads.
More details here.
Need help building something with Python?
Python is a great language to get started with programming on any Linux computer.
Learn the essentials, step-by-step, without losing time understanding useless concepts.
Get the e-book now.