
Install Pi-Hole on Raspberry Pi (Free Ad Blocker in 15 min)
Blocking ads and pop-ups on all of your devices can sometimes take a lot of time and effort. Today, I’ll show you how to install an ad blocker for your entire network in 15 minutes. We’ll use Pi-Hole, which is a famous ad-blocker for Raspberry Pi.
Pi-Hole is a free and open-source ad-blocker that can be easily installed and set up on Raspberry Pi. The source code is available on GitHub, and it can be installed on Raspberry Pi OS with one command line: curl -sSL https://install.pi-hole.net | sudo bash
In this post, I’ll start by introducing Pi-Hole, then show you how to install and configure it on your network.
By the way, Pi-Hole is one of the many projects I introduce in my book “Master your Raspberry Pi in 30 days“. So, if you are interested in improving your skills on Raspberry Pi, I highly recommend it. It’s a 30-day challenge to take you from beginner to master, with step-by-step tutorials and many projects to practice along the way.
Pi-Hole Presentation

What is Pi-Hole?
As I said in the introduction, Pi-Hole is a free and open-source ad-blocker.
It’s different from AdBlock or other browser extensions because it’s directly on the network, it’s a DNS ad-blocker.
Pi-Hole has existed since 2014, and it works on most Linux distributions.
It’s available for Debian-like distributions (Debian, Raspberry Pi OS, Ubuntu) and also Fedora/CentOS.
By the way, I have a tutorial on how to set up Pi-Hole on Ubuntu here. Whether you’re using a Raspberry Pi or another computer, it might be interesting for the Ubuntu users reading this.
What is a DNS Ad-Blocker?
You probably know or use AdBlock to get the same results, but it depends on your browser.
If you have AdBlock on Google Chrome and switch to Firefox, ads are back.
Also, it isn’t possible to use it on mobile (or at least with any system/browser).
A DNS ad-blocker is easier to manage because once you install Pi-Hole, you can use it directly with any device on the same network.
Just set your DNS server with the Raspberry Pi IP, and that’s it, you won’t have ads anymore.
I recently tested AdGuard Home, which is an alternative to Pi-hole. You can read this article to find out the differences and pick the one that’s best for you.

Join Our Community!
Connect, learn, and grow with other Raspberry Pi enthusiasts. Support RaspberryTips and enjoy an ad-free reading experience. Get exclusive monthly video tutorials and many other benefits.
Learn moreInstalling Pi-Hole On Raspberry Pi
Let’s move on to the installation process. It’s pretty straightforward.
Hardware
Pi-Hole is a lightweight software, and it’s designed especially for Raspberry Pi.
So, you can use it with any Raspberry Pi model.
It's a free PDF guide containing every Raspberry Pi Linux command you should know!
Download now
In my case, I’m using my Raspberry Pi Zero for this (you can use this kit for example) and it works well.
If you don’t have a Raspberry Pi yet, you can follow the same procedure with a Linux computer, or even a virtual machine running on Linux.
Operating system
Pi-Hole works on Raspberry Pi OS, so there is no need to take a specific SD card or buy a Raspberry Pi just for this.
You can use any Raspberry Pi you have.
If you already have one running all day, you can use that one.
If you need to install Raspberry Pi OS, check my guide here on how to install it on Raspberry Pi.
Raspberry Pi OS Lite is fine if you don’t need the graphical interface for something else.
Before continuing, make sure you have:
- Raspberry Pi OS installed.
- A working network.
Wired or wireless is ok on a small network, as it’s just for DNS requests. - An up-to-date system with the latest packages:
sudo apt update && sudo apt upgrade -y - SSH access enabled:
sudo service ssh start
And that’s it, you’re ready to go!
Are you a bit lost in the Linux command line? Check this article first for the most important commands to remember and a free downloadable cheat sheet so you can have the commands at your fingertips.
Downloading and Installing Pi-Hole
Pi-Hole is available on this GitHub repository, and they have a one-line command to easily install it.
- Connect to your Raspberry Pi with SSH.
If you don’t know the IP address, follow this tutorial on how to find the Raspberry Pi IP address.
Login with pi and your password (raspberry by default). - Copy and paste this command:
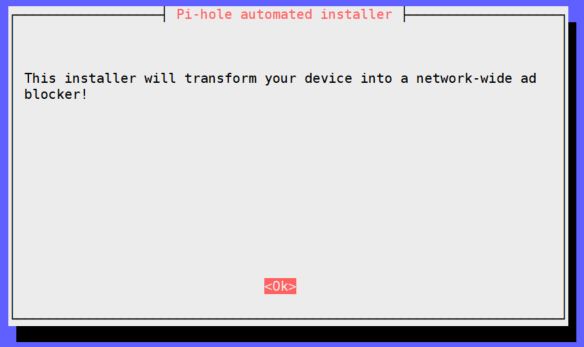
curl -sSL https://install.pi-hole.net | sudo bashThe installation starts with ASCII art:

- Then a standard Debian wizard will start.
- Answer Ok to the three questions.
- Then the following message tells you that you need a static IP.
It isn’t mandatory, but if the IP changes, you’ll lose Internet, so I recommend doing this.
You can also fix the IP address in your DHCP server. - Choose the Interface to use.
eth0 for a wired connection, wlan0 in WiFi.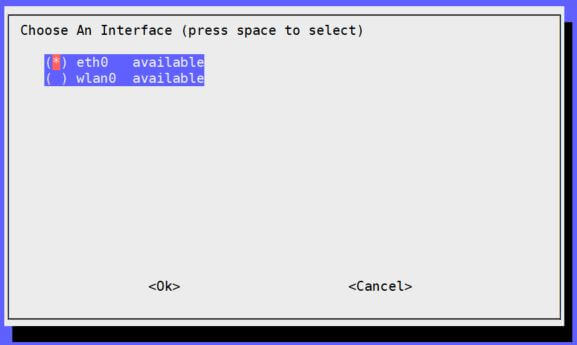
- Then you have to choose a DNS provider.
Pi-Hole will forward all requests to DNS servers after filtering them.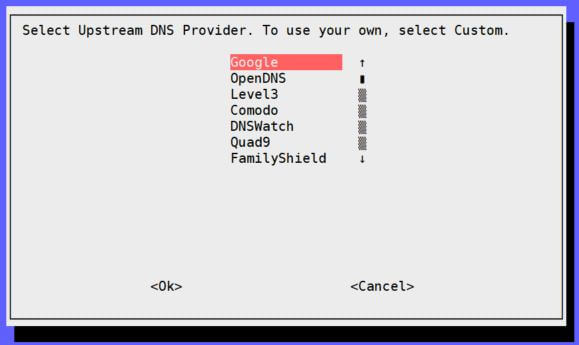
You can take the default one (Google) and change it later if needed. - The wizard now asks you to select third-party lists to use for blocking ads:
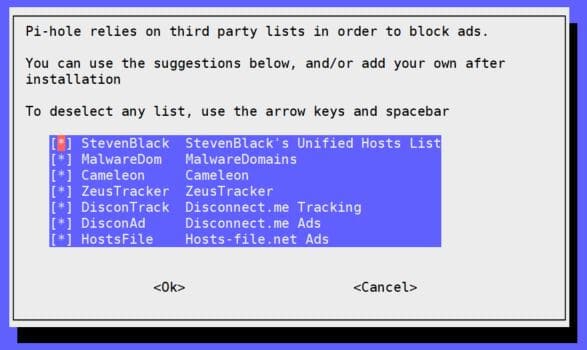
I think you can keep them all, and change/add some later. - The next question is about IPv4/IPv6 protocols.
Make your choice, or keep default values if you don’t know. - Then it asks you about the static IP settings:
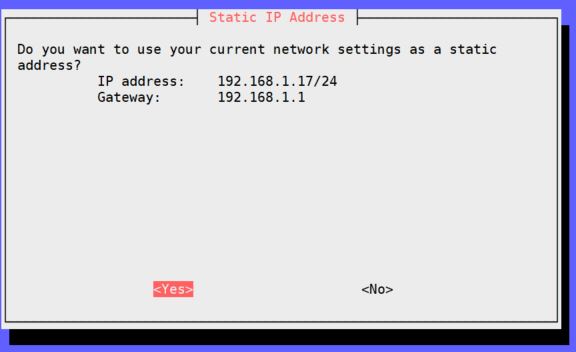
I recommend clicking on Yes to fix your IP address. - The next screen is a warning message about using DHCP and static IP on the same network range:
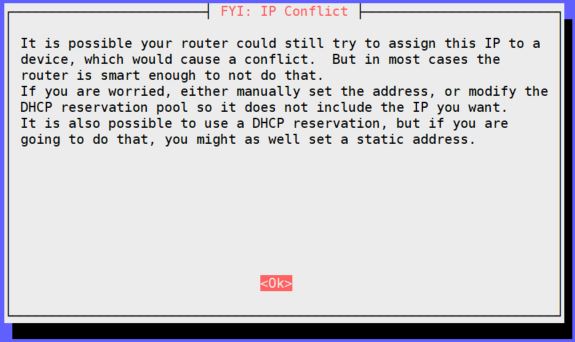
But most of the time the router will detect your Raspberry Pi and not assign this IP to another one. - Then it gives you the IPv6 address if you chose to keep it enabled.
- Then the wizard asks you to enable the web admin interface:
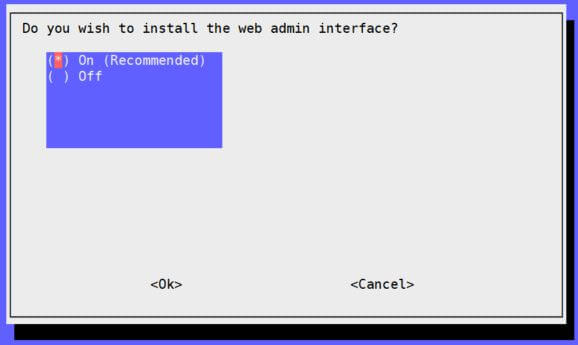
I highly recommend doing this, it’s a major feature of Pi-Hole and you’ll love it. - In the next step, you need to confirm the Lighttpd installation.
It’s mandatory to get the interface working, so choose “On.” - Now, you need to choose if you want to enable the queries log.
The software will store any DNS request you make and display stats about them.
I recommend enabling it for the moment, you can disable it later on the interface. - Finally, there is a privacy mode to select between five levels.
You can change it later if you want: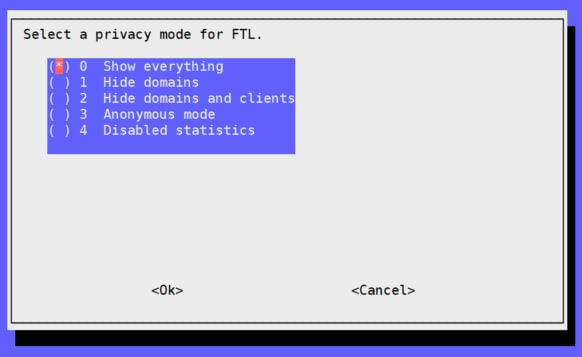
If you are installing it for a company, make sure you have permission to enable queries to log and display every request details, it’s probably something to consult your legal department about.
Ok, it was a long wizard, but basically, you can just keep the default value for each screen.
You can change everything later with the web interface.
It looks like the developer love to shuffle the questions order, so I’m sorry if your setup wizard was not exactly in the same order as mine :-).
After this, the installation process continues by downloading and installing new packages based on your choices.
Don’t miss the last screen as it will give you the web interface address and the login password:
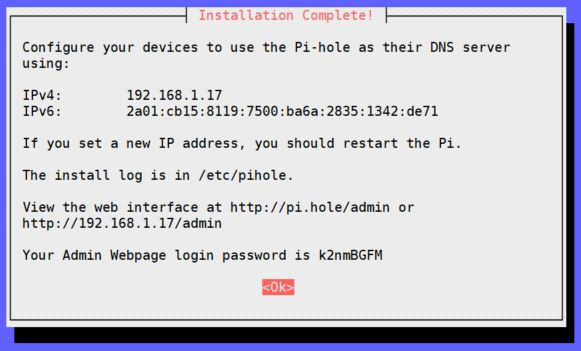
I’ll explain the web interface in the next section.
But before that, we need to tell the clients to use the new DNS server.
Client Configuration
DHCP Configuration
The easiest way to configure all devices at once is to change your DHCP server configuration.
At home, it’s probably your Internet router that takes this role.
I won’t explain this in detail, as it’s different on each router.
It can be in the DHCP settings or the DNS settings.
For me, it’s in the DNS settings.
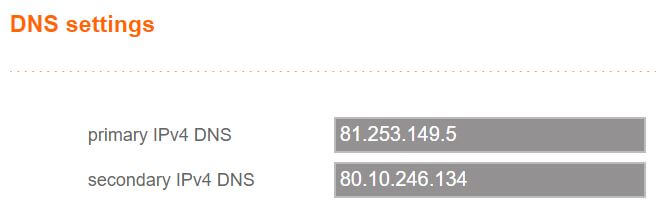
The only thing to do is to remove all values and set the primary DNS server as 192.168.1.17.
That’s my Raspberry Pi IP address, so remember to set it with your own.
Don’t set a secondary IPv4 DNS server, except if you have two Raspberry Pi with Pi-Hole on your network.
It's a free PDF guide containing every Raspberry Pi Linux command you should know!
Download now
This way, any device using DHCP will now use the Pi-Hole ad-blocker from your network as a DNS server.
It can take a few hours to update the device settings on all devices, be patient, or disconnect/reconnect them manually.
Static Configuration
If you don’t have access to these settings or want to make a try first, you can edit only your computer settings:
On Windows 10:
- Right-click on the “Start Menu” and choose “Network Connections”.
- Then click on “Change adapter settings”.
- Right-click on your current connection and choose “Properties”.
- Double-click on “Internet Protocol Version 4 (TCP/IPv4)”.
- Set the DNS server to static and enter your Raspberry Pi IP Address.
Keep the secondary DNS server empty.
On Windows 11:
- Open the system settings from the main menu.
- Click on “Network & Internet”.
- Find your current connection (Wi-Fi or Ethernet) and click on it to view the settings:

- Click on “Edit” to change the DNS server, and set it to your Raspberry Pi IP address.
- Save and exit, the ad blocker should be active now.
On Linux and Mac OS:
- If you have a graphical interface, you’ll find the network settings in the System Preferences.
- If not, you can edit the /etc/resolv.conf file and replace the current DNS server with the Raspberry Pi IP address.
On mobile, it’s in your Wi-Fi settings.
Click details or edit the network on a network to see the DNS configuration.
Pi-Hole Web Interface
Pi-Hole comes with an excellent web interface, let’s check it out now.
First Login
To access the web interface, open your browser and go to http://<RASPBERRYPI_IP>/admin.
In my case, it’s http://192.168.1.17/admin.
If you didn’t note the IP address during the installation wizard, you can find it with “ifconfig.”
Warning: Pi-Hole will use the HTTP port (80) by default. If you already had a web server on your Raspberry Pi, you need to change the port for one of them.
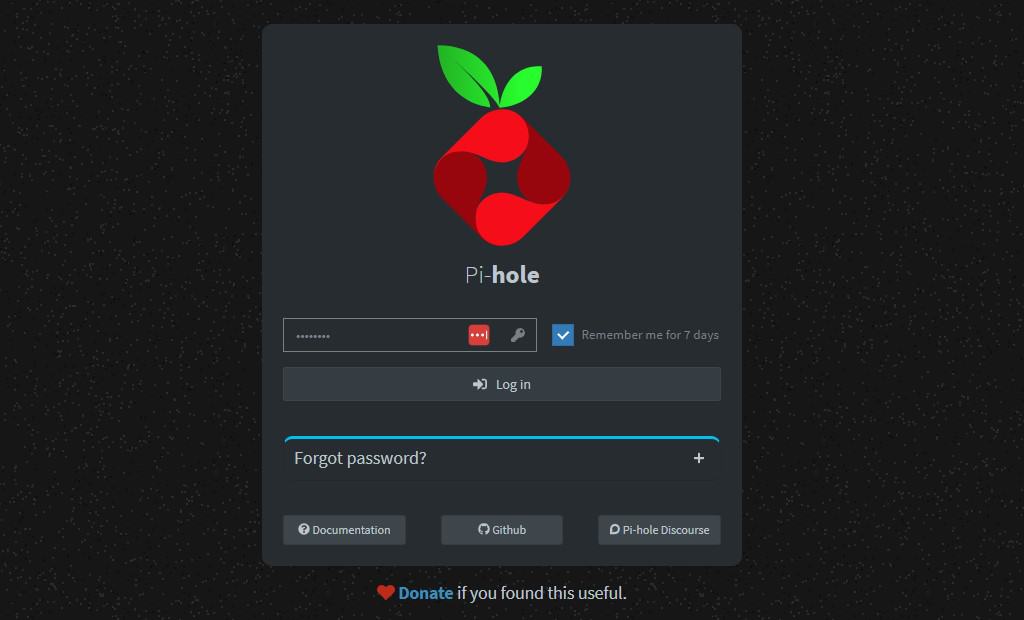
Once on the web page, click Login and enter the password you got previously.
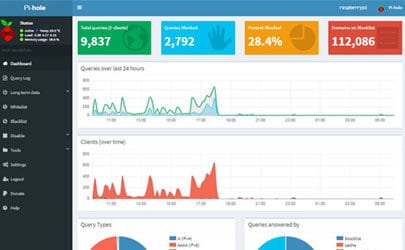
If everything is correct, you’ll get something like this:
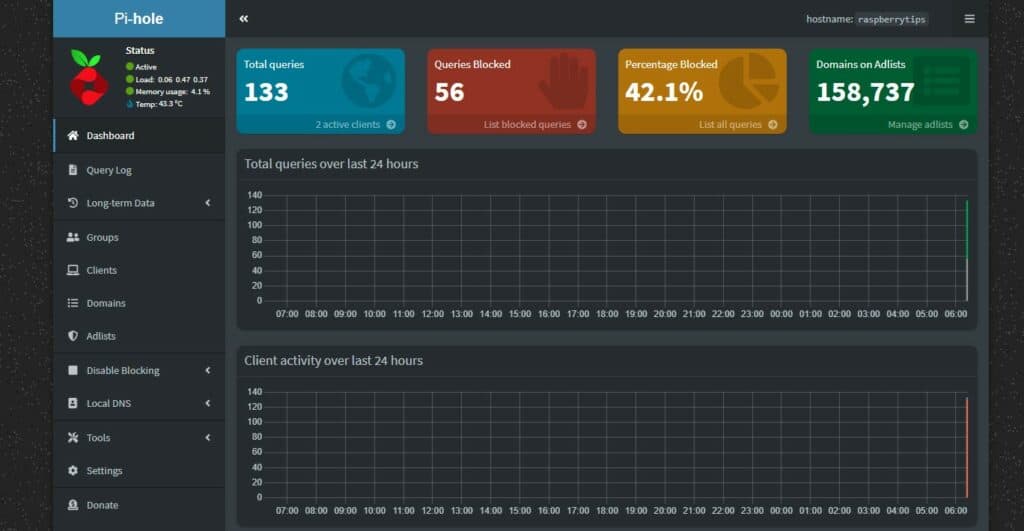
On this page, you can see all the statistics about your Internet usage:
- Total queries: the number of requests you have made.
- Queries blocked: the number of requests blocked.
- Percent Blocked = queries blocked / total queries.
- Domains on Blacklist: the number of domain names you have on the blacklist.
There are also graphs about queries and clients’ evolution in recent hours.
Two pie charts show data about query types.
And below (we don’t see it in the picture), it lists the top domains and top blocked domains, and the same thing for clients.
That’s pretty cool, and it’s only the first page.
Menu sections
In the main menu you’ll find links to the other pages and sections:
- Dashboard: the page we just saw.
- Query Log: if enabled, all the queries you made and if Pi-Hole blocked them or not.
- Long-term data: the dashboard shows data from the last 24 hours, but in this section, you can specify the date range.
- Whitelist: here you can add domains to the whitelist (if they are on a blacklist and you don’t want to block them). For example, I use Google Analytics for this website, and it’s on the blacklist, so I added the URL here.
- Disable: Sometimes you may need to disable Pi-Hole for a few minutes or permanently to do something specific on your computer. This is where you can do it.
- Tools: a bunch of tools to debug Pi-Hole. I will let you discover this part.
- Settings: all the configuration menus, which we’ll come to in the next paragraph.
- Log out / Donate / Help: these should be clear.
If you have any questions about one menu item, leave a comment in the community and I’ll try to help you.
Settings
Let’s look especially at the settings part now.
When you click on the “Settings” menu item, you’ll get 6 tabs with settings forms:
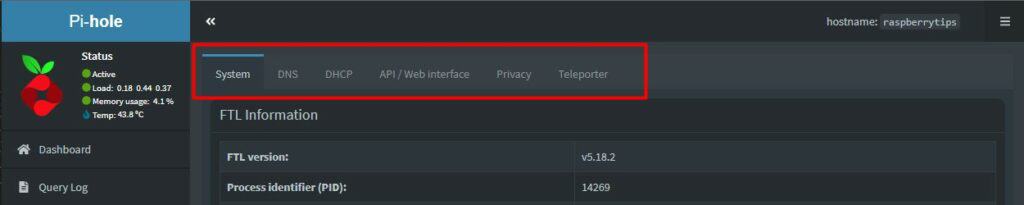
You can edit here all the things you previously chose in the installation wizard.
- System: In this first tab, you can check information about the network and the Pi-Hole version and usage. You also have a “Danger Zone” to restart services, reboot Raspberry Pi, or clear logs.
- DNS: DNS tab is where you can change your DNS providers and configure more advanced DNS settings.
- DHCP: This tab allows you to enable a DHCP server on Pi-Hole. That’s another way to configure clients if your current router doesn’t do this. Don’t forget to disable the old DNS server if you want to try this.
- API / Web interface: The next tab is for various settings about the interface. You can mask domains for the dashboard and customize the interface display.
- Privacy: In this tab, you can change the privacy level we saw in the installation wizard to increase or decrease the privacy level on the interface.
- Teleporter: Finally, what they call “Teleporter” is just an Import/Export tool, to move the configuration from one Raspberry Pi to another.
Pi-Hole Tips
Before ending this tutorial, you need to know a few other things about Pi-Hole.
Updating the Blacklist
As you can guess, domain blacklists change every day.
Like antivirus software, you need to update them regularly to maintain good protection.
To do this, go to Tools > Update Gravity and click on Update.
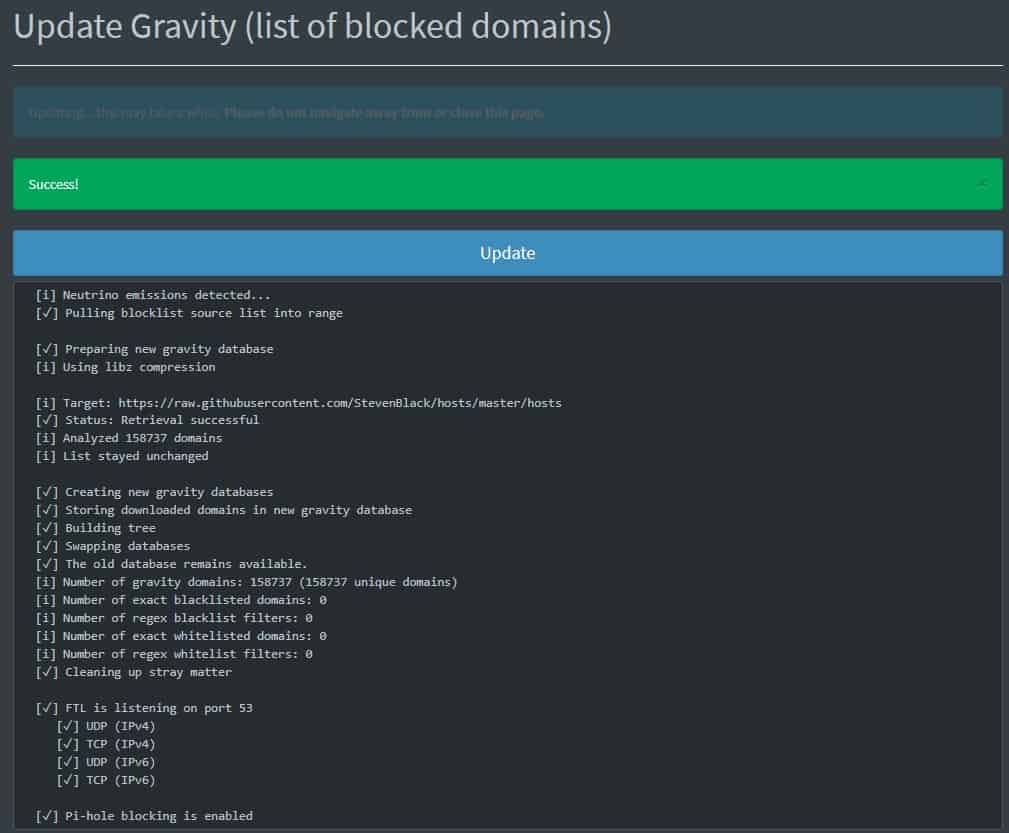
Pi-Hole will download each blacklist file from the specified sources and reload the configuration.
Updating the Software
The other thing you need to update is the software.
Pi-Hole is releasing updates and fixes regularly, so you need to update it.
To do this, the procedure is simple:
- Connect to your Raspberry Pi via SSH.
- Type this command:
sudo pihole -up
- You’ll get something like this:
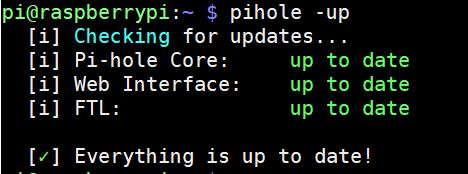
- In my case, I’m already up to date, but if there is an update, you’ll see it here.
Related Questions
Is there a way to use Pi-Hole to block more than ads domains?
From the Pi-Hole interface, you can add custom domain names and lists. So, you can use it to block any domains: not safe for kids, specific domains, or websites known to install malware.
What can I do if it blocks a useful website?
If you have websites that you often use not working after the Pi-Hole configuration, you can add the domain name in the whitelist menu to unblock it.
It's a free PDF guide containing every Raspberry Pi Linux command you should know!
Download now
Video
It's a free PDF guide containing every Raspberry Pi Linux command you should know!
Download now
Reminder: Remember that all the members of my community get access to this website without ads, exclusive courses and much more. You can become part of this community for as little as $5 per month & get all the benefits immediately.
Conclusion
That’s it, you know everything you need about how to install Pi-Hole on Raspberry Pi.
I hope this will help you remove ads and block undesired domains.
If you have any other questions, leave a comment in the community, and I’ll try to answer you.
Thanks to share this post by using the buttons below!
Whenever you’re ready, here are other ways I can help you:
The RaspberryTips Community: If you want to hang out with me and other Raspberry Pi fans, you can join the community. I share exclusive tutorials and behind-the-scenes content there. Premium members can also visit the website without ads.
Master your Raspberry Pi in 30 days: If you are looking for the best tips to become an expert on Raspberry Pi, this book is for you. Learn useful Linux skills and practice multiple projects with step-by-step guides.
The Raspberry Pi Bootcamp: Understand everything about the Raspberry Pi, stop searching for help all the time, and finally enjoy completing your projects.
Master Python on Raspberry Pi: Create, understand, and improve any Python script for your Raspberry Pi. Learn the essentials step-by-step without losing time understanding useless concepts.
You can also find all my recommendations for tools and hardware on this page.


Dear Patrick,
When I try to access the web interface I get “This site cant’ be reached” error. I do not know how to fix this. Can you please help me?
Hi,
Make sure you enabled it during the installation.
You can also try a reboot.
Except that I have no idea :/
Using static configuration for my laptop doesn’t seem to work as it doesn’t seem to show up on the web interface. The reason I had to try static configuration is my internet provider is xfinity and they don’t allow customers to edit dns settings on their routers. But I have heard that getting a second 3rd party router would be a way to bypass this. Does this sound feasible?
Hi,
Not sure to understand what you mean by “static configuration”. DNS or just IP?
You should be able to set the DNS to Pi-Hole on your computer(s), no matter what your provider allows you to do or not.