

Can You Play Quake 3 on a Raspberry Pi? And how?
Quake 3 is a first-person shooter released in 1999 that many people of my generation remember as the beginning of a new era for video games on personal computers. But running Quake 3 on random devices is also a running joke on social networks, can it run Quake 3? Let’s try it on a Raspberry Pi.
Quake 3 can be easily installed on Raspberry Pi by finding quake3 in the package manager. However, some additional steps are required to get it running properly after installation.
In this tutorial, I’ll explain in a few words what Quake 3 is and what you can expect on Raspberry Pi, before showing you all the steps to install it and play this game on your system.
If you’re looking to quickly progress on Raspberry Pi, you can check out my e-book here. It’s a 30-day challenge where you learn one new thing every day until you become a Raspberry Pi expert. The first third of the book teaches you the basics, but the following chapters include projects you can try on your own.
What is Quake 3?
Presentation

Quake 3 Arena is a first-person shooter that was one of the first to introduce bots controlled by artificial intelligence. This technology made the games much more interesting. The game takes place in a sci-fi universe with arenas for up to 16 players per map, where each player chooses a character.
All players start with the same weapons, but can find new weapons as they move around the map.
Quake 3 features multiple game modes: Solo vs. Bots, local play, and even multiplayer online.
In addition to the Arena and single player campaign, there are also game modes such as Flag Capture and Team Play.
History
Quake 3 is a mythical game of the 2000s, released in 1999 for PC, Dreamcast and PS2.
Most importantly, it had delighted video game critics and satisfied many gamers, who continued to play it for years.
This game has always been an icon for gamers. Therefore, many projects have made it possible to play it on other platforms.
Get a list of my 24 favorites games (with links) to play on Retropie, Recalbox or Lakka
Download now
Later, it was possible to play Quake 3 on Xbox 360, Nintendo DS, PSP, and even iPhone.
It makes sense that Quake 3 would be available on Raspberry Pi.
On Raspberry Pi
In August 2011, a post appeared on the Raspberry Pi blog showing this video of Quake 3 running on Raspberry Pi for the first time. Here is the original video:
Since then, things have evolved, and installing Quake 3 is no longer a scientific experiment.
It has become relatively easy over time. So let’s see how to install it on your Raspberry Pi.

Join Our Community!
Connect, learn, and grow with other Raspberry Pi enthusiasts. Support RaspberryTips and enjoy an ad-free reading experience. Get exclusive monthly video tutorials and many other benefits.
Learn moreDon’t expect anything amazing, because the Raspberry Pi is still a miniature PC, and therefore its primary goal is not necessarily to run video games in 3D.
But it’s a small project that we’re proud to be able to do on such a small computer, and I’m going to explain how you can do it.
How to install Quake 3 on a Raspberry Pi?
The easiest way to install Quake 3 on Raspberry Pi is to do the initial installation with the package manager, and then fix the startup error with a command line.
Prerequisites
While I first tried running Quake 3 on my Raspberry Pi 3B+ (and wrote the first version of this tutorial for it), I recently re-tested it on the Raspberry Pi 5, and the results are much better.
So if you have one, or can afford one, try using the latest Raspberry Pi model for this test, you’ll be much happier with the results.
From the desktop
Installing from the desktop could have been straightforward, but there’s one little tip I need to give you.
Start by following a typical software installation :
Get a list of my 24 favorites games (with links) to play on Retropie, Recalbox or Lakka
Download now
- Go to Preferences > Add/Remove Software.
- Type “quake3” in the search engine.
- Tick the “Quake 3 Arena menu entry and launcher scripts” in the list:
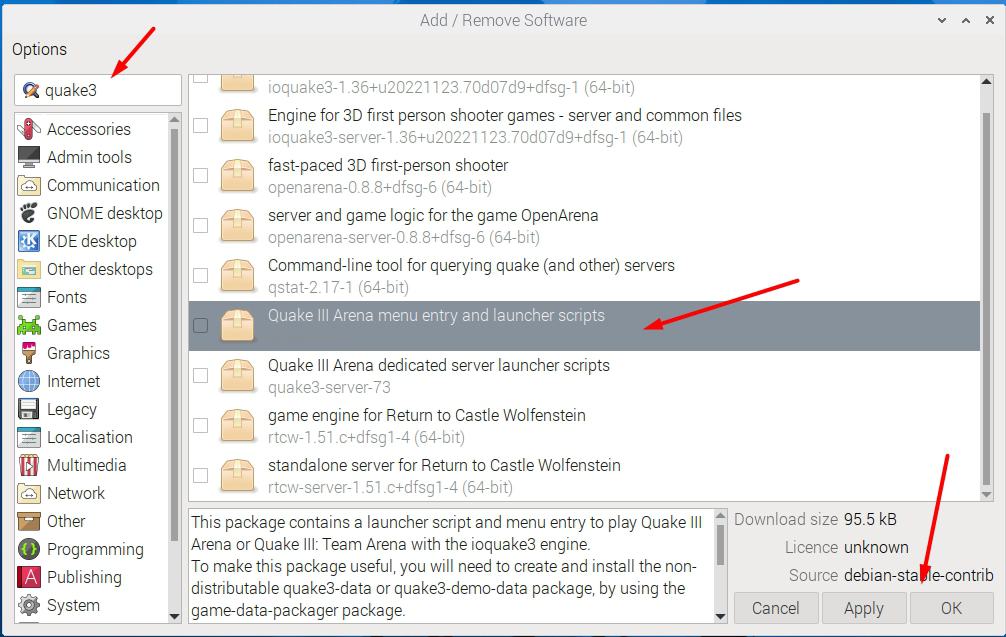
- Install it by clicking Ok at the bottom of the window.
- Confirm by entering your password (raspberry by default).
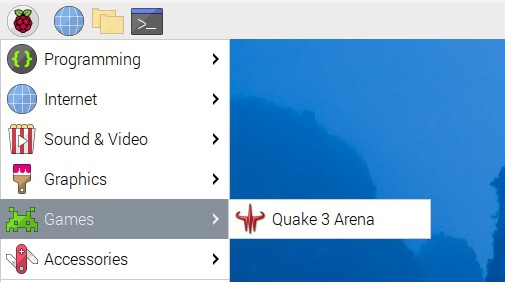
- Quake 3 is now available in the main menu :
But if you run it now, it will not work due to the following error:
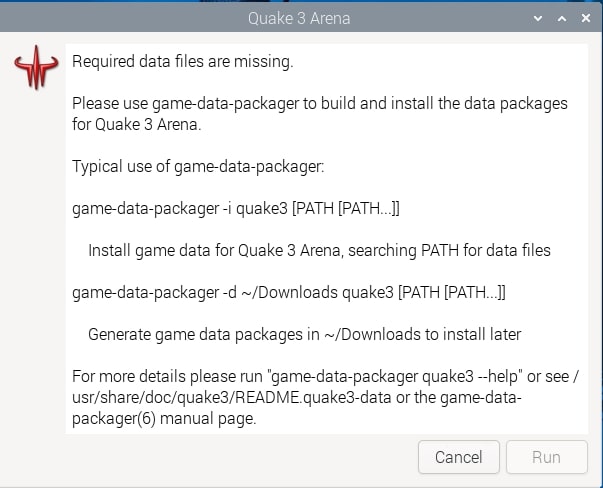
Required data files are missing,
Please use game-data-packager to build and install the data packages for Quake 3 Arena
What you need to do to fix this error, is to open a terminal and run the following command:game-data-packager quake3 -i
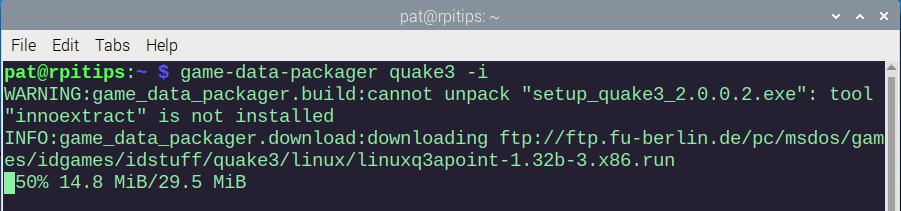
This command will download and build the missing files for Quake 3.
It will take a few minutes to compile, but then the game will run properly.
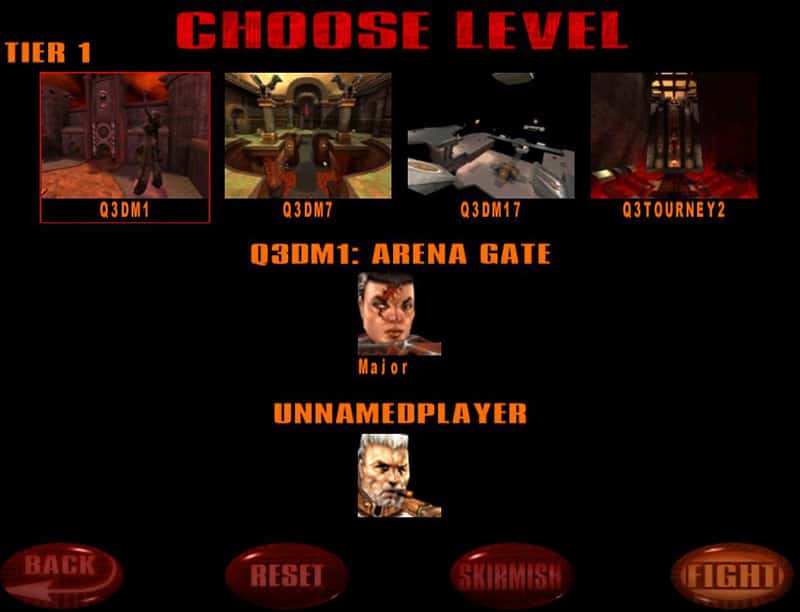
At the end of this command, return to the start menu, launch Quake 3, and you’ll get the menu:

That’s it, you can now play Quake 3 directly on your Raspberry Pi, without any complicated setup.
Are you a bit lost in the Linux command line? Check this article first for the most important commands to remember and a free downloadable cheat sheet so you can have the commands at your fingertips.
It's a free PDF guide containing every Raspberry Pi Linux command you should know!
Download now
How to play Quake 3?
Now that you’ve successfully installed Quake 3 by using any of these methods, let me show you a few tips to get you started.
The first thing you need to know is that, like any game like this; you will need speed and accuracy. Often, with Raspberry Pi, we do not necessarily have the required equipment.
I strongly recommend you to have a controller or at least a correct keyboard and mouse. It’s useless to play without the proper equipment; you will not take any pleasure.
Second thing, take a first look at the options to configure the game to match what you want
From the main menu, choose “Setup”, and you will then have several options:
- Player
- Here you will find everything to customize your character
- Controls
- To configure the keys corresponding to the actions of the game (take a look if you have a specific controller)
- System
- To manage graphics, display, sound and network options
- Game options
- Various game settings, not very useful for the first time you play
- CD keys
- If you have a valid license key, you can activate it here
- Default
- To reset all options to default
I recommend you at least to check the commands and configure the graphics options to have a correct but fluid display.
Then start a single player game with the lowest difficulty mode, see how it works, and return to the options if needed:
Remember that the Raspberry Pi is not a video game PC, so it may be necessary to review your ambitions and reduce the level of graphics to play optimally.
On Raspberry Pi 5, it works pretty well, but on older models it was not the same thing 🙂
It's a free PDF guide containing every Raspberry Pi Linux command you should know!
Download now
Want to chat with other Raspberry Pi enthusiasts? Join the community, share your current projects and ask for help directly in the forums.
Video
If you need a more step-by-step demonstration, I have recorded a video on the topic. You can watch it here if you want :
Check the RaspberryTips YouTube channel to receive new videos in your feed :
There are many old games available on Raspberry Pi (from different game consoles), which allow you to turn your Raspberry into a retro gaming console.
Check these related posts if you are interested:
- Play recent PC games on Raspberry Pi (Steam)
- 12 recommended games on Raspberry Pi (Retropie)
- How to play PlayStation games on Retropie?
Whenever you’re ready, here are other ways I can help you:
The RaspberryTips Community: If you want to hang out with me and other Raspberry Pi fans, you can join the community. I share exclusive tutorials and behind-the-scenes content there. Premium members can also visit the website without ads.
Master your Raspberry Pi in 30 days: If you are looking for the best tips to become an expert on Raspberry Pi, this book is for you. Learn useful Linux skills and practice multiple projects with step-by-step guides.
The Raspberry Pi Bootcamp: Understand everything about the Raspberry Pi, stop searching for help all the time, and finally enjoy completing your projects.
Master Python on Raspberry Pi: Create, understand, and improve any Python script for your Raspberry Pi. Learn the essentials step-by-step without losing time understanding useless concepts.
You can also find all my recommendations for tools and hardware on this page.


Hello! The Github solution is the only one that I’d recommend out of the three. The other two solutions, while faster to setup, install an unplayable build of Quake 3. Even the menu screen that you have pictured is glitchy, and runs at such a low framerate that you can barely move the mouse.
I hope that the first two options are fixed, because they are far easier and quicker to setup. But if you want an actual playable version of Quake 3, go with the Github option.
hello, could you fix supertuxkart, because from the forum it doesn’t work out how to fix it from raspbian
in spanish: hola, lo arregle segun el codigo de github pero no muestra las letras; como cambio a 126 lo maximo de texturas?
Hello,
I just updated this post
It’s working very well now on Raspberry Pi 4 and the installation is faster
The installation didn’t change so much, but the GitHub solution is not working “currently”
I’m not sure if it will be fixed, as the security notice is from June 2019
Thank you for mentioning that it works well (now) on Raspberry Pi 4.
Since I have bought the Raspberry Pi 4, I have felt that I have wasted my money on the Pi 4.