Kivy on Raspberry Pi: Installation and First Steps in Python
Kivy is one of those Python libraries that allow you to build graphic interfaces in Python. Instead of having 10 scripts that you run from the terminal (which is a bunch of parameters), you can create an interface with a form or a few buttons to make the app easier to use.
Coding your Python project with Kivy might be great for the end user, but unfortunately, it’ll be a completely new challenge for you, the developer. It’s not installed by default on Raspberry Pi, and using this framework will quickly make your code more complicated.
That’s why I’m writing this article. I want you to succeed, so after a short introduction, I’ll explain how to install Kivy on your Raspberry Pi and use this library to add the first elements to your application.
By the way, if you get overwhelmed as soon as Python is required for a project, I recommend checking out my e-book “Master Python on Raspberry Pi“. It will guide you step-by-step to learn the essential concepts (and only the essential concepts) required to achieve any project in the future. Raspberry Pi without Python is like a car without an engine, you miss all the fun parts. Get 10% off by downloading it today!
Introducing Kivy
What is Kivy?
Kivy is an open-source Python library, created to build graphic user interfaces (traditional applications on a desktop environment).
As with other alternatives (PyQt, Tkinter, etc.), it allows you to build a visual interface for your project. Maybe it’s a button to click to open the garage door instead of a random script you run manually, or a sensor value that is displayed in real-time inside the app.
But Kivy is like the ultimate library to create GUIs. It’s more modern than the other solutions I mentioned. You can build cross-platform applications, with advanced features like multitouch or gesture-based interfaces.
When should you use it?
You can basically use Kivy for all your projects requiring a graphic user interface. But from my short experience with it, it’s not always the best option.
If you just want to create an interface for your own usage (or even a few users), where a minimalist industrial design is fine, then PyQt and other libraries are probably a better choice. They are easier to use, and you won’t be using the advanced features included in Kivy.

Join Our Community!
Connect, learn, and grow with other Raspberry Pi enthusiasts. Support RaspberryTips and enjoy an ad-free reading experience. Get exclusive monthly video tutorials and many other benefits.
Learn moreI have a tutorial about PyQt available on this website if you want to compare. If you check the example, you’ll quickly see that it’s easier to use. You need fewer dependencies, and you don’t have to use classes or concepts that might be a bit more abstract or complicated for non-developers.
If like me, you always mix the languages syntax, download my cheat sheet for Python here!
Download now
Kivy is a decent choice if you already have a good level of understanding of Python, and that you want to use some of the advanced features (touchscreen support for example).
Goal of this article
To be clear, the goal of this article is mainly to get you started on Raspberry Pi. This means installing the library and creating your first app with Kivy.
Kivy is a gigantic library, requiring a good level of Python. I can’t explain everything in only one article.
By the end of this article, you’ll have everything set up, with a basic app running, and from there you can follow the online documentation or other tutorials to build the interface for your project.
If you need a refresher in Python before going further, I have several articles you might find useful:
- How to Learn to Program in Python with a Raspberry Pi?
- The 7 Best Text Editors for Programming on Raspberry Pi
- How to Install and Use Python Packages on Raspberry Pi?
It's a free PDF guide containing every Raspberry Pi Linux command you should know!
Download now
Install Kivy on Raspberry Pi
Kivy can be installed with PIP on Raspberry Pi. You just need to install a few dependencies first.
Prerequisites
I tested this on a fresh installation of Raspberry Pi OS (Bullseye), so it might be slightly different depending on your operating system. But you’ll probably need (at least) these packages to install Kivy:sudo apt update
sudo apt install libsdl2-dev libsdl2-image-dev libsdl2-mixer-dev libsdl2-ttf-dev
Once done, you have two options:
- If you have Thonny and are used to it, you can use its plug-in manager to install Kivy from the interface. (I have a Thonny tutorial here if not).
- Or you can do the same thing in command lines from a terminal (or via SSH).
Are you a bit lost in the Linux command line? Check this article first for the most important commands to remember and a free downloadable cheat sheet so you can have the commands at your fingertips.
Install Kivy with Thonny
Most people don’t know this, but Thonny has two interface “themes”:
- The default one: is minimalist, with only a few buttons, which is great for beginners.
- The regular mode: with all the menus and options you might expect from a text editor.
When you switch to the regular mode, there is a package manager, allowing you to install Python libraries in one click (in fact there is even a third mode, but we’ll see that another day).
Click on “Switch to regular mode” in the top-right corner and follow these steps:
- Open the “Settings” menu.
- Click on “Manage plug-ins”.
- Type “kivy” in the search engine, and click on “Search on PyPi”.
- You’ll get the result in a window looking like:
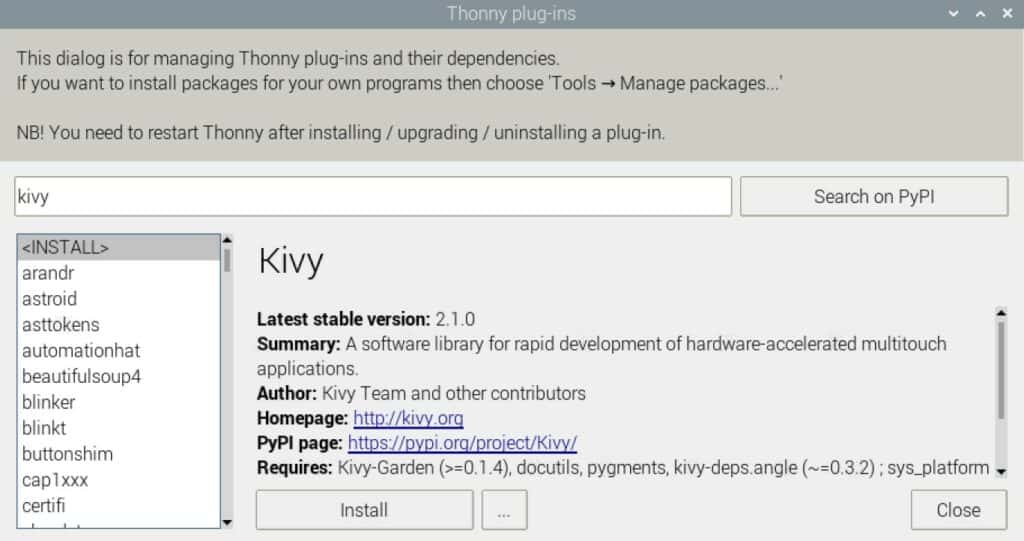
Click on “Install” and wait a few seconds. The library will be installed automatically.
You are ready to use Kivy on your Raspberry Pi, you can skip the next part.
Note: If you want to get back to the simple mode in Thonny, you can change this in “Tools” > “Options” > “UI mode”.
Install Kivy from the terminal
The other option is to install Kivy from a terminal. Thanks to the “pip” command and repository, it’s not that complicated.
If like me, you always mix the languages syntax, download my cheat sheet for Python here!
Download now
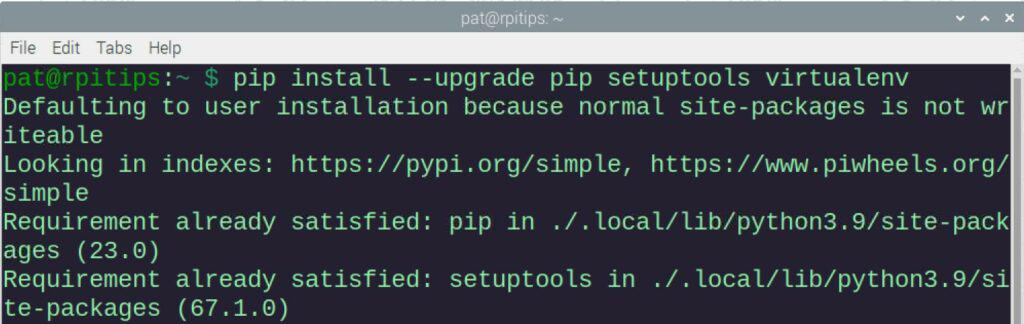
In most cases, you’ll need these requirements, and make sure they are up-to-date, by using:pip install --upgrade pip setuptools virtualenv
I don’t use virtualenv for this tutorial, but most examples in the online documentation are using it.
You can then install Kivy with:pip install "kivy[base]" kivy_examples --no-binary kivy
Kivy is a pretty big library, with many dependencies, it might take a while if you are trying this on an old model. Just be patient here.
Note: I got a weird error when trying this the first time. I tried again without the “–no-binary option” and it worked. I don’t know if it was a temporary issue or what, but at least you know what you can try if you also get an error.
It's a free PDF guide containing every Raspberry Pi Linux command you should know!
Download now
Reminder: Remember that all the members of my community get access to this website without ads, exclusive courses and much more. You can become part of this community for as little as $5 per month & get all the benefits immediately.
Getting started with Kivy on Raspberry Pi
Once Kivy is installed on the Raspberry Pi, using it won’t be different from using it on any other device or operating system. As explained previously, my goal here is just to get you started. So let’s see two examples to make sure everything is working as expected.
Hello world!
“Hello world” is like the typical line of code you use when learning a new language. The idea is to create the simplest script possible to see how it works. That’s basically the idea here.
But with Kivy, even showing an empty window with a line of text is not that straightforward.
Here is the code sample you can copy into your favorite text editor:
from kivy.app import App
from kivy.uix.label import Label
class TestApp(App):
def build(self):
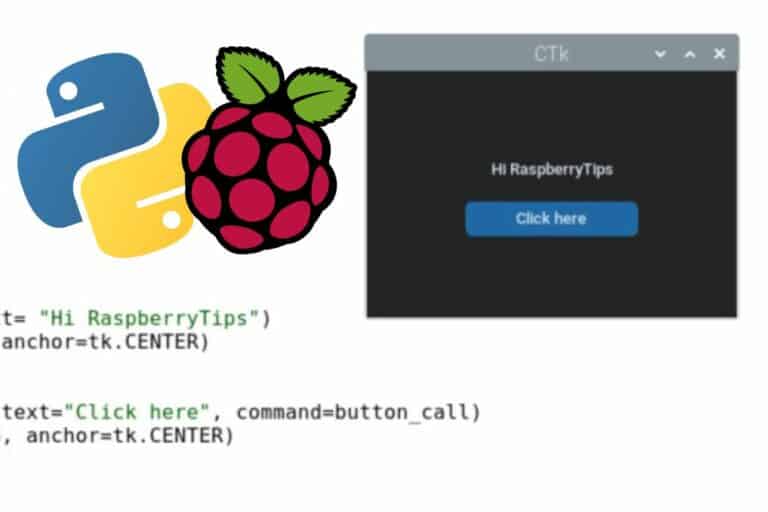
return Label(text='Hello RaspberryTips')
if __name__ == '__main__':
TestApp().run()We start by importing the App and Label classes from the library. The “App” is the main object we’ll use to create the interface, and “Label” is used to show text inside the app.
As you can see, even for the simplest example, we create a new class (“TestApp”) where we build the interface. It’s good practice when you use this library, so let’s do this directly.
If you are not used to object-oriented programming, you might need to level up your Python skills before going further.
Anyway, if you paste this code in Thonny and run it, you’ll get something like:
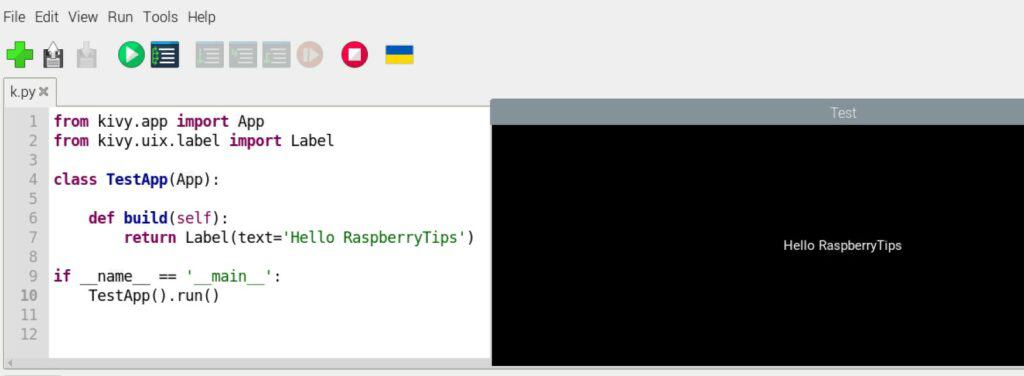
Not that impressive, right? It will create a black window with your text in the middle.
Add new elements
But Kivy can do way more than that. In most cases, you’ll at least need to add a button in your app, and probably play a bit with the interface design. That’s the goal of this second example.
The idea in this example is to:
- Have a text (label) and a button.
- Pressing the button will run a specific piece of code (a function).
You can create a button by doing something similar to the label we have seen earlier.
You just need to import the “Button” class and create a new object with it, passing the button text as an argument. - We’ll place the text and the button on a grid, to choose where all elements are displayed.
There are different ways to handle the design, here we’ll use the “GridLayout” class, and build a simple interface with two lines (the label + the button).
Kivy names the elements as “widgets”.
Here is the complete code, doing exactly what I just explained:
from kivy.app import App
from kivy.uix.gridlayout import GridLayout
from kivy.uix.label import Label
from kivy.uix.button import Button

def button_pressed(instance):
    print('Button '+instance.text+' pressed')

class MainWindow(GridLayout):

    def __init__(self, **kwargs):
        super(MainWindow, self).__init__(**kwargs)
        self.rows = 2
        self.add_widget(Label(text='Hello RaspberryTips'))
        button = Button(text='Click here')
        button.bind(on_press=button_pressed)
        self.add_widget(button)

class TestApp(App):

    def build(self):
        return MainWindow()

if __name__ == '__main__':
TestApp().run()- We still have our “TestApp” class, but instead of building everything in it, we do it in another one (“MainWindow”) derived from the GridLayout class.
- In this “MainWindow” class, we initialize the window with two rows, and we add the two widgets in it (the label and the button).
- We can bind the button to a specific action for each event.
In this case, we tell the app to run the function “button_pressed()” when the button is pressed (yeah, I’m very creative with my functions and class names!).
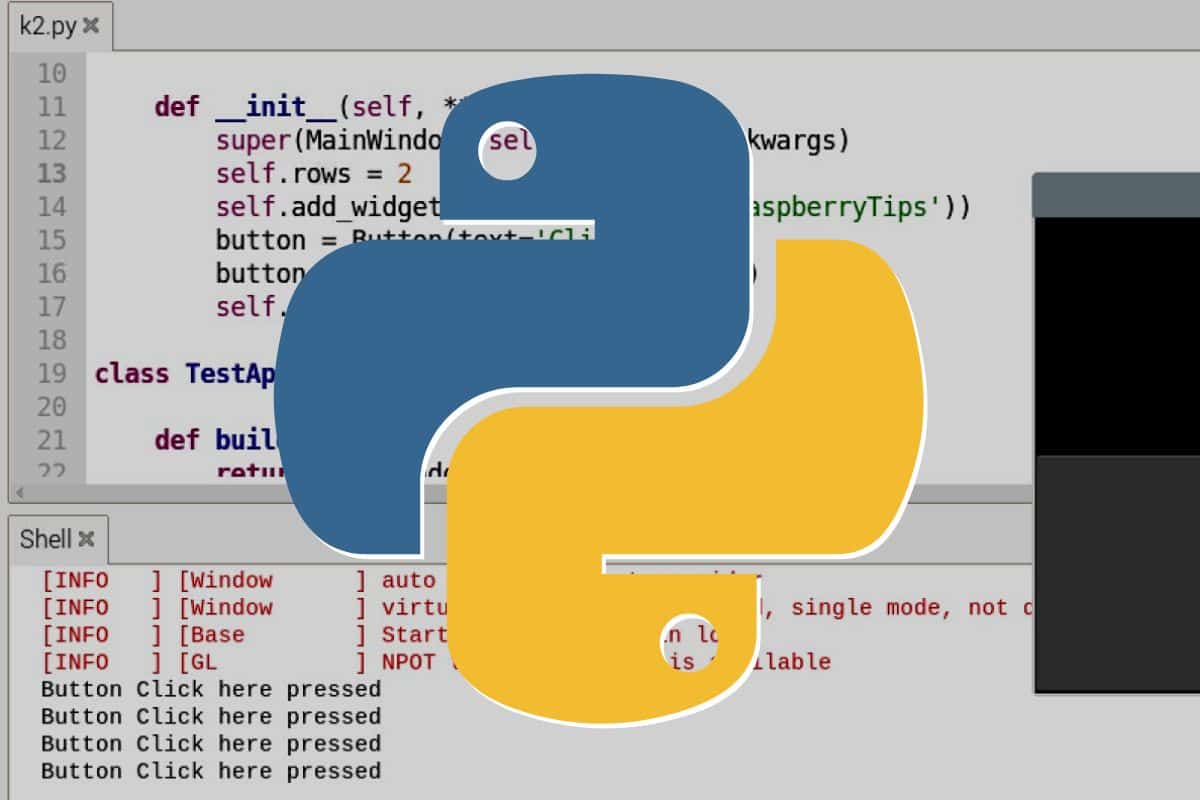
If you run the code now, it looks like:
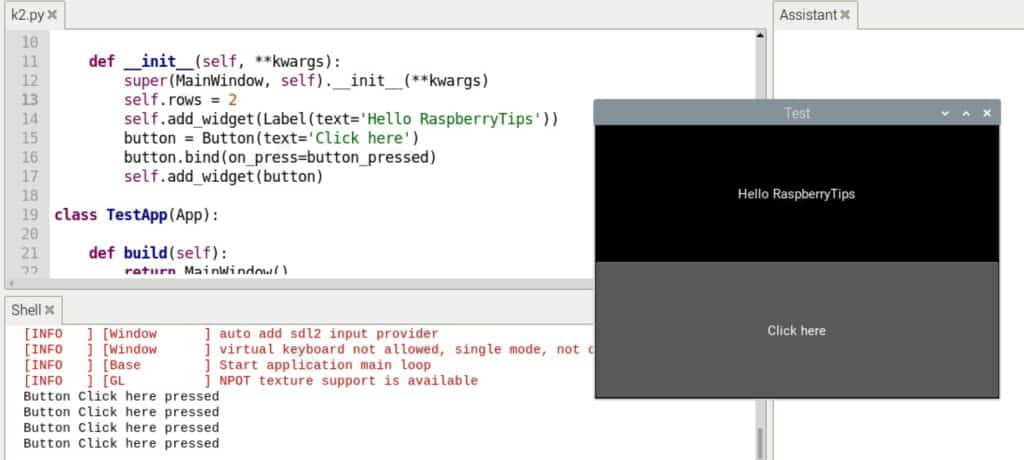
Not the most beautiful interface at all, but the idea is just to get started quickly here.
And, as you can see in the “Shell” frame when I click the button, the text “Button Click here pressed” is displayed, meaning my function has been executed.
I recommend playing with this basic script to see how you can do something more useful based on it.
I think it’s also a good time to start checking the documentation and see how you can do little changes in this example. For example, how would you have two buttons? How can you change the label colors (background and font)? What if you want two columns instead of two rows?
That’s the best way to learn, I think. Starting from a basic example and improving it step-by-step from there. And if you can apply a real need to it, it’s even better (maybe you can display the temperature on the label and run or stop the fan when clicking the button?).
Going further with Kivy
Even if Kivy is not the easiest Python library you can use to build interfaces on your Raspberry Pi, it’s really powerful, and if you have serious projects on your todolist, it’s clearly something to consider.
Hopefully, they have a great website, with extensive documentation and many examples to give you a better idea of the potential. Here are the links you should check to go further with Kivy:
- Kivy documentation: You can follow the documentation step-by-step, but you can also use the search engine to quickly find something.
For example, if you search “button” and open the documentation for “kivy.uix.button”, you’ll see the options available to listen to another event (on_release) or change the background color. - Kivy gallery: They also have a gallery available on their website, featuring remarkable projects built with Kivy. They don’t always include the source code, but anyway, it’s a great way to get inspiration.
And if you want to check other options, you can find my favorites here:
The Best Python GUI Libraries for Raspberry Pi to Try Out
Whenever you’re ready, here are other ways I can help you:
The RaspberryTips Community: If you want to hang out with me and other Raspberry Pi fans, you can join the community. I share exclusive tutorials and behind-the-scenes content there. Premium members can also visit the website without ads.
Master your Raspberry Pi in 30 days: If you are looking for the best tips to become an expert on Raspberry Pi, this book is for you. Learn useful Linux skills and practice multiple projects with step-by-step guides.
The Raspberry Pi Bootcamp: Understand everything about the Raspberry Pi, stop searching for help all the time, and finally enjoy completing your projects.
Master Python on Raspberry Pi: Create, understand, and improve any Python script for your Raspberry Pi. Learn the essentials step-by-step without losing time understanding useless concepts.
You can also find all my recommendations for tools and hardware on this page.