9 Raspberry Pi Projects to Learn Linux, Coding & Networking
Over the years, I’ve learned more about Linux, Python, and networking by building Raspberry Pi projects than I ever would have by memorizing commands and theory. Once you have a real project to work on, the concepts stop feeling abstract and start making sense.
Raspberry Pi is an excellent educational tool. It can help you learn Linux and build valuable skills such as system management, coding, networking, and more.
I’ve selected 9 Raspberry Pi projects that are useful for learning, not just for the final result. They cover Linux, networking, coding, automation, Docker, AI, and even robotics, so you can choose one based on what you want to learn next.
If you’re looking for inspiration for your next Raspberry Pi project, I’ve put together a list of 75+ ideas with full descriptions, difficulty ratings, and links to tutorials. Whether you’re a beginner or more advanced, there’s something here for you. Grab the list for free here!
NAS With Automated Backups
Store, share, and automatically back up your files.
What You’ll Learn
Difficulty: Medium
Time Required: 2-3 hrs
I store a lot of files on Network Attached Storage (NAS), which is a bunch of hard drives connected to my local network. This lets me share files around my home or office, which is quite convenient.
Read next: 15 Easy Projects for Raspberry Pi Beginners
Most commercial NAS devices use RAID configurations to keep your important files safe in case of any hard drive failure. However, if you are looking for a cheaper alternative, you can build a NAS with a Raspberry Pi and an automated backup script to keep your important files safe.

To build a NAS, you can use tools like OpenMediaVault or Nextcloud. These tools do most of the heavy lifting themselves and can help you set up a NAS without any technical knowledge.
Alternatively, if you want to get into the technical stuff, you can manually create a file-sharing solution by using Samba. With Samba, you will need a good understanding of the Linux file system and command line. But I think it provides the maximum educational value.
You can get answers from real experts in minutes.
Get help with your setup
To add more storage space to a Raspberry Pi, I usually pair it with either a portable hard disk or an NVMe SSD.

For the backup part of the project, you can use tools such as rclone for cloud backups, rsnapshot for incremental backups on local or network storage, or the simple rsync to create your own backup solution.
The advantage of creating your own NAS storage and backup solution is that you can assign backup priorities and schedules to different file types.

I think this is a great project to try; besides being an extremely productive and cheap solution, it offers plenty of learning opportunities to help you get familiar with network file sharing and Linux file systems.
Check this: Should you wait for Raspberry Pi 6?
Related Articles
- Pi NAS: A Guide to Build Your Own Budget-Friendly NAS
- How to Turn a Raspberry Pi into a File Server?
- Top 10 Raspberry Pi Backup Tips to Keep Your Data Safe
- How to Use rsnapshot for Incremental Backups on Raspberry Pi
Hosting Your Own Website
Host a website and learn how the web works.
What You’ll Learn
Difficulty: Hard
Time Required: 5-11 hrs
Another cool project I recommend for people looking to get into Linux programming and networking is hosting your own website. Since the Raspberry Pi is designed to run Linux (Raspberry Pi OS), it’s a great option for a server that hosts your website.
A few components come into play when hosting your website. First, we need to choose a web server to host our website. The two popular choices are Nginx and Apache. In addition to the web server, we also need a database management tool like MySQL and a backend solution like PHP.

However, these are only a few of the options available. In fact, you can use many different types of software stacks to develop and host your website.
In my opinion, choosing which stack to use is probably the most important and fun part of development itself. Each stack consists of four main elements:
- Web server – The software that handles HTTP requests, such as Nginx or Apache.
- Frontend – The user-facing element of the website. You define what the website looks like and where images and buttons appear. You can use HTML, CSS, and JavaScript, often with React, Vue, or Angular to develop your frontend.
- Backend – The code that defines how your website behaves and defines what happens when someone clicks a button. Common backend technologies include Node.js, Python, PHP, or C#.
- Database – This stores application data, such as variables your application needs. Many database management tools are available, such as PostgreSQL, MySQL, MongoDB, or SQLite.
Once you select your stack and develop the code for your website, you should be able to access it in any web browser using your Raspberry Pi’s IP address.
Check this: Don't buy a new SD card until your read this.
However, this webpage will only be accessible from your home network. To access this webpage from anywhere in the world, there are a few extra steps you need to undertake.
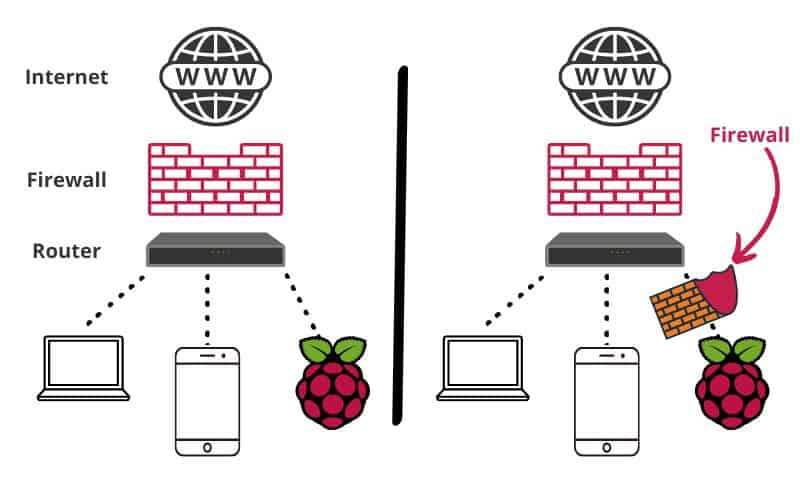
We need to configure our Raspberry Pi and router to forward the webpage whenever it receives an HTTP request on its Public IP. You also need to configure your router’s firewall to allow public HTTP access.
Also, get a domain name so you don’t have to remember IP addresses to access your website.
This might seem challenging at first, but once you get started, it will quickly take up all your free time and become a hobby of sorts. I personally enjoy projects like this, where you keep learning new skills and tools to add to your arsenal.
Related Articles
- Host a Website at Home with Raspberry Pi: Step-by-Step Guide
- YunoHost: Turn Your Raspberry Pi into a Self-Hosting Server
- Self-Host a Website Safely with Raspberry Pi & Cloudflare Tunnel
- Getting Started With Nginx on Raspberry Pi (Full Guide)
Local Git Server
Host your own code and learn Git and SSH.
What You’ll Learn
Difficulty: Easy
Time Required: 1-2 hrs
I really struggled to properly manage a bunch of code and script files for projects I was working on. However, since I have started using Git for version control, it has significantly reduced the chore of manually managing individual code files.
Check this: Pi5 vs. Pi4: I tested them, here's the result
One of the most commonly used version control solutions is Git. The most well-known, GitHub, is actually a publicly hosted Git server. But you can also host your own Git server on your Raspberry Pi to maintain a personal backup of your projects.
Bonus tip: When I started, the hardest part wasn’t the setup, it was figuring out what to build next. I ended up creating a list of 75+ project ideas with links and difficulty, so it’s easier to just pick something and try it. Grab the list here.

If you want a clearer path than jumping from tutorial to tutorial, my book gives you a step-by-step roadmap to really understand your Raspberry Pi.
Check the book here
You have two options if you want to run your own Git server: install GitLab, which is basically a Git server available in the form of an application or package. It provides Git along with tools such as a webpage to manage your projects through a GUI.
If you are feeling a bit more adventurous, you can install Git and get started from there. However, in this case, you’ll need to install or develop the server portion of the project separately.
I personally prefer using Git alone and configuring SSH so I can use Git from any PC on my home network. I find this solution gives me the level of autonomy I prefer for my setup.
However, for most users, I’d recommend installing GitLab, as it is the more user-friendly option.

I think this is a great starting project that, in addition to being beginner-friendly, also provides the perfect staging point to try other projects, with the assurance of a constant backup for any other project you try.
Related Articles
- Git on Raspberry Pi: Your Ultimate Guide to Version Control
- Install GitLab on Raspberry Pi: Your Own GitHub Server at Home
- SVN Server on Raspberry Pi: A Complete Installation Guide
- Use SSH to Remote Control Your Raspberry Pi: A Complete Guide
Raspberry Pi VPN Gateway
Securely connect to your home network from anywhere.
What You’ll Learn
Difficulty: Hard
Time Required: 1-2 hrs
When I’m doing sensitive work, I like to use a VPN to hide my network signature and access websites that are blocked in my country.
A VPN carefully routes your traffic through a VPN server. Basically, the VPN server acts as a middleman, initiates all requests as if it were the one making them, and then forwards the response back to your PC.
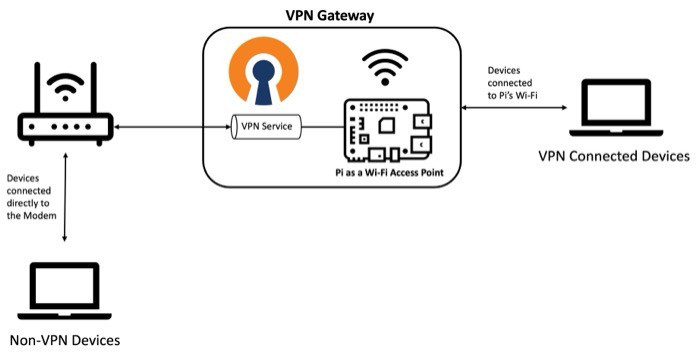
Instead of installing VPN software on each device, you can configure your Raspberry Pi as a VPN server. This way, all your devices connect to your router through the Raspberry Pi, which connects to another VPN service.

First, decide which VPN service you want to use. Several VPN services can work, such as SurfsharkVPN, ExpressVPN, NordVPN, or ProtonVPN.
We also need to install OpenVPN on our Raspberry Pi.OpenVPN gives us command-line access to these VPN services once we authenticate.
Once you have VPN configured on your Raspberry Pi, you can put your Raspberry Pi WiFi into Access Point mode, so it acts as a hotspot and gives WiFi access to other devices. Now any device that connects to the internet through your Raspberry Pi’s WiFi will automatically be routed through the VPN service.
Another neat thing you can do with VPN services is use a VPN mesh service like Tailscale or WireGuard to create a private VPN that lets you access your devices at home when you are away.
If you have a Raspberry Pi lying around and want to get some productivity out of it, this can be a great project. In addition to being a great learning experience, it will also provide a secure network connection for all devices at your home.
Related Articles
- How to Set Up a VPN Gateway with Raspberry Pi: Easy Guide
- Best VPN Providers on Raspberry Pi (I Tested All)
- Tailscale VPN Setup on Raspberry Pi: Secure Home Networking
- How To Install & Use ProtonVPN On Raspberry Pi (GUI & CLI)
Home Automation Server
Connect sensors and devices to create smart automations.
What You’ll Learn
Difficulty: Medium
Time Required: 5-10 hrs
One practical, educational project I recommend is building a smart home using the Raspberry Pi as the home automation server. The key idea is to use your Raspberry Pi as the main processor, or brain, for different smart sensors in your home.
It can take input from sensors such as light, temperature, proximity, or cameras. Based on these inputs, the Raspberry Pi can control devices in your home like lights, air conditioning, curtains, etc.

Luckily, the software part of this project is pretty straightforward. I prefer and recommend using a ready-made software solution like Home Assistant or openHAB. Install it on your Raspberry Pi and configure it based on the sensors and smart devices you have at home.
Raspberry Pi can connect to your devices through Bluetooth or WiFi. You can also use the MQTT protocol for IoT communication with your smart devices by running an MQTT server on your Raspberry Pi.

Installing the home automation software on a Raspberry Pi is relatively straightforward. Configuring it for your use case can be challenging. However, you’ll find a large online community that you can turn to for support.
I think part of the appeal of this type of project is searching online posts and finding people with similar problems and solutions. Besides learning new things, this provides an excellent opportunity to make new friends with similar interests.
Overall, I really like this project. Besides being educational, I think this is a more practical project, with the end product being a smart home which can be extremely productive and a great conversation starter with your guests.
Related Articles
- Raspberry Pi for Home Automation: Tools and Tips
- Top Tools for Building a Raspberry Pi Smart Home
- Getting Started With Home Assistant on Raspberry Pi (2 Ways)
- How to Install openHABian on Raspberry Pi (Step-by-Step Guide)
Send Notifications From Your Raspberry Pi
Get alerts whenever something important happens.
What You’ll Learn
Difficulty: Easy
Time Required: 1-2 hrs
Another simple, relatively easy project that I tried and found to be a great learning experience is programming your Raspberry Pi to send you notifications.
These notifications can be for anything. For example, you can set up your Raspberry Pi as a network monitoring device that monitors all your devices on your network and notifies you if anything is out of the ordinary.
The most common technique, and the one I recommend for most readers, is to use an online messaging service like Telegram or Discord. With a Raspberry Pi, you can configure a Discord channel and write a Python program to send notifications to it.

Another cool program I found while looking for ways to share notifications from your Raspberry Pi to your mobile is Pushbullet. It is primarily designed for sharing data between different devices.
However, one of its key features is forwarding notifications from one device to another, giving you a combined notification dashboard. You can install its Python libraries on your Raspberry Pi and use a Python script to send notifications to all your configured devices.

Most of these techniques rely on internet connectivity. However, I think automatic notifications really shine in remote outdoor projects. For example, if you have a remote weather station or wildlife monitoring setup, sending notifications can be great.
For projects like that, I prefer using a GSM HAT with my Raspberry Pi and either using the internet connection through GSM or using it like a smartphone to send SMS notifications to my phone.

This is a great project idea that provides excellent educational value and can be combined with numerous other projects. Sending automatic notifications to your mobile or PC can be a great add-on to any other Raspberry Pi project.
You might also like: The Raspberry Pi I'd actually buy today
Related Articles
- Python: 5 Ways to Send Notifications from Your Raspberry Pi
- Use a Raspberry Pi to Track Website Downtime and Broken Pages
- Outdoor Raspberry Pi Setup: Complete Guide to Off-Grid Projects
- How to Make a Discord Bot on Raspberry Pi? (Python easy method)
Local Docker Server
Run multiple applications in isolated containers.
What You’ll Learn
Difficulty: Medium
Time Required: 1-2 hrs
Bonus tip: When I started, the hardest part wasn’t the setup, it was figuring out what to build next. I ended up creating a list of 75+ project ideas with links and difficulty, so it’s easier to just pick something and try it. Grab the list here.
Docker is a software platform that lets you run different applications in a compartmentalized way. Each application and its dependencies run in its own container. I recently discovered Docker and quickly understood why so many people highly recommend learning about it.
Docker’s key advantage is that each application runs in its own container, so dependencies don’t conflict.
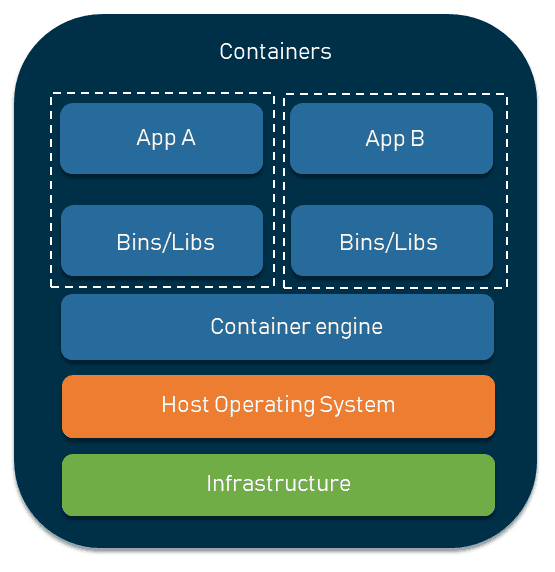
You can create your own Docker images and containers. However, Docker’s real strength is that you can pull any Docker image from its official repository. All you need to do is run the command.
docker pull [application name]There are a plethora of Docker images to choose from. You can run a network-wide ad blocker with Pi-hole or a media server with Jellyfin or Plex. You can also choose to run multiple containers on the same Raspberry Pi

Instead of running everything from the terminal, another neat thing I prefer is using Portainer to manage the different Docker containers running on my Raspberry Pi.
You can also use Docker Compose to combine different Docker Containers so that you can choose and run your own development stack.
Overall, in my opinion, learning Docker images and understanding Docker architecture is a key skill set every DevOps or Linux engineer needs. And building a Docker Server on your Raspberry Pi is a great way to get started.
Related Articles
- Getting Started With Docker On Raspberry Pi (Full Guide)
- 11 Docker Projects Every Raspberry Pi Owner Should Try
- Docker Compose: The Easier Way to Run Docker on Raspberry Pi
- 7 Docker Mistakes That Will Eventually Break Your Raspberry Pi
Tip: Command lines can be a pain to memorize. I put the essential Linux commands on a printable cheat sheet so you don't have to keep googling them. You can grab the PDF here if you want to save some time.
AI Vision System
Use AI to recognize objects through a camera.
What You’ll Learn
Difficulty: Hard
Time Required: 3-5 hrs
I like experimenting with AI models on my Raspberry Pi to test its limits. With the increasing processing power of new Raspberry Pi models, running an AI model on Raspberry Pi has become much more practical than before.
One of the first projects I tried to test AI models on Raspberry Pi was developing an object recognition system using the Raspberry Pi Camera and Computer Vision libraries. Besides being a great learning experience, it was also enjoyable.
You might also like: Yes, you can access your Pi from anywhere. Here's how.

All you need is a Raspberry Pi with a camera module. Then download and install the relevant Python libraries and use pre-trained object detection models such as YOLOv8.
You can do a lot of things with an AI vision system. You can use it for facial recognition, pose estimation, or intrusion detection on your perimeter security cameras.

After completing this project, I started experimenting with running different AI models using LLAMA on my Raspberry Pi, and I found the overall experience extremely eye-opening and educational. However, the Raspberry Pi itself can only run relatively smaller models.
Luckily, a few AI accessories, like the AI HAT+ and the AI Camera, let the Raspberry Pi run larger, more complex models efficiently.
Overall, based on my experience with this project, I highly recommend it. Especially if you already have a Raspberry Pi and a Camera Module. It can be a great learning experience and introduce you to the world of AI processing.
Related Articles
- How to Set Up Object Detection on Raspberry Pi
- 10 Object Detection Projects You Can Build with a Raspberry Pi Camera
- What a Raspberry Pi Can (and Can’t) Do With AI
- AI HAT vs AI Camera vs AI Kit: Which One Should You Buy?
Something not working? Don't waste hours going in circles. Ask in the RaspberryTips Community and get help from people who've already figured it out. Get unstuck now.
Raspberry Pi-Based Robot
Combine coding, electronics, and Linux to build a robot.
What You’ll Learn
Difficulty: Hard
Time Required: 24-48 hrs
Another cool project that I enjoy doing with my son is building a robot using a Raspberry Pi as its brain. In fact, this was the most common use case of Raspberry Pi when it was first introduced.
Building a robot seems challenging at first. However, it is an excellent, fun way to get into Raspberry Pi programming and electronics engineering.

The core concept is to use the Raspberry Pi as the robot’s main processor and connect it to electrical components, such as motors, to control the robot’s movement. You can also add different sensors to make your robot more aware of its surroundings.
This is possible with Raspberry Pi because of its GPIO pins. You can use the GPIO pins to send signals to and receive commands from sensors and motors.
One of the first robotics projects I tried was building a remote-controlled car. Below is a video of my son and me playing with our very first robot car.
Starting a robotics project can feel challenging. However, there are many great robotics kits you can start with. These kits come with a complete assembly guide to help you build and program your robot.
Overall, I really enjoy making different robotics projects with my son. It has evolved into a shared hobby and a great learning and bonding experience for both of us.
I highly recommend picking up this hobby, as it offers plenty of learning opportunities. In particular, it opens up avenues regarding Raspberry Pi GPIOs, different sensors, and electronics engineering. A large community of robotics enthusiasts are willing to help you get started.
Related Articles
- The 10 Best Raspberry Pi Robot Kits for Beginners in 2026
- Building a Drone With Raspberry Pi – What You Need to Know
- Raspberry Pi GPIO Basics: Components You Need to Know
- 7 Beginner-Friendly Raspberry Pi Sensors for Your Projects
Whenever you’re ready, here are other ways I can help you:
Test Your Raspberry Pi Level (Free): Not sure why everything takes so long on your Raspberry Pi? Take this free 3-minute assessment and see what’s causing the problems.
The RaspberryTips Community: Need help or want to discuss your Raspberry Pi projects with others who actually get it? Join the RaspberryTips Community and get access to private forums, exclusive lessons, and direct help.
Master your Raspberry Pi in 30 days: If you are looking for the best tips to become an expert on Raspberry Pi, this book is for you. Learn useful Linux skills and practice multiple projects with step-by-step guides.
Master Python on Raspberry Pi: Create, understand, and improve any Python script for your Raspberry Pi. Learn the essentials step-by-step without losing time understanding useless concepts.
Master Linux Commands: Overwhelmed with Linux commands? This book is your essential guide to mastering the terminal. It includes practical tips, real-world examples, and a bonus cheat sheet to keep by your side.
You can also find all my recommendations for tools and hardware on this page.