How To Install Linux Mint On Raspberry Pi (Workaround guide)
Linux Mint is currently one of the most popular Linux distributions (in the top 3 according to Distrowatch). Based on Ubuntu, and using Cinnamon for the desktop environment, Mint is a great solution for Linux beginners on PC (but not only). Unfortunately, Linux Mint doesn’t have a version available for the Raspberry Pi, but there is a way to almost get it.
Linux Mint is only available on x64 architectures, so it can’t run directly on a Raspberry Pi. But as it’s based on Ubuntu, with most applications in the official repository, it’s possible to install everything manually to get a similar experience.
That’s exactly what we’ll do in this article! I took some time to test this, and frankly, that’s not so far. Yes, if you are used to Linux Mint, you’ll probably see the difference, but as a whole, it’s pretty close (and the closest it can be).
If you’re looking to quickly progress on Raspberry Pi, you can check out my e-book here. It’s a 30-day challenge where you learn one new thing every day until you become a Raspberry Pi expert. The first third of the book teaches you the basics, but the following chapters include projects you can try on your own.
Can you Install Linux Mint on Raspberry Pi?
Linux Mint can’t run on Raspberry Pi because the distribution is only available for x86-64 processors, while the Raspberry Pi has an ARM processor. The closest solution available is to install Cinnamon on Ubuntu, which is available on Raspberry Pi.
How to do it on Raspberry Pi?
As you may already know, most Linux distributions are based on one another. Ubuntu is based on Debian, Linux Mint is based on Ubuntu, Raspberry Pi OS is based on Debian, etc. Obviously, developers are not just using a new name without changing anything else, but if your system runs on the same base, you can often get a similar experience with only a few tweaks.
That’s the idea here, to install the closest distribution available, and try to reach a similar experience. In fact, I followed the advice given on their official forums:
You can likely get all of Linux Mint’s software working on the Raspberry Pi 4 but will mean compiling them from source.
xenopeek (Linux MINT)
I don’t think we need to compile anything from source, but the idea is to get all Linux Mint’s software on Ubuntu Server. Let’s learn how to do it.
The goal: Linux Mint on PC
I’m not an expert of Linux Mint. I have used Ubuntu for a long time, but Linux Mint never was my main Linux distribution. So, first I needed to see what it looks like, and what is “special” about it.
It's a free PDF guide containing every Raspberry Pi Linux command you should know!
Download now
To do this, I created a virtual machine on my computer with Linux Mint running, and took note of the default applications.
Yes, it doesn’t look like the standard Ubuntu, but you’ll still find similar applications:
- Internet: Firefox, Thunderbird, Transmission
- Office: LibreOffice
- Sound/Video: Rythmbox
What we really need is:
- The desktop environment: Cinnamon
- A similar theme: Linux Mint use “Mint-Y” as the default theme, we’ll see if we can find it on Ubuntu.
- And maybe a few apps like Warpinator, Timeshift, Synaptic, Hexchat, etc.
Let’s see how far we can go with this idea!

Join Our Community!
Connect, learn, and grow with other Raspberry Pi enthusiasts. Support RaspberryTips and enjoy an ad-free reading experience. Get exclusive monthly video tutorials and many other benefits.
Learn moreIt's a free PDF guide containing every Raspberry Pi Linux command you should know!
Download now
Linux Mint on Raspberry Pi: The alternative
The goal of this article is not (only) to tell you that installing Linux Mint on Raspberry Pi is impossible, but also to provide an alternative. The idea was to install Ubuntu Server, and then install all the Linux Mint applications on top of it.
Here are the steps to follow if you want to try it on your own.
Install Ubuntu (Server)
First, we need to start with something. As Linux Mint is based on Ubuntu, the logical idea is to start by installing it. I already have a tutorial on how to install Ubuntu on Raspberry Pi, so I will be brief here. Basically, you have two choices:
- Install Ubuntu Desktop: The easy method, but your SD card will be loaded with lots of useless apps at the end of the tutorial. If the goal is to use Cinnamon, you don’t really need to install GNOME first.
- Install Ubuntu Server: A bit more complicated, but you’ll get only what you need on the SD card. I got some issues with the desktop environment setup, but I’ll show you how to fix them.
I prefer the second option. Ubuntu is already a bit slow on Raspberry Pi, so I’m not sure having the entire app collection installed is a good idea. Anyway, pick one and install it on a new SD card:
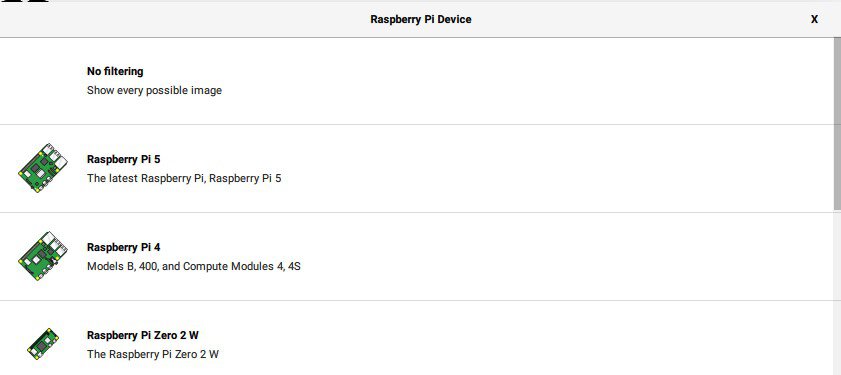
- Download and install Raspberry Pi Imager if you don’t have it yet.
- Click on “Choose Device” and pick your Raspberry Pi model from the list.
- Click on “Choose OS“.
- Then “Other general purpose OS” > “Ubuntu“.
Pick the image corresponding to your Raspberry Pi model (I’ll use the Server edition).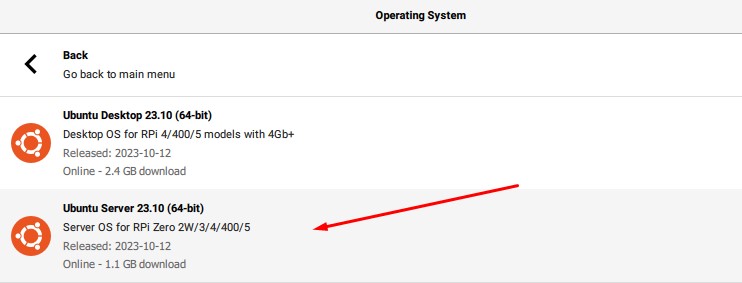
- Click on “Choose Storage” and pick the SD card or USB drive you’ll use for your system.
- Click “Next“.
- At this point, I recommend filling out the OS customization options so you can configure the initial system settings (hostname, network, username and password, enable SSH, etc.). Everything will be set up automatically the first time you boot, so you don’t need to do anything else.
- Wait a few minutes while Imager downloads the Ubuntu files and copies them to the SD card.
First boot on Ubuntu Server
If you didn’t change the OS customization option with Raspberry Pi Imager, the default login is “ubuntu”, and the password is “ubuntu” too. You can either log in directly on the screen or use SSH to do everything from your computer (SSH is enabled by default).
After the first login, the system will ask to update your password (unless you’ve already done it with Imager).
Note: The keyboard layout is set to Qwerty (US) by default. Refer to my full tutorial on how to install Ubuntu Server if you need to use a different one.
It's a free PDF guide containing every Raspberry Pi Linux command you should know!
Download now
Once done, follow the usual steps as with any new operating system:
- Adjust the network configuration if needed.
- Update your system:
sudo apt update
sudo apt upgrade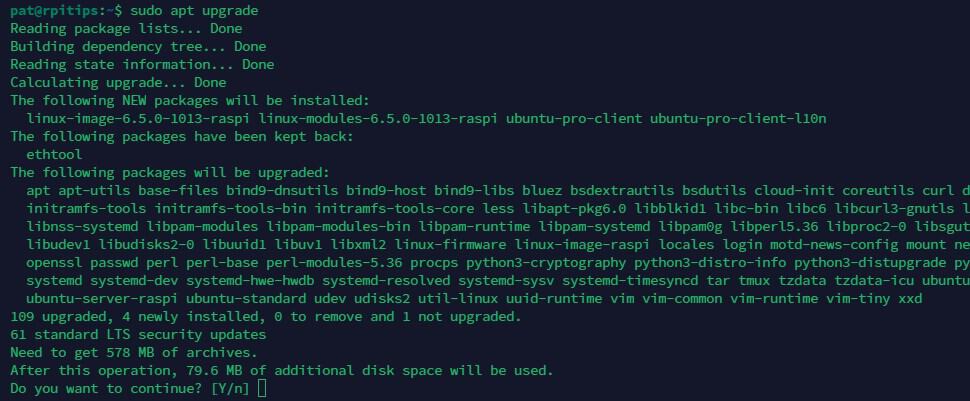
- Reboot:
sudo reboot
If you installed the Desktop version, you’ll get a graphic wizard to help you with everything (language, time zone, network settings, create the first user and updating the system).
Are you a bit lost in the Linux command line? Check this article first for the most important commands to remember and a free downloadable cheat sheet so you can have the commands at your fingertips.
Install Cinnamon desktop environment
Ok, now it’s time to install a desktop environment on your system (or another one if you have the Desktop version). We need to install Cinnamon, and to do this you have several choices:
- The minimal installation: Install the package name “cinnamon”:
sudo apt install cinnamonIt will only add the minimum applications required. - The essentials components with:
sudo apt install cinnamon-core - Or the complete installation: The package is “cinnamon-desktop-environment”.
sudo apt install cinnamon-desktop-environment
(about 1300 packages and 1GB to download)
Make your choice depending on your Internet connection and the apps you want to use. I tried the minimal and the full version, both work well on Raspberry Pi 4. By choosing a bigger installation, you’ll save time as you won’t need to look for each application with apt or synaptic, but it’s also longer to install and probably heavier.
Once the installation done, you can reboot your system once again.
Open your session with Cinnamon
After the installation, you’ll get the usual Ubuntu login screen. If you installed Ubuntu server, you’ll probably get an error here.
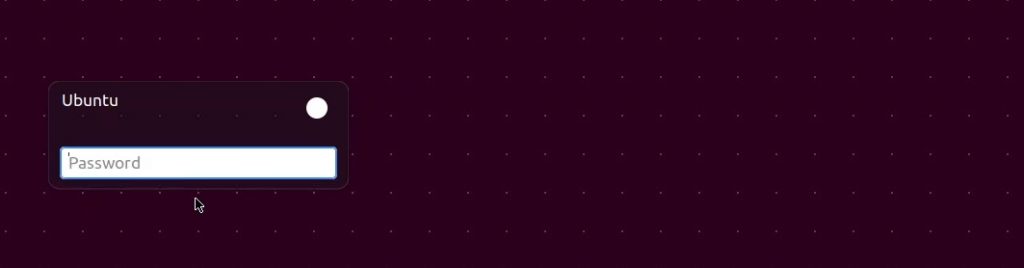
If you try to log in directly, it won’t work. Each time I tried, I received this error:
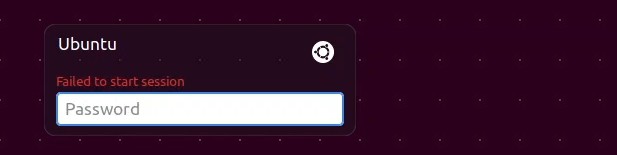
To fix it, click on the Ubuntu icon in the top right, and choose “Cinnamon Software Rendering”:
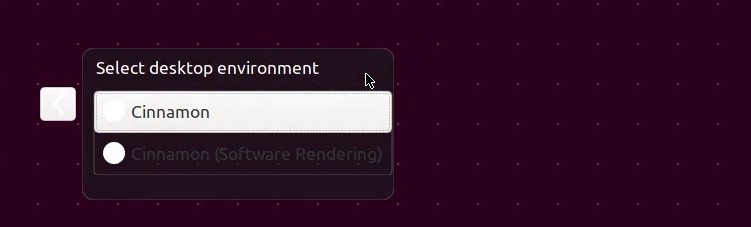
By the way, you also need to do this if you installed Ubuntu Desktop first, or you’ll log in with the default desktop environment.
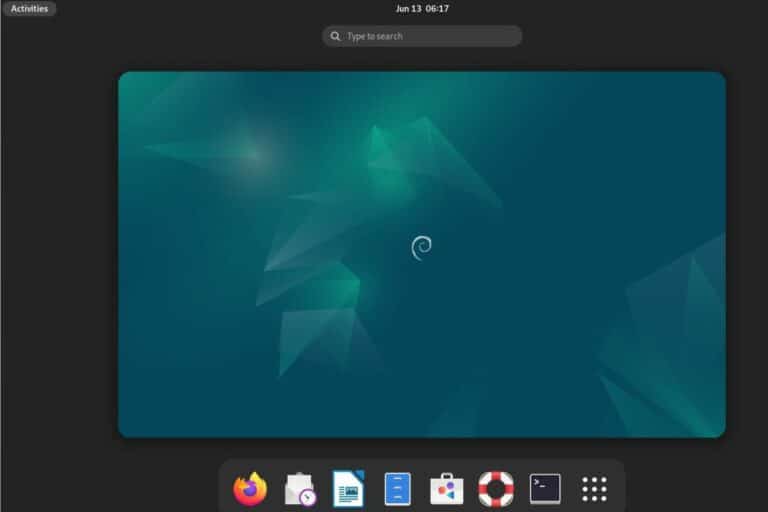
After that, you may get a black screen, I don’t know why, but it should work after a reboot (power off or SSH reboot). Probably something that doesn’t initialize correctly. After that, you should get access to your session, by default it looks like this:
Install the missing apps
When you install the full version of cinnamon, you’ll get all the apps you need for a desktop usage (Firefox, LibreOffice, etc.), which might be enough. But for a lighter version, or if you need something specific, you can install the missing apps by using Synaptic.
Synaptic is a package manager, that looks a bit like the “Add / Remove Software” tool on Raspberry Pi OS. Use the search engine and install the apps you need. Nothing complicated here. You can take a look at my tutorial about Ubuntu if you need more guidance here.
Obviously, apt is your friend if you know the packages names. Open a terminal and type this to install the most important ones:sudo apt install firefox thunderbird libreoffice timeshift redshift synaptic transmission hexchat
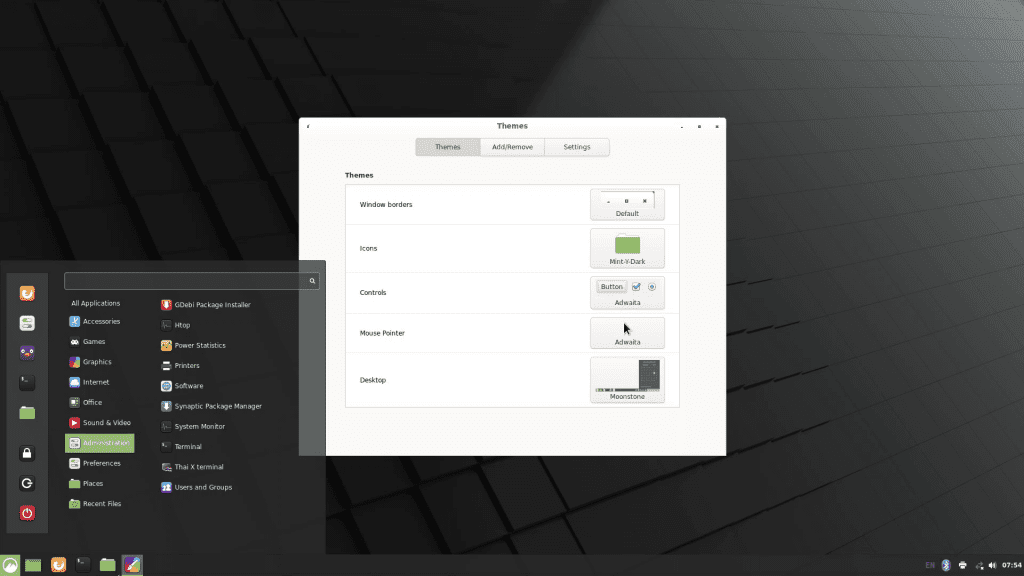
Appearance settings
From there, there are a few tweaks you can do to make it looks like Linux Mint:
- Change the wallpaper: The Debian wallpaper doesn’t go well with our project.
Find the Linux Mint official wallpaper or use any other one to hide the cunning. - Install a new theme: Linux Mint use the Mint-Y theme by default, which is a bit darker than the default one on Ubuntu.
Go to Preferences > Themes in the main menu. Then in the Add/Remove tab, you can install the one you prefer.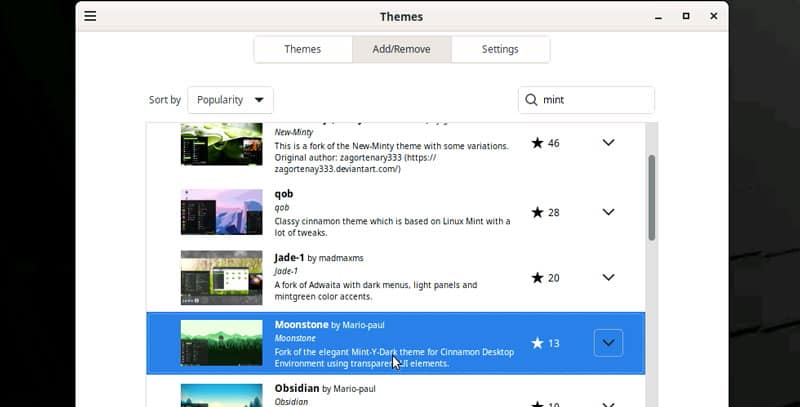
I find that “Moonstone” is the closest to the original. - Install the same icons: If you want to push it a bit further, you can also install the same icons as on Linux Mint.
I followed this tutorial on UbuntuBuzz, and it works well.
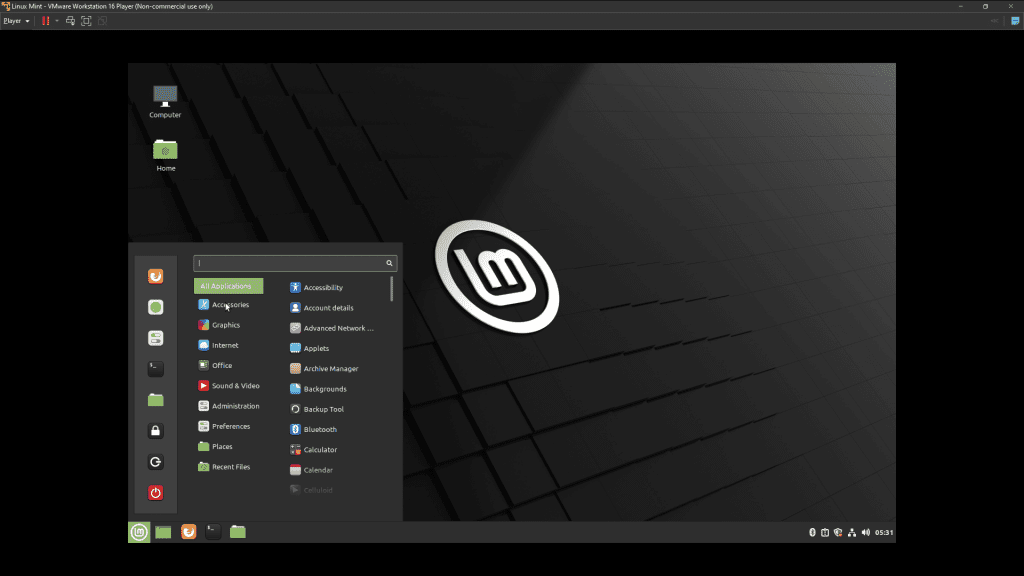
After doing all of this, you shouldn’t be too far from having Linux Mint on your Raspberry Pi:
Going further
For me, having access to similar apps with a similar desktop environment is enough to consider this experiment a success. I understand that some of you might be more picky if you are used to it on your computer, but I’m sure you’ll find a way to install everything else from there.
By the way, you can do the same thing on Raspberry Pi OS if you want, you don’t need to switch to Ubuntu to install Cinnamon. The same tutorial should work on Raspberry Pi OS, except maybe a few apps which can be missing or in an older version.
If you are interested in Raspberry Pi and Ubuntu, you should check this other articles:
- Raspberry Pi OS vs Ubuntu: What’s the Best for Desktop Usage?
- How to Install Ubuntu on Raspberry Pi? (Server, Desktop)
- What’s the Best Operating System for Beginners on Raspberry Pi?
It's a free PDF guide containing every Raspberry Pi Linux command you should know!
Download now
Reminder: Remember that all the members of my community get access to this website without ads, exclusive courses and much more. You can become part of this community for as little as $5 per month & get all the benefits immediately.
Video version of this article
Whenever you’re ready, here are other ways I can help you:
The RaspberryTips Community: If you want to hang out with me and other Raspberry Pi fans, you can join the community. I share exclusive tutorials and behind-the-scenes content there. Premium members can also visit the website without ads.
Master your Raspberry Pi in 30 days: If you are looking for the best tips to become an expert on Raspberry Pi, this book is for you. Learn useful Linux skills and practice multiple projects with step-by-step guides.
The Raspberry Pi Bootcamp: Understand everything about the Raspberry Pi, stop searching for help all the time, and finally enjoy completing your projects.
Master Python on Raspberry Pi: Create, understand, and improve any Python script for your Raspberry Pi. Learn the essentials step-by-step without losing time understanding useless concepts.
You can also find all my recommendations for tools and hardware on this page.