
How to Easily Log In as Root on Raspberry Pi OS
You only get one normal user on default with Raspberry Pi OS (it was “pi”, but now it’s the user created during the first boot), but it isn’t an administrator account and you can’t configure things with it (i.e. use commands “reboot” or “shutdown”). Why? How does it work? How do you disable it? Keep reading to learn how to use root to change user privileges.
For security reasons, root is disabled by default on Raspberry Pi OS and most Linux distributions. To re-enable it, the user must use “sudo” and set a new password for the administrator account.
However, I don’t recommend it. In this post, I’ll explain what the sudo command is, and why Raspberry Pi OS developers added it and disabled the root user. And then I’ll show you how to do things as root on Raspberry Pi.
If you’re looking to quickly progress on Raspberry Pi, you can check out my e-book here. It’s a 30-day challenge where you learn one new thing every day until you become a Raspberry Pi expert. The first third of the book teaches you the basics, but the following chapters include projects you can try on your own.
Linux reminders
I want to start with some reminders about Linux systems. If you start on Linux with your fresh new Raspberry Pi, the reminders below could help you understand better.
What is “root”?
On Linux operating systems, “root” is the administrator user.
On Windows, you have the “Administrator” account (and most of the time anyone is admin), on Linux, it’s “root”.
This user has all permissions on the system. If you want to create files in /etc, reboot the system, or change the network configuration, you need root privileges.
At the beginning of the Linux history, you got root access directly after the installation. But developers have changed this by asking to create a standard user in the installation process, and this user has no direct privileges.

Join Our Community!
Connect, learn, and grow with other Raspberry Pi enthusiasts. Support RaspberryTips and enjoy an ad-free reading experience. Get exclusive monthly video tutorials and many other benefits.
Learn moreWhy did Debian developers hide it?
Before this, everyone used root, and mainly only root. So it was easy to break something, and also as everyone logs as root, you don’t know who changed something, as it’s only “root”.
So Debian developers have changed this to force the creation of the first user in the installation process and then give this user a way to elevate his privileges like an administrator: sudo.
It's a free PDF guide containing every Raspberry Pi Linux command you should know!
Download now
The main goal was to only give everyone the privileges needed to work, but the possibility to get more temporarily if needed.
The sudo command
Let’s learn about sudo and how to use it.
Sudo presentation
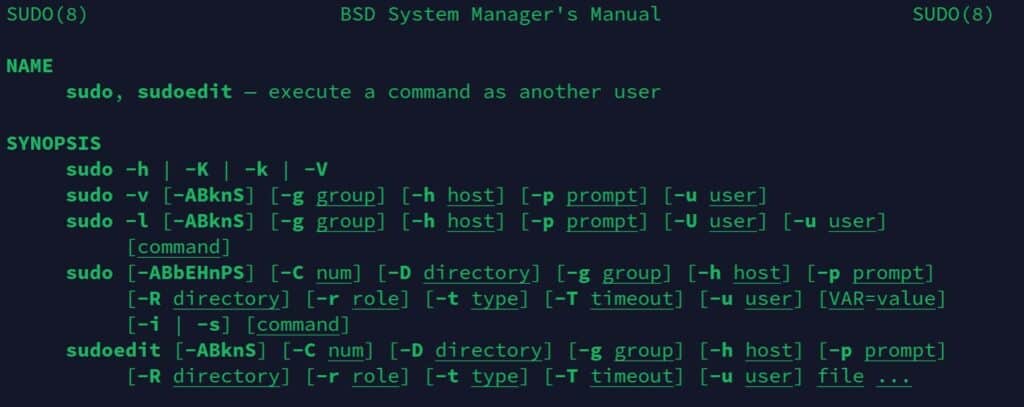
Sudo is a prefix command used to run any command with root permissions.
When you put “sudo” just before your command, you get administrator privileges for this command. The system might ask for your password the first time you use it.
Check this tutorial if you want to know how to give sudo permission to a new user.
How to use sudo
Usage: sudo <command>
Here is an example:
pi@raspberrypi:~ $ shutdown -h 20:00
Failed to set wall message, ignoring: Interactive authentication required. Failed to call Schedule
Shutdown in logind, proceeding with immediate shutdown: Interactive authentication required.
pi@raspberrypi:~ $ sudo shutdown -h 20:00
Shutdown scheduled for Mon 2018-12-31 20:00:00 GMT, use 'shutdown -c' to cancel.
The “shutdown” commands allows you to stop your Raspberry Pi properly (which should be done each time, as explained in the linked article).
You need root privileges to stop your Raspberry Pi. The first command failed with “authentication required”, but the second is ok.

Are you a bit lost in the Linux command line? Check this article first for the most important commands to remember and a free downloadable cheat sheet so you can have the commands at your fingertips.
Switch to root on Raspberry Pi OS
If you are on a project that requires you to run 50 commands as root, it might be boring to think about adding sudo before each one.
There is a way to switch from your user to root user: sudo su
“su” is a command to switch users. If you are root, it allows you to switch to another user: su - <username>
Without a parameter, it gives you the root terminal, but you need sudo to run this command.

Here is an example:
It's a free PDF guide containing every Raspberry Pi Linux command you should know!
Download now
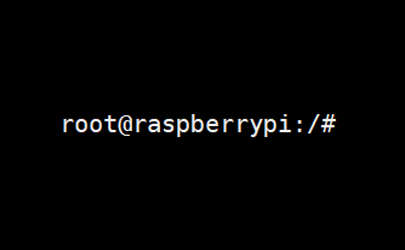
pi@raspberrypi:~ $ sudo su
root@raspberrypi:/home/pi#
As you see, in the second line I get a # terminal, beginning with root@raspberrypi.
So, I’m ready to run all my commands as root.
Use “exit” to come back to the pi user terminal:exit
Using sudo with new users
We just learned how to use sudo with the default user. But would it be the same if you created other users?
Default parameters
By default, the new users can’t use sudo.
- root: direct access to administrator privileges for any command.
- pi (or first user): administrator privileges, if needed, via the sudo command.
- Other users: no administrator privileges.
But if you need sudo on other users, it’s possible. We’ll learn about this next.
Allow a user to use sudo
To allow a user to run commands with sudo, add this user to the sudo group like this:sudo adduser <username> sudo
Switch to this user account and try:sudo su - <username>
sudo raspi-config
On the first access, you’ll get a warning message like this:
We trust you have received the usual lecture from the local System
Administrator. It usually boils down to these three things:#1) Respect the privacy of others.
#2) Think before you type.
#3) With great power comes great responsibility.
But then it’s ok, you’re ready-to-use sudo with this user account.
Login with root remotely
I don’t recommend allowing remote access for the root user. But it can be useful sometimes, for automated connections for example (scripts), so I’ll give you the process here.
If you want to keep your Raspberry Pi safe, you can read these security tips, but following the instructions below is not a good idea. At least, do this temporarily for the installation, but don’t keep it enabled after that.
Create a password for root
The first thing to do is to create a password for the root user.
As you want to access it directly, the pi user password wouldn’t help.
The easiest way to do this is to use this command:sudo passwd
This may ask for your password, and then the new password for root.
Here is an example of what you should get:
pi@raspberrypi:~ $ sudo passwd
Enter new UNIX password:
Retype new UNIX password:
passwd: password updated successfully
Allow SSH access for root
The root user now has a password set, but it’s not enough to access your Raspberry Pi with this account directly.
You need to edit the SSH server configuration file to allow root to log in:
- Open the SSH configuration file:
sudo nano /etc/ssh/sshd_config - Find this line:
#PermitRootLogin prohibit-password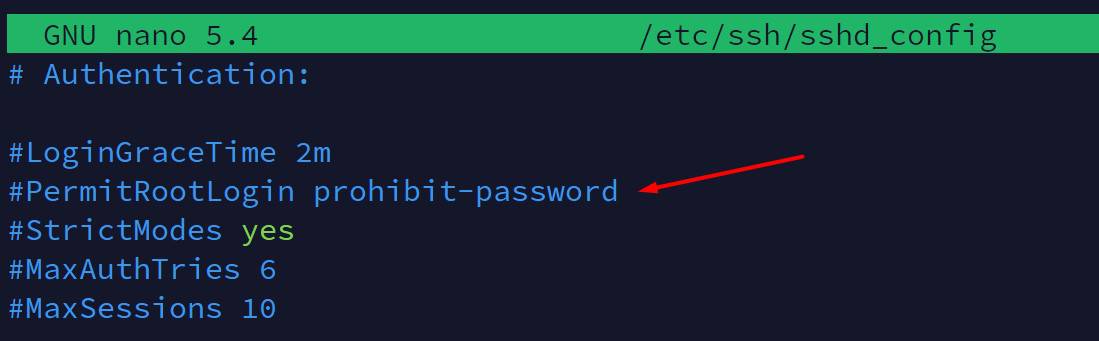
- Replace with this one:
PermitRootLogin yes
We remove the # to enable this option (# = comment).
And then change the value to “yes” to allow direct login with a password.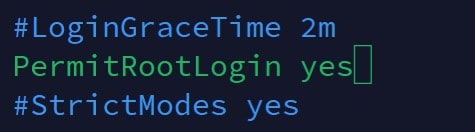
- Save and exit (CTRL+O, CTRL+X).
- Restart SSH:
sudo service ssh restart - Try again, as it should be ok now.
If you want to automate this process in a script, you need to connect with an SSH key.
I explain how to do this in the last paragraph of this article if you need help.
Related questions
What is the default root password on Raspberry Pi OS?
On Raspberry Pi OS, the root account is disabled by default, so there is no default password. The account can be enabled by creating a new password and using sudo to access the administrator session for the first time.
How to know who may use sudo?
In this article, we gave the sudo permission to a new user, but I don’t remember which user. To find it use this command:$ grep 'sudo' /etc/group
sudo:x:27:pi,foo
It gives you the group name, and the group id, and then all members of the group are separated by commas.
How to remove the sudo right to someone?
To remove the user “foo” from the sudo groups and deny root privileges for this user, run this command:$ sudo gpasswd -d foo sudo
Removing user foo from group sudo
Run the previous command to check it’s ok. It may require a new session to apply (disconnect/reconnect).
It's a free PDF guide containing every Raspberry Pi Linux command you should know!
Download now
Video
Want to see all these tips in action? Check this video on my YouTube channel:
It's a free PDF guide containing every Raspberry Pi Linux command you should know!
Download now
Want to chat with other Raspberry Pi enthusiasts? Join the community, share your current projects and ask for help directly in the forums.
Conclusion
That’s the end of this post about the root user on a Raspberry Pi.
I hope it helps you to better understand how it works.
Don’t forget that the root user is most of the time useless, sudo should be enough to do everything you need.
You can also create new users for any apps or person who don’t need administrator privileges (for your kids, for example).
As you know:
With great power comes great responsibility
Peter Parker 🙂
Whenever you’re ready, here are other ways I can help you:
The RaspberryTips Community: If you want to hang out with me and other Raspberry Pi fans, you can join the community. I share exclusive tutorials and behind-the-scenes content there. Premium members can also visit the website without ads.
Master your Raspberry Pi in 30 days: If you are looking for the best tips to become an expert on Raspberry Pi, this book is for you. Learn useful Linux skills and practice multiple projects with step-by-step guides.
The Raspberry Pi Bootcamp: Understand everything about the Raspberry Pi, stop searching for help all the time, and finally enjoy completing your projects.
Master Python on Raspberry Pi: Create, understand, and improve any Python script for your Raspberry Pi. Learn the essentials step-by-step without losing time understanding useless concepts.
You can also find all my recommendations for tools and hardware on this page.


I’m out of pi@raspbnerry pi with green color. How to go back to this colored (administrator). Can you help me, please?
Hi José,
Use the command “sudo su” to go back to the root terminal
The Linux permission system is a tool anyway. On one side they try to keep the root user out, but you get nuts of typing sudo in front of everything.
They really should fix Linux permissions to be more OSX like:
– Make an administrator user between user and root with access to all non critical files
– Add a permission repair tool
– Lock out certain areas with a gatekeeper kind of shield
Type sudo chown $USER:www-data / by accident for example. That basically kills your linux system with no way to fix it. Any serious OS should prevent such accidents from happening in the first place.