Magic Mirror on Raspberry Pi: Complete Installation Guide
Building a Magic Mirror is one of the most popular projects on Raspberry Pi, but that doesn’t necessarily mean that it’s better documented. After trying it myself, I noticed that the official documentation is a bit complex for beginners to follow, and other guides don’t help that much. This is why I decided to write the ultimate installation guide to set up a Magic Mirror. If you are interested in this project and need more information, keep reading!
In this guide, I’ll give you a brief introduction about the Magic Mirror project, then we’ll see the best installation method (several are available), and then I’ll take some time to explain the configuration that is not especially intuitive (like tweaking things and adding new fun modules). I’ll also give you some tips to optimize your setup overall.
You are welcome to use this guide as a buffet, and skip parts if you already know them or are seeking something specific. Let’s start!
If you’re looking to quickly progress on Raspberry Pi, you can check out my e-book here. It’s a 30-day challenge where you learn one new thing every day until you become a Raspberry Pi expert. The first third of the book teaches you the basics, but the following chapters include projects you can try on your own.
Introduction to the Magic Mirror project
Like playing classic games on Retropie or watching Netflix with Kodi, building a Magic Mirror is a project that helped popularize the Raspberry Pi. It is such a beautiful realization once completed, and still something futurist to put in your house, that it peaked the interest of many makers.
Michael Teeuw is the original inventor of the Magic Mirror project, and you can find many resources about it on its website. As we will learn later, building a Magic Mirror isn’t as complicated as you might think, but the idea was really innovative at the time.
Anyway, in short, a “magic” mirror, is like any mirror, but you’ll add interesting data on it, like a clock, your calendar or the weather forecast for the next few days. It’s “magic” because it’s a mix between a TV dashboard and a mirror, connected to numerous APIs to display everything you are interested in, nothing like the one in Harry Potter 🙂
If you’re reading this, I’m sure you already know what a Magic Mirro looks like, so let’s jump directly into the interesting part of the content.
Installing the Magic Mirror software on a Raspberry Pi
How to build a Magic Mirror frame
If you plan to build a Magic Mirror and have it on one of your walls at home, the classic way of doing this is to build a custom frame, then place a TV and a Raspberry Pi behind a too-ways glass (like this one on Amazon).
To be clear, this guide is not about this. But I can help you with a great video showing you all the steps to build a Magic Mirror with a wooden frame:

Join Our Community!
Connect, learn, and grow with other Raspberry Pi enthusiasts. Support RaspberryTips and enjoy an ad-free reading experience. Get exclusive monthly video tutorials and many other benefits.
Learn moreIf, like me, you are not a great handyman, you can still use the Magic Mirror software as a “Magic Dashboard”, without the frame and the mirror thing. For example, it could be a great use of the RasPad 3 I tested here. You’ll get the same result in a much easier way.
The main goal of this article is to give you tips to save time with the software installation, which we will learn in detail now.
It's a free PDF guide containing every Raspberry Pi Linux command you should know!
Download now
Setup Magic Mirror on your Raspberry Pi
Several ways to install the Magic Mirror on Raspberry Pi
On the official installation guide for the Magic Mirror, you will find several methods to set it up on your Raspberry Pi:
- Magic Mirror OS: that might seem the easiest way to do it (flash it, and it’s done), but it’s not the method I recommend.
- Docker image: Docker is often a great solution to install new services, as it keep everything in a safe container, protecting the app and your system. Again, not my favorite method for the Magic Mirror.
- Random installation scripts: Typically methods that are “easy” but where you have no control on what will be installed.
All of these are methods that might seem easy, but I find that once installed, the maintenance is more complicated. If you just want to quickly check to see how it runs on a specific Raspberry Pi model or screen, go for it, take the Magic Mirror OS image and flash it to your SD card. It’ll work directly.
But if you want the best method overall for the long term, keep reading this guide.
Magic Mirror installation
As a whole, the best method to install Magic Mirror on a Raspberry Pi is manual installation. After installing NodeJS, you can clone the GitHub repository and install the application with npm.
Here are the required steps to install Magic Mirror on your Raspberry Pi :
- Download and install NodeJS:
curl -sL https://deb.nodesource.com/setup_14.x | sudo -E bash -
sudo apt install -y nodejs
At the time of writing, NodeJS 17 was available, but the official guide still use the version 14. I haven’t tested with the latest version, but feel free to try it if you experience issues on the following steps.
I have a guide about Node.js on Raspberry Pi if you want to know more about this cool language. - Once done, clone the GitHub repository to download the Magic Mirror source code on your device:
git clone https://github.com/MichMich/MagicMirror
cd MagicMirror - Finally, install the application with:
npm install - Copy the sample configuration file:
cp config/config.js.sample config/config.js
I’ll explain everything about this file in the next section. - And start the application:
npm run start
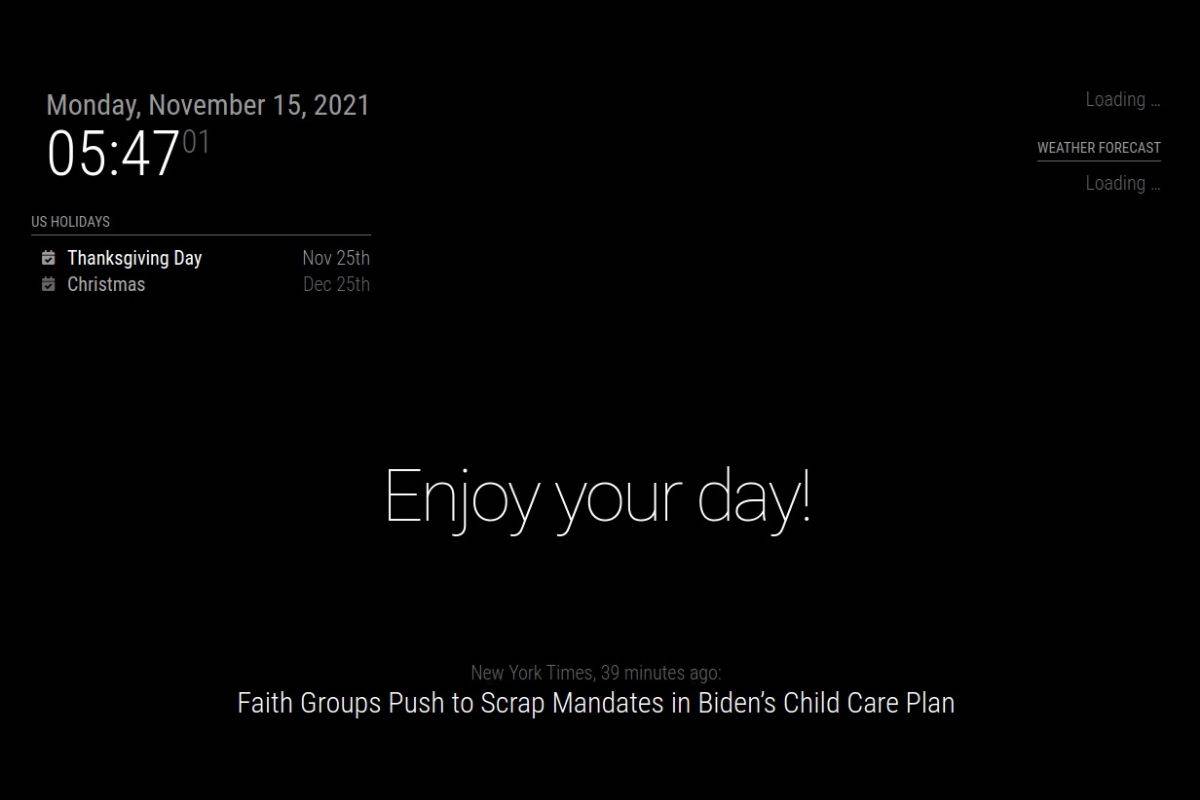
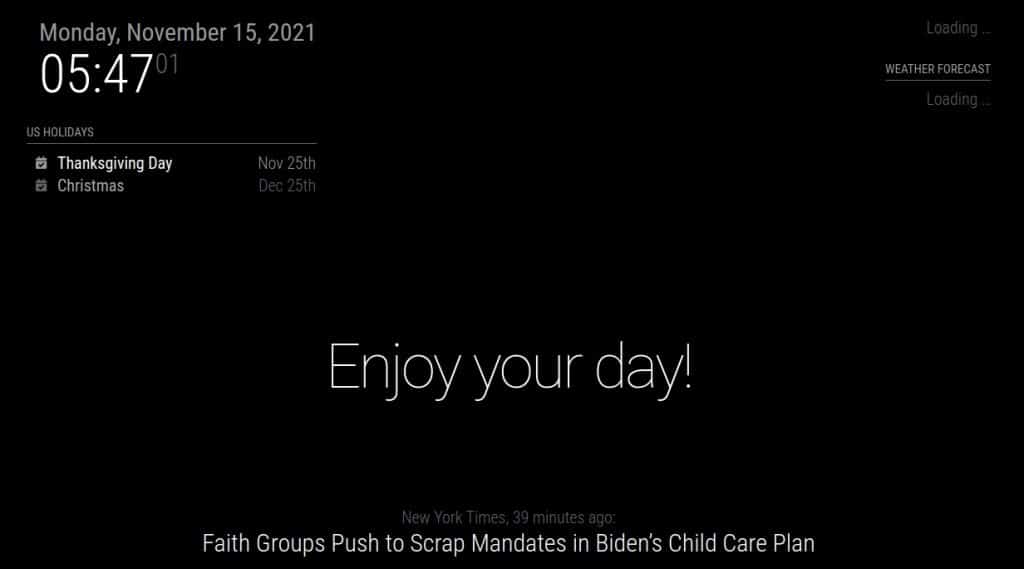
That’s it, you should get the default Magic Mirror display on your screen (date, weather, news and a random compliment).
You are now ready to move on to the next part, where I’ll explain how to configure and customize this screen (and fix the weather widget).
Are you a bit lost in the Linux command line? Check this article first for the most important commands to remember and a free downloadable cheat sheet so you can have the commands at your fingertips.
Magic Mirror configuration guide
How to exit the Magic Mirror screen
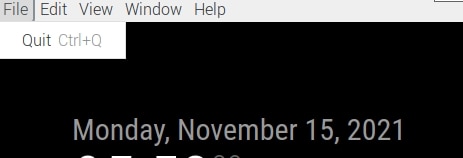
Before going further, there’s one thing you need to know: how to close the Magic Mirror app.
By default, it opens in full screen, and you have no way to exit.
To exit the Magic Mirror screen, press “ALT” on your keyboard, the top menu will show up. Then go to File > Quit to close the application (or use CTRL+Q).
If you want to configure the Magic Mirror directly from the same Raspberry Pi, you need to close everything before going further.
How the Magic Mirror configuration works
The Magic Mirror configuration is the one you created during the installation. The file location is probably something like: “/home/pi/MagicMirror/config/config.js”. Open it with your favorite editor (nano for example), and take a look at the file content.
The structure of the configuration file:

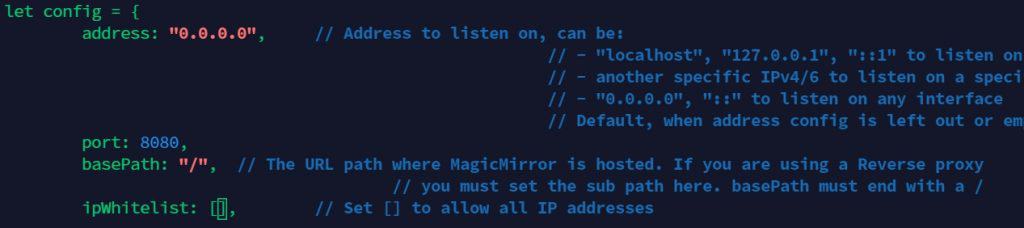
The top of the configuration file includes the general variables for your installation: IP address, port, language and locale, time format, etc. These settings will be used by all widgets on your screen, so take the time to change them if needed. For example, you can set “timeformat” to 12 if you prefer and change the language to “fr”, “de” or whatever you prefer.
Then there is a big block with all the widgets listed. Widgets are named “modules” in the Magic Mirror configuration:
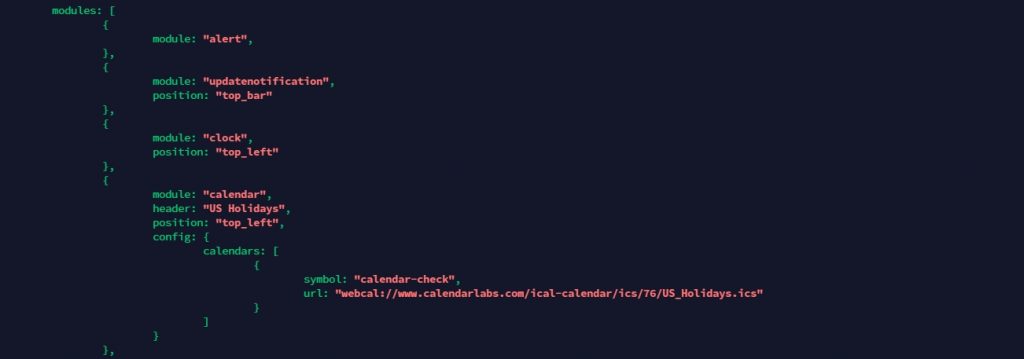
Most modules have a name and a position set. For example, on this screenshot, we can see that by default there is a “clock” module set to be displayed on the top left of the screen.
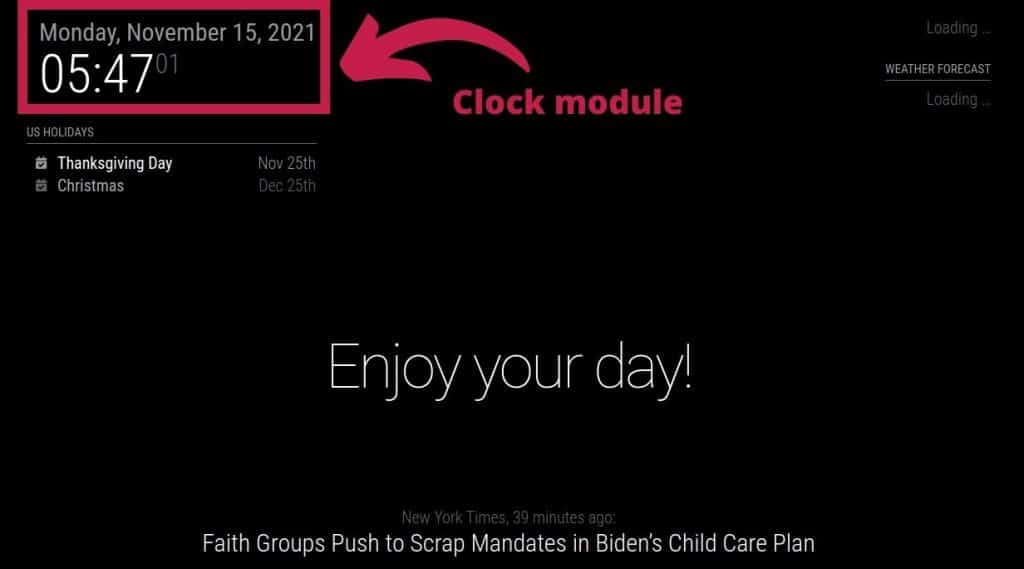
Some modules included in your configuration have only the position parameter set to tell where to display it on the screen, but others have many more options, like the calendar one, that will fetch a URL to download the next holidays.
A simple example: change the news feed.
Let’s take an example to see how it works. At the bottom of the screen, you have a news feed. It takes the latest articles in the New York Times, and displays the title and published date. Maybe you are more interested in Raspberry Pi news, and can edit the modules options to display the latest tutorials on your favorite website:
- Open the configuration file with any editor, for example:
nano /home/pi/MagicMirror/config/config.js - Find the newsfeed module:
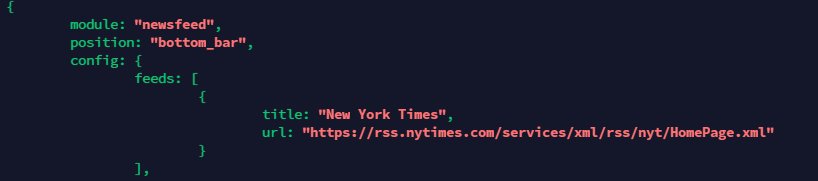
- Change the title and URL of the feed, with something like:
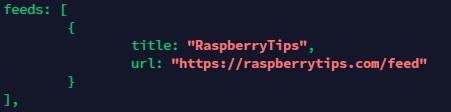
- Restart your Magic Mirror service:
cd /home/pi/MagicMirror
npm run start
That’s it, you’ll now see much more interesting news on your screen.
It's a free PDF guide containing every Raspberry Pi Linux command you should know!
Download now

I hope that you have a better understanding of how you can easily edit the default configuration file to fit your needs. You are welcome to change the settings, remove useless modules or witch modules positions as you want.
Creating copies of the configuration file as backup regularly is probably a good idea, in case you broke something while doing these changes.
Remote access to the Magic Mirror
As with most projects, I find it easier to make the changes in this configuration file from my computer (via SSH). And in fact, there is a way to see the results in your browser instead of the Raspberry Pi display. This way, if you have a dual screen, you can edit the configuration on one and see the result on the other one.
If you are interested in doing the same thing, here is how to do it:
- Open the configuration file:
nano /home/pi/MagicMirror/config/config.js - Edit the “address” line. You can either put the current IP address of the Raspberry Pi, or “0.0.0.0” if you want it to work even if the Raspberry Pi switches to another IP on your network. In my case, I prefer the second option, as I don’t use a static IP address:
address: "0.0.0.0" - The default port is 8080. You only need to change it if you already have a service using it. If your Raspberry Pi setup is dedicated to this project, you can keep it like this.
- Then you also need to change the “ipWhitelist” line to allow your computer to remote access. Same thing here, if your computer as a static IP, just add it to the list. IF not, allow all IP addresses.
With a static IP:ipWhitelist: ["192.168.1.10", "127.0.0.1", "::ffff:127.0.0.1", "::1"]
Allow all:ipWhitelist: []
That should be enough for now. You can enable HTTPS if you want, but you’ll need a certificate, that’s not necessary if it’s just to see your changes in real-time.
Restart the Magic Mirror app, and check that you can access it from your computer, by opening the URL http://<IP>:8080 in your browser. If you don’t know how to find your Raspberry Pi IP address, click on this link to read my tutorial on the topic.
Using this is more convenient, and can also help to debug most issues, like JavaScript errors, by using the developer tools in your browser.
Fix the weather widget on your Magic Mirror
By default, there is a weather widget enabled on the top right of the Magic Mirror screen, but it doesn’t work. It shows “Loading…” all the time. Here is how to fix it:
- Go to OpenWeatherMap and create an account.
- Once logged in, click on “API keys” and generate a new API key for your Magic Mirror project.
- You’ll get a random string of characters. Copy it.
- Open the configuration file and find this part:
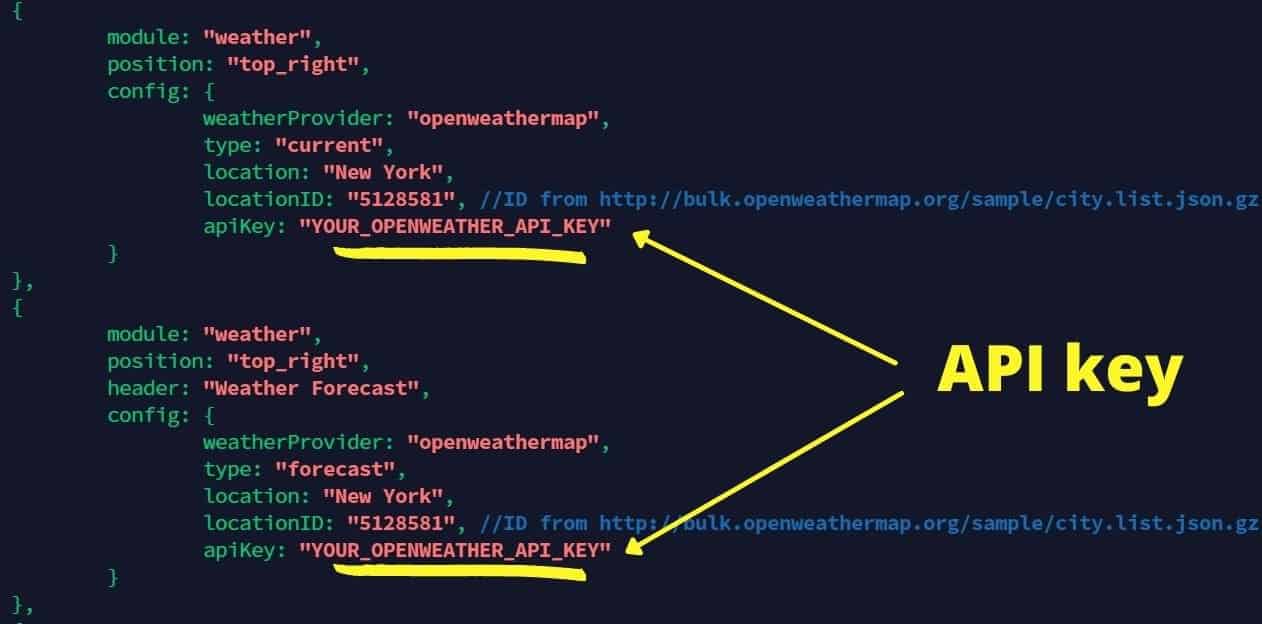
Put your API key in both locations. The first one is for the current weather, the second for the weather forecast. - Restart your Magic Mirror application to apply the changes.
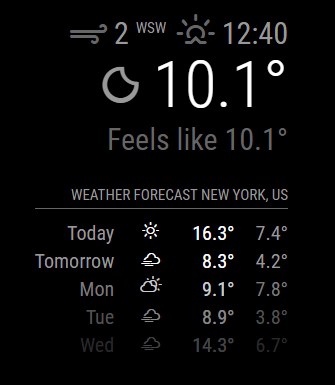
The New York weather should now be displayed on your screen. To display the weather for another location, change the two fields “location” and “locationID” for both modules. You can find the values to set by downloading and extracting this file.
This is a big file with all the cities in the world, so it’s better to do this in a terminal or via SSH:
- Download the file on the Raspberry Pi:
wget https://bulk.openweathermap.org/sample/city.list.json.gz - Extract the file:
gunzip city.list.json.gz - Use grep to quickly find the corresponding ID, something like that should work:
grep "Boise" -B1 -A2 city.list.json - You’ll most likely get several results, that’s why I keep two lines under the city name, to get the state and country field.
You can even increase that to get the longitude and latitude.

Pick the ID corresponding to your city and change the value in the configuration file. After restarting the Magic Mirror, it should be updated with the correct weather forecast.
Switch widget positions on your Magic Mirror
As you have seen, each module is set to be displayed in a specific location, but it might be complicated to understand the logic behind it. So, here are the possible locations you can use:
- top_bar and bottom_bar: full width top and bottom region.
- top_left, top_center and top_right : just under the top bar, with three columns.
- bottom_left, bottom_center and bottom_right: just above the bottom bar, with three columns.
- upper_third, middle_center and lower_third: they are the three regions in the middle of the screen
If it’s not clear enough, you can find a great visual explanation on the Magic Mirror forums (here).
Auto-start Magic Mirror
If you intend to use your Magic Mirror as a stand-alone device, you would probably need it to start automatically when the Raspberry Pi starts up. This is especially useful if you enclose your Magic Mirror in a wooden frame with two-way glass.
To do this, the easiest way I found is to use pm2. PM2 is a process manager for NodeJS application. It’s a bit like the systemd or service commands you may be used to on Linux, but for NodeJS processes. Here is how to use it:
- Install PM2 with the command:
sudo npm install -g pm2 - Set PM2 to autostart on boot:
pm2 startup - Create a script to start the Magic Mirror app:
nano /home/pi/mm.sh - Paste these lines in this file:
cd ./MagicMirror
DISPLAY=:0 npm start - Save and exit (CTRL+X)
- Add the execution permission:
chmod+x mm.sh - Start the Magic Mirror with PM2:
pm2 start mm.sh - Once started, save the current state with:
pm2 saveBy doing this, it will automatically start it on boot.
Once done, you’ll now use PM2 to manage the Magic Mirror app. You get access to handy commands like:
- Restart Magic Mirror (after any configuration change):
pm2 restart mm - Close the application:
pm2 stop mmIt will be “start” to restart it after that:pm2 start mm.sh - Show the recent Magic Mirror logs:
pm2 logs mm
This is really useful to troubleshoot any error or if the screen doesn’t show up anymore after a configuration change.
Installing new modules on your Magic Mirror setup
All of this is already pretty nice, you have a neat dashboard with the date/time, calendar, weather and news feed. But it’s only the beginning.
Introducing Magic Mirror modules
The Magic Mirror is a modular app, where you can download and install new widgets from the community. Most of them are listed here, but you can also find modules from random developers on GitHub there and there. It includes things like:
- Displaying jokes.
- Cryptocurrencies and stocks values in real time.
- Displaying the weekly timetables for students.
- Connecting to most open APIs like Google apps, transport companies or weather services.
Anything you might need is probably already available as a module for your dashboard. And if not, you can create your modules with a bit of JavaScript.
Magic Mirror modules manager
It’s possible to download and install each module separately, by acceding the GitHub project for each of them, reading the documentation and following the configuration steps. But I find it a bit complicated, and as a modules manager exist, I think it’s a good idea to try to use it first.
The modules manager is named “mmpm” and can be installed on your Raspberry Pi by following these steps:
- Install the prerequisites:
sudo apt install libffi-dev nginx-full -y - Then the package itself:
python3 -m pip install --upgrade --no-cache-dir mmpm - Run the installer:
mmpm --guided-setupIt will ask you several questions about you current installation and how you plan to use the modules manager. There is no wrong answer. Follow the wizard and answer everything (most questions are answered with “yes” or “no”). - Finally, run this command to add the mmpm command to your shell:
echo 'export PATH="$PATH:$HOME/.local/bin"' >> ~/.bashrc
You need to restart the terminal (or reconnect your SSH session) to use the commands I give just after.
Once done, you can use this tool with the following commands. It close to apt so you shouldn’t be lost with this:
- mmpm search <string>: A search engine to find corresponding modules (like apt search).
mmp search calendar - mmpm list: List all packages. Options are available to filter this list, use –help to see them.
mmpm list -a #List all
mmpm list --help #Show the help
mmpm list -i #List installed modules - mmpm install <name>: Install a new package.
mmpm install random_quotes - mmpm -h: Get more help about this tool.

How to install a new Magic Mirror module with mmpm
To make sure everything is clear, let’s take an example. Let’s say you want to display an inspirational quote on your Magic Mirror screen. Here are the easy steps to follow to do it:
- Search the name of a module doing this:
mmpm search quotes - There are two results available, let’s take the random_quotes module:
mmpm install random_quotes
- Once done, the only thing to do is to edit your configuration files, and add these lines in the “modules” section:
{
     module: "random_quotes",
     position: "bottom_bar"
},
- Restart the Magic Mirror with:
pm2 restart mm
That’s it, you’ll now get a random quote at the bottom of your screen.

Most modules will have additional options you can add. For example, with this one you can set what kind of quotes you want to see (success, inspirational, motivation, etc.). You need to check the module documentation to know all the details.
It's a free PDF guide containing every Raspberry Pi Linux command you should know!
Download now
Video
It's a free PDF guide containing every Raspberry Pi Linux command you should know!
Download now
Reminder: Remember that all the members of my community get access to this website without ads, exclusive courses and much more. You can become part of this community for as little as $5 per month & get all the benefits immediately.
Going further with the Magic Mirror
You are now ready to install the Magic Mirror the right way on your Raspberry Pi, including the service manager and using mmpm to install new modules. I think it’s a great project to go further with a Raspberry Pi, you may discover NodeJS, git and some usage of popular APIs along the way.
Obviously, this guide is only an introduction, as the possibilities are endless with this project. Let me know if you experience some issues or need other tutorials on specific things related to this (like creating a new module), I could try on my own and eventually share my findings in other articles.
Anyway, here are some related articles you might be interested in while building your Magic Mirror:
- 5 ways to remote desktop on Raspberry Pi (Windows/Linux/Mac)
- How to Find the Current IP Address of a Raspberry Pi?
- RasPad 3: Honest Review After One Month Usage
- Raspberry Pi: EVICIV 10.1″ Touchscreen Review (With pictures)
- 25 Awesome Raspberry Pi Project Ideas at Home
Whenever you’re ready, here are other ways I can help you:
The RaspberryTips Community: If you want to hang out with me and other Raspberry Pi fans, you can join the community. I share exclusive tutorials and behind-the-scenes content there. Premium members can also visit the website without ads.
Master your Raspberry Pi in 30 days: If you are looking for the best tips to become an expert on Raspberry Pi, this book is for you. Learn useful Linux skills and practice multiple projects with step-by-step guides.
The Raspberry Pi Bootcamp: Understand everything about the Raspberry Pi, stop searching for help all the time, and finally enjoy completing your projects.
Master Python on Raspberry Pi: Create, understand, and improve any Python script for your Raspberry Pi. Learn the essentials step-by-step without losing time understanding useless concepts.
You can also find all my recommendations for tools and hardware on this page.