How to Make a Discord Bot on Raspberry Pi? (Python easy method)
Discord is a fantastic tool to speak with your community (gamers at first, but now more open to other types). You can use web hooks and bots to interact with a server. Today, we’ll see how to create your first Discord bot on a Raspberry Pi with Python.
The first step to build a bot on Raspberry Pi is to create a Discord user. Then, a Python script can be created with the Discord.py library to interact with Discord and the other users.
In this tutorial, I will start with a short introduction about Discord and bots (if you need it), then guide you through all the steps required on discord to create a bot, and finally and I’ll show you how to program your bot on your Raspberry Pi.
By the way, if you get overwhelmed as soon as Python is required for a project, I recommend checking out my e-book “Master Python on Raspberry Pi“. It will guide you step-by-step to learn the essential concepts (and only the essential concepts) required to achieve any project in the future. Raspberry Pi without Python is like a car without an engine, you miss all the fun parts. Get 10% off by downloading it today!
Discord and bots presentation
Discord
If you lived in a cave for the last 5 years, Discord is a free text, voice and video messaging app.
It’s closed to Slack if you want, but was mainly oriented for gamers.
As we can find gamers at school or in business, they are now more and more companies and students that move to discord to use it as a Slack alternative as almost all features are available for free.

I have a Minecraft server where I used it for a few years as a replacement of Teamspeak (for player vocal) and Skype (for the team).
It works very well, almost no bugs and features are awesome (permission details for example).
Discord is improving almost every day, so there are regular updates and bug fixes.
Join Our Community!
Connect, learn, and grow with other Raspberry Pi enthusiasts. Support RaspberryTips and enjoy an ad-free reading experience. Get exclusive monthly video tutorials and many other benefits.
Learn moreNote: If you want to install Discord on your Raspberry Pi, check the link to read my tutorial on the topic. There is no package directly available for ARM systems, so it’s not as straightforward as on Windows / macOS.
It's a free PDF guide containing every Raspberry Pi Linux command you should know!
Download now
Bots
As the name suggest, the bot is an automated program.
On Discord, the goal is to add more features to help the users.
Examples:
- Management commands
- Music playing in chat
- Custom features linked to an external device (like a Raspberry Pi^^)
We’ll see in detail how to create one and you’ll understand at the end of the post how powerful it is.
If you are a bit curious, tons of bots are available to use on your servers without coding anything yourself, you can just browse any bot’s directory like this one!
Web hooks
It’s not the point today, but just a quick word about web hooks.
Basically, it’s for web integration, so you can use it with some external providers (I think to GitHub but there is more).
It’s mainly to post messages on a specific channel automatically.
It’s different from a bot, for example I use it to post some new updates on my Discord server, or thank someone that buy from the online store, but there is not much to do.
Let me know if you are interested, but it’s simple to code compared to a bot (for me at least).
Create your bot on Discord
Ok, let’s jump on Discord now for all the prerequisites required to create a bot. If you already know Discord or have even your server, you can probably skip a few sections here.
I’m starting from the absolute beginning, so everyone has the complete information.
Register an account
If you don’t have an account, here is how to do this:
- Go to Discord.com and click on Login, then Register
- Fill the following form on the website:
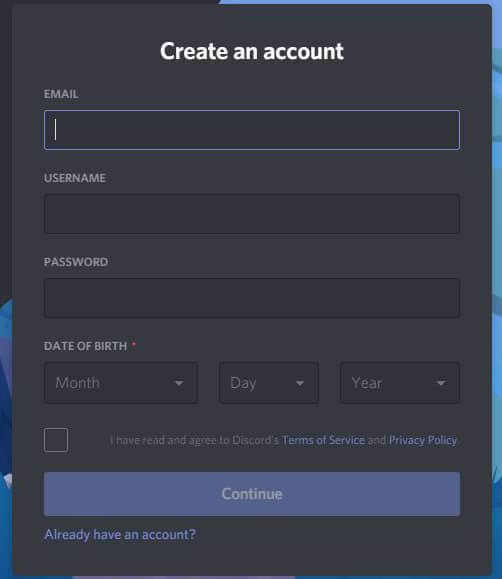
- Once logged, directly create a new server:
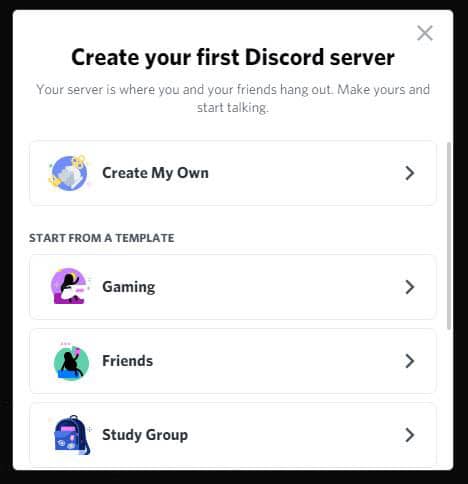
The first one is ok for this test - Then, choose a name and an icon
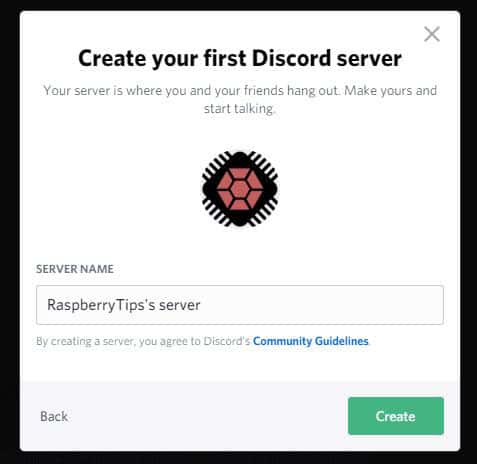
That’s it, you have your account and server ready, you can move the next step.
Don’t forget to confirm your email address as it’s mandatory to create a bot.
Create an application
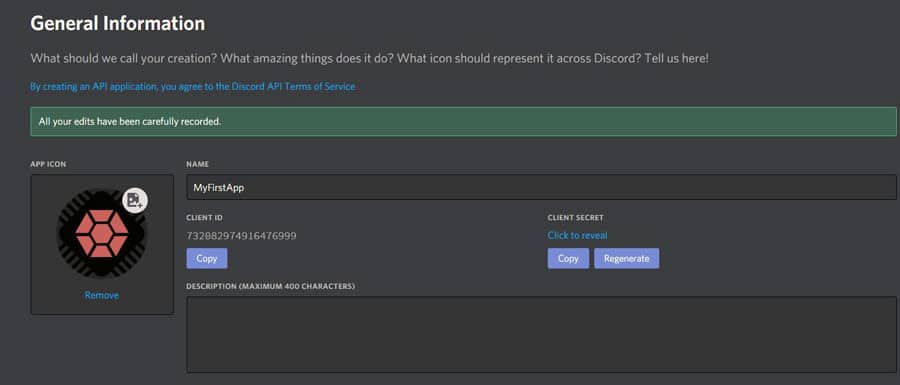
We just need to declare a new application before creating a bot:
- Start by opening the Discord developer console by clicking here
It looks like this:
- Create a new application by clicking on the top right button
- Choose a name
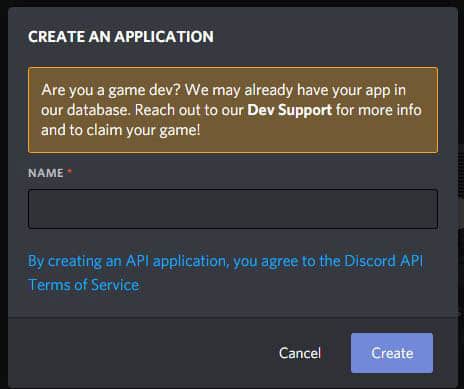
As I noticed later, your bot will get the application name. So, “test” or “myfirstapp” is probably not a good idea 🙂 - To create the app, you absolutely need to have your email confirmed.
That’s it, the application is created, we can now create a new bot.
Create a bot
- Click on “Bot” in the left menu
- Then click on “Add bot” and accept the confirmation message
- A bot is created automatically linked with your application
Invite the bot on your server
The last step is to invite the bot to join your server:
- The first thing is to go to this URL:
https://discord.com/api/oauth2/authorize?client_id=<CLIENTID>&scope=bot&permissions=1
Replace <CLIENTID> with your client ID, you can find it on the application page (check my previous image for an example) - On the page that opens, choose the server to join:
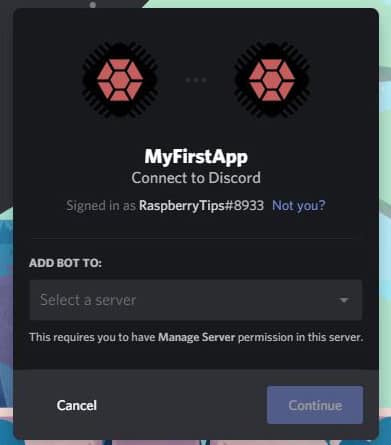
- Click on Continue
- Then click on Authorize on the next screen
- The bot is connected on the server, you can check on your server, you should have something like:

The part on Discord is now completed, we have everything we need to start to work on the Raspberry Pi.
Code your bot on Raspberry Pi
The goal here is to create a brain for your bot. For now, it can’t do anything.
After a few prerequisites, the main part is to create a script to fit with your needs.
It's a free PDF guide containing every Raspberry Pi Linux command you should know!
Download now
Operating system
I’m using Raspberry Pi OS Lite to do this, but any system is probably ok, as you just need Python.
As always, don’t forget to update your system before going further:sudo apt update
sudo apt upgrade
Are you a bit lost in the Linux command line? Check this article first for the most important commands to remember and a free downloadable cheat sheet so you can have the commands at your fingertips.
Python prerequisites
Then we need to install a few Python package:sudo apt install python3-pip python3-cffi
PIP is the Python extensions manager and CFFI is an interface between C and Python, that the library use.
Python 3 is mandatory as the library doesn’t work with older versions.
So, it’s python3-pip, not python-pip.
Basically, with this command, apt will install all the other required packages.
Then, update setuptools to be sure you have the last version (mostly if you already had PIP on your system before this)sudo pip3 install -U setuptools
The library
To keep everything simple, we’ll use a library to interact with Discord
The one I selected is Discord.py from this GitHub repository
I chose it because it’s easy to use, but there are others you can find, with probably other advantages, and for other languages if you are not familiar with Python.
To install it, just copy this command:sudo pip3 install discord.py
A first basic script
We’ll start by a short example on how this library works, so you can test that everything is good in the configuration and move further to the creation of your projects.
- As I’m on Raspberry Pi OS Lite, I will use Nano as my editor, but you can use the one you prefer.
For example, on Raspberry Pi OS Desktop you can copy and paste the code in Thorny or another editor. - Open your editor and create a new file:
nano MyFirstApp.py
A terrible name for a script once again ^^ - Copy/past these lines:
import discord
from discord.ext import commands

bot = commands.Bot(command_prefix='>')

@bot.command()
async def ping(ctx):
     await ctx.send('pong')

bot.run('token') - This is an example from the GitHub repository, there are more here.
Basically, the goal is to answer “pong” when someone run the command “ping” 🙂
The first two lines are here to import the required prerequisites from the library.
Then, we declare the prefix to detect one command (“>”).
The next block is to define the command we are waiting for, and what to do if we receive it. The syntax will be the same for each command you add after that (try it!).
Finally, we run the bot with these parameters. - Here is the command to run the bot if you don’t have an editor doing this:
python3 MyFirstApp.py
Obviously, change the name to fit the one you have created.
So, the code is pretty easy to read, and you don’t need, and you don’t need much more to do interesting thing.
If you already have some basics in Python, you can for example add a few lines before the “await” line, and send the text variable instead of a static word (I have no idea, but for example >ping => 40ms, to monitor Internet or another machine).
If you are new to Python, that’s probably not the easiest script to start with. In this case, I would recommend taking a look at my ebook on how to “Master Python on Raspberry Pi”. It will guide you step-by-step to learn the basics and understand any script in the future. I give you 10% off with this link, don’t miss out.
It's a free PDF guide containing every Raspberry Pi Linux command you should know!
Download now
Video
A video is available on the YouTube channel to show you exactly how to build your first discord bot on Raspberry Pi.
Subscribe to the channel to not miss anything:
It's a free PDF guide containing every Raspberry Pi Linux command you should know!
Download now
Reminder: Remember that all the members of my community get access to this website without ads, exclusive courses and much more. You can become part of this community for as little as $5 per month & get all the benefits immediately.
Conclusion
That’s it, you now have a better idea on how to install and create a Discord bot on a Raspberry Pi sitting at home. Now, it’s your turn to work on it to code exactly what could be cool for your community!
I invite you to read the examples from the GitHub repository to have a better idea on what is built-in in the library. Commands and basic answers are not everything you can do with it.
If you never really code anything in Python, I invite you to start by learning how it works (by reading my tutorial for example, or taking a course on Udemy). It’s important on Raspberry Pi but also in the “real world”. Python is one of the most used languages in the world, and knowing how to code is a powerful skill for companies, even if you are not a developer!
Whenever you’re ready, here are other ways I can help you:
The RaspberryTips Community: If you want to hang out with me and other Raspberry Pi fans, you can join the community. I share exclusive tutorials and behind-the-scenes content there. Premium members can also visit the website without ads.
Master your Raspberry Pi in 30 days: If you are looking for the best tips to become an expert on Raspberry Pi, this book is for you. Learn useful Linux skills and practice multiple projects with step-by-step guides.
The Raspberry Pi Bootcamp: Understand everything about the Raspberry Pi, stop searching for help all the time, and finally enjoy completing your projects.
Master Python on Raspberry Pi: Create, understand, and improve any Python script for your Raspberry Pi. Learn the essentials step-by-step without losing time understanding useless concepts.
You can also find all my recommendations for tools and hardware on this page.




pls a second part
that was a really great guide/video pls more i like ur content