

Mining Dogecoin with a Raspberry Pi: The Complete Guide
Using a Raspberry Pi to mine cryptocurrencies has always been something of interest for Raspberry Pi users: having a cheap device that consumes little electricity and can run 24/7 to mine crypto while you sleep. In this article, I’ll show you how to set up your Raspberry Pi to mine Dogecoin, the crypto popularized by Elon Musk.
To mine Dogecoin on a Raspberry Pi, a miner and a mining pool is required. XMRig is an open-source miner that can be used to mine cryptocurrencies on a Raspberry Pi. And unMineable is a great mining pool that can be used to mine most coins, like Dogecoin, Bitcoin, Ethereum, and more.
I’ll give you the instructions to install this miner on your Raspberry Pi. To be honest, don’t expect to become rich with this setup, but at least you’ll learn how it works. And if later on you want to try it on a bigger computer running any Linux distribution, it’ll be the same. Take this tutorial as a learning experience, more than a way to make money.
As always, you can find a video version of this tutorial at the end of the article if you want to quickly see how it works.
If you’re looking to quickly progress on Raspberry Pi, you can check out my e-book here. It’s a 30-day challenge where you learn one new thing every day until you become a Raspberry Pi expert. The first third of the book teaches you the basics, but the following chapters include projects you can try on your own.
Prerequisites to Mine Dogecoin on Raspberry Pi
There are 3 requirements before beginning to mine Dogecoin on a Raspberry Pi:
- A recent Raspberry Pi model is recommend for better results (good CPU needed).
- A 64-bits operating system is required to install the miner.
- A mining pool is needed to link the miner to the Dogecoin network.
I’ll explain these three steps in details in this first part of the tutorial.
Pick a solid Raspberry Pi model
Most miners use powerful computers, with several GPU, to improve their performances and earn more money. On Raspberry Pi, there is no GPU we can use, so the only thing we have is the CPU. Using a Raspberry Pi 4/400 will provide better results than an older model.
Also, we’ll need to install a 64-bits operating system (that’s the next step), so forget testing this on the older models. The only models you can use for this tutorial are:
- Raspberry Pi 2B, version 1.2 only
- Raspberry Pi Zero 2
- Raspberry Pi 3 or 3B+
- Raspberry Pi 4 or 400
- Raspberry Pi 5
The last of this list will be the best choices.
It's a free PDF guide containing every Raspberry Pi Linux command you should know!
Download now
Install a 64-bits operating system
The miner we’ll use in this tutorial only runs on a 64-bits operating system, which is why we need a recent Raspberry Pi model.
If you are entirely new to this, the miner is the software we’ll install on the Raspberry Pi to do the work. It will connect to the cryptocurrency network and use the resources on the computer to do the jobs given by the mining pool.
A 64-bits operating system will give better results. Once you’ve selected your Raspberry Pi model, the first step is to install a system on it. It doesn’t really matter which one you pick, the easiest one might be Raspberry Pi OS or Ubuntu Server as it’s included in Raspberry Pi Imager, or you can just use any system you prefer:
- Install Raspberry Pi OS 64 bits: The lite version would be enough, as we don’t need a graphic interface. You can now find it directly in Raspberry Pi Imager OS list, check my tutorial if you’re not familiar with this tool.
And you can read this other article for more details about the differences between 64 and 32 bits. - Install Ubuntu Server 64 bits: If you are used to Ubuntu or want to keep things simple, you can use Raspberry Pi Imager to flash the server version of Ubuntu. In the operating system choice, click on “Other general purpose OS” and then “Ubuntu”. Pick the 64-bit server OS in the list and flash it on your SD card.
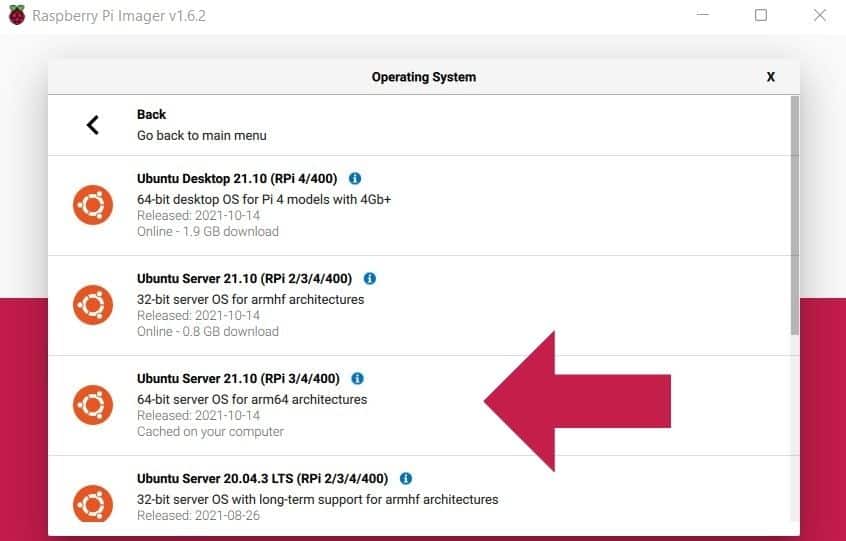
- Other options: The operating system doesn’t really matter. You just need a 64-bits operating system, if possible, without an interface for better results. But you can pick Manjaro, Fedora, Kali, etc. If you already have a 64-bits OS installed, go with it, you don’t need to start from scratch.
Once your SD card ready, boot on your new operating system and configure the basics:
- On Raspberry Pi OS, for example, you can use raspi-config to configure the network or keyboard layout if needed:
sudo raspi-config - Once done, it’s recommended to update all the packages to the latest version with:
sudo apt update
sudo apt full-upgrade
Read my article about Ubuntu or Manjaro if you are using another system and need help to do the same thing.

Join Our Community!
Connect, learn, and grow with other Raspberry Pi enthusiasts. Support RaspberryTips and enjoy an ad-free reading experience. Get exclusive monthly video tutorials and many other benefits.
Learn moreGet a Dogecoin address
Depending on the mining pool you choose, this might not be mandatory. But if you are serious about doing this (especially if you will try on another computer after testing on your Pi), you can get a DOGE address by following the instructions on the official website.
There are several ways to create an address. I did it by install Dogecoin Core on my computer, but I’m not certain it’s the easiest way. The software is heavy, and the synchronization took me a few hours with a fiber connection. I think using the app on Android or the lite version (Multidoge) on a computer would be a better choice.
Anyway, here is how to create your address with Dogecoin core:
- Download and install the app for your operating system.
- Open the app. It will start the synchronization, but you don’t need it to be synchronized to get an address (it’s only required to see your current balance and send coins).
- Click on “Much Receive” and fill the form.
All fields are optional, but I recommend putting a label, something like “Raspberry Pi mining address”. - A new line will be added in the table below, select the line and click on “Show” to get your address:
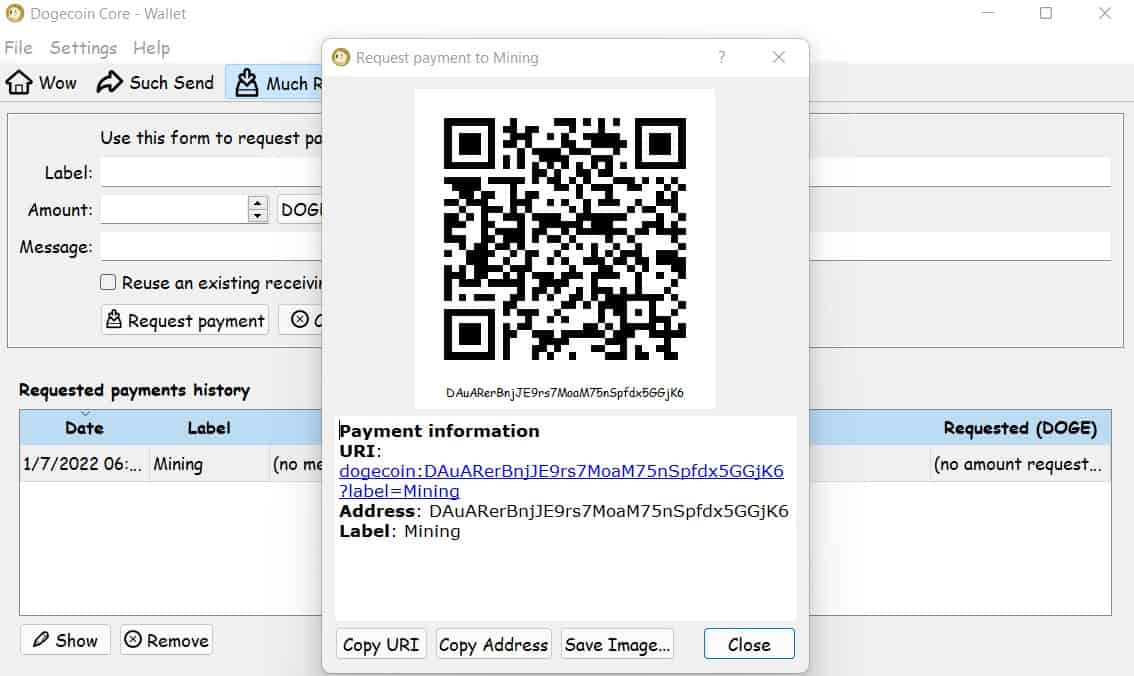
You’ll use it in the miner configuration, just keep it somewhere safe for now.
By the way, if you prefer not to bother with the software part, you can just use my address for the tests. If your goal is just to do the experiment on your Raspberry Pi, you won’t earn anything, and it doesn’t matter which address is used.
Here is my address for this tutorial: DAuARerBnjJE9rs7MoaM75nSpfdx5GGjK6
Find a mining pool
The last thing you need to mine Dogecoin on Raspberry Pi is a mining pool. A mining pool is a group of miners that put their resources in common to increase the chance to find and block, and so receiving a reward for their work.
I’m not an expert on this topic, but one mining pool that come often as a recommendation is unMineable. You can use it without having to create an account, it’s compatible with Xmrig and their fees are pretty standard (they keep 1% of your revenue).
Here are the required steps to use it as your mining pool:
- Go to their website, and click on Dogecoin in the coins list (Here is the direct link).
- You’ll see several options: Ethash, Etchash, Kawpow and RandomX.
As we don’t have a graphic card, we’ll use the CPU option: RandomX. - Click on RandomX and take note of the URL and port of the global server.
At the time of writing, the URL is rx.unmineable.com:3333 - Just below, you’ll see the explanation on how to set your user field:

I’ll show you how to configure this in the next part.
On the right, you’ll have links to guides helping you to set up the miner. You shouldn’t need it, as I’ll explain everything in the next part (and most tutorials are for Windows users…). You can also put your Dogecoin address in a form to see your results and active workers. We’ll get back to this later.
It's a free PDF guide containing every Raspberry Pi Linux command you should know!
Download now
You can try other mining pools if you want, the idea is always the same. It will give you an URL.
It's a free PDF guide containing every Raspberry Pi Linux command you should know!
Download now
How to Mine Dogecoin on your Raspberry Pi
We are now ready to start mining on the Raspberry Pi, we just need to install the miner and configure it.
I recommend following these steps from your computer. Connect to your Raspberry Pi with SSH, so you can copy and paste the following commands directly. Don’t know how to do this? Read this article first.
Install the miner: XMRig
Here is the procedure to install XMRig on your Raspberry Pi:
- Install the prerequisites:
sudo apt-get install git build-essential cmake libuv1-dev libssl-dev libhwloc-dev - Clone the GitHub project on your device:
git clone https://github.com/xmrig/xmrig.git - Create a new folder and go into it:
mkdir xmrig/build && cd xmrig/build - Start the compilation:
cmake ..
make -j$(nproc)
It shouldn’t be too long. If everything goes well, you’ll see a file named “xmrig” in your build folder.
I’m following the steps given for Ubuntu on this page, you can refer to it if you have any doubts.
If after this test on your Raspberry Pi you want to test on your computer, XMRig has releases available for all major operating systems, you can download them directly from their GitHub page. It’s only on Raspberry Pi that you need to compile it from the sources.
Configure XMRig to mine Dogecoin with unMineable
You can run XMRig with all the options in one command line, but a more practical way is to use a configuration file.
You can download the template available on their GitHub project with:wget https://raw.githubusercontent.com/xmrig/xmrig/master/src/config.json
Make sure to be in the build folder before running this command.
Then you need to slightly edit the file to set the server address and your DOGE address:
- Open the file with nano:
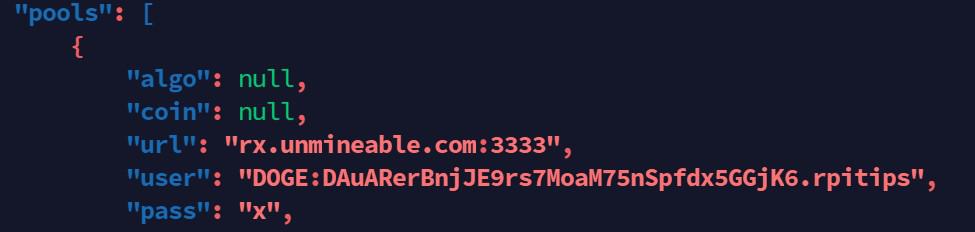
nano config.json - Find the “pools” section, you’ll need to change the values for the “url” and “user” configuration variables.
- Put your mining pool address in the “url” field, so if you are using unMineable it should be:
rx.unmineable.com:3333 - Then fill the “user” field as explained on the website:
DOGE:<address>.<worker_name>For example:DOGE:DAuARerBnjJE9rs7MoaM75nSpfdx5GGjK6.rpitips
If you use my address, please change the worker name to avoid any issue. - Save and exit (CTRL+X).
You might also like: How To Create and Edit JSON Files In Linux Terminal
Start the miner
Now that everything is set up and configured, you can start the miner. As everything is set in the configuration file, the command to start the miner is just:./xmrig
After a few seconds, you should see some logs indicating that the miner is receiving jobs from unMineable and working on them:

You’ll receive regular updates regarding the mining speed. But if you are using unMineable, you’ll find all the details directly on the website. I’ll show you how in the next part.
It's a free PDF guide containing every Raspberry Pi Linux command you should know!
Download now
Reminder: Remember that all the members of my community get access to this website without ads, exclusive courses and much more. You can become part of this community for as little as $5 per month & get all the benefits immediately.
Results & final thoughts
I told you right at the beginning, that you shouldn’t expect much from this experiment. Installing a miner on your Raspberry Pi is a great way to learn more about cryptocurrencies, and how the whole system works. But you won’t become rich overnight by doing this. You are in competition with mining farms using the latest CPUs and GPUs that will get most of the reward.
Check your results
If you are using unMineable, you can use the form on this page to check your results in real-time:
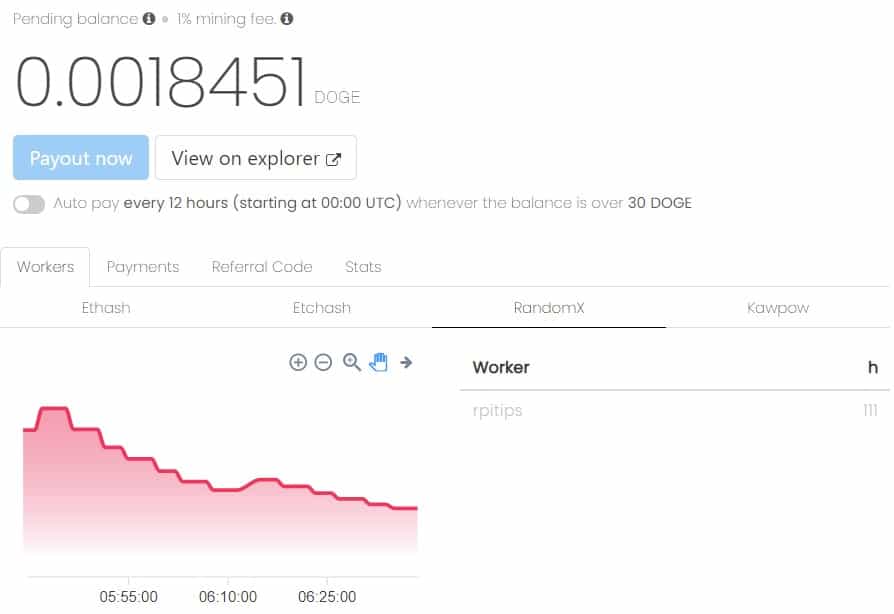
You’ll see your current balance in DOGE coins. And also a list of your workers and the results they got in the last hours.
I tested this on my Raspberry Pi 4, without optimizing anything, and the hash rate was between 100 and 200. The speed is declining, I suspect this is a cooling issue. I didn’t put my Pi in a proper case with a decent cooling system. The CPU temperature is now around 75° C, and it’s probably why everything is slowing down.
If you are testing this for a longer period, it’s probably a good idea to overclock your Raspberry Pi and install a good cooling system (something passive maybe like the Argon Neo, or even the Ice Tower to keep the temperature as low as possible).
To learn more about the Raspberry Pi temperature and how to keep it cool, check this guide I have on the website.
Final Thoughts
As you can see, with my results, I got something like 0.001 DOGE coin for each hour of mining. At the time of writing, 1 DOGE is worth something like $0.15, and you’ll need around one month of mining to get one :-).
Even if you have a way to get a Raspberry Pi for free and don’t pay the electricity bills, it’s not really worth it.
Also, unMineable require at least 30 DOGE coins for a payout, so you’ll need to keep your Pi running for 2 or 3 years before getting anything on your DOGE account! There are probably mining pools with a lower threshold, but anyway. At least, you learned how all of this works, and can now apply the same tutorial on a better computer, where you should get very different results.
Want to try another crypto? Read my guide on how to mine Monero on your Raspberry Pi.
I use different software and a different mining pool, so you can learn other things.
And if your ultimate goal is to make money to pay off your Raspberry Pi, click the links to find better options.
Video tutorial
Whenever you’re ready, here are other ways I can help you:
The RaspberryTips Community: If you want to hang out with me and other Raspberry Pi fans, you can join the community. I share exclusive tutorials and behind-the-scenes content there. Premium members can also visit the website without ads.
Master your Raspberry Pi in 30 days: If you are looking for the best tips to become an expert on Raspberry Pi, this book is for you. Learn useful Linux skills and practice multiple projects with step-by-step guides.
The Raspberry Pi Bootcamp: Understand everything about the Raspberry Pi, stop searching for help all the time, and finally enjoy completing your projects.
Master Python on Raspberry Pi: Create, understand, and improve any Python script for your Raspberry Pi. Learn the essentials step-by-step without losing time understanding useless concepts.
You can also find all my recommendations for tools and hardware on this page.


When I try and start the compilation for XMRIG, make -j$(nproc) hangs for me at 8%. Done it multiple times already. Any ideas?