The Definitive Guide To Monitor A Website On Raspberry Pi
Using a Raspberry Pi to monitor a website is an interesting project. The Raspberry Pi can be left on all the time and can be programmed with Python or any other language to run various tests. I tried this project for you, and in this tutorial, I will give you a few ways you can use your Raspberry Pi to monitor a website.
A Python script can be created on Raspberry Pi to monitor if a website is up or returns an error. The same script can also be used to check the website content (looking for changes or for a specific HTML tag).
Python is a powerful language to do this, but don’t worry, I’ll explain all the steps, so even if you are not an expert, it’ll be pretty straightforward. I will also suggest other options if you don’t want to use Python.
By the way, if you get overwhelmed as soon as Python is required for a project, I recommend checking out my e-book “Master Python on Raspberry Pi“. It will guide you step-by-step to learn the essential concepts (and only the essential concepts) required to achieve any project in the future. Raspberry Pi without Python is like a car without an engine, you miss all the fun parts. Get 10% off by downloading it today!
It's a free PDF guide containing every Raspberry Pi Linux command you should know!
Download now
Monitor a website with Python on Raspberry Pi
In Python, the “requests” module can be used to check the HTTP status of a website, and get the HTML content returned for a specific URL. Python can then analyze and log the results in a database, or send a notification when there is a problem.
Goal
There are many ways to monitor a website, so you might need to adjust my example.
But here is the idea I want to implement:
- Create a script with a website URL passed as an argument.
Ex: python check_website.py https://raspberrytips.com - Check if the URL is accessible, and the HTTP status that is returned (200 = site working, 404 = page not found, etc.).
- If the site is working, get the HTML code and make sure the content matches what is expected.
I’ll show you how to build a simple script to do this, and if you need something more complex, you can build it up from there.
Note: This is great if you want to monitor a local website, or do specific actions when it’s not working as expected. But if you just want to check the status of a public website (like RaspberryTips), there are easier ways to do this without lines of code. Check the end of this article first.
Create a script with an argument
As for any type of code project, always start with something as simple as possible. In this case, let’s just create a script that can take an argument (the website URL) and display it on your script.
Arguments passed to a Python script are stored in “sys.argv” and can be accessed via a list:

Join Our Community!
Connect, learn, and grow with other Raspberry Pi enthusiasts. Support RaspberryTips and enjoy an ad-free reading experience. Get exclusive monthly video tutorials and many other benefits.
Learn more- sys.argv[0]: name of the script
- sys.argv[1]: first argument
- etc.
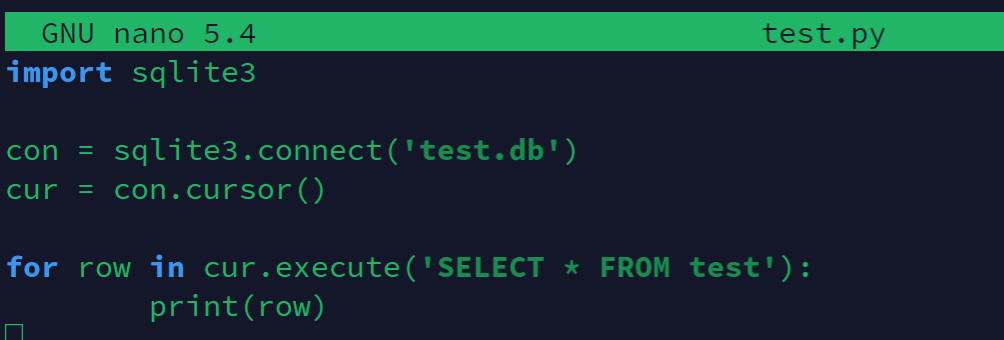
So, create a new Python script. Use nano or any other editor to create the file (you can find my favorite text editors for Raspberry Pi here):nano check_website.pyThen the first step might look like this:
import sys

url = sys.argv[1]

print(url)
We need to import “sys” to access the arguments, create a variable to store the url, and just print it to make sure it’s working.
Save and run this first version with:python check_website.py https://raspberrytips.com
If like me, you always mix the languages syntax, download my cheat sheet for Python here!
Download now
It will just display the URL.
In my script, I added a test to stop the script if no URL is passed when running it.
This is not mandatory if you are the only one to use it, but it’s best practice to always test the user input.
So, my script at this point looks like this:
import sys

if(len(sys.argv)>1):
        url = sys.argv[1]
else:
        print("Website URL missing")
        sys.exit()
Get the HTTP status
Now that we have the URL, we’ll use the “requests” module to try to reach it, and see the HTTP response we get. You can check the official documentation to get all the possibilities.
We’ll use the get(URL) function to access the URL, and the result will include the status code (200, 404, 500, etc.) and the full HTML code. I’ll show you how to use both.
Here is how to get the status of the URL:result = requests.get(url)
status = result.status_code
The status variable will be a number, that you can then test to do something specific depending on its value.
Here is a new version of my script including this:
import sys
import requests
if(len(sys.argv)>1):
url = sys.argv[1]
else:
print("Website URL missing")
sys.exit()
def get_site_status(url):
result = requests.get(url)
status = result.status_code
return status
response = get_site_status(url)
- I add the “import requests” at the beginning, to inform Python that I’ll use this module.
- I create the “url” variable, as explained in the previous section.
- I then added a new function, to get the status of a URL.
I will expand a bit on this script in the next part, but if you just need to see if your web server is up or something like that, you don’t need much more. You can just test the “response” variable value to know if the site is up or not.
Check if a specific tag or word is present in the HTML code
When I started creating websites, I just monitored the website’s status: “If the URL is responding, everything is fine”. Well, it’s not that simple.
If your website shows something like “Database error” on the page, the status code will still be 200, and your monitor could tell you that everything is fine.
So, at this stage, I recommend testing the content of the page. When we use “requests.get”, the HTML code is returned, so we can easily add another step in our script to make sure the correct page is displayed.
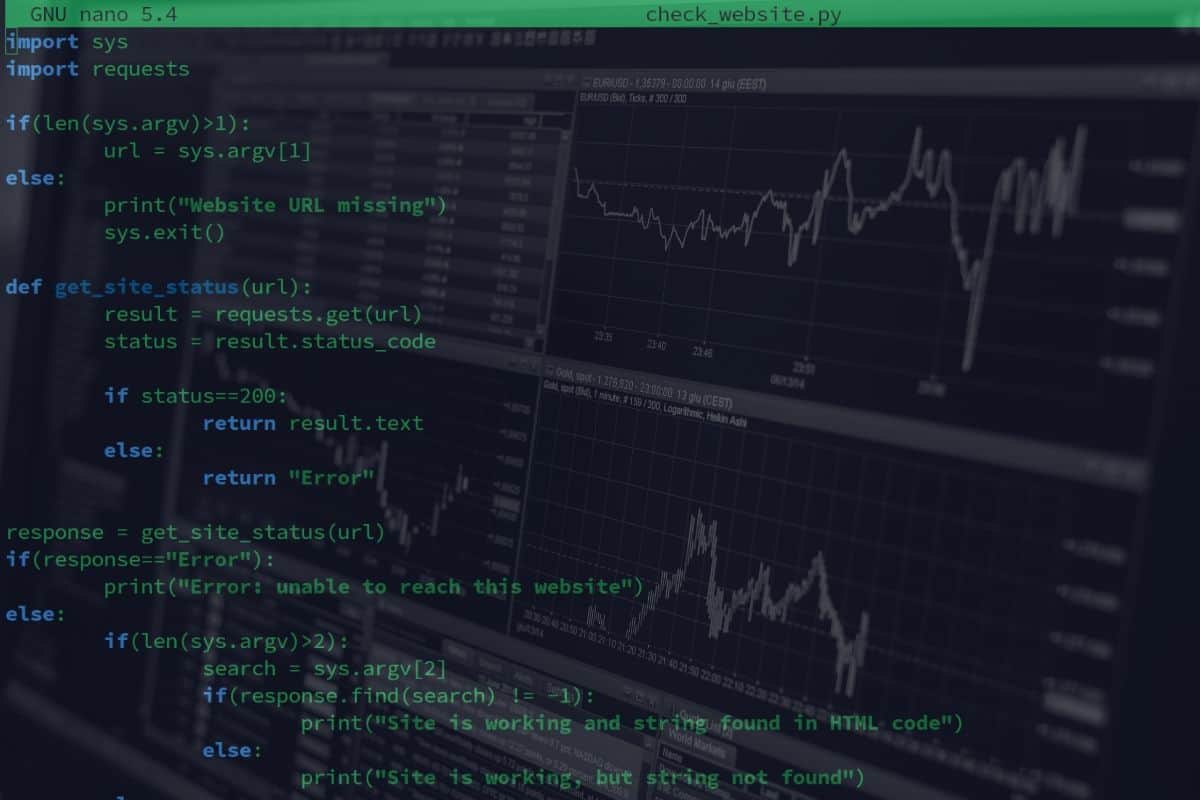
Here is my full script to do this:
import sys
import requests

if(len(sys.argv)>1):
        url = sys.argv[1]
else:
        print("Website URL missing")
        sys.exit()

def get_site_status(url):
        result = requests.get(url)
        status = result.status_code

        if status==200:
                return result.text
        else:
                return "Error"

response = get_site_status(url)
if(response=="Error"):
        print("Error: unable to reach this website")
else:
        if(len(sys.argv)>2):
                search = sys.argv[2]
                if(response.find(search) != -1):
                        print("Site is working and string found in HTML code")
                else:
                        print("Site is working, but string not found")
        else:
                print("Site is working")
It’s not meant to be the best script ever. I just want you to understand the logic and be able to improve it from there. You already know how the first half of the script works, here is what I added:
- Instead of returning the status code in get_site_status(), I return the HTML code when it works (result.text) or “Error” when it’s another HTTP status.
- If there is an error, we can stop here, the website is not working, no need to test its content.
- If the website is working, I use a second argument with the content I’m looking for.
My script will tell me if the second argument is included in the HTML code or not.
Then, you can use the script with this syntax:python check_website.py <url> <content>
Here are a few examples:
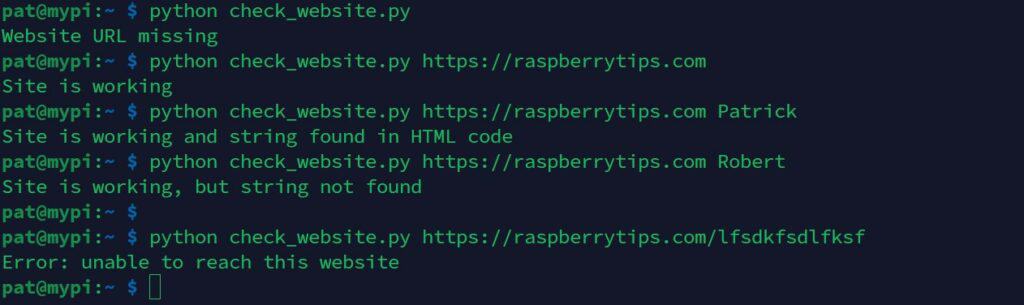
That’s it, you now know how to check if a website is reachable and if the content matches what is expected.
But it’ll often just be the starting point. Many improvements are available from there, depending on your goals and needs. Let’s explore a few ways to create a really useful script.
Going further with Python
Once you know how to determine a website or URL status, you can add a few features to your script. You can, for example, use it as a logger, and keep the results in the database, or do some kind of action to fix the website.
Save the result in a file
If you want to keep the history of the website availability, a simple way to do this is to store the result in a file. It’s pretty basic, but at least you can easily keep an eye on this history.
If like me, you always mix the languages syntax, download my cheat sheet for Python here!
Download now
Here is how to add a line in an existing file with Python:f = open ("logfile.txt", "a)
f.write("new line")
f.close()
You can for example add the current date & time, the URL, and the status code.
If you created a scheduled task that runs your script every 5 minutes, for example, you can see the next day how often your website is down.
Log the site status in a database
To go a bit further, and create something a bit more professional, you should probably store the result in a database. Many database systems are available on Raspberry Pi, from SQLite to MySQL.
In fact, I have a complete article where I list the most popular databases you can use on Raspberry Pi, with pros and cons and Python examples. So, you should probably start there if you are interested.
I like to have one script per main action, so I would probably have the check_website.py script that monitor the website and store the result in a database, and then other scripts to read the database and either display the stats or do some kind of action when there is an issue.
Send email notifications
Another thing you can add to your script, is to email you when the status_code is not 200. You can use the smtplib module to do this in Python or run a system command if your operating system is properly configured.
I won’t explain all the details here, as the setup and code is a bit too long to explain everything in this article.
But if you have my book “Master Python on Raspberry Pi“, I have a full chapter on how to do this (simple mail, attachment, and other types of notifications).
Or you can simply check this article for an introduction: Python: Send Emails From Your Raspberry Pi (no server required).
Use PushBullet to send notifications
Email is great, but if it’s critical that your website stays online, there is an even better option: push notifications.
Sending push notifications to Android or iOS from a Python script is a pretty big project, but you can use an API like PushBullet to do this easily. Basically, you install the PushBullet app on your phone, and your Python script will connect to their API to send a notification to your phone (title, message, image).
I love this app. There is also a browser extension for your computer, so even if you don’t have your phone, you’ll get the notification.
I also explain how to do this in the book, it’s not complicated.
Execute a remote command
And the last option I can think of is to run a system command depending on the status code of the URL (or the HTML content).
Let’s say you are testing an HTTP server located on the same Raspberry Pi, or on another Linux server on the network. You could just restart Apache when the site is down, sometimes it’s all it takes to fix the website.
There are many ways to do this, one simple option is to use the “os” module, like this:import os
os.system("service apache2 restart")
If it’s on a remote server, you can use SSH to connect to the server and then run the command.
It's a free PDF guide containing every Raspberry Pi Linux command you should know!
Download now
Want to chat with other Raspberry Pi enthusiasts? Join the community, share your current projects and ask for help directly in the forums.
Other options to monitor a website on Raspberry Pi
As I told you at the beginning, Python is not the only way to monitor a website status. And depending on your goals, you can even find much easier solutions, here are two of them.
Nagios
I wouldn’t necessarily say that Nagios is an easy alternative to Python for website monitoring. But it’s probably more professional, and if you already have it on your network it’s most likely the best way to do this.
When I was a network administrator, I was using it all the time. We had many web servers with import applications that needed to be accessible 24/7.
Nagios was configured to monitor the URLs of these web servers, and send a notification if something was wrong.
Nagios is a web interface, where you can add your servers, and the services you want to monitor for each server. You can then configure some actions when something goes wrong (test again, send notifications after 5 min downtime, etc.).
I have a full tutorial about Nagios on Raspberry Pi. You should read it if you want to use something more professional to monitor a website. Nagios is not intuitive for beginners, but it works really well once properly configured.
Monitor a public website without any line of code
If the website you want to monitor is public (meaning like RaspberryTips), then using Python or Nagios is not really the easiest option. There are some companies that specialize in doing this, and most of them offer free plans to keep an eye on your website.
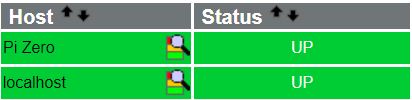
Here are two applications I use a lot for my websites:
They basically do the same thing. They will check your website status and response time every 5 minutes, and log the results. You can get notifications when the website is down, and have access to the history in your account:
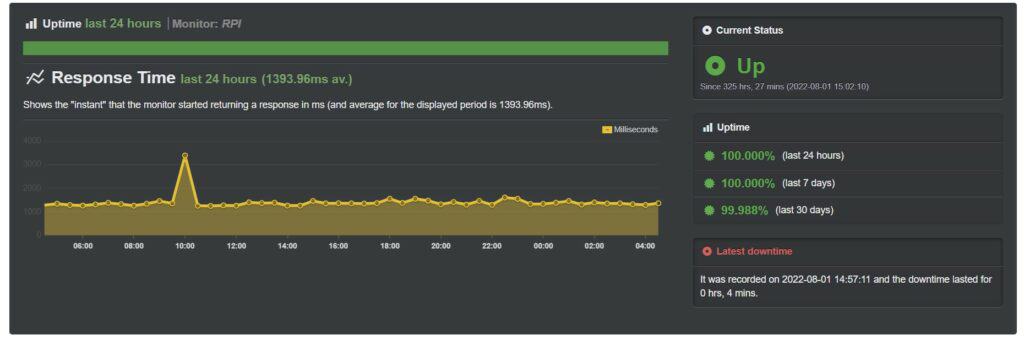
Advanced features are available to do various tests like checking the HTML content. You can also create status pages for your users.
The free plans are generally limited, but it’s usually enough in most cases (I don’t have a paid plan).
So, if you want to monitor a public website, accessible from everywhere, you should probably consider this solution first, before spending hours creating your perfect Python script :-).
Whenever you’re ready, here are other ways I can help you:
The RaspberryTips Community: If you want to hang out with me and other Raspberry Pi fans, you can join the community. I share exclusive tutorials and behind-the-scenes content there. Premium members can also visit the website without ads.
Master your Raspberry Pi in 30 days: If you are looking for the best tips to become an expert on Raspberry Pi, this book is for you. Learn useful Linux skills and practice multiple projects with step-by-step guides.
The Raspberry Pi Bootcamp: Understand everything about the Raspberry Pi, stop searching for help all the time, and finally enjoy completing your projects.
Master Python on Raspberry Pi: Create, understand, and improve any Python script for your Raspberry Pi. Learn the essentials step-by-step without losing time understanding useless concepts.
You can also find all my recommendations for tools and hardware on this page.