Getting Started With Node.js On Raspberry Pi (With examples)
I’ve already covered many languages you can use with Raspberry Pi on this website (Python, C/C++, etc.). Node.js is another one you can try. Numerous libraries are available for it, so you can easily use the specific hardware on the Pi (GPIO, camera module, etc.). Let’s learn how to get started with it.
Node.js is available in the default repository on Raspberry Pi OS. It can be installed by using the “Add/Remove software” tool or with APT in command lines. The Node package manager (npm) can also be installed to manage additional libraries.
In this tutorial, I explain how to install Node.js on your system and give you a few concrete examples that you can use as a base for your projects.
If you’re looking to quickly progress on Raspberry Pi, you can check out my e-book here. It’s a 30-day challenge where you learn one new thing every day until you become a Raspberry Pi expert. The first third of the book teaches you the basics, but the following chapters include projects you can try on your own.
Node.js installation on Raspberry Pi
Here are the main steps to install Node.js on a Raspberry Pi:
- Use the package manager to install the “nodejs” package.
- Use the “node” command to make sure it works.
- Add Node Package Manager (NPM) if you need additional libraries.
Let’s see how to do this in detail.
Install Node.js on Raspberry Pi
Node.js is available in the default repository on Raspberry Pi OS (and all Debian-based distributions at least). The easiest way to get it on your Pi is to use apt in a terminal:sudo apt update
sudo apt install nodejs
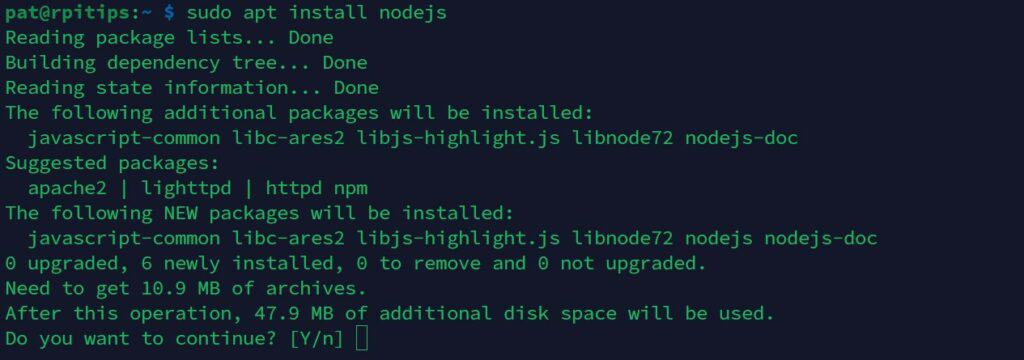
If you are not used to the Linux commands, you can use the GUI via the “Add/remove software” tool. Search for “nodejs” and you should get the same result.
Are you a bit lost in the Linux command line? Check this article first for the most important commands to remember and a free downloadable cheat sheet so you can have the commands at your fingertips.
Verify if Node.js is working
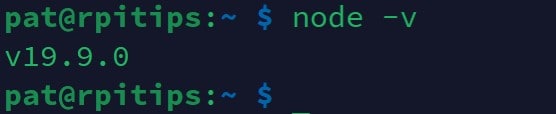
Once the Node.js package is installed, you can use the “node” command to make sure it’s working as expected:node -v

How to get the latest Node.js version?
As you can see in my previous screenshot, the current version available in the repository at the time of writing is v12.22, while version 19 is available from the official website.
If like me, you always mix the languages syntax, download my cheat sheet for Python here!
Download now
If you want to get a more recent version, you can use a script available on the NodeSource GitHub project.
Here is the command for version 19 (tested on Pi 4, not sure if it works on older models):curl -fsSL https://deb.nodesource.com/setup_19.x | sudo -E bash -
sudo apt-get install -y nodejs
You can check the GitHub page here with all the supported releases and distributions.
Optional: Install the Node Package Manager (NPM)
You can already use Node.js at this point, with all the built-in standard libraries that come with it. But if you’ll be using it for larger projects, there is a high chance you’ll need more.
With Python, we can install libraries directly from the RPI OS repository for the most common ones, or use PIP to install other ones from random developers all over the world.

Join Our Community!
Connect, learn, and grow with other Raspberry Pi enthusiasts. Support RaspberryTips and enjoy an ad-free reading experience. Get exclusive monthly video tutorials and many other benefits.
Learn moreNPM is like the equivalent of PIP with Node.js. You’ll need it in most projects, especially if you intend to use the specific hardware of your Raspberry Pi (GPIO pins, typically).
It’s available in the default repository too, so you can get it with:sudo apt install npm

It comes with a ton of additional packages, which is why I say it’s optional. You can always come back to this step later if you discover you need it.
It's a free PDF guide containing every Raspberry Pi Linux command you should know!
Download now
Project examples using Node.js on Raspberry Pi
Now that Node.js is installed on your Raspberry Pi, let’s see a few examples of how you can use it in your future projects.
Basics
First thing first, if you are entirely new to this, here are two things to know:
- Node.js scripts will have the “.js” extension.
You can use any text editor you like (here are my favorites), but save your code with the “.js” extension. So, with nano, you can do something like:nano myscript.js - Use the “node” command to run your script after that:
node myscript.js
Web server
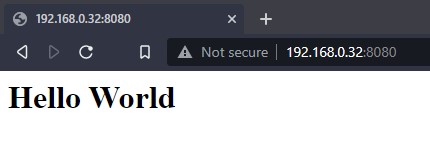
JavaScript is a web language, so the first thing you can try to see how simple it is to use Node.js is to spin up a web server with a simple script.
Simple HTML code
Here is the main code you can use, I will explain just after:
const http = require('http');

const hostname = '192.168.0.32';
const port = 8080;

const server = http.createServer((req, res) => {
  res.statusCode = 200;
  res.setHeader('Content-Type', 'text/html');
  res.end('<h1>Hello World</h1>');
});

server.listen(port, hostname, () => {
  console.log(`Server running at http://${hostname}:${port}/`);
});- On the first line, we require the “http” module.
It’s the same principle as with most languages, we import an external library that will handle the specific actions for this project (starting a web server in this case). - We then set variables with the server IP address and port.
Make sure to put your Raspberry Pi IP address there and pick a port that is not already used by another application. - Then we use the main functions of the “http” module, by creating a server using a basic HTML code and telling it to listen on the specific port and IP address we set in the variables.
Create a new JS file with this code, and run it with the node command:node <filename.js>
If like me, you always mix the languages syntax, download my cheat sheet for Python here!
Download now
It should work from any computer on the same network. I got this page from my laptop, with Node.js running on the Raspberry Pi:
Press CTRL+C to stop the server.
Feel free to change the HTML code and play a bit with it.
Serve an HTML file
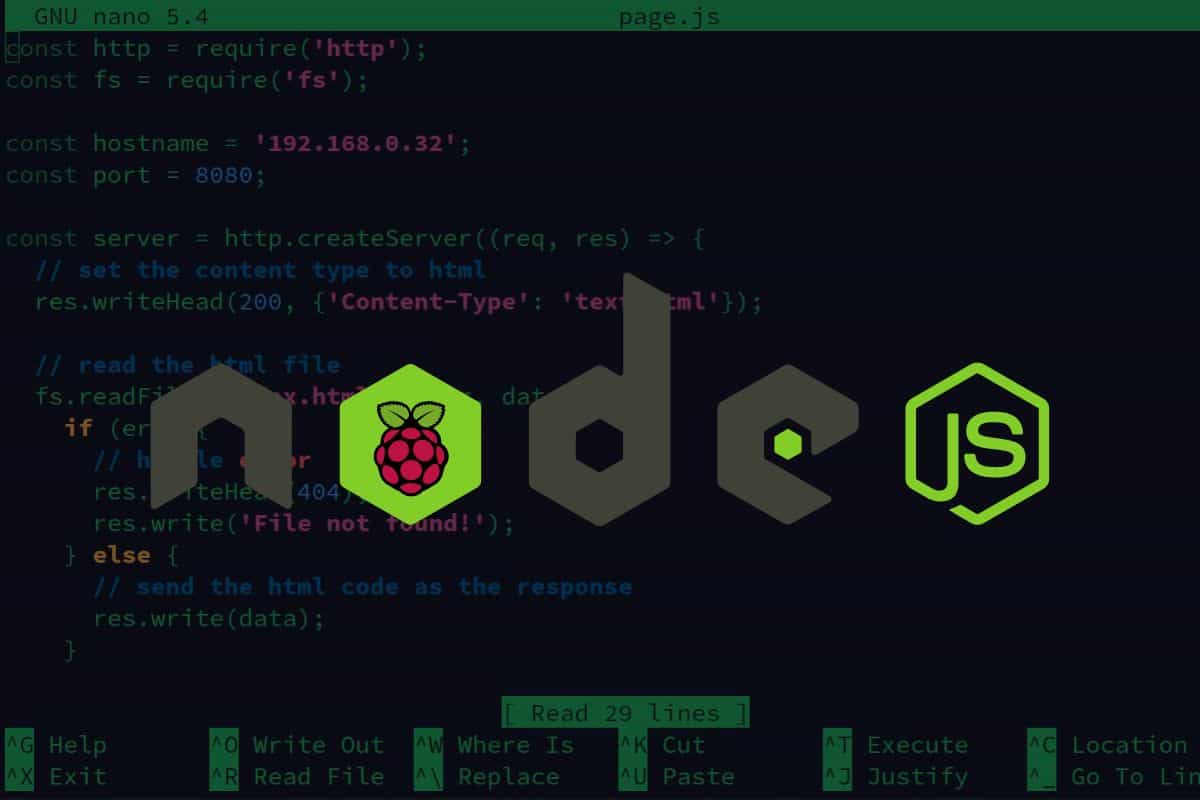
Editing the HTML code directly in the Node.js script is not very convenient, so you can slightly change the script to serve an HTML page instead.
Here is how I updated my script to load an HTML file (index.html) instead of writing the HTML code directly in the Node.js file:
const http = require('http');
const fs = require('fs');

const hostname = '192.168.0.32';
const port = 8080;

const server = http.createServer((req, res) => {
  // set the content type to html
  res.writeHead(200, {'Content-Type': 'text/html'});

  // read the html file
  fs.readFile('index.html', (err, data) => {
    if (err) {
      // handle error
      res.writeHead(404);
      res.write('File not found!');
    } else {
      // send the html code as the response
      res.write(data);
    }

    // end the response
    res.end();
  });
});

server.listen(port, hostname, () => {
  console.log(`Server running at http://${hostname}:${port}/`);
});
We basically use the same main functions from the “http” module, but we also use the “fs” module to load the HTML file and deliver it to the web server instead of typing the code directly.
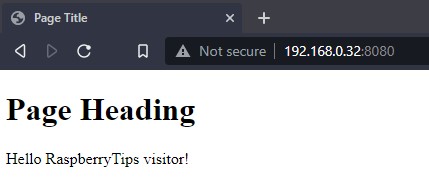
Here is the template you can start with for your HTML page:
<!DOCTYPE html>
<html>
<head>
        <title>Page Title</title>
</head>
<body>
        <h1>Page Heading</h1>
        <p>Hello RaspberryTips visitor!</p>
</body>
</html>
From there, you can use any external library as if you were on a standard Linux server or computer. You’ll find tons of tutorials online on how to get started with Node.js, it doesn’t have to be specific for the Raspberry Pi.
I just want to share two other examples that are specific to the Raspberry Pi with you: using the GPIO pins and the camera module.
Interact with GPIO pins
Many libraries are available for the Raspberry Pi, a simple one you can use for basic GPIO interactions is “onoff”.
You can install it with npm:npm install onoff
And here is a simple example to make a LED blink:
const Gpio = require('onoff').Gpio;

const led = new Gpio(17, 'out');

let isOn = false;

setInterval(() => {
  led.writeSync(isOn ? 1 : 0);
  isOn = !isOn;
}, 1000);
You basically send “1” or “0” to the writeSync function to say if it should be on or off.
The setInterval function allows you to create a loop to make it blink.
If you need guidance for the circuit to build for this, you can find more details in this GPIO tutorial.
Control the camera
Another thing you might be interested in is how to interact with the camera module within a Node.js script.
I tested many libraries for doing this, and most of them don’t work on Raspberry Pi OS Bullseye. So, here is one that seems to work properly, relying on the libcamera commands.
First, install libcamera with NPM:
npm install libcamera
Then, a minimal code would be something like this:
const {libcamera} = require('libcamera')

libcamera
  .jpeg({ config: { output: 'test.jpg' } })
  .then(result => console.log(result))
  .catch(err => console.log(err));
For most modules, you’ll find a GitHub page or a documentation site of any kind with all the options available. Here is the link for this one if you want to test the other features.
It's a free PDF guide containing every Raspberry Pi Linux command you should know!
Download now
Want to chat with other Raspberry Pi enthusiasts? Join the community, share your current projects and ask for help directly in the forums.
Related questions
What are the pros and cons of Node.js on Raspberry Pi?
Pros:
- Node.js is lightweight and runs well on the Raspberry Pi’s low-powered hardware.
- Node.js has a large community, with many modules and libraries available for the Raspberry Pi (via NPM).
- Node.js can be used to control hardware components connected to the Raspberry Pi’s GPIO pins.
Cons:
- Node.js is single-threaded, which may limit performance on the Raspberry Pi’s CPU.
- Node.js may require additional configuration and setup on the Raspberry Pi, compared to Python which is directly available.
Should I use Python or Node.js on Raspberry Pi?
Node.js is a good choice for building web applications. It’s a lightweight alternative, but you can still use one of the libraries available for the Raspberry Pi in your projects.
Python will generally be a better choice in other cases (standalone apps, servers, etc.), with almost everything already available on a fresh install, and probably better support for the Raspberry Pi hardware overall.
Ultimately, the choice will most likely depend on your experience with those languages. Both can be used in most projects.
Whenever you’re ready, here are other ways I can help you:
The RaspberryTips Community: If you want to hang out with me and other Raspberry Pi fans, you can join the community. I share exclusive tutorials and behind-the-scenes content there. Premium members can also visit the website without ads.
Master your Raspberry Pi in 30 days: If you are looking for the best tips to become an expert on Raspberry Pi, this book is for you. Learn useful Linux skills and practice multiple projects with step-by-step guides.
The Raspberry Pi Bootcamp: Understand everything about the Raspberry Pi, stop searching for help all the time, and finally enjoy completing your projects.
Master Python on Raspberry Pi: Create, understand, and improve any Python script for your Raspberry Pi. Learn the essentials step-by-step without losing time understanding useless concepts.
You can also find all my recommendations for tools and hardware on this page.