How To Install & Use ProtonVPN On Raspberry Pi (GUI & CLI)
Using a VPN client to protect yourself on the Internet is becoming increasingly important, but finding one that works well on Linux, and especially on Raspberry Pi, is still a challenge. I tested most of them for a previous article, but today I’ll focus on ProtonVPN, which is one of the best options available for us Raspberry Pi users.
ProtonVPN doesn’t officially support Raspberry Pi, but it offers an application that works on some distributions (like Ubuntu) and a command line version that runs on any Raspberry Pi system. It can be installed easily by adding its repository to your system.
Before going into more detail, I have to clarify some requirements that are not necessarily evident on their website. I’ll then show you how to get ProtonVPN working on your Raspberry Pi, either in the command line (the best choice for Raspberry Pi OS) or with the app (if you use one of the supported operating systems).
If you’re looking to quickly progress on Raspberry Pi, you can check out my e-book here. It’s a 30-day challenge where you learn one new thing every day until you become a Raspberry Pi expert. The first third of the book teaches you the basics, but the following chapters include projects you can try on your own.
Requirements to use ProtonVPN on Raspberry Pi
As explained in the introduction, ProtonVPN doesn’t officially support the Raspberry Pi (even if it works), so you won’t find any official documentation about it on their website.
Let’s start at the beginning. Here is what you need to get started.
Get a ProtonVPN account
The first thing you need is obviously a Proton account.
Good news: you can start for free. Unlike most other VPN providers, it’s possible to create a free account (forever) on Proton, where you’ll get:
- A free email address, with 1 GB of storage (max 150 messages per day).
- Access to a medium-speed VPN connection.
I wouldn’t use this for your primary email address, but to test the VPN connection it’s a pretty good offer.
So, go create your account here, and make your choice between the free and paid options.
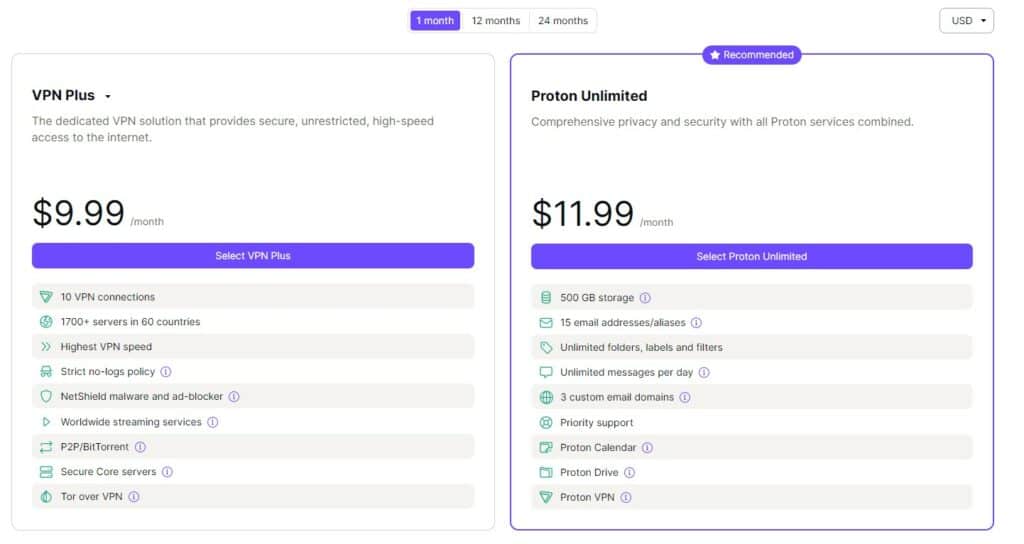
A paid account is not that expensive (especially during promotions or for a long-term engagement), and you have a 30-day money-back guarantee if it doesn’t work for you.
With a paid account, you get a full-speed connection and access to all servers.
Whatever your choice, it’s the first step, as you need an account before going any further in this tutorial.
Take a few minutes to do it, and move on.
Hardware requirements
Then, grab your hardware, it should work with any Raspberry Pi model, but here are my current recommendations:

Join Our Community!
Connect, learn, and grow with other Raspberry Pi enthusiasts. Support RaspberryTips and enjoy an ad-free reading experience. Get exclusive monthly video tutorials and many other benefits.
Learn more- A Raspberry Pi 4 or 400: Especially if you decide to use Ubuntu (more on that later) or want a VPN for desktop use, it will be a bit slow with other models.
- A good SD card (here is the best one) or a USB stick (I use this one). 32 GB is the minimum I recommend.
- The official power supply, especially if you use a USB drive, or you’ll get low voltage errors all the time, and it will slow down the system and the VPN connection.
You’ll then need to have the Internet access configured, and maybe a way to control the Raspberry Pi remotely (via SSH or VNC for example, click on the links for more details). But let’s talk about the operating system first.
Operating system
When I did my reviews of all the best VPN providers for Raspberry Pi last year, ProtonVPN worked perfectly on Raspberry Pi OS, including their application. It didn’t work with a free account, but it was OK with a paid one.
It's a free PDF guide containing every Raspberry Pi Linux command you should know!
Download now
Well, after testing it again on all Raspberry Pi OS versions (Bullseye/Buster, 64-bit or 32-bit, etc.), it looks like this is no longer the case. You can install the app, and sign in, but you’ll never get connected to a server.
I contacted the support, and the only answer was that the Raspberry Pi and Raspberry Pi OS are not supported. But Debian and most Debian-based distributions are supported, so I don’t really understand why it doesn’t work on Raspberry Pi OS.
Anyway, here is my recommendation at the time of writing this tutorial:
- Use Ubuntu with Desktop (64-bits) if you absolutely want/need to have the graphic application.
I didn’t test all the supported distributions, but I made it work on Ubuntu with Desktop. - Use any other Linux distribution if you agree to use the command lines.
At the end of this article, I’ll also show how to use OpenVPN or WireGuard instead (they may have graphic interfaces for some distributions, by the way).
Whatever your choice, you can read my tutorial to get started with Ubuntu Desktop here, and my step-by-step guide to install Raspberry Pi OS here.
The command line is not complicated to use, so if you already have Raspberry Pi OS installed, even if you are still a beginner on Raspberry Pi, I would stick with it for now.
How to install ProtonVPN on Raspberry Pi OS
ProtonVPN provides a Debian package that can be installed on Raspberry Pi OS to add their repository to the package manager (APT). Once done, ProtonVPN will be available for installation with APT or the Add/Remove Software tool.
Download the ProtonVPN package
The first step is to download the ProtonVPN package for Debian.
You can find the link on their website, for example on this documentation page for Debian.
Just open the page with your browser, and download the file linked in it.
If you don’t have a desktop environment, access your Raspberry Pi via SSH, and use wget to download it.
Here is an example with the current version:wget https://repo.protonvpn.com/debian/dists/stable/main/binary-all/protonvpn-stable-release_1.0.3_all.deb
There is the version number in the link I use, so make sure to replace it with the latest one available (I’m not sure if it’s updated regularly, but double-check that).
Are you a bit lost in the Linux command line? Check this article first for the most important commands to remember and a free downloadable cheat sheet so you can have the commands at your fingertips.
Add the ProtonVPN repository on Raspberry Pi OS
Once you have the ProtonVPN package on your Raspberry Pi, you can either use the GUI to install it (right-click on the file > software install) or open a terminal and use the command syntax:sudo dpkg -i <package-name>
So, in my example:sudo dpkg -i protonvpn-stable-release_1.0.3_all.deb

This command won’t install anything more on your system, it will just add their repository. So, you still need to install ProtonVPN after that.
Install ProtonVPN with APT
Start by updating the packages list, as usual, with:sudo apt update
Then, the ProtonVPN applications will be available with:sudo apt install protonvpn-cli

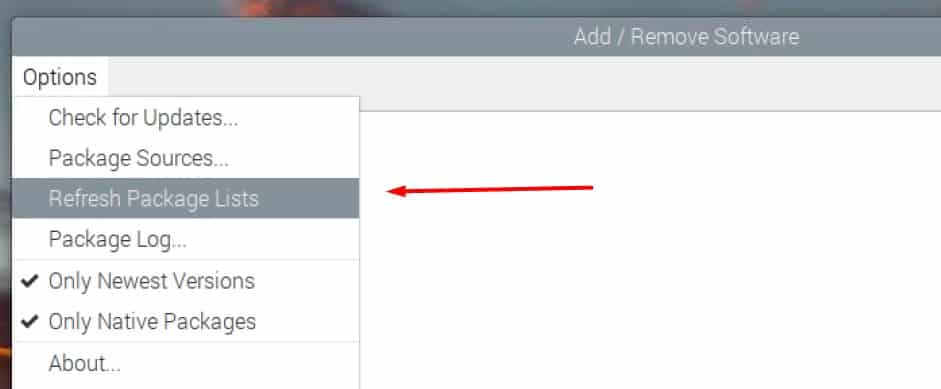
If you have a GUI, you can do the same thing in “Add/Remove Software”. Just refresh the package list from the menu, and then search for “protonvpn”.
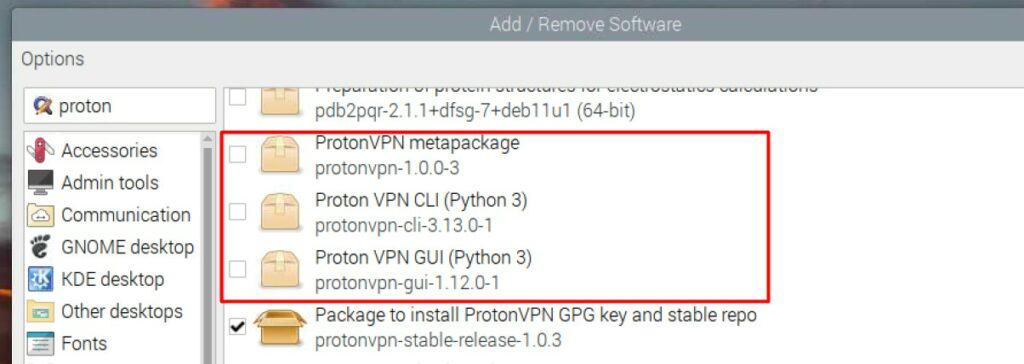
If you want to try the full application, it’s named “protonvpn” and it will be added to the main menu once installed. Maybe you’ll be luckier than me, and it will work. Let me know if you find a solution :-).
Use ProtonVPN on Raspberry Pi OS
Once the ProtonVPN CLI is installed, there are only two commands to know to connect to their servers from Raspberry Pi OS.
First, you need to link your Raspberry Pi to your ProtonVPN account.
You can do this with:protonvpn-cli login <username>

Use the same username you defined when creating your account on their website.
You’ll need to enter your ProtonVPN password, and that’s it, you should be identified after that.
Once done, you can simply connect to any server with:protonvpn-cli connectOr:protonvpn-cli c
It will ask for a server location, and the protocol you want to use (UDP is recommended):
It's a free PDF guide containing every Raspberry Pi Linux command you should know!
Download now

And that’s it, you’ll be instantly connected to the corresponding server.
You can then use this command to check the connection:protonvpn-cli status
Or directly open a web browser and check your current IP if you have a desktop environment installed.
You can finally use this command to stop the VPN connection:protonvpn-cli disconnect
Check their documentation for Debian, or just type “protonvpn-cli” to get a list of all the commands available. But basically, these should be enough in most cases.
It's a free PDF guide containing every Raspberry Pi Linux command you should know!
Download now
How to use the ProtonVPN application on a Raspberry Pi
According to my tests and the answer from their support team, the only way to use the ProtonVPN application on a Raspberry Pi is currently to run a supported distribution, like Ubuntu Desktop. Raspberry Pi OS is not supported, and it doesn’t work on it.
So, if you have Ubuntu Desktop installed (or want to try on another supported distribution: Fedora, Kali Linux or Manjaro), here are the steps to follow.
It’s basically the same as for the CLI version, but you can do everything from the desktop interface.
Download and install the repository package
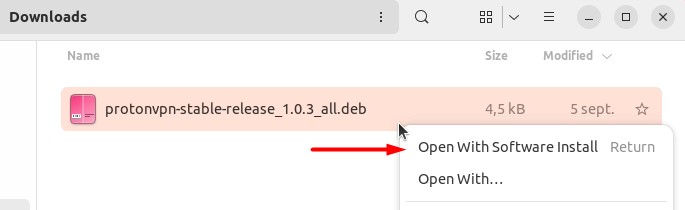
As for the CLI version, the first step is to download the Debian package from the official website (you can find the link in this procedure for example).
Then, right-click it and choose “Open with Software Install”:
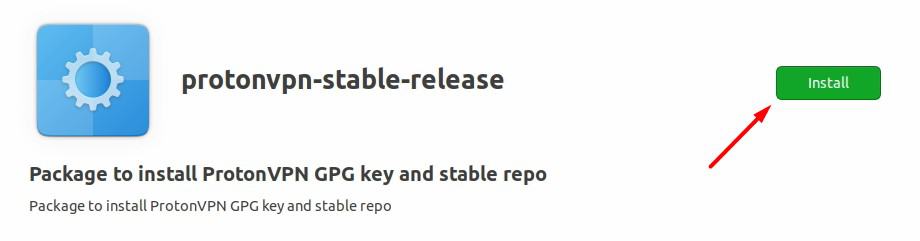
Click on “Install” and type your password to confirm the installation:
Install the ProtonVPN application with APT
The ProtonVPN repository will be added to APT, and once the package list is updated, you can install it with:sudo apt update
sudo apt install protonvpn
I don’t know if there is a way to do this in the desktop interface with the default Ubuntu applications, but it’s really fast with the command line, so I think it’s fine.
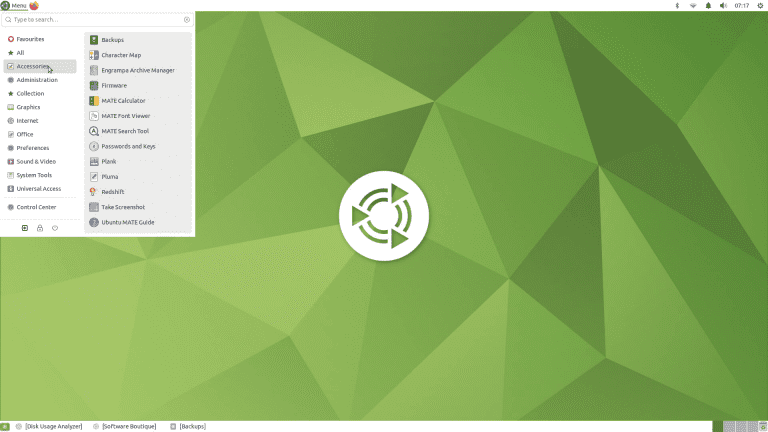
Getting started with the ProtonVPN app
Once done, you’ll find the ProtonVPN in the applications list, from the main menu:
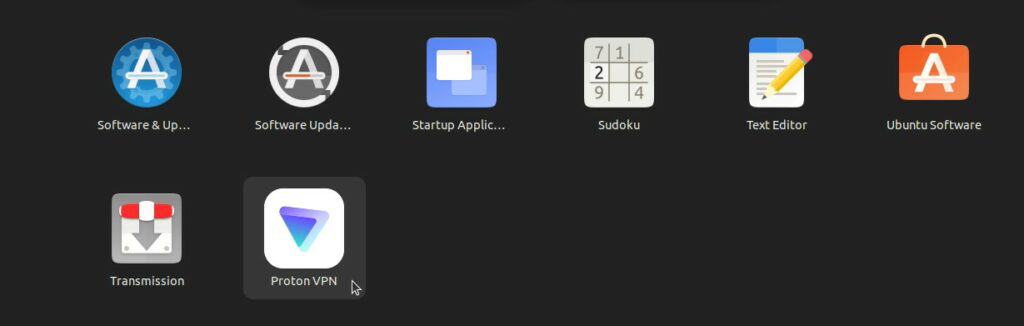
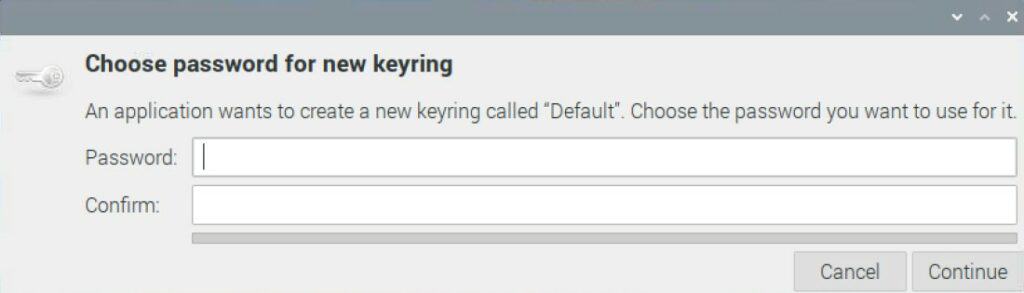
Just click on the icon to start the application. Ubuntu might ask to create a password for the keyring system, to save your ProtonVPN account in it:
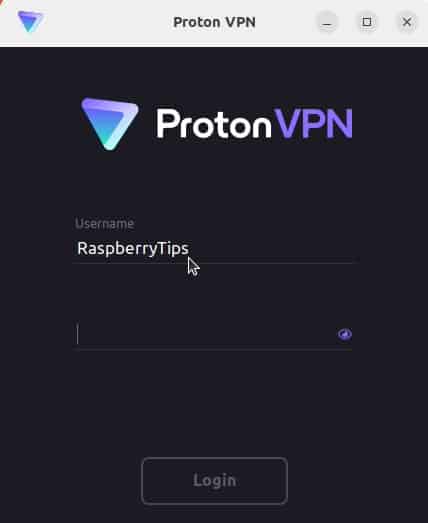
Then, you can sign in with the ProtonVPN app:
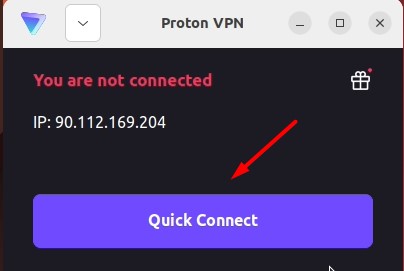
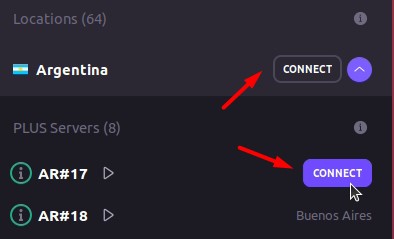
From there, you can either use the “Quick connect” feature to get connected to any server, or pick a country or server from the list below:
Note: During my tests on Ubuntu Desktop, I got the same error as on Raspberry Pi OS at first:
“An unknown error has occurred. Please ensure that you have internet connectivity. If the issue persists, please contact support.“
But it worked after a restart. So, maybe there are some permission issues that required a reboot. Give it a try, and it should be fine (on Ubuntu at least).
It’s a pity it doesn’t work on Raspberry Pi OS, but it’s nice to have an application for Linux. ProtonVPN is one of the few VPN providers to offer this, and the only one that can work on Raspberry Pi I think.
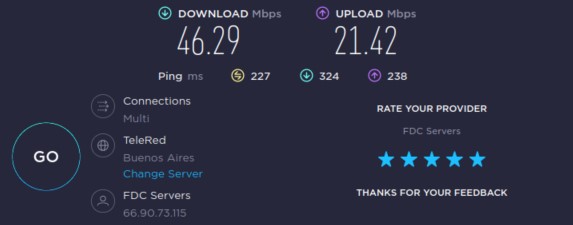
You can then use SpeedTest or any alternative to check where they locate you and the Internet speed you get with this server. I got excellent results during my tests (50 Mbps with a VPN active is great):
It's a free PDF guide containing every Raspberry Pi Linux command you should know!
Download now
If you are looking for exclusive tutorials, I post a new course each month, available for premium members only. Join the community to get access to all of them right now!
Alternatives: use OpenVPN or WireGuard
I will be quick about this because I’m uncertain if it’s really necessary, as ProtonVPN offers several solutions to use their application (CLI or GUI) on Raspberry Pi. But they also give you everything you need to use OpenVPN or WireGuard to access their servers.
These tools are standards when it comes to VPN connections. If you already have them set up or want to use ProtonVPN with an exotic system, it might be something to consider.
For example, if you have LibreElec with Kodi, you’ll easily find an OpenVPN add-on, but installing the ProtonVPN client won’t work.
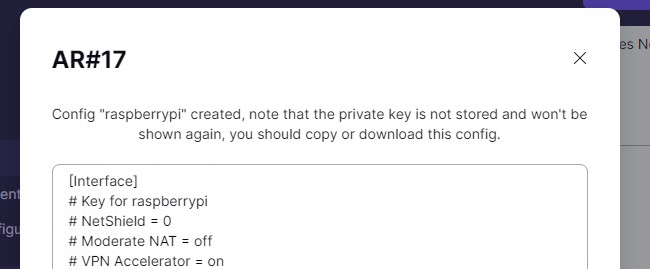
Anyway, in both cases, you can generate a configuration file from your ProtonVPN, to use with either OpenVPN or WireGuard.
Use OpenVPN to connect to ProtonVPN servers
For OpenVPN, find this section in your account and fill in the form to generate your configuration file:
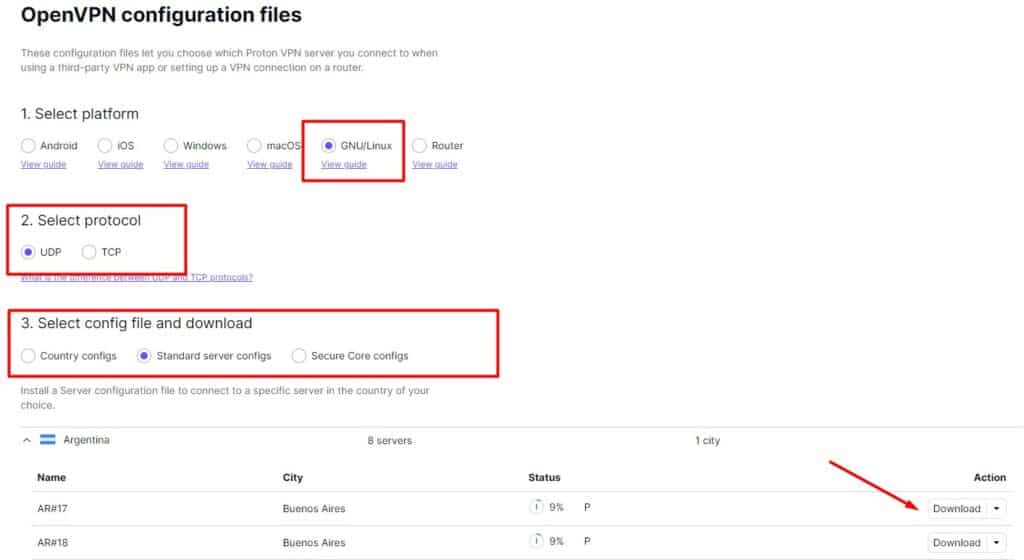
When you click on “Download”, you’ll get a configuration file (“name.ovpn”) that you can transfer to the Raspberry Pi to use with the OpenVPN client.
You then need to have OpenVPN installed, so on Debian-based distributions it will be something like this:sudo apt install openvpn
And use the configuration file to get connected to ProtonVPN directly:sudo openvpn --config <yourfile.ovpn>

It will ask for a username and password, but these are different from your account. You can find a specific username and password in the OpenVPN section of your ProtonVPN account.
That’s it, you are connected, and you didn’t need to install anything from ProtonVPN. Just the OpenVPN package is enough.
Some systems may have a way to use the configuration file directly in the system settings or have additional graphic applications you can use for OpenVPN. It can be a solution to have a better integration that ProtonVPN offers.
On a production server, I would also prefer using only OpenVPN from the official repository than adding a new repository and application I don’t trust as much as this one. But it’s a personal choice.
Use WireGuard to connect to ProtonVPN servers
Do you prefer WireGuard to OpenVPN? No problem, ProtonVPN supports both!
It’s a similar idea, you can generate a configuration file from your account, and transfer it to your Raspberry Pi.
Install WireGuard if needed:sudo apt install wireguardAnd connect with:sudo wg-quick up <config>
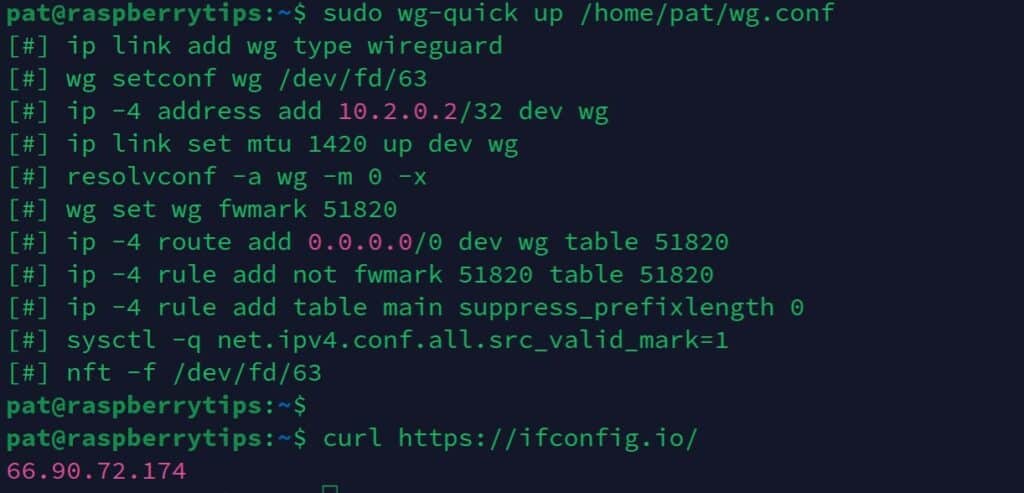
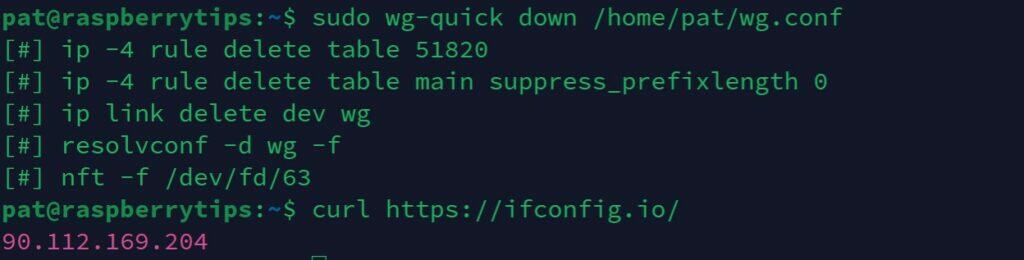
You can check if the connection is working with any IP address service that works in the command line, for example, I tested with:curl https://ifconfig.io/
The same command with the option “down” to disconnect the VPN:sudo wg-quick down <config>
I hope this article was helpful, and if you want to try other VPN providers or learn more about WireGuard and OpenVPN, you will find many related topics on this website:
- Best VPN Providers on Raspberry Pi (I Tested All)
- Raspberry Pi: OpenVPN vs WireGuard, which one is the best?
- Ultimate guide to NordVPN on Raspberry Pi (Kodi & Raspbian)
- ExpressVPN on Raspberry Pi: The Ultimate Guide
Whenever you’re ready, here are other ways I can help you:
The RaspberryTips Community: If you want to hang out with me and other Raspberry Pi fans, you can join the community. I share exclusive tutorials and behind-the-scenes content there. Premium members can also visit the website without ads.
Master your Raspberry Pi in 30 days: If you are looking for the best tips to become an expert on Raspberry Pi, this book is for you. Learn useful Linux skills and practice multiple projects with step-by-step guides.
The Raspberry Pi Bootcamp: Understand everything about the Raspberry Pi, stop searching for help all the time, and finally enjoy completing your projects.
Master Python on Raspberry Pi: Create, understand, and improve any Python script for your Raspberry Pi. Learn the essentials step-by-step without losing time understanding useless concepts.
You can also find all my recommendations for tools and hardware on this page.