
Getting started with Proxmox on Raspberry Pi (Virtualization server)
New Raspberry Pi models come every year with increased CPU power and RAM, and virtualization is now a recurring topic on this website. This wasn’t always the case. Today, we’ll discuss a solution to host virtual machines (VM) on Raspberry Pi that I haven’t written about yet: Proxmox.
Proxmox is not available directly on Raspberry Pi, but the Pimox project is a port of Proxmox for the Raspberry Pi we can use to achieve the same results. An auto-installation script is available, so the installation is straightforward once the prerequisites are installed.
It’s easy on the paper, but I ran into several issues when trying to follow the instructions given on the GitHub page. In this article, I’ll give you a step-by-step guide, so you don’t lose as much time as I did when trying it :-).
Also, I must say right away that even though I’ll show you how to install this solution on your Raspberry Pi, it doesn’t mean that’s a good idea. It works, but there are still many issues due to missing drivers or just because the Raspberry Pi isn’t officially supported. See this as an experiment, a proof of concept, not a formal recommendation.
If you’re looking to quickly progress on Raspberry Pi, you can check out my e-book here. It’s a 30-day challenge where you learn one new thing every day until you become a Raspberry Pi expert. The first third of the book teaches you the basics, but the following chapters include projects you can try on your own.
Introducing Proxmox
If you are reading this, you are probably already familiar with Proxmox, but I will still start with a brief introduction for those who randomly came across this article.
What is Proxmox?
Proxmox is an open-source server management and server virtualization platform.
That’s the official definition, but to clarify, it’s a solution you can use to host virtual machines and containers with a simple web interface.
Personally, I’m used to VMWare ESXi (that you can also install on a Raspberry Pi) and a bit of Hyper-v, but I haven’t used Proxmox on production servers in my system administrator job. From what I have seen on the Raspberry Pi, it seems interesting.
I already explained on this website how to use QEMU on Raspberry Pi, you can see it as an interface for it (I know that’s probably far too restrictive, but it’s a simple way to see it). QEMU is a great tool to create virtual machines, but as everything is done via command lines, it’s not the easiest solution for beginners. Proxmox can be a way to make this easier.
What about Pimox?
As with many other projects, Proxmox doesn’t support Raspberry Pi, so we have to use a workaround to install it on our devices. Pimox is a port of Proxmox created especially for the Raspberry Pi. It’s not perfect, but at least you can install Proxmox and get a taste of it.
It's a free PDF guide containing every Raspberry Pi Linux command you should know!
Download now
You can find the Pimox project on GitHub (here), with short documentation on how to install it. You can also use the “Issues” tab to ask questions if you experience any issues during the installation. I will try to make it easy for you to follow the instructions, but I haven’t fixed everything, so if you are serious about it, you might need their help.
The project is active as there are recent updates, and they still answer questions.
Now that the introductions are done, let’s move on to the installation part.
How to install Proxmox on Raspberry Pi
Here are the required steps to install Proxmox on a Raspberry Pi:
- Install a compatible OS (Debian 11 or RPI OS 64 Bits).
- Update the operating system with apt.
- Download the Pimox script and edit it.
- Run the installation script.
Once done, a web interface will be available to configure everything else.
Proxmox requirements: OS and Raspberry Pi
The main requirement is to use a 64-bit operating system, on the GitHub page they give you two choices:

Join Our Community!
Connect, learn, and grow with other Raspberry Pi enthusiasts. Support RaspberryTips and enjoy an ad-free reading experience. Get exclusive monthly video tutorials and many other benefits.
Learn more- Debian Bullseye 64-bit (see here how to install it).
- Raspberry Pi OS 64-bit, it’s a beta version (more details here).
So, you can’t use the standard Raspberry Pi OS version that you probably already have on your Raspberry Pi. In fact, I would recommend starting with a new SD card, even if you use one of these systems because the installation will change many things on your system. I don’t want you to break your current installation, so start with a new one.
I tried both. I didn’t have much success with Debian (the installation script never ends), and I think that using Raspberry Pi OS will be easier for most of you, so I’ll explain this version. If you really want to try with Debian, I’ll let you follow the steps on the GitHub page and come back there afterward.
So, the first step is to install the 64-bit version of Raspberry Pi. It’s almost the same process as usual, but you have to download the latest image available here.
I haven’t tried on another model, but using a Raspberry Pi 4 is also one of the requirements on the GitHub page, so make sure you use this model.
Update your operating system
Once your system is installed and configured correctly, you also need to update everything. You can use the welcome menu to do it, or type these two commands:sudo apt update
sudo apt upgrade -y
The script we’ll use later will probably do it, but it’s a good habit to get to secure your Raspberry Pi.
As with any server project, try to use an Ethernet cable instead of the Wi-Fi connection, and you can also enable SSH and/or VNC to do the following steps from your computer if you want.
Install Pimox using the installation script
Nothing really new or complicated so far. Let’s move on to the Pimox installation steps:
- Switch to root by using this command:
sudo -s - Download the installation script with:
curl https://raw.githubusercontent.com/pimox/pimox7/master/RPiOS64autoinstall.sh > RPiOS64autoinstall.sh - You’ll not edit the file to adjust a few things:
nano RPiOS64autoinstall.sh - The beginning of the file looks like this:
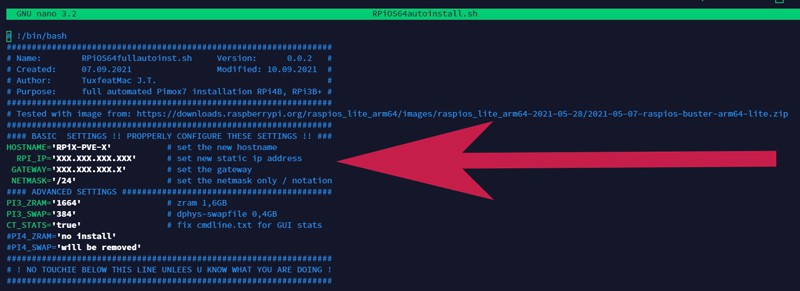
- You need to change the first uncommented lines to fit your network settings.
You can keep the hostname, as I don’t think you have anything named like this if it’s your first installation.
But then you need to change the RPI_IP and GATEWAY variables at list.
For example, you can set the IP address to “192.168.1.100” (any free IP on your network, ideally outside the DHCP range) and the gateway to “192.168.1.1” (the IP of your router). - Once done, save and exit nano (CTRL+X).
- Add the execution permission to the script and run it:
chmod +x RPiOS64autoinstall.sh
./RPiOS64autoinstall.sh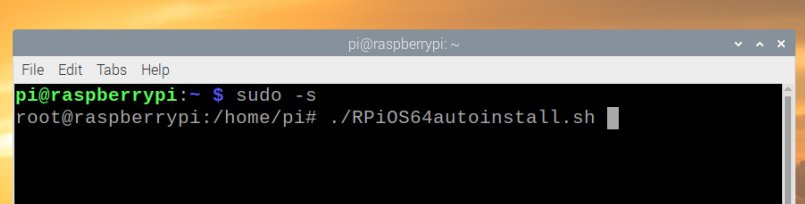
- It will ask you for a root password right away. Remember it, as you’ll need it later to access the web interface.
- Then you shouldn’t have anything else to do. The installation script will do everything for you. If you are asked any question during the apt installation, keep the default values.
Your Raspberry Pi will reboot at the end of the installation process, and Proxmox should be ready to use. I installed it on a Desktop version of Raspberry Pi and noticed that my wallpaper changed, and the network tool was removed, which is why I recommend using a dedicated SD card for this project.
It's a free PDF guide containing every Raspberry Pi Linux command you should know!
Download now
Are you a bit lost in the Linux command line? Check this article first for the most important commands to remember and a free downloadable cheat sheet so you can have the commands at your fingertips.
It's a free PDF guide containing every Raspberry Pi Linux command you should know!
Download now
First steps with Proxmox on Raspberry Pi
Once installed, the fun part starts, as we can now access the Proxmox interface and try to create our first VM.
To be honest, I haven’t had great success with it, so I’ll share everything I have learned, but there is probably something missing as it doesn’t work as expected. I’m a bit disappointed with the result I got.
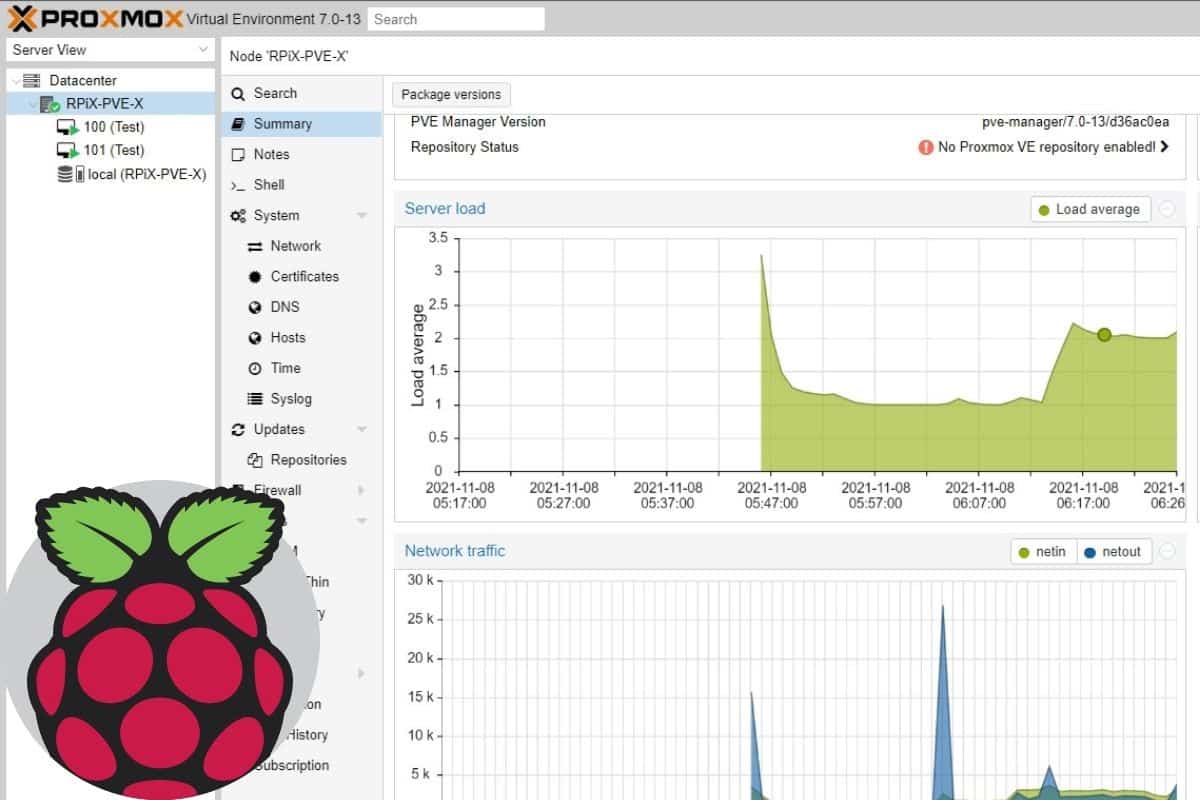
Proxmox web interface
If everything has gone well until now, the Proxmox web interface should be available at https://IP:8006.
The IP address is the one you set in the installation script, so for example https://192.168.1.100:8006.
You’ll get an SSL error as we don’t have a certificate yet, but you can skip it (something like “Advanced” > “Proceed anyway” or similar depending on the browser you use).
Then you’ll get a login form. The default credentials for Proxmox are:
- Login: root
- Password: the one you set at the beginning of the installation.
Finally, you can access the usual interface of Proxmox. If you are familiar with it, you probably don’t need me anymore!
You’ll get an error message saying you don’t have a valid subscription. Subscriptions are for support only, you don’t need one for a simple test.
Upload ISO images on Proxmox
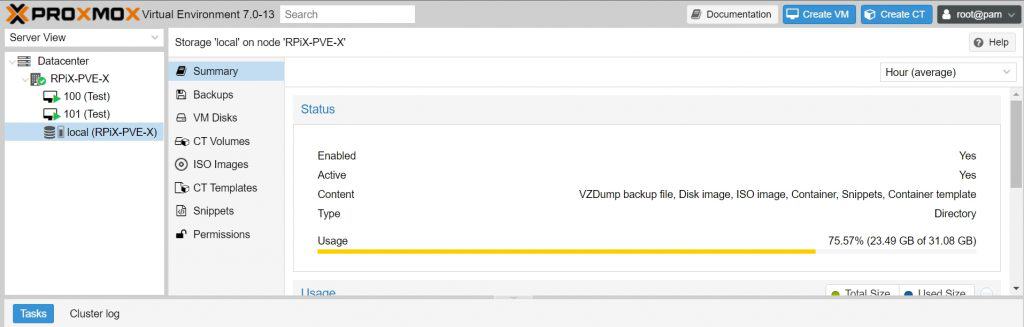
I ran into many issues while trying to make it work. Now, I’ll share with you an issue that I fixed, so you can move forward. The first one was to upload ISO images with the interfaces.
I started using Proxmox from my computer and uploading images from there (RPiX-PVE-X > Storage > ISO Images). But I got the error “Error 0 occurred while receiving the document.”. It means the upload has been cut before the end, but it doesn’t give any reason for it.
I then tried from the Raspberry Pi directly, using the https://localhost:8006 address, it was way better. But I also got the same error from time to time.
The best way to fix this error, it to move your downloaded ISO images directly to the Proxmox folder. So, for example:sudo mv yourimage.iso /var/lib/vz/template/iso/
By doing this, the image will appear instantly in the web interface, and it works 100% of the time. I have no idea why it doesn’t work with the web interface, but using this command will fix it.
Create a network bridge.
Create a virtual machine with Proxmox
But most issues occurred while creating a new virtual machine.
The main issue is that you can’t use IDE peripherals. If you set your VM with an IDE drive or CD-ROM, it won’t start. Instead, you’ll get an error like “QEMU exited with code 1”.
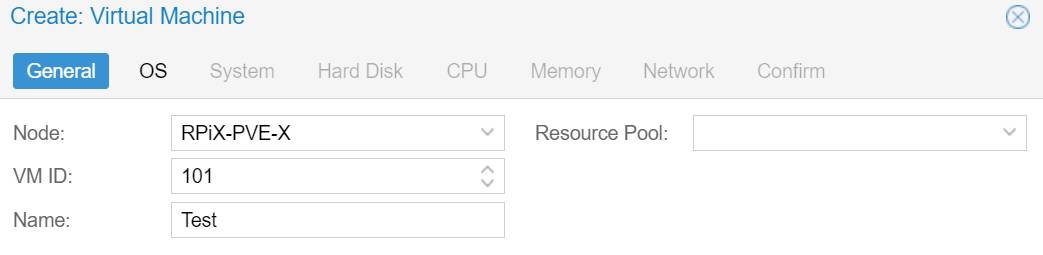
Here are the steps to create a virtual machine with Proxmox:
- Click “Create VM” in the top-right corner.
- Enter a name for your system:
- Click next, and choose “Do not use any media”.
It will create an IDE CD Drive by default, and we can’t use it. - You can keep the default values in the System tab, but make sure to choose SCSI for the hard disk.
Adjust the size if needed (32 GB by default, it won’t work if you have a small SD card). - You can adjust a bit the CPU and memory settings, but remember you are on a Raspberry Pi, so you don’t have much available.
- For the network, you can start without it, but if you want to use it, you need to create a network bridge first (see the previous section).
Once done, your virtual machine will appear in the left menu, but there are a few more steps:
- Pick the VM in the left menu, and go to “Hardware”.
- Select the CD Drive line and remove it.
- Then click Add > CD/DVD Drive. Choose SCSI and type 2 in the second field.
You can then choose your ISO image to start with: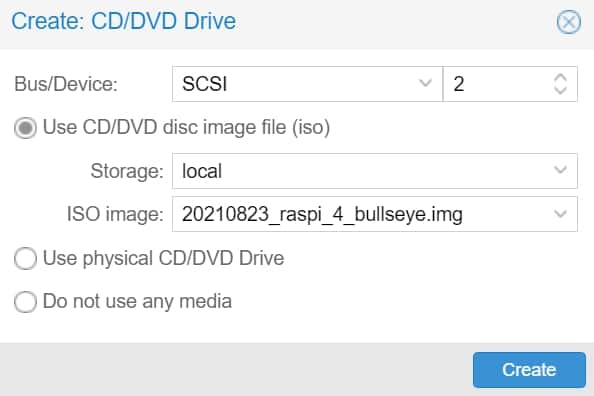
You should now be able to start the virtual machine by clicking “Start” in the top-right corner when the VM is selected.
But when you go to the “Console” section, you’ll probably get something like “Guest has not initialized the display (yet)”. That’s where I’m stuck.
I have found that by switching the BIOS I used to OVMF (UEFI) instead of SeaBios, I have a display, but the VM doesn’t start as there is no UEFI drive.
It's a free PDF guide containing every Raspberry Pi Linux command you should know!
Download now
Reminder: Remember that all the members of my community get access to this website without ads, exclusive courses and much more. You can become part of this community for as little as $5 per month & get all the benefits immediately.
Final thoughts
So yeah, that’s why I’m a bit disappointed with this experiment. Everything seems fine, but I can’t start any VM. I tried several operating systems, almost every option for Display and Bios, but nothing works.
If you have more experience with Proxmox and know how to fix this, I would love to have the solution and complete this tutorial (contact me if you have more success!), but for now, I can only help you with the first steps. I have spent so much time on this. I think this article will be useful anyway, but I’m sure there is a way to make it work.
When possible, I would recommend installing Proxmox on a traditional PC, with Ubuntu, for example. I tested it in the linked article, and it’s way better.
As a whole, Proxmox seems a good solution to install virtual machines on Raspberry Pi, as the installation process with VMWare ESXi was much more complicated. However, if Proxmox doesn’t work, VMWare ESXi is the only way for now. I’m sure there is a way to make it work, but anyway there aren’t many workarounds as the Raspberry Pi is not officially supported. So, as I told you in the beginning, take this as an experiment, it’s not intended to be used in production.
If you are looking to run Raspberry Pi OS on a virtual machine, you can also do it directly on your computer, it’s much more stable. I explain everything in this tutorial.
Whenever you’re ready, here are other ways I can help you:
The RaspberryTips Community: If you want to hang out with me and other Raspberry Pi fans, you can join the community. I share exclusive tutorials and behind-the-scenes content there. Premium members can also visit the website without ads.
Master your Raspberry Pi in 30 days: If you are looking for the best tips to become an expert on Raspberry Pi, this book is for you. Learn useful Linux skills and practice multiple projects with step-by-step guides.
The Raspberry Pi Bootcamp: Understand everything about the Raspberry Pi, stop searching for help all the time, and finally enjoy completing your projects.
Master Python on Raspberry Pi: Create, understand, and improve any Python script for your Raspberry Pi. Learn the essentials step-by-step without losing time understanding useless concepts.
You can also find all my recommendations for tools and hardware on this page.


Thank you for sharing this post about virtualization on arm64. I think it is an amazing use case.
I have successfully installed pimox7 on a pine64 device running dietpi.
And I get to the point where VMs are created (cpu host, no ide, scsi ) but not running.
I am stuck with this error :
kvm: kvm_init_vcpu: kvm_arch_init_vcpu failed (0): Invalid argument
TASK ERROR: start failed: QEMU exited with code 1
Best regards,
I don’t know how relevant this is now; but after many trial and error the following setting will initialize a display.
BIOS : OVMF (UEFI)
Display : Serial Terminal 0 (Serial0)
Machine : Default (i440fx)
-found q35 will give you a graphical for the first menu than encounter another error
Add –
Serial Port (Serial0)
Connect via xterm.js
However i cannot get the vmbr0 device to bridge an ip to VM’s enp0s18 interface.
suggestions?