Getting Started With Python Games On Raspberry Pi (Pygame)
A few Python games were included in older versions of Raspberry Pi OS. Though it isn’t the case anymore, you can still use the Pygame library to create your own games. This module gives you the essentials you need to capture user events (mouse, keyboard, etc.) and create 2D animations based on them.
To be honest, I rediscovered this Pygame library while writing the article, and it’s a lot of fun. So, I hope you’ll enjoy this experience too. I’ll guide you through the system setup, the first tests and important functions you should know to create your first game.
I’ll try to keep things simple, but a minimum level of Python is recommended. If you are not comfortable with functions, conditions and loops, it’s probably better to start with something easier. I have a Python tutorial for beginners here, and many other projects on this website (Matplotlib and PyQT are an easier way to apply the basics, for example).
By the way, if you get overwhelmed as soon as Python is required for a project, I recommend checking out my e-book “Master Python on Raspberry Pi“. It will guide you step-by-step to learn the essential concepts (and only the essential concepts) required to achieve any project in the future. Raspberry Pi without Python is like a car without an engine, you miss all the fun parts. Get 10% off by downloading it today!
Introduction to Python games on Raspberry Pi
What is Pygame?
Pygame is a Python library that is included by default on Raspberry Pi OS and can be used to create video games. It includes functions to create 2D games with graphics, audio and events handling.

Pygame has been around for a long time and has a large community with many tutorials online. Once you understand the basics, it’s not that complicated to use, so it’s a great way to practice with Python with fun examples.
I’ll give you all the links at the end of this article.
What can you do with Pygame?
The main goal of Pygame is to create simple video games (mostly 2D). Even if it’s not built for that, the library can also be used to generate all kinds of graphic interfaces.
As you can create a window with images, and text, and capture user events. You can basically do anything with it.
Set up your Raspberry Pi for game development
Let’s quickly make sure that you have everything ready on your Raspberry Pi, and we’ll start with a first example using Pygame.
Install Raspberry Pi OS
Raspberry Pi OS is generally the best option to use Python on your Raspberry Pi. Everything is included by default (Python, editors, common libraries), so I would recommend starting with it for this tutorial.
You can use another system and install Pygame on it if you prefer, but I’ll assume you’re using Raspberry Pi OS in the following steps.
If you need further guidance to install Raspberry Pi OS, click on the link to read my step-by-step tutorial.
Make sure you have:

Join Our Community!
Connect, learn, and grow with other Raspberry Pi enthusiasts. Support RaspberryTips and enjoy an ad-free reading experience. Get exclusive monthly video tutorials and many other benefits.
Learn more- The basic system setup, with a desktop interface.
- The network configuration is done, with Internet access.
- Maybe SSH or VNC is enabled, which allows you to easily copy/paste the code examples from your computer.
Choose a code editor for Python
Raspberry Pi OS (with Desktop) comes with two text editors by default: Geany and Thonny. Which should be enough for this tutorial. I’ll use Thonny as an example.
If you are used to another editor, feel free to install it and configure it the way you like, it doesn’t really matter which one you use.
I like VS Code for bigger projects, but I’ll keep things simple here, so any code editor would be fine. If you want some inspiration, you can find my favorite text editors for Raspberry Pi here.
If like me, you always mix the languages syntax, download my cheat sheet for Python here!
Download now
Install the required package for game development (Pygame)
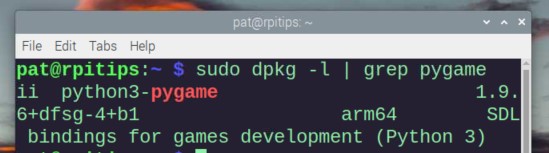
Pygame is installed by default on Raspberry Pi OS with Desktop. You can use this command to make sure it’s the case on your system:sudo dpkg -l | grep pygame
If for any reason, you don’t have it, you can install it with APT:sudo apt install python3-pygameOr it’s also available on PyPi (might be easier with other distributions):pip install pygame
To check that Pygame is installed and working properly, you can create a new Python file with only this line:import pygame
When you run the file, you should get the Pygame version and a short message from the developers:

As a reminder, if you don’t use Thonny, you can save your code in a Python file (.py) and run it with the command:python <yourfile.py>
Are you a bit lost in the Linux command line? Check this article first for the most important commands to remember and a free downloadable cheat sheet so you can have the commands at your fingertips.
Pygame: a first example on Raspberry Pi
Great, we’re ready to move on. Let’s start with the most basic script possible, and add new things from there.
Hello world
“Hello world” is the traditional minimal script you’ll create when learning a new programming language. I also often use it with new libraries in Python, just to get a sense on how things work.
Well, displaying text with Pygame is not that easy, so for that minimal example, we’ll just create a blank window with a title.
Here is my code to do this:
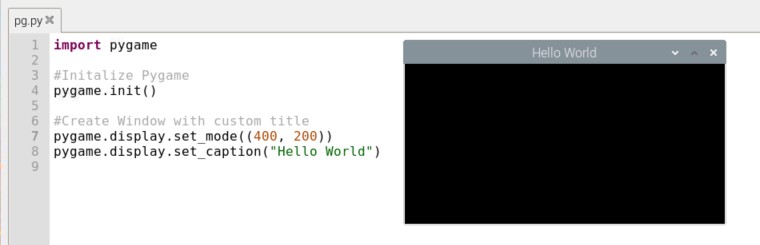
import pygame

#Initalize Pygame
pygame.init()

#Create Window with custom title
pygame.display.set_mode((400, 200))
pygame.display.set_caption("Hello World")
We start by creating a display window with the “init()” function, and then change the default parameter, adding a size (set_mode) and title (set_caption).
When you run this script, you should get something like:
That’s it. Not very exciting as a game, and nothing much to add here.
Let’s move to the next step.
Exit the right way
You’ll quickly realize that if you try to close the window, it doesn’t work by default. You need to stop the script or the window will just stay there.
I don’t know why it’s not handled by default, but if you want to quit the program when you close the window, you need to start playing with events.
We’ll talk more about this later, but the idea here is to have an infinite loop that will record all the events running (mouse clicks for example) and check if it’s you clicking on the cross or something else. It will stop the script if you click on it.
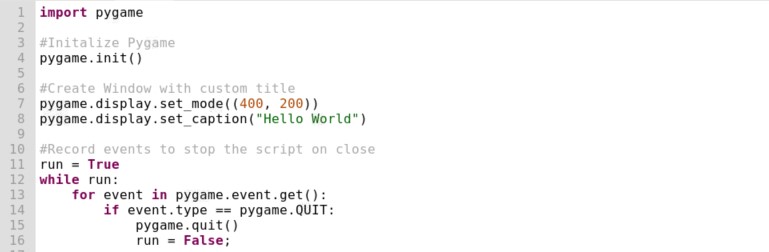
Here are the lines you need to add at the end:
#Record events to stop the script on close
run = True
while run:
    for event in pygame.event.get():
        if event.type == pygame.QUIT:
            pygame.quit()
run = False;- pygame.event.get() read the latest events recorded from the queue.
- Each event type will be tested in our “if” statement.
- If the type of the event corresponds to “QUIT”, we’ll stop the script, by using the “quit()” function.
As we are doing an infinite loop until you try to close the window, we shouldn’t miss any event.
With syntax highlighting, it looks like that in Thonny:
Try to run the script again, and you’ll see that this time, if you close the window, it will really close, and stop the script properly.
So make sure to add something like that to all your scripts in the future.
Images and movements
Well, let’s try to add something to the window now. One of the easiest examples I have found is to import an image and make it move automatically (horizontally, vertically or both).
The script will start the same way, but we’ll use some variables to make it easier to read, as it’s a bit longer than the previous examples. Here is the initialization paragraph I used:
#Initalize Pygame
pygame.init()
size = width, height = 320, 240
title = "First app"
image = "icon.png"
bg = 36, 36, 36
speed = [1, 1]
Everything is almost self-explanatory. We create variables to store the size of the window, the window title, the image file we’ll use, the background color (RGB) and the movement speed.
If like me, you always mix the languages syntax, download my cheat sheet for Python here!
Download now
The image I use is this one if you want to try with the same, but you can use anything you want, it doesn’t really matter I think (just find something with a good size according to your window).
Then, we create a window (same as previously, but using variables), and load the image as a Pygame object:
#Create Window with custom title
window = pygame.display.set_mode(size)
pygame.display.set_caption(title)

icon = pygame.image.load(image)
iconr = icon.get_rect()
Make sure you have the image file in the same folder as your script.
get_rect() returns the rectangular area of the image, we’ll work with it most of the time (to get or change the coordinates, for example).
Note that we save the display window in the “window” variable this time, as we’ll use it as a parameter when we want to add something in this window (the image for example).
Then, we’ll use three important lines to set the background color, load the image and refresh the window:
window.fill(bg)
window.blit(icon, iconr)
pygame.display.flip()
So, fill() is used to set the background color (we defined it in the initialization paragraph), and blit() to draw the image. flip() refreshes the entire window to make the previous changes visible.
We then put everything together. But I told you that I want the image to move on the screen, so I use the move() function, with the speed parameter created earlier to make it move from the top-left corner to the right.
Here is the entire script:
import pygame

#Initalize Pygame
pygame.init()
size = width, height = 320, 240
title = "First app"
image = "icon.png"
bg = 36, 36, 36
speed = [1, 1]

#Create Window with custom title
window = pygame.display.set_mode(size)
pygame.display.set_caption(title)

icon = pygame.image.load(image)
iconr = icon.get_rect()

#Main loop
run = True
while run:
    #Move the icon
    iconr = iconr.move(speed)

    window.fill(bg)
    window.blit(icon, iconr)
    pygame.display.flip()

    #Exit event
    for event in pygame.event.get():
        if event.type == pygame.QUIT:
            pygame.quit()
            run = False;
If you try it, you’ll see the window loading, and the image just moving fast from left to right and top to bottom. Then, it goes out of the screen, and you have a blank screen again.
To avoid this, you need to constantly check the image position in your loop, and change the speed direction. (1, 0) moves from left to right, while (-1, 0) moves it from right to left.
You can get the icon coordinates with:
- iconr.left
- iconr.right
- iconr.top
- icon.bottom
The top-left corner corresponds to 0,0 while the bottom-right corner corresponds to the width and height of your window (320, 240 in my example).
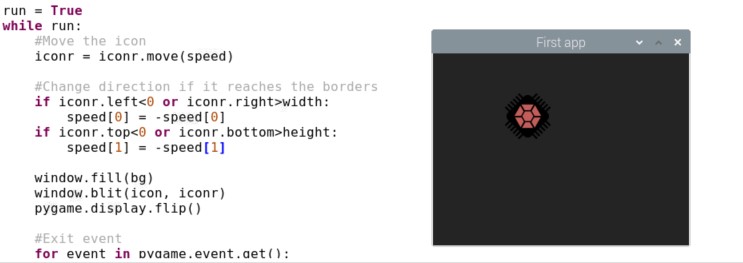
We have created variables with the height and width of the window, so we can add these lines in the loop to make sure the image never goes out of the window:
    #Change direction if it reaches the borders
    if iconr.left<0 or iconr.right>width:
        speed[0] = -speed[0]
    if iconr.top<0 or iconr.bottom>height:
        speed[1] = -speed[1]
After adding this to your code, the image should now bounce around in all directions but always stay inside the window. Try it!
It's a free PDF guide containing every Raspberry Pi Linux command you should know!
Download now
Pygame basics: a few useful functions you need to know
At this point, you should already get a sense of the possibilities offered by this Python library. But to create a game, moving images in a window is not enough. You have to know how to interact with the user, by capturing all events and displaying messages or shapes.
Capture keyboard events
We already saw how to capture the event when you try to exit the window. Capturing the keyboard events is very similar.
An event type you can use in this case is “KEYDOWN”.
If this event is triggered, the value of “event.key” will be a number, identifying the key pressed on the keyboard. You can run a test with:
for event in pygame.event.get():
        if event.type == pygame.KEYDOWN:
           print(event.key)
If you run the script and press a few keys, you’ll see the corresponding numbers in your debug shell:
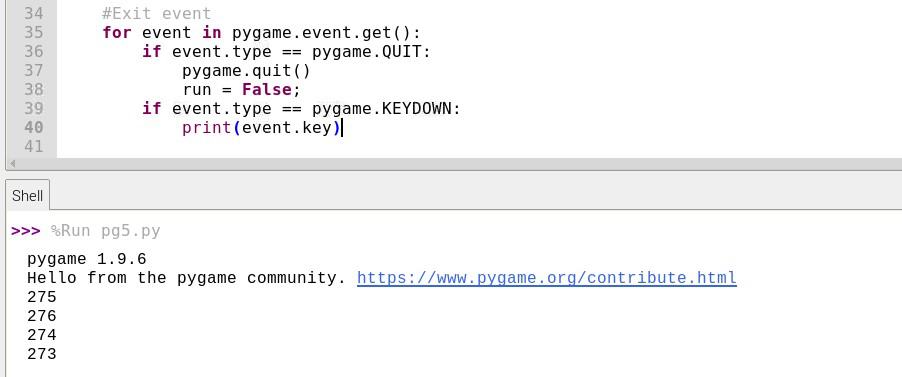
273 to 276 are the ID of the arrow keys, so you can use them in your script to do specific actions. For example, if you keep editing the previous script with the image moving in all directions, you can record the arrow key, and change the image direction based on this:
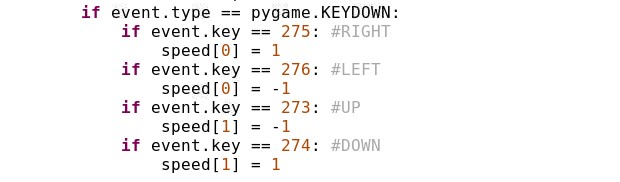
Instead of bouncing “randomly” from left to top right and top to bottom, you now have a bit of control of the image moves.
You can even decide that the image is no longer moving automatically, but only when the user uses the arrows (as if it was a character moving on the screen). You can do this by using this script:
import pygame

#Initalize Pygame
pygame.init()
size = width, height = 320, 240
title = "First app"
image = "icon.png"
bg = 36, 36, 36
speed = [0, 0]

#Create Window with custom title
window = pygame.display.set_mode(size)
pygame.display.set_caption(title)

icon = pygame.image.load(image)
iconr = icon.get_rect()

#Main loop
run = True
while run:

    #Change direction if it reaches the borders
    if iconr.left<0 or iconr.right>width:
        speed[0] = -10
    if iconr.top<0 or iconr.bottom>height:
        speed[1] = -10

    #Exit event
    for event in pygame.event.get():
        if event.type == pygame.QUIT:
            pygame.quit()
            run = False;
        if event.type == pygame.KEYDOWN:
            if event.key == 275: #RIGHT
                speed[0] = 10
            if event.key == 276: #LEFT
                speed[0] = -10
            if event.key == 273: #UP
                speed[1] = -10
            if event.key == 274: #DOWN
                speed[1] = 10

    #Move the icon
    iconr = iconr.move(speed)
    speed = [0, 0]

    window.fill(bg)
    window.blit(icon, iconr)
    pygame.display.flip()
I changed the order of the instructions in the script a bit in order to make it work as expected, but it’s basically everything we have seen until now. I set the speed to 0,0 in the beginning, and reset it to 0,0 after the move, so it only moves the character when a key is pressed.
Capture mouse events
You can also capture mouse events similarly.
For example, taking the previous example, you could stop the movement when the player does a left click, and start it again on a right click.
The event type to check in this case is “MOUSEBUTTONDOWN” and the button pressed is accessible via “event.button”, so it looks like:
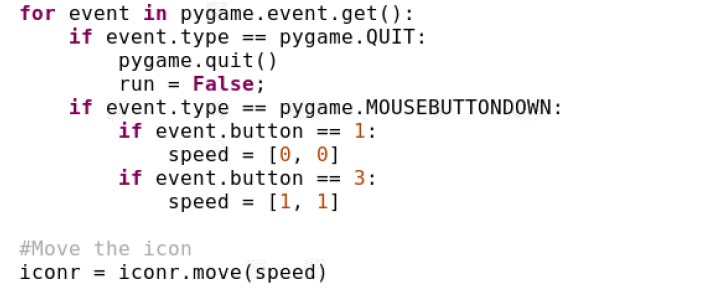
Button 1 is left, and button 3 is right.
You can find other mouse events in the documentation (you can get the coordinates of the mouse, for example. Let’s say you want to try to follow the mouse with your moves).
Display text
Surprisingly, displaying text is almost more complicated than loading images, which is why I kept it for the end of this tutorial.
You need to specify the text font, size, color and then load it almost like an image, with the blit() and flip() functions.
Here is a basic example, you’ll quickly understand the idea:
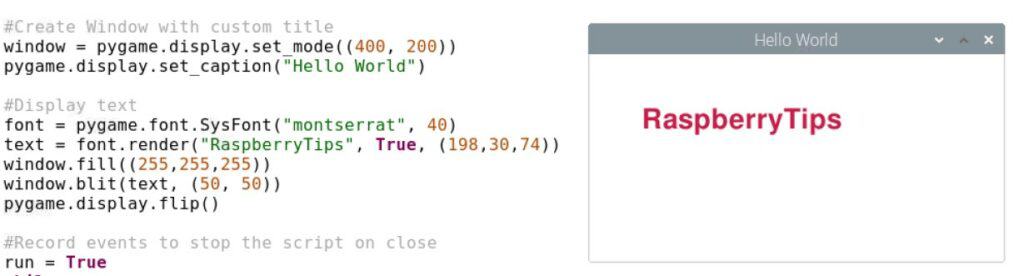
#Display text
font = pygame.font.SysFont("montserrat", 40)
text = font.render("RaspberryTips", True, (198,30,74))
window.fill((255,255,255))
window.blit(text, (50, 50))
pygame.display.flip() - In the first line, you define the text font and size (Montserrat and 40 in my example).
- Then you create a surface render (like “iconr”), with the text you want to use, and the color (RGB).
- The fill() function set the background color (white in this case).
- And the blit() function places the text surface we just created in specific coordinates (50, 50).
If you run these lines, you should get something like that:
Create buttons (or shapes)
Pygame also includes functions to draw different shapes. For example, you can use this to create a button instead of a simple text, or more broadly to create anything you want in your game.
If I want to create a button, I’ll add this line in my previous example:pygame.draw.rect(window,(198,30,74), (50, 50, 200, 30))
I’ll draw a rectangle shape, with the specified color (second argument) at the specified location (50, 50) and size (200, 30).
Running the entire script now will do this:
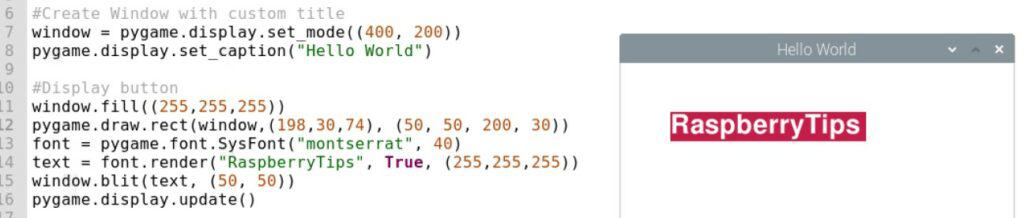
Note: I changed the text color to white.
It's a free PDF guide containing every Raspberry Pi Linux command you should know!
Download now
Want to chat with other Raspberry Pi enthusiasts? Join the community, share your current projects and ask for help directly in the forums.
Going further with Pygame on Raspberry Pi
From there, I think you have some basics to get started with Pygame on your Raspberry Pi. Make sure you understand the concepts introduced in this article, and try to play with them to go a bit further than my example. It’s always better to learn on your own, and not just by copying/pasting the code written by others.
Ideas:
- Draw a rectangle at a random position on the screen. If the character bumps into it, it’s game over.
- Load images of “coins” at random positions, if the character grabs them, the score is updated (text) and a new coin is loaded somewhere else.
- You can then add ghosts and walls to recreate a sort of Pacman game:

You can find the complete documentation here, and there are tons of examples and tutorials available online if you are looking for something specific. Have fun!
And if you want more step-by-step instructions, you can also watch courses online, here are a few examples you can find on Udemy, that should really speed up the process:
- Video Game creation with Python and Pygame
- Learn Python by making games
- Complete Pygame tutorial (Dungeon crawler)
Whenever you’re ready, here are other ways I can help you:
The RaspberryTips Community: If you want to hang out with me and other Raspberry Pi fans, you can join the community. I share exclusive tutorials and behind-the-scenes content there. Premium members can also visit the website without ads.
Master your Raspberry Pi in 30 days: If you are looking for the best tips to become an expert on Raspberry Pi, this book is for you. Learn useful Linux skills and practice multiple projects with step-by-step guides.
The Raspberry Pi Bootcamp: Understand everything about the Raspberry Pi, stop searching for help all the time, and finally enjoy completing your projects.
Master Python on Raspberry Pi: Create, understand, and improve any Python script for your Raspberry Pi. Learn the essentials step-by-step without losing time understanding useless concepts.
You can also find all my recommendations for tools and hardware on this page.