

How to use Raspberry Pi as a Wireless Router with Firewall
A Raspberry Pi only has one Ethernet adapter, so it isn’t necessarily the best device to build a network router, but we can still use the wireless adapter on one side of the router. I’ll show you how to do this in this article.
A Raspberry Pi can be used as a network router by configuring the wireless adapter as an access point and routing all the traffic to the LAN and Internet over the Ethernet cable. It’s possible to add a firewall in the middle to filter what is accessible to Wi-Fi clients.
Keep in mind that it’s a big topic with many services and network notions to understand.
I’ll start with the theory and then explain how to install and configure each piece of the puzzle.
Note: This article has been updated for Raspberry Pi OS Bookworm. I highly recommend using it, as it simplifies most of the process thanks to Network Manager.
If you’re looking to quickly progress on Raspberry Pi, you can check out my e-book here. It’s a 30-day challenge where you learn one new thing every day until you become a Raspberry Pi expert. The first third of the book teaches you the basics, but the following chapters include projects you can try on your own.
Begin with the end in mind
This is not a simple tutorial that you can accomplish by copying/pasting a few commands without necessarily understanding anything. So, depending on your current level of network and system administration, it’s best to start with a little theory first.
What is a router?
In simple words, a router is a network device that connects two subnetworks together.
If you have two Ethernet ports on your computer that are connected to different networks, your computer can act as a router. But we usually use a device designed for that purpose (like your Internet router).
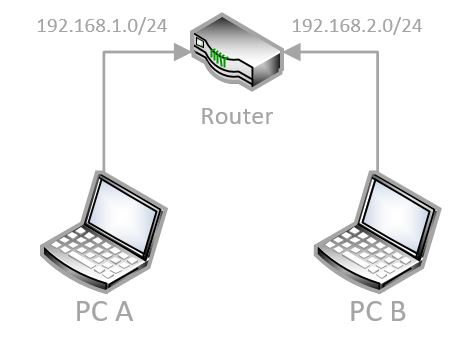
In this diagram, we have two different networks connected by a router: 1.0 and 2.0. If the router is configured well, it will allow computers A and B to see each other (and exchange data), even though they are on different networks.
Raspberry Pi models have limitations, and the major limitation in this case is that there is only one Ethernet adapter. But we’ll use the Wi-Fi adapter to create a second network.
Keeping the previous schema as an example, we can replace the router with a Raspberry Pi, using the RJ45 cable on one side and a wireless hotspot on the other. It’s a router because we’re going to configure it so that PC A and PC B can communicate through the Raspberry Pi.
I’ll clarify the end goal of this tutorial in a minute, but first let’s talk about the firewall part.
Firewall
A firewall is like a filter on our router. It’s a piece of software that checks what’s going in and out, and what devices it should allow or block based on predefined rules.
For example, in the previous example, we can configure that A can ping B, but not access the HTTP server on B. I’ll use a software called “iptables” for this, but you can use any other firewall software if you prefer.
You may even choose not to install a firewall at all. If you trust both sides of the network (like a home lab or something), a firewall is not necessary.
My goal
If you use your Raspberry Pi at home, you probably don’t need to connect two networks.
But my goal here is to create a new wireless access point with a firewall and other cool software to monitor the network and filter some kind of traffic.
So, if this is the current network:

The goal is to make it look like this instead:
It's a free PDF guide containing every Raspberry Pi Linux command you should know!
Download now

Here are the main steps to follow to get the same result:
- Install your Raspberry Pi on the network.
- Enable the Wi-Fi access point with a different network subnet.
- Create a bridge between the two networks.
- Create firewall rules.
- Install other cool software.
Don’t worry, I’ll explain each step in detail. Let’s move to the first step of this process.
Install your Raspberry Pi
The first thing to do is to install your Raspberry Pi on the network. Nothing complicated at this point, just install a fresh version of Raspberry Pi OS and obtain access via SSH. Here is what you need to do:
- Install Raspberry Pi OS by following this tutorial.
You don’t need the Desktop version unless you want to use the Raspberry Pi for other things as well. - Plug the Raspberry Pi into the network with an RJ45 cable.
We’ll use the Wi-Fi later, so don’t use it as your main connection. - Setting up a static IP address for the Raspberry Pi is probably a good idea.
You can click on the link to read my tutorial on this topic.
While it’s mandatory on the Wi-Fi side, it’s just for convenience on the Ethernet adapter. - Once done, update your system by doing:
sudo apt update
sudo apt upgrade - If you haven’t done it in Raspberry Pi Imager directly, enable SSH in raspi-config > Interface options.
sudo raspi-config
You’ll use it in this tutorial to copy/paste commands from this page.
You can find more details on how to use SSH in this tutorial if needed.
That’s it, you have done the preparation steps, and we can now start with the router installation.
Are you a bit lost in the Linux command line? Check this article first for the most important commands to remember and a free downloadable cheat sheet so you can have the commands at your fingertips.
Install a wireless router
Once the system is installed, your next step is to create the hotspot with the wireless adapter. Since Bookworm and the use of Network Manager, it can now be done in a few command lines.
Note: I have a more in-depth tutorial on how to set up a Wi-Fi access point on Raspberry Pi on the website. I give you the short version here, but you are welcome to check it for more step-by-step guidance. And if you use an older version of Raspberry Pi OS, the steps are only there (I cleaned the old ones here).
Configure the Wi-Fi country
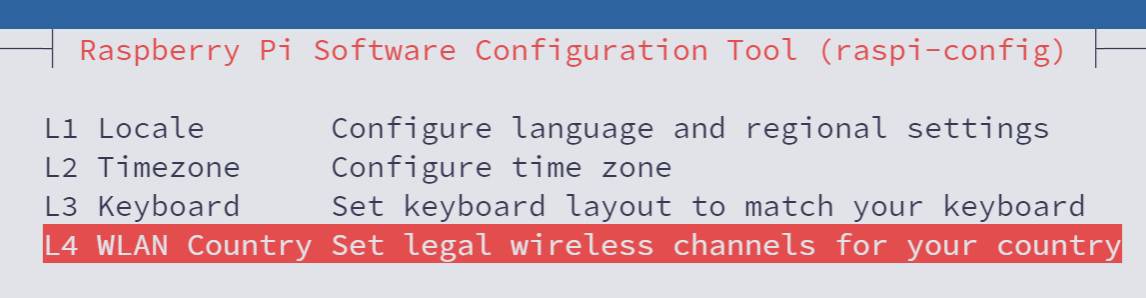
In theory, this is no longer necessary, as you probably did it via Raspberry Pi Imager or the Welcome Wizard. However, just in case you are using a fresh new Raspberry Pi OS, make sure you have set the Wi-Fi country on the Raspberry Pi.
The Wi-Fi is disabled until that.

Join Our Community!
Connect, learn, and grow with other Raspberry Pi enthusiasts. Support RaspberryTips and enjoy an ad-free reading experience. Get exclusive monthly video tutorials and many other benefits.
Learn more- Open raspi-config.
sudo raspi-config - Go to “Localisation Options” > “WLAN Country”.
- Select your country in the list.
- Confirm and exit.
Enable the access point
Enabling an access point with Network Manager is more straightforward, but requires a few command lines you can’t really guess without this tutorial.
Here are the main steps you need to follow:
- Start by enabling the Wi-Fi interface in Network Manager with:
sudo nmcli con add con-name hotspot ifname wlan0 type wifi ssid "RaspberryTips-Wifi"
You can replace the last parameter with your own SSID of choice, which will be the access point Wi-Fi name. You can also replace “hotspot” with anything else, it’s the configuration name. Just make sure to also change it in the following commands. - We’ll then set the access point security and password, for example:
sudo nmcli con modify hotspot wifi-sec.key-mgmt wpa-psk
sudo nmcli con modify hotspot wifi-sec.psk "raspberry"
The last parameter is your Wi-Fi password, make sure to use something more complicated :-). - And finally, configure Network Manager to run in access point mode, with shared IP addresses on this interface:
sudo nmcli con modify hotspot 802-11-wireless.mode ap 802-11-wireless.band bg ipv4.method shared
If everything goes as expected, your access point should be up and visible a few seconds later. You can try to connect to it from another computer or your phone:
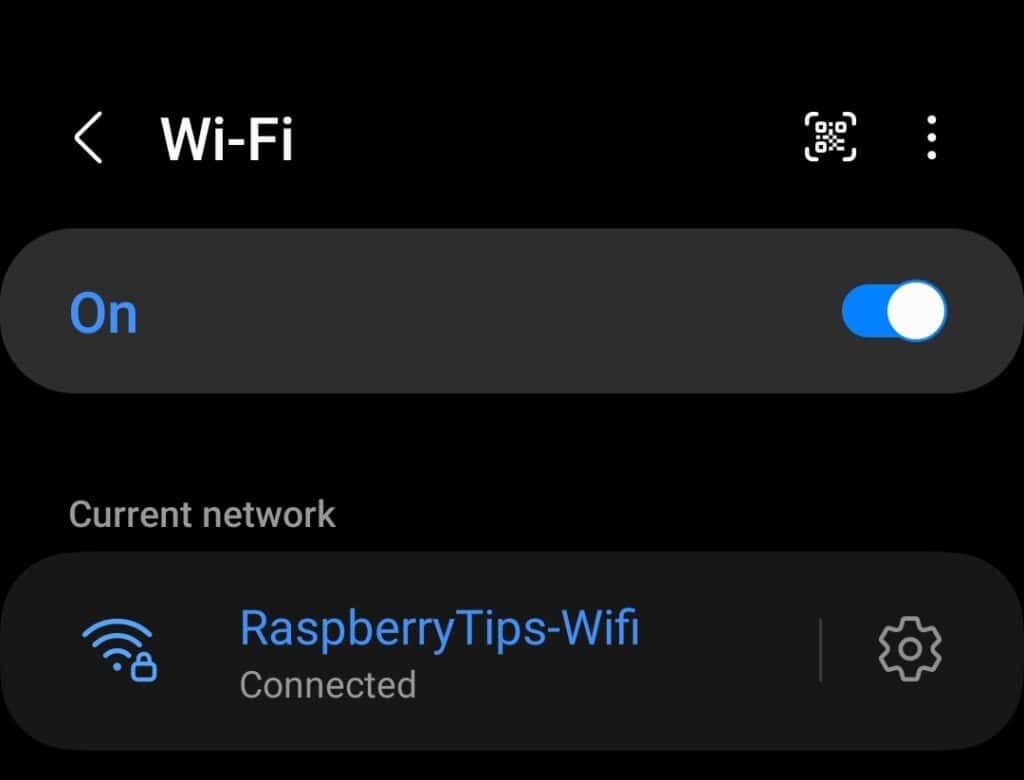
You should get an IP on a different network than your main LAN. For example, my phone IP address is now 10.42.0.192, while my LAN is something like 192.168.X.Y.
By default, everything is open, and you should have access to the Internet as well as any computer or server on your main network (for example, I can access my NAS and web server from my smartphone).
In some cases, it’s fine, and you don’t need more. But I suspect that some of you will want to add another layer of security and filter what is accessible and what is not. That’s where adding a firewall is useful.
Understand the firewall concepts
Again, I prefer to take the time to explain a little bit about the firewall because I don’t want to lose you in the next steps. If you are already familiar with it, you can skip to the next section.
Introduction
The role of a firewall is to block or allow access from a specific IP to another.
And often we also use a port to set the exact permission.
For example, we can deny usage of port 22 (SSH) to everyone, except computer A that can connect to computer B on port 22.
Black or White
In a firewall configuration, you start with a choice between two default rules:
- Blacklist: Allow all except …
- Whitelist: Deny all except …
Depending on what you want to do with your Raspberry Pi router, it’s your choice to take the one you want.
The first option is probably ok if you are using it at home. You may want to block only certain things, like the torrent protocol or specific IPs addresses. But at work it’s generally the second. The good practice is to block everything except what is allowed (if you don’t need something, it’s safer to keep it blocked).
In, Out and Forward
Whether you decided to go with a blacklist or a whitelist, you’ll then create rules to filter what is allowed or not. Each rule can be set in three directions:
- Input: Network packets coming into the firewall.
- Output: Packets going out from the firewall.
- Forward: Packets going through the firewall.
For example, if you host a web server, you can generally block everything in input except HTTP and HTTPS traffic. But in output, it’s not a big deal what your server is doing on the Internet.
In our case, we’ll mainly use FORWARD rules only, as there is nothing on the Raspberry Pi.
There is no need to protect it more than that.
Configure the firewall service
Now that the theory is clear, let’s discuss how to put it in practice.
IPTables
There are several firewall packages available on Raspberry Pi OS: iptables or ufw for example.
There is also OpenWRT, a Raspberry Pi compatible distribution, to create a router firewall.
In this post, I’ll use iptables, which is used the most and is preinstalled with most operating systems.
It's a free PDF guide containing every Raspberry Pi Linux command you should know!
Download now
If it’s not already installed on your Raspberry Pi, you can install it with:sudo apt install iptables
See the current configuration
Before adding rules, let’s check the current configuration.
It’s probably empty if you just installed it, but let’s start simple anyway.
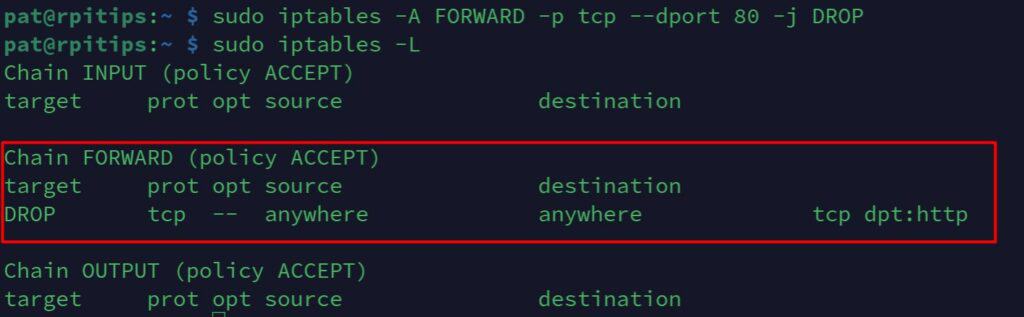
At any point in this tutorial, you can use this command to show the firewall configuration:sudo iptables -L
For now, you should get something like:
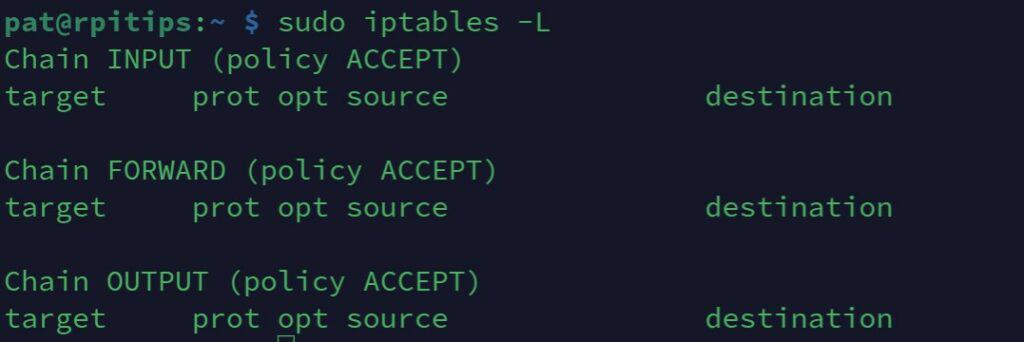
We find the input, output and forward parts I talked about previously.
For each section, we see that the default policy is ACCEPT, so everything allowed except what we add (blacklist mode).
You can use this command later to check if the new rules you add correspond to what you want.
Add a FORWARD rule
We’ll now use the iptables command to add new rules in the firewall.
Every network is different, so every firewall rule table is different.
I’ll start with a basic example and then give you the whole syntax to add specific rules to your environment.
- Start by resetting the iptables configuration:
sudo iptables -F
It shouldn’t do anything at this point, but it’s a command to know just in case you break something later on. Also, the rules must be set in a specific order, so it’s a good practice to start with a reset. - Add a DROP rule:
For example, let’s say we want to deny access to HTTP websites for Wi-Fi clients.
We can add that kind of rule to the firewall:sudo iptables -A FORWARD -p tcp --dport 80 -j DROP
This command specifies that:
– we add a new rule (-A).
– in the forward section (FORWARD).
– for the tcp protocol (-p TCP).
– for the HTTP port (–dport 80).
– and the action is to DROP everything (timeout connection). - After that, you should not be able to access a website like this one for example (but sites in HTTPS still work).
It’s ok, your first rule is operational.
You can use iptables -F to remove all rules and start again.
Or you can use the same command with the -D operator instead of -A.sudo iptables -D FORWARD -p tcp --dport 80 -j DROP
This command allows you to delete a specific rule and not all like with the -F.
Iptables command syntax
As you should already understand, you can now use the same command template to create the firewall rules you need.
The command template is:iptables -<operation> <direction> -p <protocol> --dport <port> -j <action>
- operation:
- -F: flush, remove all rules, it requires no other parameters.
- -A: append, add a new rule.
- -D: delete, remove an existing rule.
- direction: INPUT, OUTPUT or FORWARD (see the previous section).
- protocol: mainly TCP or UDP.
- port: the port number you want to create your rule for.
You can find a list of common ports here. - action: Define the choice to make for the corresponding traffic.
- ACCEPT: Allow access (while in whitelist mode).
- REJECT: Deny access and tell the sender it’s not allowed.
- DROP: Deny access but don’t tell the sender.
This is a short introduction to what you’ll mainly use.
If you need further information, use “man iptables” or check this page for all parameters.
Switch to whitelist
As you can see with “iptables -L”, we are in blacklist mode: ACCEPT all except the rules we add.
If you are in a stricter environment, switch to whitelist mode.
For example, if you are creating free Wi-Fi in a hotel or other business, you probably want to allow only a few ports (like web and mail).
To do this, you need to create a list of all ports you want to allow.
If you do all the commands manually, you’ll lose access after the first one.
So, the easiest way is to create a script that runs all commands at once.
Create the firewall script
- Create a new file with nano:
sudo nano /usr/local/bin/firewall.sh - Paste these lines inside:
#!/bin/sh
#Clear all rules
iptables -F

#Whitelist mode
iptables -P INPUT ACCEPT
iptables -P FORWARD DROP
iptables -P OUTPUT ACCEPT

#Allow PING for everyone
iptables -A FORWARD -p icmp -j ACCEPT

#Allow HTTP/HTTPS for WiFi clients
iptables -A FORWARD -p tcp --dport 80 -j ACCEPT
iptables -A FORWARD -p tcp --dport 443 -j ACCEPT

#Allow POP/IMAP/SMTP for WiFi clients
iptables -A FORWARD -p tcp --dport 25 -j ACCEPT
iptables -A FORWARD -p tcp --dport 110 -j ACCEPT
iptables -A FORWARD -p tcp --dport 993 -j ACCEPT

#Allow PING for WiFi clients
iptables -A FORWARD -p icmp -j ACCEPT

#Allow NAT
iptables -t nat -A POSTROUTING -o eth0 -j MASQUERADE
iptables -A FORWARD -i eth0 -o wlan0 -m state --state RELATED,ESTABLISHED -j ACCEPT
- You can adapt these lines to your needs. This is just an example.
I don’t drop on INPUT and OUTPUT in this sample script, but you can do it if you want better control of your network usage. - Save and exit (CTRL+O, CTRL+X).
- Add execution right to this script.
sudo chmod +x /usr/local/bin/firewall.sh - Run it.
sudo /usr/local/bin/firewall.sh - Check if everything works fine.
If something goes wrong, reboot the Raspberry Pi to recover all access.
Then find what you missed in your script.
When it’s ok, you can add it in the init tab to start it on boot.
Make your configuration persistent
For now, any iptables rules added will be removed on the next reboot. It’s often a good idea to keep it this way while testing the configuration (if you do something wrong, you can easily revert everything by simply rebooting the Raspberry Pi). But at some point, you’ll want to save your work.
Here are the steps to make your firewall configuration persistent:
- Install this package:
sudo apt install iptables-persistent - It will ask you if you want to save your rules during the installation. Accept the save if it’s already configured (and tested).
- And each time you change the rules, you’ll need to run this command to save them:
sudo iptables-save > /etc/iptables/rules.v4
If you get a “permission denied” error, you need to switch to root to do it:sudo su
iptables-save > /etc/iptables/rules.v4
exit
Monitor the network
Now that the router is working (with a firewall or not), we can add other packages to improve the Raspberry Pi capabilities.
In this part, I suggest adding a web interface to monitor what happens on the Raspberry Pi (and on the network).
What’s this tool?
The tool I chose is Webmin.
It’s a web interface that is easy to install and shows you the current configuration, and several statistics and graphs about the system usage.
You can even change the configuration from this interface.
If you know other ones, tell me in the community.
It’s a tool that has existed for a long time, but I don’t know of a newer tool to do this.
Webmin Installation
I have a full tutorial on this website on how to install Webmin on a Raspberry Pi, so I’ll let you check it for detailed instructions.
There are a few ways to install it, either by downloading the files directly or adding a repository. I’ll let you pick the method you prefer and get back there afterward.
Webmin interface
Webmin has a web interface and supports plenty of tools, we don’t need all of this.
We’ll mainly use those in the “Networking” section.
For example, you can enable bandwidth monitoring or manage your firewall configuration from here:
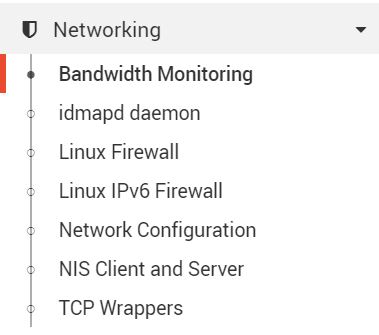
We’ll come back later to this interface, for the proxy configuration, for example.
Add a proxy and a web filter
What’s a proxy?
A proxy has three main roles:
- Creating a cache of all Internet pages to increase web browsing speed.
- Log all visited pages to generate reports (top domain, top traffic, …).
- Act as a website blocker (optional) to deny access to some kinds of content.
To do this, we’ll install Squid (the proxy) and SquidGuard (the filter) on the Raspberry Pi.
Squid installation
- Squid is available in the repository. Install it with:
sudo apt install squid - Backup the configuration file:
cd /etc/squidsudo mv squid.conf squid.conf.old - Switch to the root user for a few seconds and remove all the comments quickly:
sudo su
cat squid.conf.old | egrep -v -e '^[[:blank:]]*#' | grep "\S" > squid.conf
exit
Then check the configuration file:sudo nano squid.conf
You should only see configuration lines now and can edit the default configuration as you want. - Restart Squid to apply changes:
sudo systemctl restart squid
Once Squid is configured, you have two choices to use it:
- Configure your web browser to use the Raspberry Pi as the HTTP Proxy.
It depends on your browser, but you should find this option in Options > Network settings. - Configure iptables to redirect automatically all HTTP traffic to squid.
It should be something like this:iptables -t nat -A PREROUTING -i wlan0 -p tcp --dport 80 -j DNAT --to 10.42.0.1:3128
iptables -t nat -A PREROUTING -i eth0 -p tcp --dport 80 -j REDIRECT --to-port 3128
Then check that HTTP websites are working fine.
You can see all the websites visited in the Squid log file:
sudo tail -f /var/log/squid/access.log
Webmin add-on
There is a Webmin add-on called “calamaris” you can install to monitor the proxy efficiency.
Install it with apt:
sudo apt install calamaris
And then go back to webmin, in the unused modules to find new tools for squid monitoring.
SquidGuard installation
We can now move to the SquidGuard installation:
- Install the SquidGuard package:
sudo apt install squidguard - Download a list of websites by category:
wget http://squidguard.mesd.k12.or.us/blacklists.tgz - Extract files from the archive:
tar -zxvf blacklists.tgz
While extracting, you’ll see some blacklist categories appear on your screen.
You can choose one and use it for the SquidGuard configuration later.
You can open the files to get some website examples. - Move files to the SquidGuard folder:
sudo mv blacklists /var/lib/squidguard/db - Archive the original SquidGuard configuration file:
cd /etc/squiguard
mv squidGuard.conf squidGuard.conf.old - Create a new configuration file:
sudo nano squidGuard.conf - Paste these lines:
dbhome /var/lib/squidguard/db logdir /var/log/squidguard dest violence {
   domainlist blacklists/violence/domains
   urllist blacklists/violence/urls
   log violenceaccess
}
acl {
   default
   {
      pass !violence
      redirect http://localhost/block.html
} }
This is a sample file, you can block whatever you want.
You can also add more categories by creating more dest sections. - Save and exit (CTRL+O, CTRL+X).
- Build the SquidGuard database:
sudo squidGuard -C all -d
This can take a long time. If it’s too long, remove files you don’t need from the blacklists folder.
Use a screen if you don’t stay in front of your computer (screen -S build).
So if the SSH connection with your computer is lost, this will not stop the build process. - Restart Squid to apply changes:
sudo service squid restart
It should be ok now, try to access a URL from the domain list and check that you are blocked by SquidGuard.
Installing Fail2ban might also be a great addition to this setup. Click on the link to learn more about that.
It's a free PDF guide containing every Raspberry Pi Linux command you should know!
Download now
Related questions
Can I add an Ad Blocker brick to this router?
Yes, you can use Pi-Hole to do this. It’s easy to install, and you just need to set the Raspberry Pi as your DNS server (manually or in the DHCP configuration file, see Firewall > DNS issues for more information).
Can I use a Raspberry to build a “full Ethernet” router?
Yes, you can add an Ethernet hat to your Raspberry Pi, like this expansion Hat (more details on Amazon). It’s perfect for a firewall. It should also work with a USB adapter like this one.
It's a free PDF guide containing every Raspberry Pi Linux command you should know!
Download now
Reminder: Remember that all the members of my community get access to this website without ads, exclusive courses and much more. You can become part of this community for as little as $5 per month & get all the benefits immediately.
Conclusion
That’s it, you should now have a better understanding of how to build a complete firewall router with proxy on a Raspberry Pi.
I hope it works for you.
It took me a lot of time to write this post with many tests I didn’t include here, but you have the most important things, with the best tools.
If you encounter any issues, ask your questions in the community, and we’ll try to help you.
Also, these tools are basically Linux stuff, and you can find a lot of help on the Internet to go further. I give you all the documentation links here if needed:
Whenever you’re ready, here are other ways I can help you:
The RaspberryTips Community: If you want to hang out with me and other Raspberry Pi fans, you can join the community. I share exclusive tutorials and behind-the-scenes content there. Premium members can also visit the website without ads.
Master your Raspberry Pi in 30 days: If you are looking for the best tips to become an expert on Raspberry Pi, this book is for you. Learn useful Linux skills and practice multiple projects with step-by-step guides.
The Raspberry Pi Bootcamp: Understand everything about the Raspberry Pi, stop searching for help all the time, and finally enjoy completing your projects.
Master Python on Raspberry Pi: Create, understand, and improve any Python script for your Raspberry Pi. Learn the essentials step-by-step without losing time understanding useless concepts.
You can also find all my recommendations for tools and hardware on this page.


Hi,
interesting way to use the RPi. Just wondering what the config would be using a USB to eth adapter instead of WifI.
best regards
Peter
+1 to peter.
Also, is it possible to add a torrent client to the mix?
Hello,
I think it would only change the interface name, I can test it if you want
And yes, you can absolutely add a torrent client on this installation
Patrick
Hello nice document , i have a question which version of raspi should i use? I have raspberry pi one B version and 3 only… Should i buy raspi 4 models? Thanks alot alot…
Hi Umur,
I’ve done this tutorial with a Raspberry Pi 3B+ so it’s ok
If the question is general, the Raspberry Pi 4 only add extra performances, so it depends on what you want to do
Hi, I would only be interested in the raspberry router, leaving aside the rest that seems quite complicated to me, beginner. The raspberry router clearly coexists with a modem. Your site is really useful, good!
Thanks!
Hi, I followed the instructions for the Wireless router installation.
But something went wrong, I probably did something wrong.
Fact is, the wireless raspberry doesn’t work.
Could I get a little help?
Thank you in advance.
Hello James,
Did you get an error?
Which part are you stuck in?
Patrick
Hi Patrick,
Thanks for the guide. I think with the latest rasp pi – hostapd.conf is masked. It was in my case. So, unmask, rerun the config and all good now
@James.
This might assist.
https://raspberrypi.stackexchange.com/questions/95916/why-is-hostapd-masked-after-installation
Thanks for the information 😉
Hi,
Nice Project
i have few questions
1. i am using ssh to login the pi with static IP so will i be able to still do the above wireless router part?
2. is there a way to implement IDS with alert notifications (email or sms)
Hi,
1. Yes, but only if the computer doesn’t use the Wi-Fi router (if not you have to use the IP on the Wi-Fi network)
2. I think that Snort would work on this installation, but I didn’t try it
Patrick
Hi Patrick,
Thank you so much for the information
Hi Patrick,
what a great tutorial! I would love to try this as soon as i can!
Can this be able to work with Pi-Hole?
Hi
Nice project
How can i force user to brows a local home page imidiatly after connecting to wifi?
Thanks,
Hi Mohammad,
The word you are looking for is “captive portal”
Even if I never tested it on Raspberry Pi, it should be possible
You need to install a Radius server for the authentication
You will easily find tutorial for Linux
Nodogsplash seems a good solution: https://github.com/nodogsplash/nodogsplash
Let me know if you find a solution
And if others are interested, I could probably try it and share how to do this
Thanks Patrick,I’ll share with you the results.
Hi,
Just updated the first part as there is some changes on Buster with Hostapd, the script I gave previously is not updated anymore
So, I added the manual configuration
Let me know if you have any issue with it
Patrick
hi great tutorial i have a question, i config the acces point and install the webmin and all good, i connected with the wifi and I was able to connected to the internet, and then i install pi-hole in the same raspberry pi and all the service just come down the acces point and the webmin. can you tell me how i can configured this services in the same raspberry pi?
I searched for solutions on the internet but I can’t find anything.
thanks you.
Excellent tutorial…
To make this work for Ethernet replace wlan0 with eth1 (confirm second adaptor name assigned) to adaptor in all the config settings.
i found when rebooting Internet forwarding had to be enabled again.
sudo iptables -t nat -A POSTROUTING -o eth0 -j MASQUERADE
sudo iptables -A FORWARD -i eth0 -o wlan0 -m state –state RELATED,ESTABLISHED -j ACCEPT
sudo iptables -A FORWARD -i wlan0 -o eth0 -j ACCEPT
With my limited knowledge wonder how. Probably just creating a script.
Can I run just the firewall?
Hello! Awesome.
One question,
When I try the command “sudo iptables -A FORWARD -i eth0 -o wlan0 -m state – state RELATED,ESTABLISHED -j ACCEPT” says:
Bad argument `–’
Try `iptables -h’ or ‘iptables –help’ for more information.
Why this?
Also, when I reboot my raspberry, Internet forwarding had to be enabled again.
Replace – by --hola,
i’ve followed step by step the tutorial, yet i’m not able to see any access point releated to the rasperry.
i’ve cheked if hostapd status and you can see there is a error.
● hostapd.service – Advanced IEEE 802.11 AP and IEEE 802.1X/WPA/WPA2/EAP Authenticator
Loaded: loaded (/lib/systemd/system/hostapd.service; enabled; vendor preset: enabled)
Active: activating (auto-restart) (Result: exit-code) since Thu 2021-03-18 20:03:16 CET; 1s ago
Process: 1533 ExecStart=/usr/sbin/hostapd -B -P /run/hostapd.pid -B $DAEMON_OPTS ${DAEMON_CONF} (code=exited, status=1/FAILURE)
root@raspberrypi:/home/pi# sudo service hostapd status -l
● hostapd.service – Advanced IEEE 802.11 AP and IEEE 802.1X/WPA/WPA2/EAP Authenticator
Loaded: loaded (/lib/systemd/system/hostapd.service; enabled; vendor preset: enabled)
Active: activating (auto-restart) (Result: exit-code) since Thu 2021-03-18 20:03:25 CET; 830ms ago
Process: 1544 ExecStart=/usr/sbin/hostapd -B -P /run/hostapd.pid -B $DAEMON_OPTS ${DAEMON_CONF} (code=exited, status=1/FAILURE)
root@raspberrypi:/home/pi# sudo service hostapd status -l
● hostapd.service – Advanced IEEE 802.11 AP and IEEE 802.1X/WPA/WPA2/EAP Authenticator
Loaded: loaded (/lib/systemd/system/hostapd.service; enabled; vendor preset: enabled)
Active: activating (auto-restart) (Result: exit-code) since Thu 2021-03-18 20:03:32 CET; 765ms ago
Process: 1553 ExecStart=/usr/sbin/hostapd -B -P /run/hostapd.pid -B $DAEMON_OPTS ${DAEMON_CONF} (code=exited, status=1/FAILURE)
Mar 18 20:03:32 raspberrypi systemd[1]: Failed to start Advanced IEEE 802.11 AP and IEEE 802.1X/WPA/WPA2/EAP Authenticator.
i’ve looked in internet, apparently a solution is to go back to a early version of hostapd or, add a line at :
sudo nano /etc/default/hostapd
DAEMON_CONF=”/etc/hostapd/hostapd.conf”
which it’s already implemented in your tutorial.
A little help would be welcome.
Gracias.
Can you check the log files to get more details about the exact error?
It would be difficult to help without more information.
Thanks
Hello Thank you for your post; it’s very helpful. Just one remark. while updating the iptables using the command :
sudo iptables-save > /etc/iptables.ipv4.nat to be percistent i received this error:
-bash: /etc/iptables.ipv4.nat: Permission denied
For does who have the same problem this solution:
sudo bash -c “iptables-save > /etc/iptables/rules.v4”
has worked for me.