
Getting Started with GPIO Pins on Raspberry Pi (Beginners guide)
GPIO pins on Raspberry Pi are a main feature you need to know.
As I’m a Linux administrator, I mainly used the Raspberry Pi for testing systems and software in the first months. But to go further and create your own electronic systems and programs, you need to learn how to use them.
GPIO pins allow adding extensions to your Raspberry Pi, whether with HATs or to create circuits. The easiest way to use them is to create Python scripts, but Scratch or other software are good options to consider.
In this beginner guide, I’ll really start with the basics, for people who never tried GPIO pins. If you already made some tests, you can use the content table below to get directly to the paragraph you want to read.
You’ll need a few items to complete this tutorial. If you don’t have anything yet, please check this great kit from Sunfounder. This might be a bit too much for this tutorial, but it’s worth it on the long run, as you won’t need anything else for your first few projects.
GPIO Basics
Let’s start with the basics about GPIO.
What are GPIO Pins?
GPIO stands for General Purpose Input/Output.
It’s the 40 pins you can see on the Raspberry Pi, near the edge:

The goal of the GPIO Pins is to add some extensions to your Raspberry Pi.
For example, most of the Raspberry Pi HATs use these pins to connect with the Raspberry Pi (you can find here my Raspberry Pi HATs recommendations if you want to try one).
You can also create your electronic circuit by using these GPIO pins with cables, LED, and other accessories. We’ll see that later.
GPIO Pinout
As you may have guessed, each pin has a specific role, and you can use it only for that role.
Some of them are input/output, power (3.3V or 5V), or ground.
There are even more complex things we’ll see later.
So, it’s important to know what is what.
I have a complete guide on the GPIO pinout here that you can check for more details.
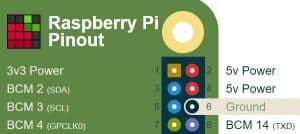
Here is an illustration to move quickly:
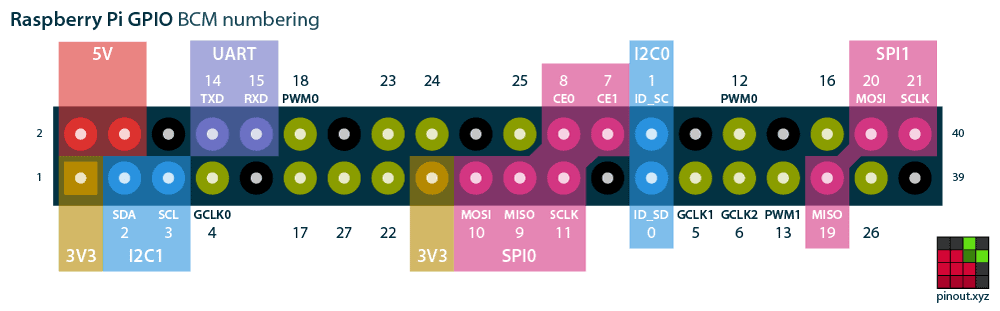
The website pinout.xyz is useful for this.
It gives you the exact layout and role of each pin.
I also have a dedicated article to the Raspberry Pi Pico pinout if you are using this model.
If you don’t have it with your breadboard or GPIO kit, I recommend printing this image to use it later.
If like me, you always mix the languages syntax, download my cheat sheet for Python here!
Download now
Raspberry Pi Configuration
Before starting with the GPIO pins practice, we need to do a few steps on the Raspberry Pi to make sure that everything is ready:
- Start by updating your system
sudo apt updatesudo apt upgrade - Install the rpi.gpio package (it should be pre-installed on most versions)
sudo apt install python3-rpi.gpio - Enable I2C and SPI in raspi-config
You don’t need them in this tutorial, so you can skip this step.
But if you go further after this one it may save you time, as nobody explains this 🙂sudo raspi-config
Go into “Interface Options”.
And enable I2C and SPI in each submenu.
I2C and SPI pins are specific GPIO pins.
You may need them with some hardware modules that need them (a screen like this one for example).
Are you a bit lost in the Linux command line? Check this article first for the most important commands to remember and a free downloadable cheat sheet so you can have the commands at your fingertips.
Required Hardware
Here is the recommended hardware you need to have to follow the rest of this tutorial (Amazon links):

Join Our Community!
Connect, learn, and grow with other Raspberry Pi enthusiasts. Support RaspberryTips and enjoy an ad-free reading experience. Get exclusive monthly video tutorials and many other benefits.
Learn more- A Raspberry Pi, I’m using the 3B+ for this post, but any model will be ok.
- A breadboard kit will be perfect, with everything you need inside. This way you’ll not ask dozens of questions to know which component you really need (not easy when you just start with GPIO circuits).
- Or at least:
- A breadboard
- Some male/female jumper wires, to plug the breadboard to the GPIO pins
- And also male/male jumper wires can be useful too (on the breadboard)
- LEDs and resistors
- I don’t have one yet, but this kind of GPIO Expansion board is an excellent option to know which pin to use
These components will be useful for many projects later, it’s a long list of things you need to get started, but you’ll use them every time after that 🙂
That’s it, once you have everything ready, you can move to the next part.
Breadboard Basics
Let’s start with the breadboard.
If it’s your first time with it, you may have a hard time understanding how it works.
Breadboard Installation
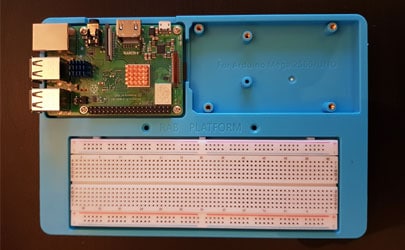
If you are using the breadboard kit I recommended above, the first step is to install it in the blue plastic case.
Generally, you have to stick it in the large space and screw the Raspberry Pi to the corresponding location.
At this point, your setup should look like this:
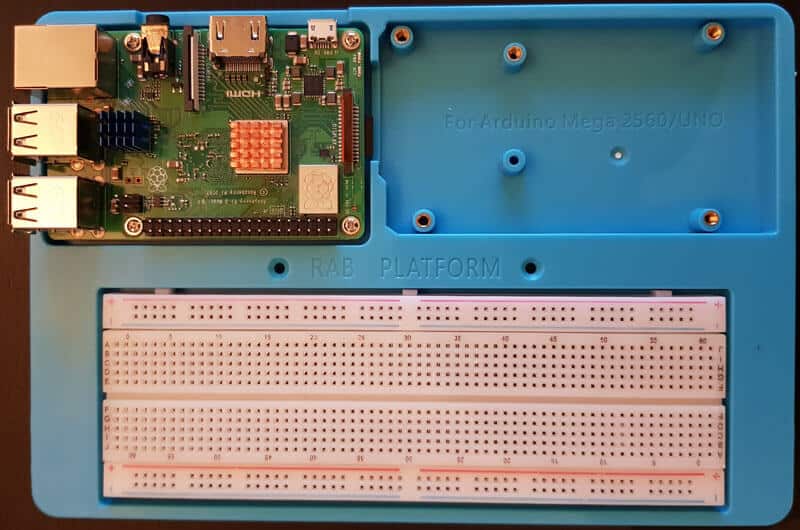
Don’t plug in the Raspberry Pi power cable for the moment.
Breadboard Schema
Before going further, you need to understand how a breadboard works.
Each hole is a pin you can use to plug something.
Power Input
On the edges of the board, there are two lines:
- The red line is for the power input
- The blue line is for the ground
Each port is connected with all the pins from the same line.
Attention, with some breadboards (like mine), there is a separation in the middle, you can see a gap in the red line for example.
If you plug near port 0, it will not work near port 50.
If like me, you always mix the languages syntax, download my cheat sheet for Python here!
Download now
Other Ports
The other ports are used for everything else (LEDs, resistors, other modules).
A wire connects them in columns.
If you take one number on the board, it connects each port from the same column with the others.
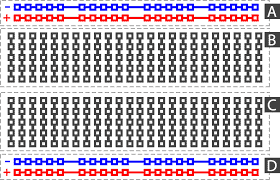
Schema
It will be clearer with this picture:
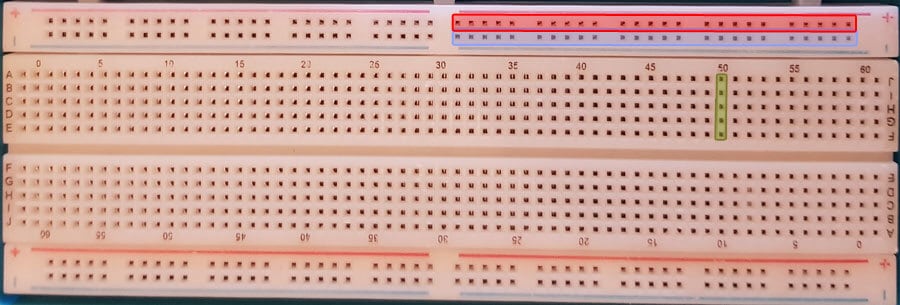
I have squared each connected ports.
The red square corresponds to a power input line.
There are four lines of this type on the board.
If you input power in one of the squared ports, you can use it from any other highlighted ports.
For the ground ports, it’s the same thing (blue square).
And for the other ports, you can see the green square how they are connected together.
It’s the same for each column, for both side of the middle line.
If needed, here is a complete schema:
It's a free PDF guide containing every Raspberry Pi Linux command you should know!
Download now
Your First Circuit: Blink the LED!
Ok, that’s the end of the theory part, and the beginning of your first circuit tutorial.
Let’s practice 🙂
Breadboard Configuration
As always, start to plug the pins without a power source plugged.
To get started you need:
- 1x LED
- 2x male/female jumper wires
- 1x resistor
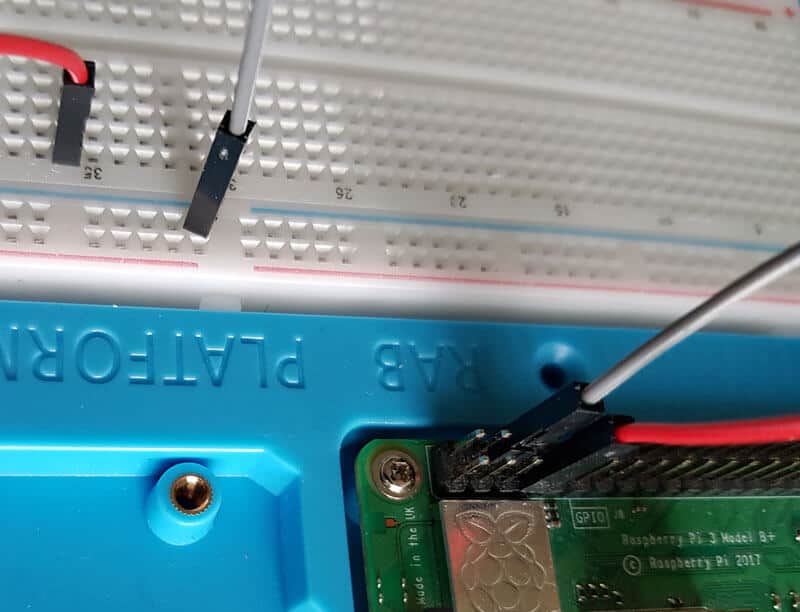
Take the two jumper wires and plug them like this:
- One from the ground line to a ground pin of the Raspberry Pi (for example, the third one from the second row, port 6)
- The other from an input/output port (for example, the fourth one of the first row, port 7)
You now have two cables, connected to only one side.
On the other side, you need to connect them to the breadboard.
Plug the ground jumper wire to the ground line of the breadboard (any port).
Plug the other cable into one column of the breadboard (anywhere).
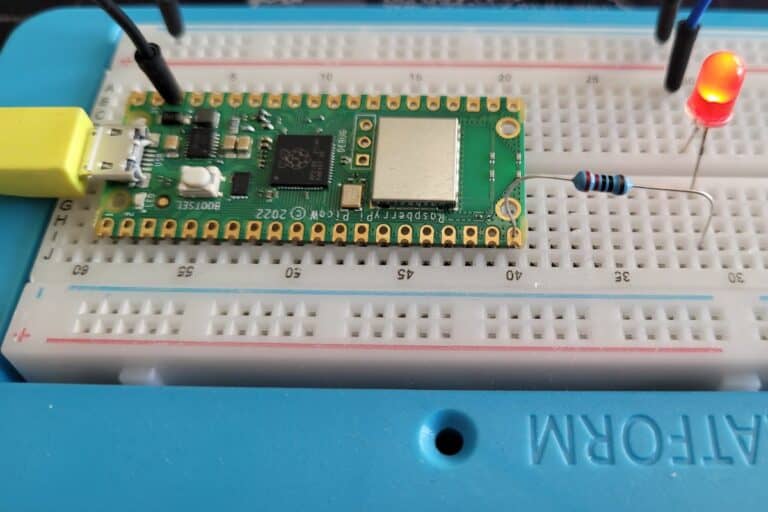
It should look like this:
Finally, put the resistor between the ground line and the column near the other cable.
And put a light with one foot on each column, the shorter in the resistor/ground column.
Something like this:
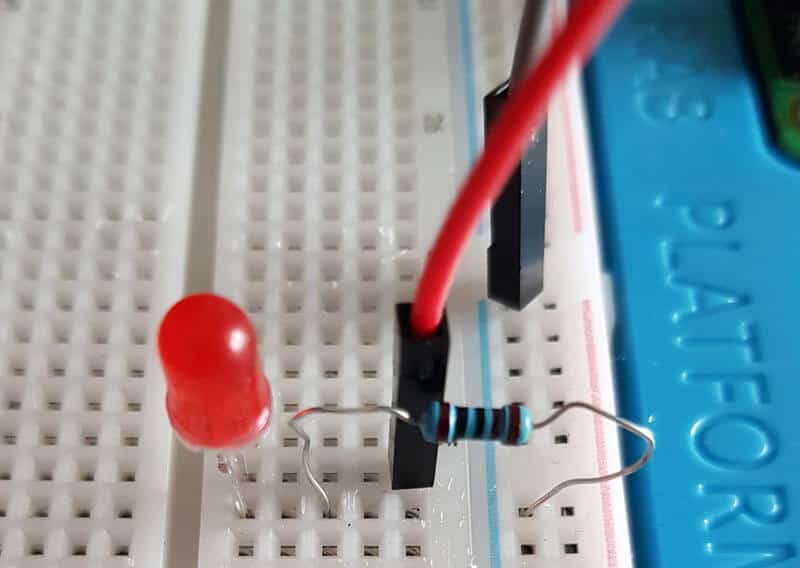
Yes, I know my resistor seems to be having a hard time 🙂
You can now boot the Raspberry Pi and jump into SSH (or GUI if you prefer) to create the Python script.
As soon as the Raspberry Pi is on, avoid touching the circuit.
Python script
The first basic script we can code is to turn on the LED light to check that everything works.
To do this, Raspberry Pi OS already includes any libraries you need.
- In a terminal, or with your favorite code editor, create a new python file:
nano led_on.py
- Paste these lines inside:
#import libraries
import RPi.GPIO as GPIO
import time

#GPIO Basic initialization
GPIO.setmode(GPIO.BCM)
GPIO.setwarnings(False)

#Use a variable for the  Pin to use
#If you followed my pictures, it's port 7 => BCM 4
led = 4
#Initialize your pin
GPIO.setup(led,GPIO.OUT)

#Turn on the LED
print("LED on")
GPIO.output(led,1)

#Wait 5s
time.sleep(5)

#Turn off the LED
print("LED off")
GPIO.output(led,0)
I commented on everything so it should be clear.
The only trap is the pin number to use in the LED variable.
You may have a different numeration in your breadboard expansion board or sticker, but you have to use the BCM number from pinout.xyz. - Save and Exit (CTRL+X)
- Run the script with:
python3 led_on.py
The LED will turn on for 5 seconds and then turn off.
If not, double-check every previous paragraph to see what you have missed.
If your circuit seems good, check the LED direction, there is a + and – side.
By the way, if you are new to Python scripts, you must probably check this article first. I also have a complete e-book about Python on Raspberry Pi, that explain everything from scratch to mastery. I highly recommend using it if you are serious about learning Python and Raspberry Pi.
It's a free PDF guide containing every Raspberry Pi Linux command you should know!
Download now
Want to chat with other Raspberry Pi enthusiasts? Join the community, share your current projects and ask for help directly in the forums.
Conclusion
That’s it, you now have learned the basics about GPIO pins and breadboard.
You’re able to build basic circuits, and you’re ready for the next level 🙂
You may also like:
- The 11 Best Raspberry Pi Robots Kits for Beginners.
- Enabling UART on Raspberry Pi: A Step-by-Step Guide
- How To Connect and Code a Motion Sensor with Raspberry Pi
Whenever you’re ready, here are other ways I can help you:
The RaspberryTips Community: If you want to hang out with me and other Raspberry Pi fans, you can join the community. I share exclusive tutorials and behind-the-scenes content there. Premium members can also visit the website without ads.
Master your Raspberry Pi in 30 days: If you are looking for the best tips to become an expert on Raspberry Pi, this book is for you. Learn useful Linux skills and practice multiple projects with step-by-step guides.
The Raspberry Pi Bootcamp: Understand everything about the Raspberry Pi, stop searching for help all the time, and finally enjoy completing your projects.
Master Python on Raspberry Pi: Create, understand, and improve any Python script for your Raspberry Pi. Learn the essentials step-by-step without losing time understanding useless concepts.
You can also find all my recommendations for tools and hardware on this page.


Patrick,
I used your excellent tips on how to install a print server on a the pi, and it works great.
Thank you.
I like coming back to you website, for more tips and things to try, It’s just great!!!
Hi ED!
Thanks for your nice feedback!
Hello! I wired everything in as listed and ran the program (though I did have to put parenthesis on the ‘print’ lines) and this is what I got:
Python 3.7.3 (/usr/bin/python3)
>>> %Run ‘led flash.py’
Traceback (most recent call last):
File “/home/pi/Desktop/led flash.py”, line 12, in
GPIO.setup(led,GPIO.OUT)
NameError: name ‘led’ is not defined
>>>
I tried installing a module named ‘led’ and adding ‘import led’ into the program and got this:
>>> %Run ‘led flash.py’
Traceback (most recent call last):
File “/home/pi/Desktop/led flash.py”, line 4, in
import led
File “/home/pi/.local/lib/python3.7/site-packages/led/__init__.py”, line 24, in
from led import api
File “/home/pi/.local/lib/python3.7/site-packages/led/api.py”, line 21, in
from led import core
File “/home/pi/.local/lib/python3.7/site-packages/led/core.py”, line 35, in
from led.config import config
File “/home/pi/.local/lib/python3.7/site-packages/led/config.py”, line 25, in
import acme
ModuleNotFoundError: No module named ‘acme’
>>>
Yeah. And I took one final try and imported the ‘acme’ module and got this:
>>> %Run ‘led flash.py’
Traceback (most recent call last):
File “/home/pi/Desktop/led flash.py”, line 4, in
import led
File “/home/pi/.local/lib/python3.7/site-packages/led/__init__.py”, line 24, in
from led import api
File “/home/pi/.local/lib/python3.7/site-packages/led/api.py”, line 21, in
from led import core
File “/home/pi/.local/lib/python3.7/site-packages/led/core.py”, line 35, in
from led.config import config
File “/home/pi/.local/lib/python3.7/site-packages/led/config.py”, line 25, in
import yaml
ModuleNotFoundError: No module named ‘yaml’
>>>
I tried to import the ‘yaml’ module and got this:
pi@raspberrypi:~ $ python3 -m pip install yaml
Looking in indexes: https://pypi.org/simple, https://www.piwheels.org/simple
Collecting yaml
Could not find a version that satisfies the requirement yaml (from versions: )
No matching distribution found for yaml
pi@raspberrypi:~ $
So yeah. Thanks for reading this, and do you have any suggestions for how to solve this? That would be very helpful 😀
Thanks! L.M.
Thanks for your comment.
There was an error in the formatting, it’s fixed.
You need to define “led” before to use it. (led=4 for example)