Raspberry Pi Temperature: Limits, monitoring, cooling and more
When you buy a Raspberry Pi board, you are on your own. Do you need to cool the thing? If so, what is the ideal temperature range? How do you know the current CPU temperature? If you have any doubts, you are at the right place! I will answer all your questions in this article.
In short, the CPU temperature of a Raspberry Pi must stay below 85 °C at all times. It will start throttling (reducing performance) as it approaches this threshold in order to prevent overheating. Cooling is not mandatory for normal usage but can help maintain top performance all the time.
I’ll answer your questions in a Q&A format in this article, so feel free to jump directly to the one you are interested in or read everything in the logical order to master this topic.
If you need help getting started on Raspberry Pi, I have an entire course to guide you through your first steps. I’ll help you use the perfect hardware, plug everything in and install your first system. You’ll also do your first projects with me, just to make sure you are ready for the next level. Get all the information on this page if you are interested.
What temperature should the Raspberry Pi run at?
The CPU temperature on a Raspberry Pi must stay below 85 °C to keep it running with the best performance. The CPU will slow down (throttle) as it approaches this threshold, which can lead to a general slowness of the operating system.
In general, the Raspberry Pi temperature will be around 40-50 °C when you power it on or keep it idle, and will slowly climb up when you start to use the CPU. With short tasks and idle time in between (as it is for normal usage), the CPU will have enough time to cool down with the fresh air in the room.

The CPU temperature can be an issue if you have tasks using the processor for a long period, without downtime (heavy scripts, crypto mining, gaming, etc.). In this case, having a basic cooling system and keeping an eye on the CPU temperature are recommended.
In theory, a Raspberry Pi can’t overheat, as there is a mechanism to slow down the CPU when it’s too hot. But over time, not cooling down the CPU can lead to bad performance and a reduced lifespan.
Related: Does Your Raspberry Pi Need Heatsinks? The definitive answer
How to monitor the CPU temperature on a Raspberry Pi?
Let’s learn how to check the current temperature of your Raspberry Pi in order to see if you need to cool it or not. I will give you several ways to do this on Raspberry Pi OS, some of them should work on other systems too.

Join Our Community!
Connect, learn, and grow with other Raspberry Pi enthusiasts. Support RaspberryTips and enjoy an ad-free reading experience. Get exclusive monthly video tutorials and many other benefits.
Learn moreRaspberry Pi OS Desktop: How to keep an eye on the temperature?
On Raspberry Pi OS with Desktop, the easiest way to see the CPU temperature is to add the Temperature Monitor widget in the top panel.
- Do a right-click on the blank spot in the top bar.
- Choose “Panel Settings” in the drop-down menu.
- Go to the “Panel Applets” tab and click on “Add”:
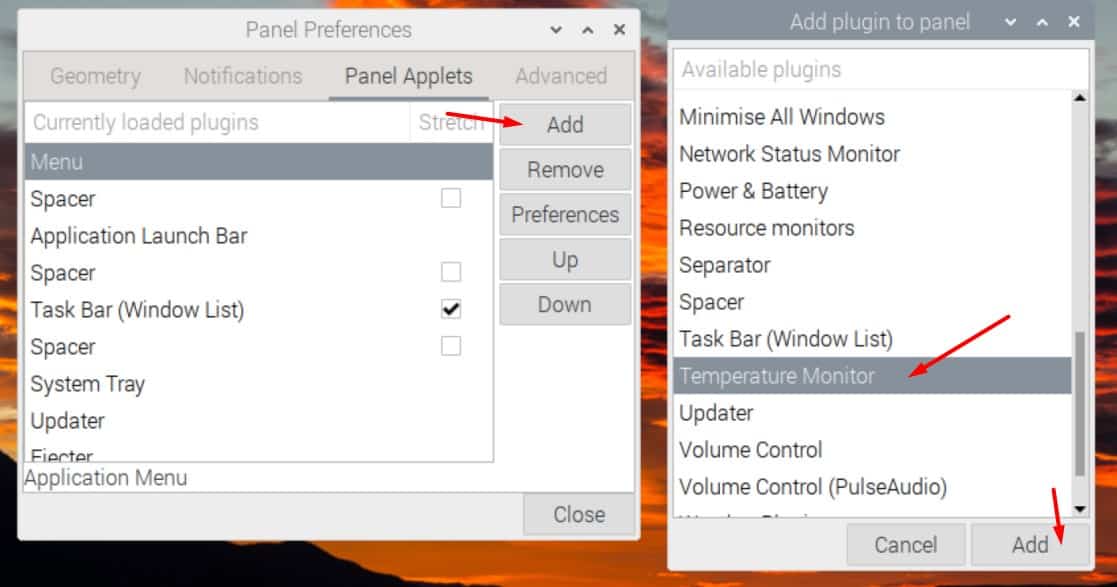
- Choose “Temperature Monitor” in the list and click on “Add” again.
- Close everything, and you should now see the current CPU temperature in the top bar:

In my case, it was 46 °C at the time I took the screenshot.
You can move the widget by using the “Up” and “Down” buttons and clicking on “Preferences” to change the colors. You can also change the thresholds if you want (the color will be different when the CPU is too hot, so you’ll notice it easily).
If you are lost in all these new words and abbreviations, request my free Raspberry Pi glossary here (PDF format)!
Download now
By doing this, you’ll always have an eye on it and can see if a cooling system is necessary or not.
Check the Raspberry Pi temperature in the command line
On Raspberry Pi, there is a command line that can be used to get the current temperature:vcgencmd measure_temp
You’ll get the temperature in degrees Celsius, something like:

This will be particularly useful if you are using Raspberry Pi OS Lite, or connect to your Raspberry Pi via SSH. You can also use these commands in Shell scripts. This can be particularly handy to add downtime in a long script when the CPU temperature is too high, for example.
Are you a bit lost in the Linux command line? Check this article first for the most important commands to remember and a free downloadable cheat sheet so you can have the commands at your fingertips.
If you are using Python in your scripts, I have another option for you.
Monitor the Raspberry Pi temperature with Python
There are several ways to get the CPU temperature in Python. On Raspberry Pi, the GPIO Zero library is installed by default and can give you the current temperature with the CPUTemperature() class.
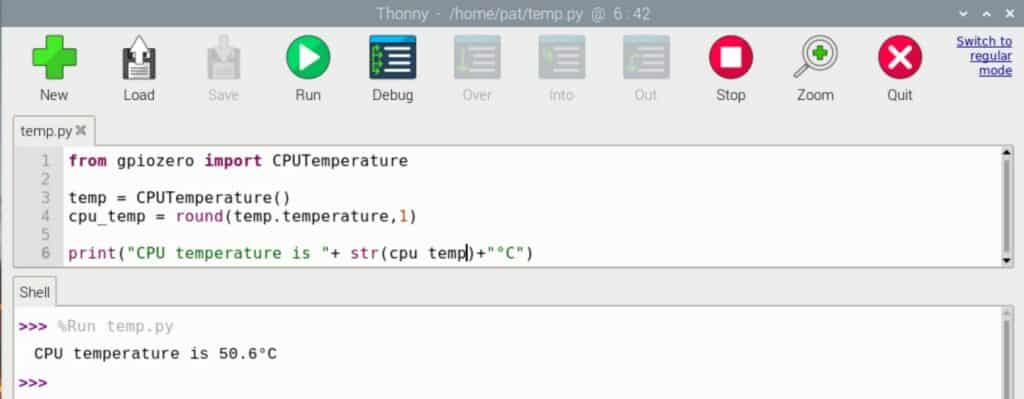
A basic script can look like this:
from gpiozero import CPUTemperature

temp = CPUTemperature()
cpu_temp = round(temp.temperature,1)

print("CPU temperature is "+ str(cpu_temp)+"°C")
It worked directly on Raspberry Pi OS, so you shouldn’t need anything, but if the GPIO Zero library is not installed on your version, you can install it with:sudo apt install python3-gpiozero
Using GPIO Zero with Python is probably the best way to build a temperature logger on Raspberry Pi. You can store the value in a database and create graphics or tables with it after that.
I have an article on the best databases you can use on Raspberry Pi. I recommend reading it if you want to play a bit with this script.
And if you are new to Python, read this article first, where I explain the basics you need to know before writing your first script. You can also download my cheat sheet if you always forget the syntax. And if you are serious about it, I also have a complete e-book to learn Python the right way (without all the useless stuff).
Advanced monitoring: using Nagios or Grafana
And if you want to go even further, you can install Nagios or Grafana on your Raspberry Pi. It seems a bit overkill for me, but maybe there are some projects where it might be a good idea.
Nagios can keep an eye on the temperature for you, and send you an alert (email, notification, sms, …) when it’s over a certain threshold. Check this article to install it on your Raspberry Pi.
Grafana is a great tool to create a graph for almost anything. It will allow you to keep the history of the CPU temperature. More details here.
It's a free PDF guide containing every Raspberry Pi Linux command you should know!
Download now
Does Raspberry Pi need cooling?
In most cases, Raspberry Pi doesn’t need a cooling system as the CPU throttles when approaching its limit temperature (85 °C). However, it’s recommended to have a basic cooling system on Raspberry Pi 4, and on any model used intensively.
Before the Raspberry Pi 4, cooling a Raspberry Pi wasn’t really a thing. There were problems with the cooling of the Raspberry Pi 4 when released, which brought this issue to light. But it was quickly fixed by the Raspberry Pi Foundation.
Anyway, I explained in the previous part how to monitor your CPU temperature, whatever the Raspberry Pi model you are using. So, it should be pretty clear now if you need a cooling system or not.
If you are lost in all these new words and abbreviations, request my free Raspberry Pi glossary here (PDF format)!
Download now
It's a free PDF guide containing every Raspberry Pi Linux command you should know!
Download now
If you are looking for exclusive tutorials, I post a new course each month, available for premium members only. Join the community to get access to all of them right now!
How to keep a Raspberry Pi cool?
There are several ways to keep a Raspberry Pi at the optimal temperature: heat sinks, passive case, fans, or even water cooling. Heat sinks or a passive case are generally enough for basic usage, but the other solutions can help for intensive use.
Let’s take a look at each solution, and in when you should use each.
Heat sinks
Heat sinks are the easiest and cheapest way to keep a Raspberry Pi cooler. It’s a piece of metal you can put on the CPU to better dissipate the heat. It looks like this:
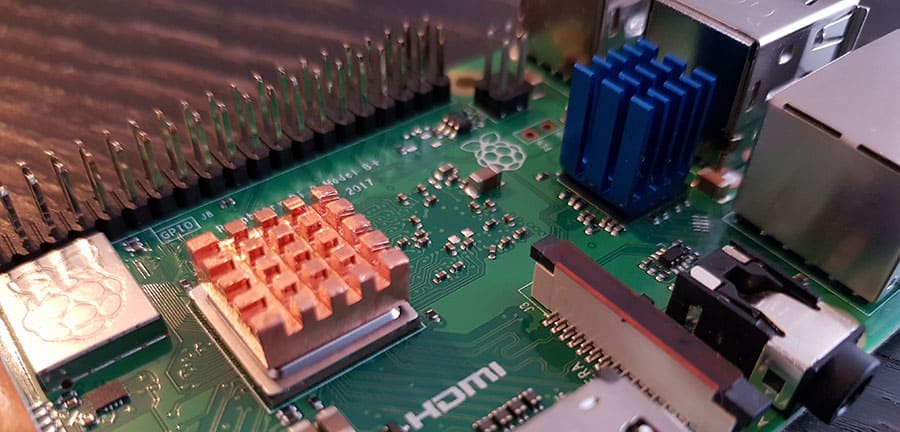
The specific form and material will help keep the CPU at a lower temperature. It won’t be magical, and it won’t be enough for all cases, but for a few bucks (check the price here), it can help a lot.
I used this on my first Raspberry Pi (a 3B+) and it was enough for me. You can read this article for more details on how to choose and install heat sinks.
In a stress test, the difference with no cooling system is minimal (a few degrees lower at best), but in normal usage, it could be enough:

Passive case
Passive cases are similar to CPU heat sinks. They are generally built in aluminum to convey the heat from the CPU to outside the case.
This is currently my favorite solution. I have been using the Argon Neo case time with my Raspberry Pi all the time and I love it (read my review here). It’s cheap and does a great job in my case.
I also tested a bunch of other passive cases, check their reviews below if you think this solution is good for you:
- Flirc Case Review: Is it Really the Best? (6 Months Usage)
- Raspberry Pi 4 Passive Cooling – Is It Worth It?
Warning: I don’t necessarily use my Raspberry Pi like you. A typical usage for me is installing something, testing it, writing an article about it, and restarting from scratch for another article. I won’t keep the Raspberry Pi on all the time or do intensive tasks on it.
So make sure you choose the best solution for you, not the one I use.
Basic fan
When passive cooling is not enough, the next step to cool down a Raspberry Pi is using a fan. Some cases have one included, or you can plug one into the GPIO pins.
One case I tested that uses a fan in addition to passive cooling is the Argon M.2 (read the review). It’s a great case for other reasons, but the cooling system works pretty well too. It’s a bit expensive (check the price), but you can find cheaper alternatives easily (this one on Amazon, for example, that have heat sinks and a fan).
I don’t necessarily love this solution, because fans are generally noisy. But it’s often possible to configure them to only run when your CPU is already at a high temperature.
If your fan is plugged into a GPIO pin, you can control it via the Raspberry Pi configuration tool.
Enable the fan control options in the “Performance” tab and choose at which temperature it should start.

At 80°C (the default temperature), it should only run when you are close to the maximum temperature allowed on Raspberry Pi OS, which is good.
If you don’t have the desktop environment, you can do the same thing via raspi-config. Open raspi-config with:sudo raspi-configAnd go to “Performances options” > “Fan” to configure the same values.

As you can see on this graph, a fan is generally enough to keep the Raspberry Pi cool enough and avoid throttling. The maximum temperature is 10 °C below what I got with heat sinks, staying around 60 °C, which is excellent after 5 minutes with the CPU at 100%.
But you can find more extreme options when you are keeping your CPU at 100% longer or just for fun. Let’s check these solutions.
Big fan
The ICE Tower is the ultimate solution to cool down a Raspberry Pi, whatever how much stress you put on the CPU. It’s the combination of a giant fan and a big heat sink.
I tested this solution a few years ago (check my review here), here is what it looks like:
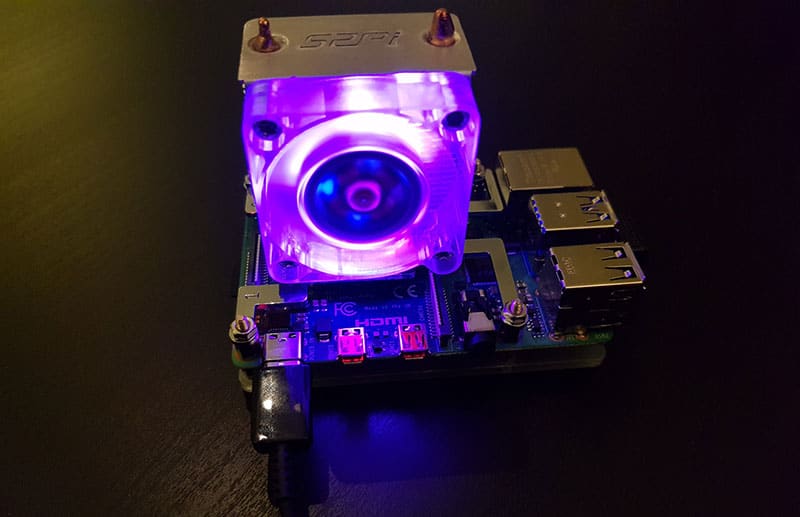
Yes, it won’t fit in a normal case, but you are pretty sure to not overheat with this fan :-).
During a stress test, the CPU temperature will almost stay at the idle level, as you can see on this graph:

Even when you boot the Raspberry Pi, you’ll already be way below the normal temperature (I think it’s basically my room temperature, around 25 °C). And after a stress test, it never goes above 40 °C, which is the normal idle temperature with heat sinks.
So, it’s a pretty good product if you are running intensive tasks on your Raspberry Pi. It’s not expensive at all (check the current price on Amazon) but it’s maybe less convenient as you can’t really put it in a case or travel with it.
Water cooling?
Want to go even further? I found a guy on YouTube that built a water cooling solution for his Raspberry Pi:
A very efficient solution (with a good-looking design, by the way), keeping its Raspberry Pi 4 under 40 °C even with overclocking enabled. Not something I would do, but it’s fun to watch :-).
Still unsure?
If you are not yet convinced which case is the best option for you, you can read this other article I wrote on RaspberryTips: I tested all the most popular Raspberry Pi cases and compare them. You should have a better overview of the possibilities after that.
Anyway, I hope this article was useful to you, you now know the maximum temperature, how to keep an eye on it, and cool down your Raspberry Pi if needed. Don’t stress too much about this topic, but I think it’s important to know this if you regularly use a Raspberry Pi (especially with overclocking or for crypto-mining).
Whenever you’re ready, here are other ways I can help you:
The RaspberryTips Community: If you want to hang out with me and other Raspberry Pi fans, you can join the community. I share exclusive tutorials and behind-the-scenes content there. Premium members can also visit the website without ads.
Master your Raspberry Pi in 30 days: If you are looking for the best tips to become an expert on Raspberry Pi, this book is for you. Learn useful Linux skills and practice multiple projects with step-by-step guides.
The Raspberry Pi Bootcamp: Understand everything about the Raspberry Pi, stop searching for help all the time, and finally enjoy completing your projects.
Master Python on Raspberry Pi: Create, understand, and improve any Python script for your Raspberry Pi. Learn the essentials step-by-step without losing time understanding useless concepts.
You can also find all my recommendations for tools and hardware on this page.