Getting started with Raspberry Pi can be a bit of a challenge – I’ve been there. In this post, I’ve compiled 27 tips to help you get started. It’s a collection of things I wish I had known when I started (hardware, software, and user tips in general).
Your journey with Raspberry Pi will probably start with choosing the hardware you need and setting it up. You may need to use Linux for the first time (with or without command lines), and only then will you be able to start fun projects with this device.
Starting in the wrong order will mess up your progress, so I arranged them in the correct order. But feel free to use the table of contents below if you’re not a complete newbie :-).
If you’re looking to quickly progress on Raspberry Pi, you can check out my e-book here. It’s a 30-day challenge where you learn one new thing every day until you become a Raspberry Pi expert. The first third of the book teaches you the basics, but the following chapters include projects you can try on your own.
Getting started
In this first part, we’ll list everything you need to get started, including the Raspberry Pi, additional accessories and software.
If you need more guidance on all of these steps, I cover them in my beginner’s video course. Click on the link to learn more. These are the most important steps to getting started, and watching me do them on video can speed up the process.
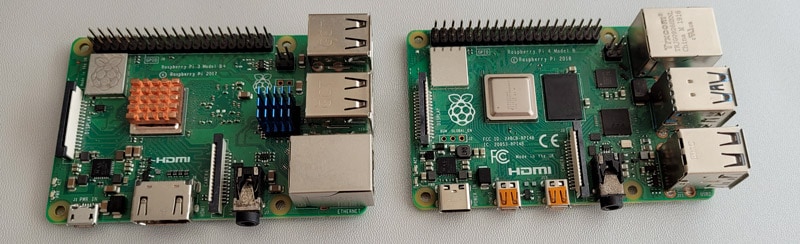
Pick the right Raspberry Pi model
The Raspberry Pi Foundation has created and improved models for everyone over the years. If you are just getting started today, you may be overwhelmed by all the options available.
Don’t worry, it’s not that complicated once you understand the logic behind each model name.
Your goal will be to pick something new enough, in the category you can afford, and that will work for your main projects. There is also the availability part to consider, as the best models are often hard to find.
I explain everything in this article: Which Raspberry Pi Model To Buy. If you don’t have one yet, I think it’s best to read the article first, so you have the best recommendations in mind before buying yours.
Set everything up
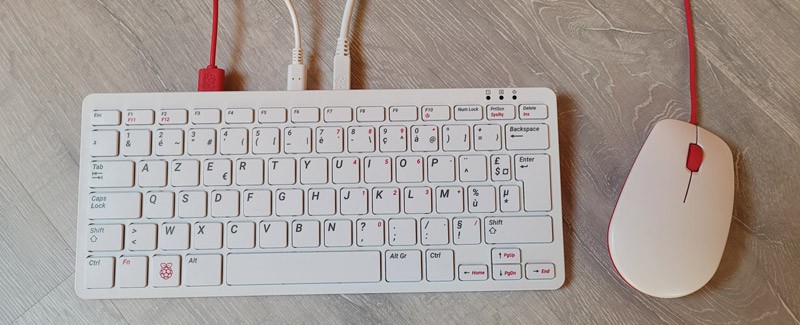
Once the right Raspberry Pi model is in your hand, you’ll need a few accessories to make it work, especially if you didn’t buy your model within a kit.
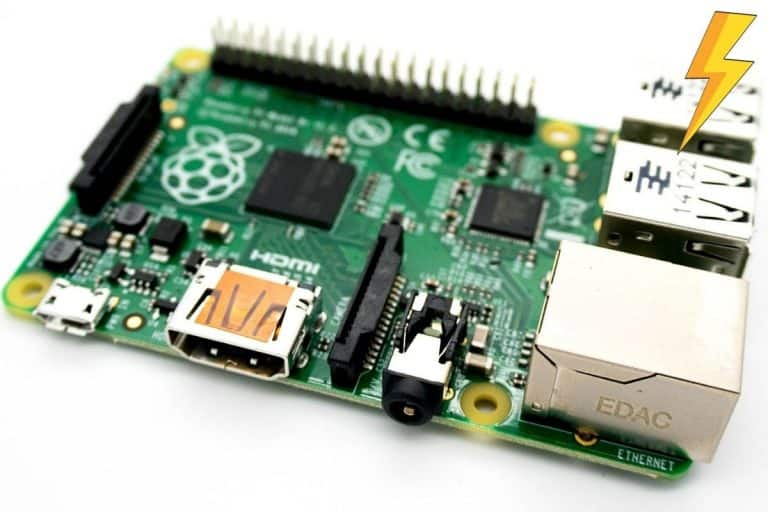
Before the first start, you must plug the power cable into the mini USB port (or USB-C on recent models). If possible, also plug one HDMI cable (or micro-HDMI) into your screen or TV, with a mouse and keyboard (here is a selection of ones I recommend).
If you get some heatsinks with your kit, they are not mandatory, but you can install them following this tutorial.
Install your first operating system
The Raspberry Pi uses micro SD cards as its main storage by default (like in phones or cameras). So, one of the first steps will be to copy the system files to a fresh SD card. Sometimes you get one with the device (when bought in a kit), but often you’ll need to do it yourself.
First, if you don’t have a few SD cards for your different projects, make sure to read this review where I tested all the most popular brands. Order a few, so you can switch from one project to another easily (without losing everything when you want to start something new).
As mentioned in the introduction of the article, a Raspberry Pi is generally powered by a Linux distribution. It’s a bit different from what you might be used to (no Windows or macOS), so it might be a challenge for some of you.
Hopefully, the Raspberry Pi Foundation has created a system that is free, easy enough to use, and 100% compatible with all Raspberry Pi models. If you’re just getting started, I highly recommend using it in the beginning.
Lite: without GUI, for embedded systems or to save power or disk space.
Desktop: with GUI, to use it as a classic computer.
If you are new to Linux or Raspberry Pi, I recommend installing Raspberry Pi OS on a Desktop.
Once you have both the hardware and SD card ready, insert the SD card with your new system and just plug the power cable to start the Raspberry Pi (some cables or models have a power button, but most don’t).
First steps on the Raspberry Pi
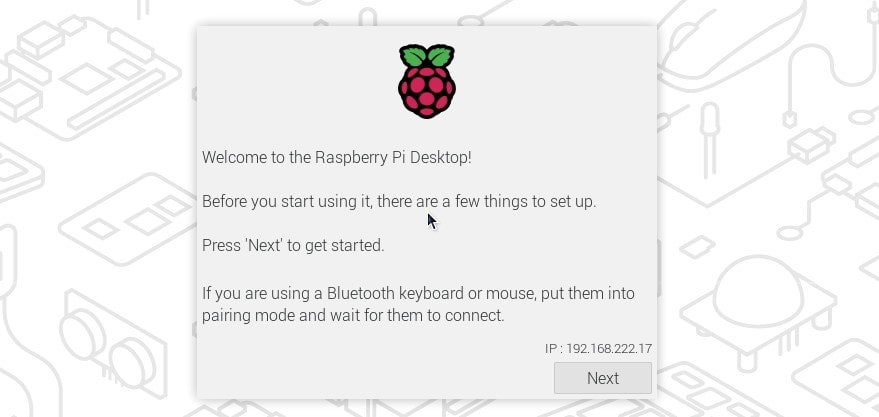
When you start the Raspberry Pi for the first time, there are a few configuration steps to follow. With the Desktop version, a welcome wizard will guide you, but you might need a few commands with the Lite version.
Join Our Community!
Connect, learn, and grow with other Raspberry Pi enthusiasts. Support RaspberryTips and enjoy an ad-free reading experience. Get exclusive monthly video tutorials and many other benefits.
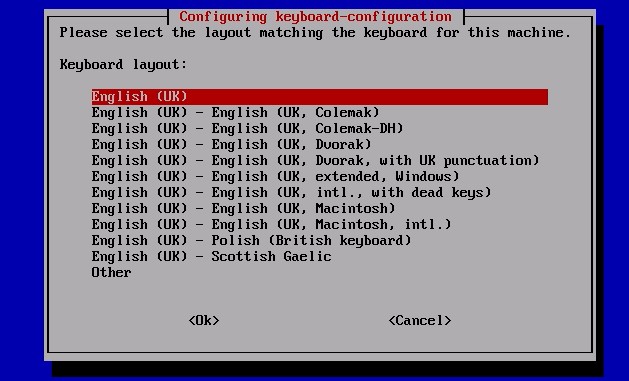
On the first boot, Raspberry Pi OS will most likely start with this wizard:
The first step will be to set the locale for your system (country, language and keyboard layout).
You’ll then be asked to create a username and password, connect to a Wi-Fi network (if needed) and complete other basic configuration steps.
Lite version
If you decide to use the “Lite” version of Raspberry Pi, the first boot is slightly different, but you’ll still get a welcome wizard that allows you to change the basic configuration.
It’s particularly important to set the right keyboard configuration, so you can follow the next tips and type command lines easily.
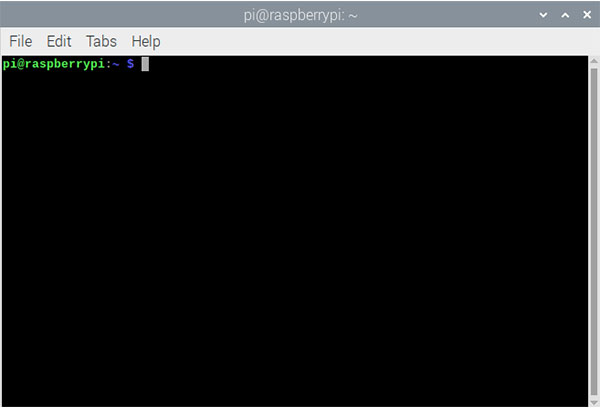
Get a command line
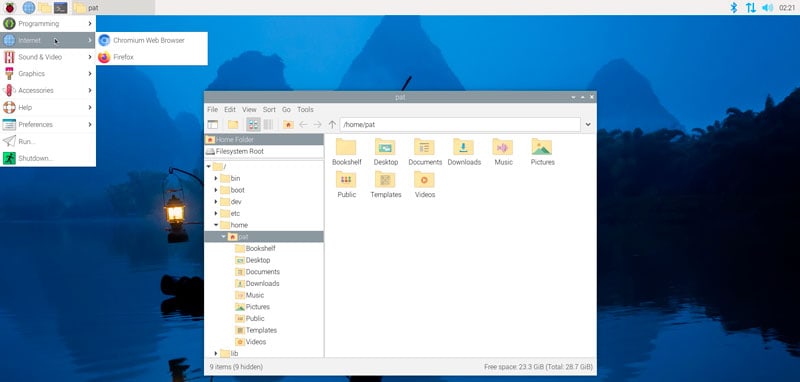
For the following tips, I’ll only explain how to do it with commands so that everyone can follow along. If you use the Desktop version, you can open the Terminal app to enter the following commands. You can find it in the taskbar or the main menu, under “Accessories”.
It looks like that, and it is simply a way to send instructions to the Raspberry Pi:
Download the Pi Glossary! If you are lost in all these new words and abbreviations, request my free Raspberry Pi glossary here (PDF format)! Download now
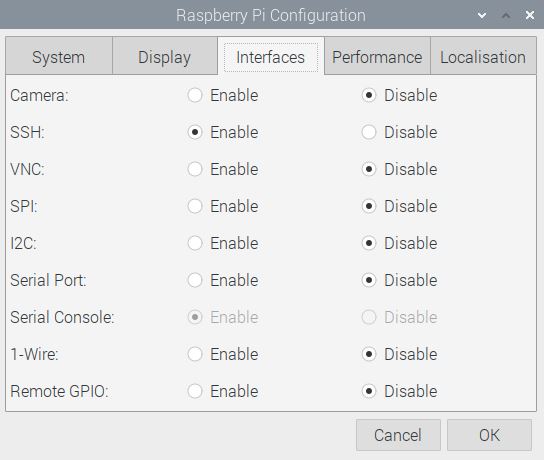
Note: Most of the time there is an equivalent for the Desktop version to do this with a graphical tool. If you don’t want to use commands, look in the main menu to see if you can find something to do the same. Often you can do this in the Main menu > Preferences> Raspberry Pi configuration tool.
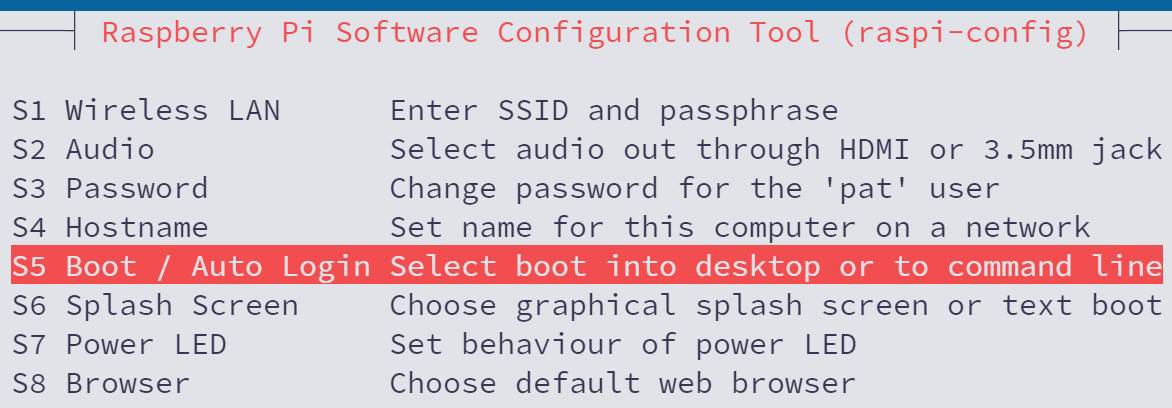
Use the command line configuration tool
When you use a terminal, a remote connection or the Lite version, you can’t necessarily use the GUI to change the system configuration. But on Raspberry Pi OS, it’s not a problem, as there is a tool available for everyone, making things a bit easier.
This tool is named “raspi-config”, and can be started with this command: sudo raspi-config
This tool can be used to change many system settings, like localization, network settings and much more.
For example, if you missed a step during the welcome wizard, and need to change your keyboard layout again, you can use this tool to try something different.
This is also something that is covered in the first boot sequence, but can be done later via raspi-config or this command directly: passwd
This command will ask you for the current and new password. If everything is correct, the password will change immediately (your current session will stay active).
Don’t enable any remote connection tools (like SSH or VNC) if you haven’t changed the default password. This is a major security issue.
If you have a DHCP server on your network (generally your Internet box) and can plug a cable into it, it will be easy. As soon as you connect the Ethernet cable, you’ll get an IP address and be connected.
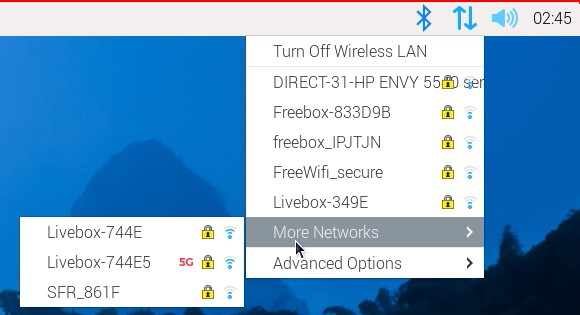
Most Raspberry Pi models also have a wireless adapter that allows you to connect to a Wi-Fi network. You can do this during the welcome sequence, or later by clicking on the network icon in the top bar.
Where it becomes more complex is if you need to set up a static IP address, especially if you don’t have a graphic interface on your system. If you’re in this case, you can check this article to understand a few ways to do it: 3 Easy Ways To Set A Static IP Address On Raspberry Pi.
Find your IP address
A Raspberry Pi is often used remotely, meaning you’re not working directly on the Raspberry Pi, but connected to it from another computer. For example, I generally use my laptop to access the Raspberry Pi, via different protocols like SSH or VNC (more about that later).
Anyway, before using a Raspberry Pi remotely, you’ll need to find its current IP address on the network.
If you have a screen on it, you can use the “ip” command to display it: ip a
This command will show you the current IP address.
The first IP (eth0) is for the ethernet cable and the second (wlan0) corresponds to the Wi-Fi connection.
If you don’t have a monitor or keyboard, you can read this article on how to find the Raspberry Pi IP address. I explain how to scan the network to find your current IP address from another computer.
Are you a bit lost in the Linux command line? Check this article first for the most important commands to remember and a free downloadable cheat sheet so you can have the commands at your fingertips.
Change the date/time
As a general rule, the timezone is set during the first boot, depending on the country you picked in the welcome wizard. So, in most cases, the date and time should be automatically adjusted as soon as you’re connected to the Internet.
To check your current date and time, you can use this command: date
This command will display the date, the time and the timezone. If you need to change it, you can use raspi-config to do this: sudo raspi-config
Go to “Localisation Options” ⇒ “Change Timezone”. Then select your Geographic area and your nearest City to set the correct timezone.
This is the easiest option, but there are many things you can do related to date and time on a Raspberry Pi, here are a few related articles you might be interested in:
Debian, and so Raspberry Pi OS, tries to prevent the users from using the root account. If you have enough privileges (it’s the case with the first user), you can use sudo to get more permissions.
Every command you add after the sudo prefix will run with root privileges.
pat@raspberrypi:~ $ whoami
pat
pat@raspberrypi:~ $ sudo whoami
root
This command will be useful to manage system files or services (that’s why we have been using it for raspi-config, remember?). Every time you don’t have access to something, you need to use sudo to unlock it.
Here are some examples: sudo service ssh start sudo nano /etc/dhcpd.conf
If you have many commands to run as root, it’s always possible to switch to a root session with this command: sudo su
Another tip for sudo is to use sudo !! to run the last command with sudo (if you forgot it): sudo !!
You can find more details in this tutorial if you are interested.
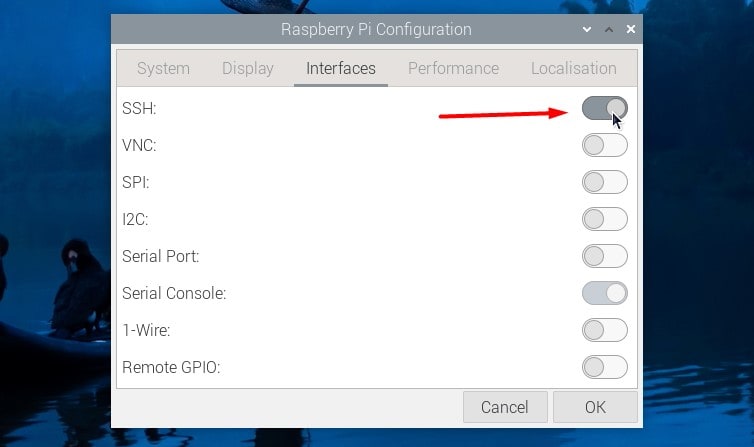
Enable SSH
SSH stands for Secure SHell and is a way to access the terminal of the Raspberry Pi remotely, typically from another computer on the same network.
SSH is disabled by default on Raspberry Pi OS, for security reasons. If you need it, you have to start it with this command: sudo service ssh start
But as you’ll quickly see, you have to do this after each reboot. The service doesn’t start automatically.
To start it on each boot, it’s better to enable it via Raspi-config or the configuration tool:
Download Your Essential Linux Commands Guide! It's a free PDF guide containing every Raspberry Pi Linux command you should know! Download now
System management & maintenance
At this point, you have a Raspberry Pi, a system installed on it, it’s connected to the network and the Internet, and you can even access it remotely. So what’s next? Let’s go a little further and really start using it.
Keep the Raspberry Pi up-to-date
Like other operating systems, Linux needs to be updated regularly to get the latest features and security fixes. It’s a bit different from Windows because each base package and application is updated separately, but don’t worry, it’s all done in one command.
There is a package manager (named APT) that connects to a server (called a repository) that hosts a list of the latest versions for each package installed on your system.
First, you need to get the last version of the packages list with: sudo apt-get update
Then upgrade all packages to the last version: sudo apt-get upgrade
Press “Y” to start the installation, and wait a few minutes for the download and installation to complete. There is nothing else to do, and all your applications and system components will be up-to-date.
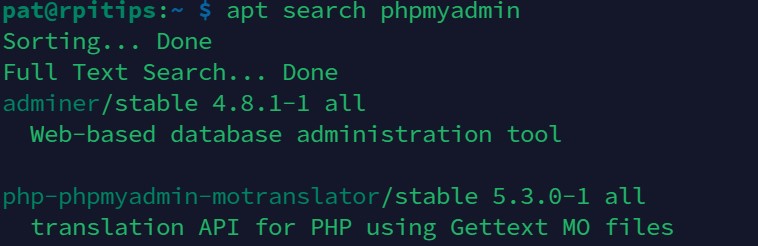
Install a new application
To install new software, you need to know the exact package name The best way to do this is to use the search function from apt: apt search <string>
Here is an example: apt search phpmyadmin
Download the Pi Glossary! If you are lost in all these new words and abbreviations, request my free Raspberry Pi glossary here (PDF format)! Download now
You’ll get a list with all packages related to your query string.
Then you can install the exact package you need with: sudo apt install phpmyadmin
If you have a desktop version, there is also graphical tool that you can use, and there is even a “Recommended Software” app for the most common applications. I explain everything there: How to Easily Install Apps on Raspberry Pi OS? (5 methods).
To remove packages from your system, you’ll use a similar command based on the same APT package manager.
As for the installation, you need to know the exact package name to remove it. To search for a package, you can use this same command: apt search <string> But you can also display all your installed packages with this command: sudo dpkg -l
Then, to uninstall a specific package, enter this command: sudo apt remove <package>
If this is not clear enough, you can check this article on how to uninstall programs. There are some other tips to free space at the end. I also show you the steps from the desktop interface.
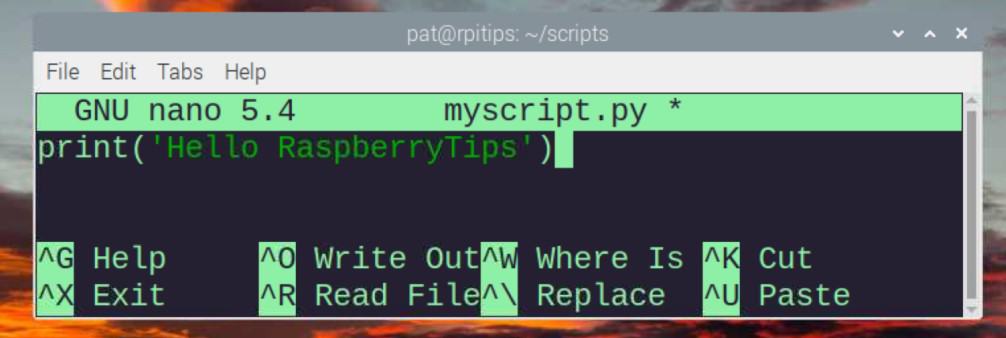
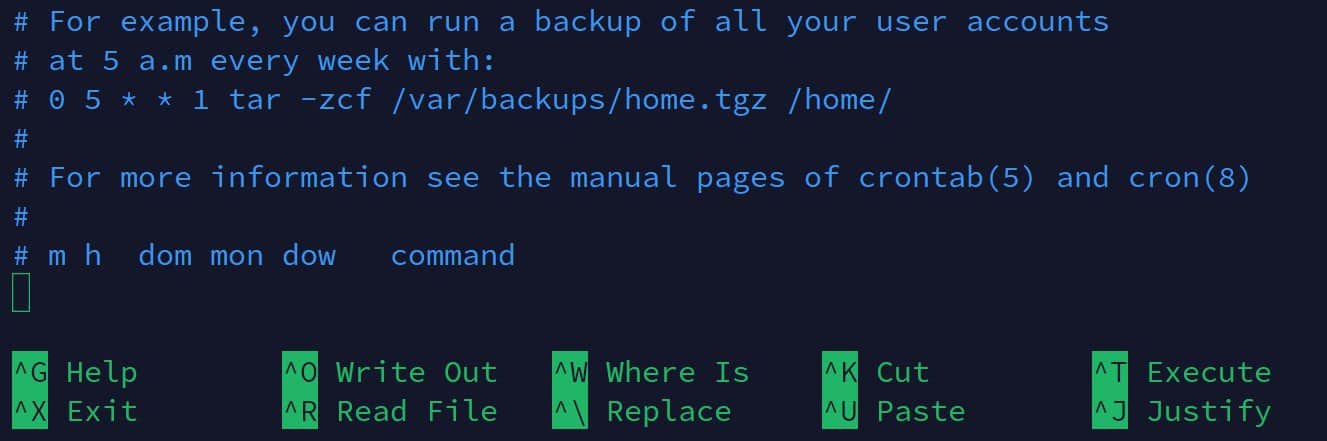
Edit text files with nano
Nano is a great tool to edit files in the terminal. Vim which is another good editor, but only nano is installed by default on Raspberry Pi OS.
To edit a file, you need to use nano with the file name in the parameter. Here are some examples: nano nano test.txt nano /home/pi/Documents/file.txt sudo nano /etc/dhcpd.conf
Unlike vim, once in the editor you can directly write and edit the text.
There is a list of actions you can do to help with editing. All are listed at the bottom of the screen. For example:
Most likely, you have already found that it’s possible to turn off the Raspberry Pi by pressing the power button or unplugging the cable. But it’s better to do it properly with these two commands.
To stop the Raspberry Pi immediately, use: sudo shutdown -h now
If you use this to stop the Raspberry Pi, you’ll need to press the power button twice for the next start.
And to restart the Raspberry Pi, just use: sudo reboot
If you start creating scripts or using advanced software, you may want to schedule something to start at a specific time. For this, there is a tool called “cron” on Linux. You can schedule commands in your user environment by using the “crontab” command.
To list all scheduled tasks, use: crontab -l
To edit the crontab list: crontab -e
This command will open the crontab with nano (you can choose another editor the first time).
For each new script you schedule, you have to add a line following this syntax: A B C D E /home/pi/myscript.sh
The first five columns define the time you want to start the script, following these rules:
A: Minutes (0-60)
B: Hour (0-23)
C: Day of the month (1-31)
D: Month (1-12)
E: Day of the week (0-7), 0 and 7 are Sunday, 3 is Wednesday, 6 is Saturday
And the last column is the command to run at this specific time.
If you need to run your script as root, you can use sudo to open the crontab: sudo crontab -e
Well, don’t worry if it seems a bit complex at first glance, I have given you the short version here, but you can read this article that explains everything in better detail, in a more step-by-step approach: How to Schedule a Task on a Raspberry Pi?.
Create backups
Backups are an important thing to think about when you start doing a lot of work on your Raspberry Pi. There are several ways to create a backup:
Backup only the critical files (configuration, MySQL database, …).
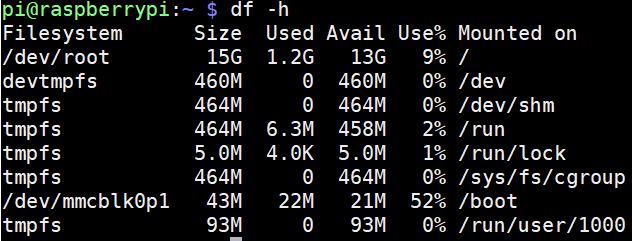
If your SD card is full, you may need to free up space.
To see your current disk usage, use df: df -h
This will display something like this:
On the first line, you can see I have 15G on the main partition. I’m using 1.2G so 9%. If you are above 80%, this paragraph will help you find and remove unnecessary files.
To get the biggest files on the SD card, I often use this kind of command: cd / du -ak | sort -nr | head -50
This command will display the 50 biggest files or directories in the / partition. If you want to focus on a specific folder, change the first line. Then check if every file in the list is needed for you, if not you can remove it.
Another easy way to gain space is to remove large applications (like Wolfram and LibreOffice, if you don’t use them), for example: sudo apt remove --purge wolfram-engine libreoffice*
You can find more details on how to do this in this post (including how to do the same thing on Desktop).
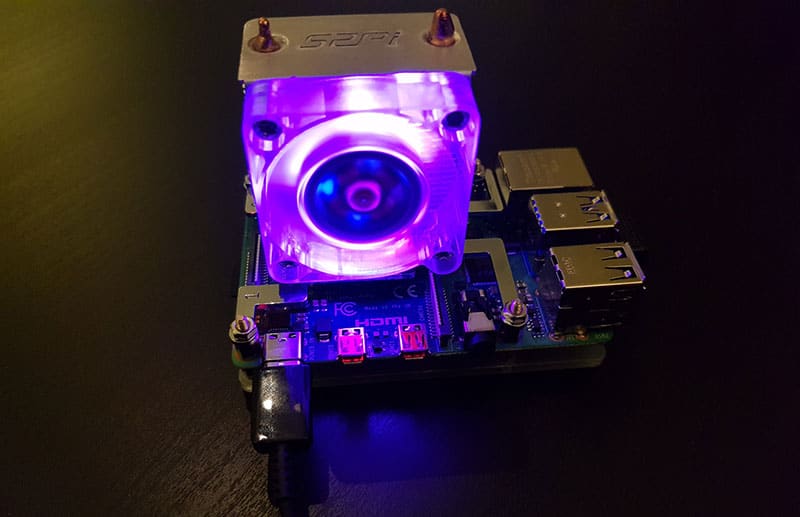
Keep an eye on the temperature
If you are worried about the temperature of the Raspberry Pi, there is a way to check it.
This command will give you the current temperature of your CPU in real-time: vcgencmd measure_temp
You have to keep it under 85 °C if possible. If you exceed this threshold, Raspberry Pi OS will start to run slower.
If you have issues with your Raspberry Pi temperature, consider adding heatsinks or even a fan to keep it low (+an extra tip to display the temperature as an icon on a desktop on the same link).
I’ve tested many Raspberry Pi cases and cooling solutions, so make sure to check them before buying anything:
This is an advanced tip, but you may want to disable the Wi-Fi if you are plugged into an Ethernet cable. I generally experience network issues when both Ethernet and wireless connections are enabled.
So, if you’re going to disable the Wi-Fi temporarily, you can disable the interface like this: ifdown wlan0
The interface will come up at the next boot, or you could force it with this command: ifup wlan0
But this won’t work if you want to disable it permanently. To completely disable the Wi-Fi follow these steps:
Edit the boot configuration file: sudo nano /boot/config.txt
Add this line at the end of the file: dtoverlay=pi3-disable-wifi
Save and exit (CTRL+O, Enter, CTRL+X).
Until you remove this line in the configuration file and reboot the Raspberry Pi, your Wi-Fi will never come up again. You’ll find 7 ways to disable Wi-Fi in this post.
Download Your Essential Linux Commands Guide! It's a free PDF guide containing every Raspberry Pi Linux command you should know! Download now
🛠 This tutorial doesn't work anymore? Report the issue here, so that I can update it!
Want to chat with other Raspberry Pi enthusiasts?Join the community, share your current projects and ask for help directly in the forums.
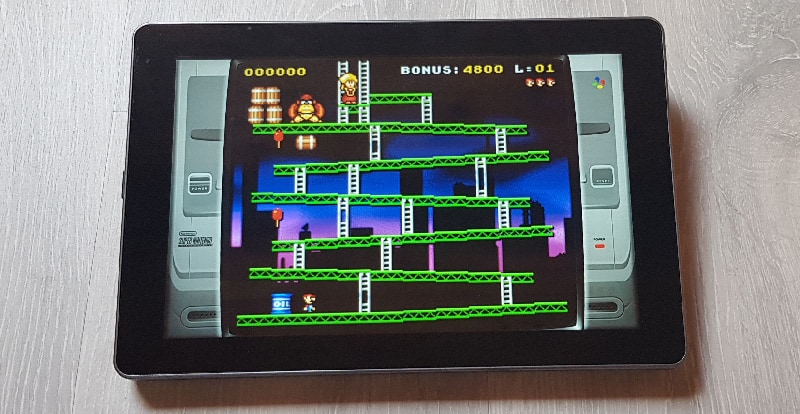
Raspberry Pi is often associated with retro gaming but rarely explains how to do it.
So if you bought your first Raspberry Pi, you might be looking into how to play games with Raspberry Pi OS.
Well, there are some small games in Raspberry Pi OS, but I don’t think that’s what you want. To play classic games from old game consoles, you need to install a specific distribution like Retropie, Recalbox or other alternatives.
They are a different operating system, that you’ll install on a new SD card, and use for gaming. I have many tutorials on this website you should check to better understand what I’m talking about:
And then you’ll find some information about downloading games in this post. I also have many other posts on the topic. I recommend using the search engine to find them.
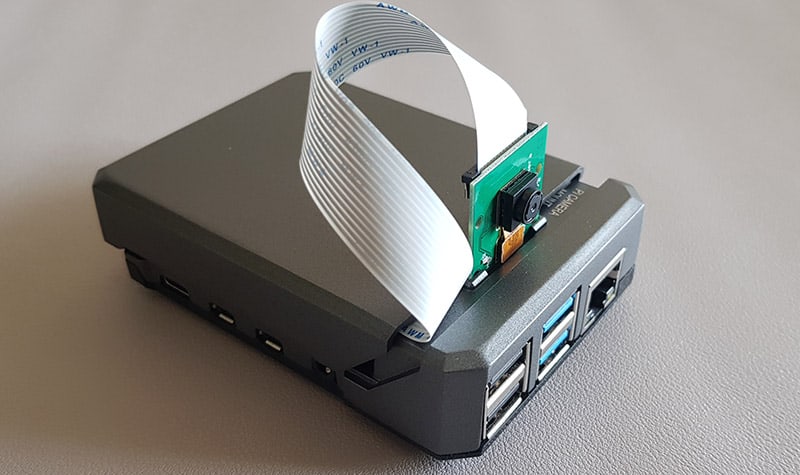
The Raspberry Pi doesn’t come with an integrated camera, but you can buy and install one easily (see my recommended products page about this).
The Raspberry Pi Foundation has a specific camera module that can be plugged into most models by following these instructions.
Once installed properly, you can test the camera with this command: libcamera-still -o image.jpg
This command will create an image file in the current directory with the camera view. And there is a lot more you can do with a camera, this is just the beginning:
On the Desktop version, USB drives should be detected automatically, but on Raspberry Pi OS Lite you need to mount USB drives manually.
Follow these steps to mount your USB drive:
Plug the USB drive into the Raspberry Pi.
Create a folder in /media to use it later to access the drive: sudo mkdir /media/usbkey
Change rights to allow pi to access it later: sudo chmod 777 /media/usbkey
List the connected drives to get the UUID: sudo blkid Note the UUID and the file format. You’ll need this later.
Edit the fstab file to prepare the mount: sudo nano /etc/fstab
Paste this line at the end of the file: UUID=B17B-299B /media/usbkey vfat defaults,nofail 0 0 Don’t forget to replace UUID and file format to fit your USB drive values.
Save and exit (CTRL+O, Enter, CTRL+X).
Mount the drive: sudo mount /media/usbkey/
Check that you can see the files on it: ls /media/usbkey
It should be ok now.
This procedure will automatically mount this key at each boot if you’ve plugged it in before. If you plugged it after the boot, you’d need to use the mount command.
As you can see, even things that seem simple at first can take a long time to understand and master if you are new to Raspberry Pi and Linux. So attempting larger projects can be frustrating.
My goal on this site is to help you as much as possible, and if you need a boost in your learning, make sure to check out my Raspberry Pi BootCamp. It’s a course for anyone who is just starting or wants to get started. It will help you quickly get over the first questions and have fun faster.
Depending on your current level, you may also be interested in my other resources, that have been created to help you with whatever your current challenges are with Raspberry Pi and Linux:
Master Linux commands: it’s like learning a new language to speak to your Raspberry Pi. Let me explain the main words you need to know.
Read RaspberryTips.com!
The last tip I’ll give you is to follow my articles on RaspberryTips.com. As the name suggests, the purpose of this site is to help you in all areas when using your Raspberry Pi, programming in Python or Linux in general.
You’ll find how-to guides for configuration, commands, software and hardware stuff. I try to explain all these things step by step to make it understandable even for beginners. I hope this helps you.
Whenever you’re ready, here are other ways I can help you:
The RaspberryTips Community: If you want to hang out with me and other Raspberry Pi fans, you can join the community. I share exclusive tutorials and behind-the-scenes content there. Premium members can also visit the website without ads.
Master your Raspberry Pi in 30 days: If you are looking for the best tips to become an expert on Raspberry Pi, this book is for you. Learn useful Linux skills and practice multiple projects with step-by-step guides.
The Raspberry Pi Bootcamp: Understand everything about the Raspberry Pi, stop searching for help all the time, and finally enjoy completing your projects.
Master Python on Raspberry Pi: Create, understand, and improve any Python script for your Raspberry Pi. Learn the essentials step-by-step without losing time understanding useless concepts.
You can also find all my recommendations for tools and hardware on this page.
I'm the lead author and owner of RaspberryTips.com.
My goal is to help you with your Raspberry Pi problems using detailed guides and tutorials.
In real life, I'm a Linux system administrator with web developer experience.
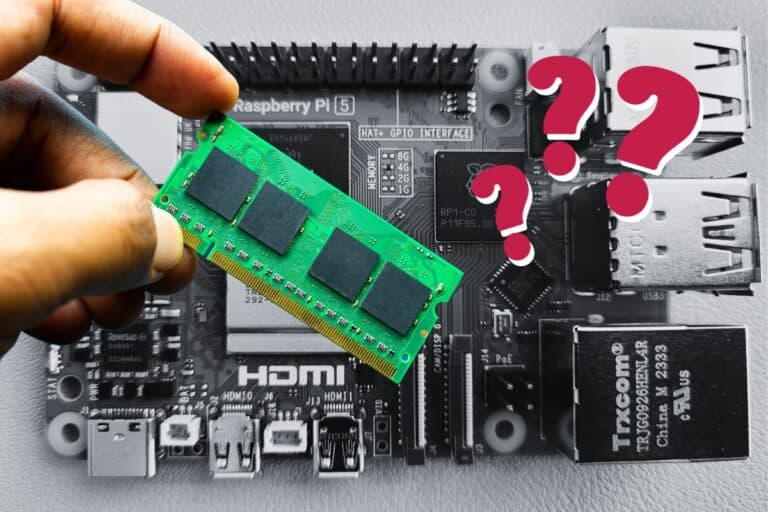
The Raspberry Pi is popular for being cheap, flexible, and easy to use. It’s great for all kinds of projects, from learning tools to advanced systems. A common question is if you can add more memory to it. So, can you increase the RAM on a Raspberry Pi? It’s not possible to add RAM to…
If you’re new to the Raspberry Pi world, installing (or reinstalling) the operating system can be a daunting challenge. Hopefully, the Raspberry Pi Foundation does its best to make it as easy as possible for you. This article will show you the easiest and safest method to do it on your own. Raspberry Pi OS…
Malware and other types of viruses are everywhere, but they are mostly written for Windows computers. The Raspberry Pi runs on Linux, and people think that there are no viruses for Linux. Is this really true, and does Raspberry Pi need an antivirus? It’s a great idea to install antivirus software on your Raspberry Pi…
When you first set up a Raspberry Pi, it’s very scary for the screen to suddenly just go black. Don’t worry, there’s no need to be alarmed. This black screen can cause some necessary anxiety, especially during software updates and other long processes. Fortunately, there are several methods to prevent this, which I will share…
Finding a power supply compatible with your Raspberry Pi can be a mess, as each model has specific requirements in terms of power and connectors. But don’t worry, I have gathered all the information you need and will explain everything in this article. A Raspberry Pi must be powered with a compatible power supply. All…
Just got your Raspberry Pi board but no additional accessories? Or maybe you don’t have your usual setup on hand? I feel you, I’ve been there. In this article, I’ll give you 2 easy ways to use your laptop as the Raspberry Pi display. While it’s possible to connect the Raspberry Pi to the laptop…
Every Raspberry Pi User’s Secret? This Downloadable Linux Command Cheat Sheet!