How To Safely Extend Your Ubuntu Partitions (GUI & Commands)
Resizing partitions is not something to be taken lightly, as you can screw up your data with one wrong step or command parameter. When I was a Linux system administrator, I often had to extend partitions on critical servers, so I’ll share all of my tips with you in this tutorial.
The easiest and safest way to extend a Linux partition is to use the application named “Gparted”. It’s a graphical tool to resize partitions visually. When there is no GUI available, the commands fdisk and resize2fs can be used to extend your Ubuntu partitions instead.
Don’t worry, I’ll explain all of the steps in detail in this article, starting with the graphical method which seems easier and safer for most systems.
How To Extend a Partition with Gparted (GUI)
Here are the main steps to extend a partition on Ubuntu:
- Identify the partition name (ex: /dev/sda3).
- Create and boot on a Live system if you want to resize the system partition.
- Use Gparted to resize the partition.
I will now give you all of the steps in detail.
Identify the partition
The first step is to identify the partition you want to expand. In most cases, this shouldn’t be complicated.
On a desktop computer, you probably have one big partition with your system and all of your files in it. You will need to be careful with more complicated installations, like if you have several hard drives, or if you divided your disk into several partitions (system, data, etc.).
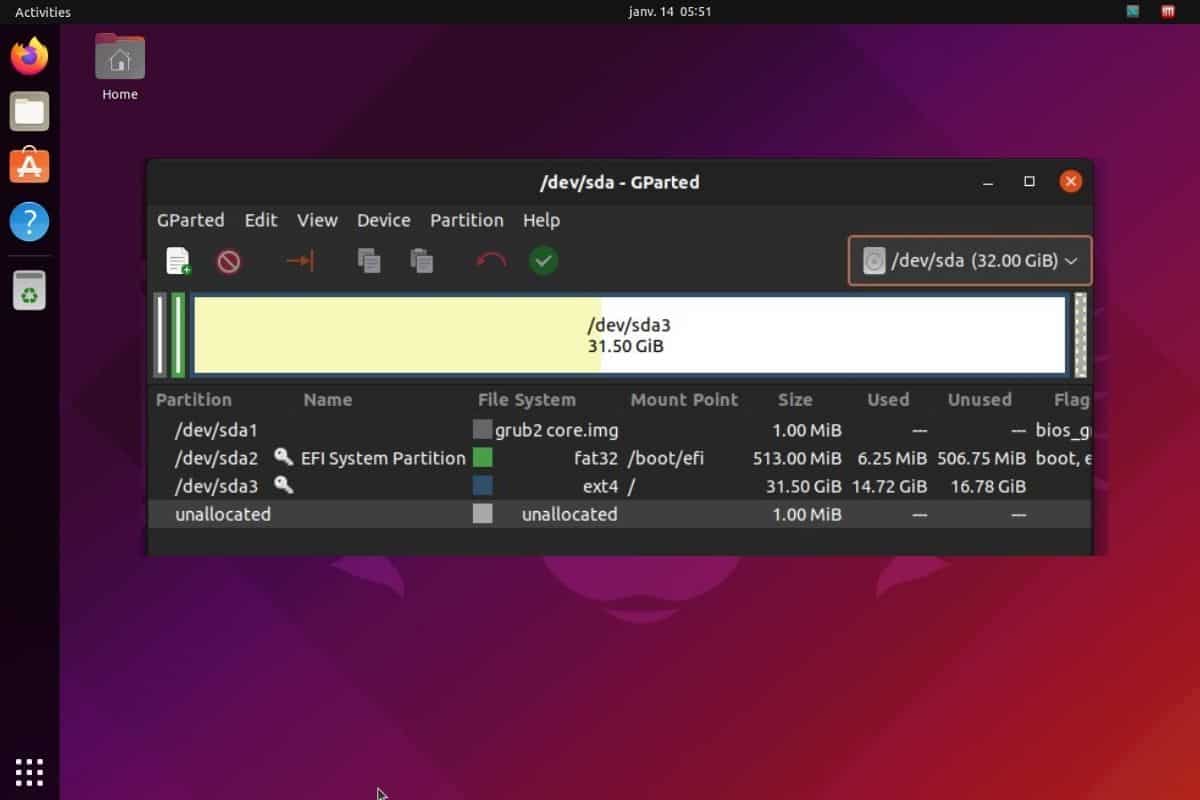
On your system, you can open the “Disk” tool to quickly see how your system is installed, and find the device name for your partition:
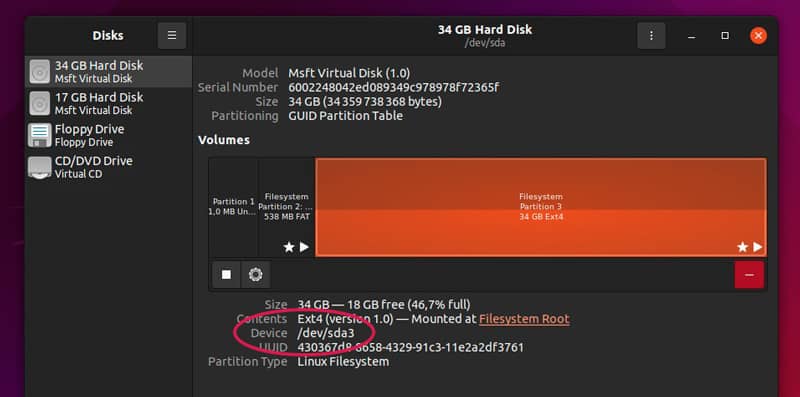
In this typical case, there are three partitions on the disk, and almost everything is in the third one. The device name is /dev/sda3. Try the same steps on your system, and find the name of the partition you want to extend.
Download your exclusive free PDF containing the most useful Linux commands to elevate your skills!
Download now
In general, the system disk will be named /dev/sda, and the number after that corresponds to the partition identifier. If you have a second disk for your data, that might be /dev/sdb1 for example.
Optional: Boot on a Live-USB key
It’s not possible to resize a partition that is currently mounted, so you need to unmount it first. But a system partition can’t be unmounted, that’s why a Live-USB key is often required.
When you boot on a Live-USB key, the system is no longer loaded from the hard drive, and we can unmount the partition safely.
This process is only required if you want to extend the system partition, in other cases, you can do it directly from your Ubuntu session:

Join Our Community!
Connect, learn, and grow with other Raspberry Pi enthusiasts. Support RaspberryTips and enjoy an ad-free reading experience. Get exclusive monthly video tutorials and many other benefits.
Learn more- Download Ubuntu from the official website.
- Flash it on a USB key.
You can use a tool like Etcher, Rufus or the one you prefer and the system you use.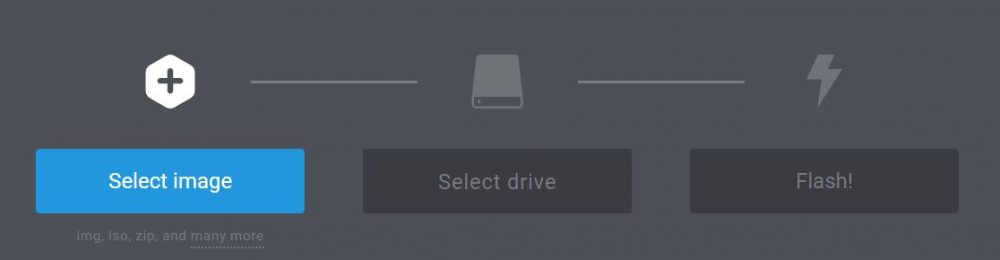
- Insert the USB key into your computer, and boot on it.
On most computers, you’ll need to press F12 or DEL to get the boot menu and boot on it instead of the system on your hard drive. - Choose the live boot (we don’t want to reinstall Ubuntu).
From there, you can follow the same steps, as if your partition is no longer hosting your system.
Recommended: Backup your system
When editing a partition table, you can easily break something which can result in your computer being unable to reboot properly. It’s highly recommended to create a backup of your data, especially for critical servers or files you don’t have anywhere else (don’t forget the configuration files).
If you don’t know how to do this, you can follow this tutorial. It’s for Raspberry Pi, but you can use the same steps and tips.
Install Gparted
Gparted is a tool I love to manage any partitioning task. In an intuitive interface, you can resize, create or delete partitions in a few clicks.
You can find it in the Ubuntu Software catalog:
Or you can install it with apt:sudo apt install gparted
Install it and start it to see your disk’s partitions (it should look like the Disk tool you used in a previous step). You’ll need to type your password to unlock the administrator mode.
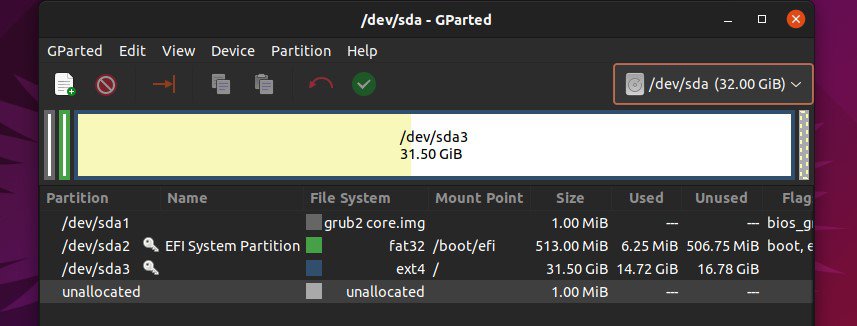
It’s a bit more detailed, as you can see all the partitions at a glance, the file system, the mount point and different sizes (total, used, unused). The yellow on the graphical visualization shows the used space.
Download your exclusive free PDF containing the most useful Linux commands to elevate your skills!
Download now
If the partition you want to resize is NOT the system partition, you need to unmount it first. Right-click on it and choose “Unmount”. Then you can follow the next steps.
If you’re new to the Linux command line, this article will give you the most important Linux commands to know, plus a free downloadable cheat sheet to keep handy.
Extend the partition
Once on Gparted, you can quickly resize any partition by following these steps:
- Make sure to select the correct drive in the top-right corner.
If you rebooted on a Live-USB key, the key is now probably /dev/sda and your system is on /dev/sdb. The partition number doesn’t change, just the drive name. - For example, let’s say you have something like:
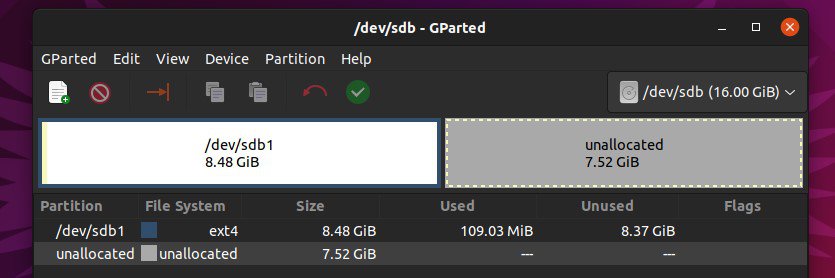
On /dev/sdb, I have one partition that is about 8GB, but my disk is 16GB total. I want to extend /dev/sdb1 to use the full size. - Right-click on the partition you want to extend and choose “Resize/Move”.
This window shows up: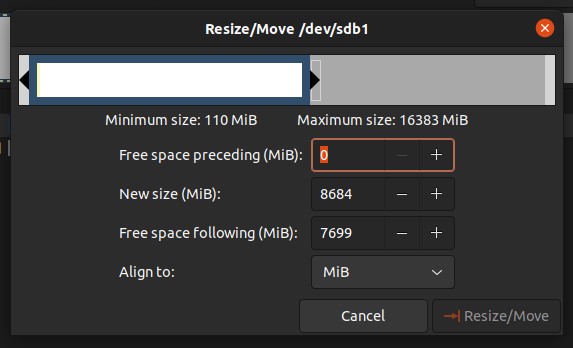
- From there, the easiest way would be to grab the right arrow on the graphical visualization and move it to the right. But you can also use the form below and update the new size field to the maximum value.
- Once done, click on “Resize/Move”. Gparted will show you the result directly.
- If it’s fine for you, click on the green tick to apply the changes.
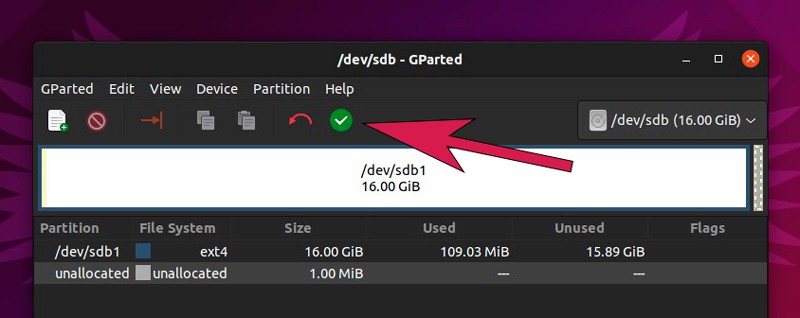
That’s it! After a few seconds (or minutes, depending on the size of your disk), your partition table has been updated, and you can now use your whole disk. If you are on a Live-USB system, you can now reboot your normal session and enjoy your new disk space.
If the resized partition wasn’t your system partition, don’t forget to mount it back (or to restart your system).
Download your exclusive free PDF containing the most useful Linux commands to elevate your skills!
Download now
How to Extend a Partition from the Command Line
Overall, the steps to extend a partition from a command line are the same as with a GUI:
- Identify the partition name and the disk space available with fdisk.
- Unmount the partition with umount.
- Use resize2fs to extend the partition size.
When possible, I highly recommend using a Live-USB key with a GUI to do these steps. A mistake can easily happen, especially when you use the command line. Using the previous method will be easier and less risky.
Only follow these steps when you can’t reboot the computer (so when you are not resizing the system partition).
Identify the partition to resize
On a server without GUI, we can’t use Gparted or the disk tool to find the partition name. In this case, the “fdisk” command will do the same thing for you:sudo fdisk -l
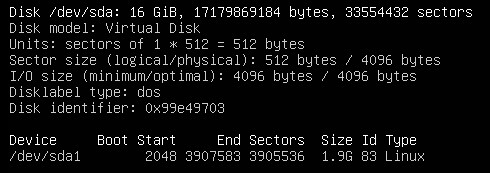
The output will include several paragraphs like the one in the pictures, each one corresponding to a physical disk. For example, in this screenshot, you can see the /dev/sda drive, which is 16 GiB and contains a partition that takes only 2 Gib.
I will show you how to extend this partition.

How To Use ‘fdisk’: The Complete Linux Command Guide
Recommended: Backup your system
When editing a partition table, you can easily break something and have your computer unable to reboot properly. It’s highly recommended to create a backup of your data, especially for critical servers or files you don’t have anywhere else (don’t forget the configuration files).
If you don’t know how to do this, you can follow this tutorial. It’s for Raspberry Pi, but you can use the same steps and tips.
Extend a partition from the command line
Here are the steps to follow to resize a partition from the command line:
- Make sure the partition is not mounted, use:
sudo umount /dev/sda1
Adjust the parameter to fit your partition name (/dev/sdb3 for example). - Open fdisk to edit the partition table:
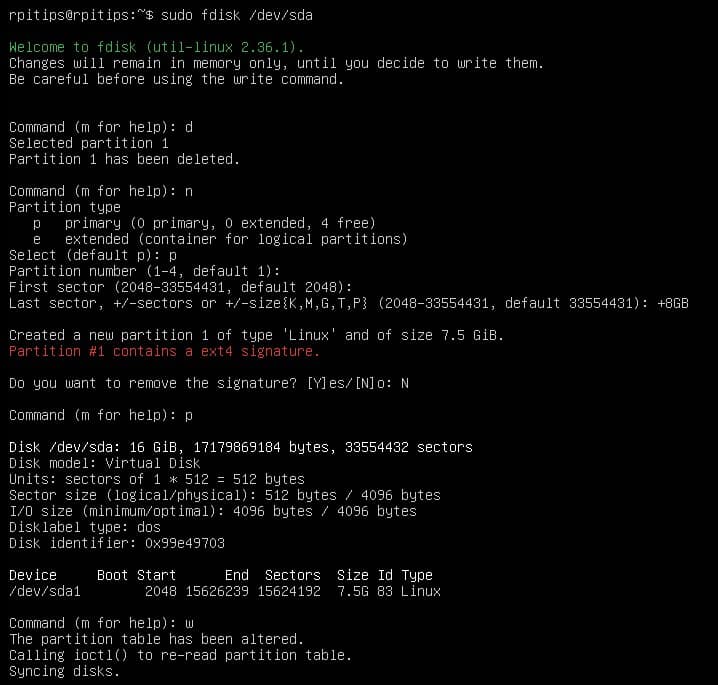
sudo fdisk /dev/sda - Delete the existing partition:
dType the corresponding number (in my case I have only one partition, but if it’s /dev/sdb3 for example, you need to type “3”).
This step can be scary, but don’t worry, you shouldn’t lose your data as we don’t format the disk content (make sure to have a backup anyway!). - Create the new partition:
n
Answer the questions to create a new partition, you should probably keep the default values. Just set the new partition size by using something like “+8GB” for the last sector. - Check that the new partition table is what you wanted:
p - And if so, write the change to your disk:
w
Here is my full log if you are unsure at some point:
The last step is to actually resize the file system to fit the new partition size, you can do this easily with:sudo resize2fs /dev/sda1

You can now mount your partition and enjoy more free space!sudo mount /dev/sda1Or something like:sudo mount /dev/sda1 /mnt/data
Related article: How to format and mount a USB drive on Linux?
Download your exclusive free PDF containing the most useful Linux commands to elevate your skills!
Download now
Reminder: Remember that all the members of my community get access to this website without ads, exclusive courses and much more. You can become part of this community for as little as $5 per month & get all the benefits immediately.
Extend a Partition: Related Questions
What if there is another partition at the end of the one I want to extend? In some cases, you have the main partition (let’s say /dev/sda1) and then your data partition (/dev/sda2) and finally some unallocated disk space at the end. To extend /dev/sd1, you’ll need to first move /dev/sda2 to the end of the disk. You can do this with Gparted and then follow the same steps to resize /dev/sda1.
Now that you have more space available on your system, you are ready to try new exciting projects with Linux, here are a few suggestions I have covered on this website:
- How To Install RetroPie On Ubuntu: A Step-by-step Guide
- How To Install NordVPN On Ubuntu (Beginner’s Guide)
- Install Home Assistant on Ubuntu: A Step-by-step guide
Whenever you’re ready, here are other ways I can help you:
The RaspberryTips Community: If you want to hang out with me and other Raspberry Pi fans, you can join the community. I share exclusive tutorials and behind-the-scenes content there. Premium members can also visit the website without ads.
Master your Raspberry Pi in 30 days: If you are looking for the best tips to become an expert on Raspberry Pi, this book is for you. Learn useful Linux skills and practice multiple projects with step-by-step guides.
The Raspberry Pi Bootcamp: Understand everything about the Raspberry Pi, stop searching for help all the time, and finally enjoy completing your projects.
Master Python on Raspberry Pi: Create, understand, and improve any Python script for your Raspberry Pi. Learn the essentials step-by-step without losing time understanding useless concepts.
You can also find all my recommendations for tools and hardware on this page.