Installing Rocky Linux on Raspberry Pi (CentOS alternative)
Rocky Linux is a pretty new Linux distribution, started by the creator of CentOS, following a controversial decision made by Red Hat to discontinue the CentOS project. When I was working as a sysadmin, CentOS was often recommended as the best choice for Linux servers. A few years later, Rocky Linux looks like the perfect replacement and is now available on Raspberry Pi, so let’s learn how to get started with it.
Rocky Linux is available for Raspberry Pi 3, 4 or 400 (aarch64 architecture). A minimal image can be downloaded from the website and flashed to a micro SD card or USB drive to use on a Raspberry Pi.
In this guide, I will show you how to install it on your device, how to do the initial configuration and maybe how to add a desktop environment. Rocky Linux is based on Red Hat, which means most of the configuration commands you’re familiar with are different.
If you’re looking to quickly progress on Raspberry Pi, you can check out my e-book here. It’s a 30-day challenge where you learn one new thing every day until you become a Raspberry Pi expert. The first third of the book teaches you the basics, but the following chapters include projects you can try on your own.
Preparing the Rocky Linux installation
Installing Rocky Linux on a Raspberry Pi has almost the same requirements as any other Linux distribution. The main difference is that not all Raspberry Pi models are supported, but aside from that, here is what you need:
- A Raspberry Pi 3B+, 4 or 400 is recommended: Most other models are not supported, as Rocky Linux is only available for the aarch64 architecture so it won’t work on 32-bit processors. For context, I’m testing on my Raspberry Pi 4 (4GB).
- A micro-SD card or USB stick: I tested both, and both work, so it doesn’t matter, pick what you prefer. If you need a new SD card for this test, you can find my current recommendations here (I tested the most popular and compared the results in this article).
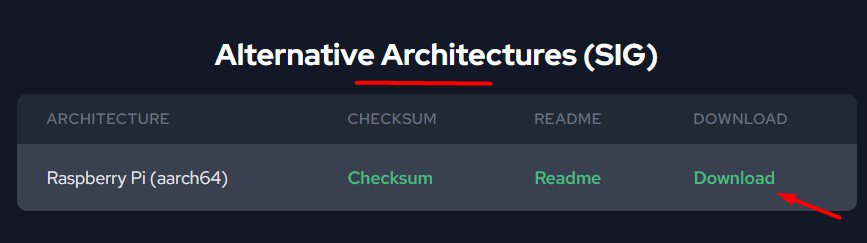
- The latest image from the official website: You can find the image for the Raspberry Pi on this page. Scroll down a bit to find the “Alternative Architectures (SIG)” section, and click on “Download”.
- Raspberry Pi Imager or Balena Etcher: Rocky Linux is not available in Raspberry Pi Imager for now, but you can flash a custom image with those tools, so pick the one you prefer.
I have a complete guide for Raspberry Pi Imager here if you need it.
Aside from that, it’s business as usual. Plug your Raspberry Pi into a power source, a monitor is recommended too (but SSH is enabled by default if needed).
Installing Rocky Linux on Raspberry Pi
Here are the steps required to install Rocky Linux on a Raspberry Pi:
- Download the Raspberry Pi image from the Rocky Linux website (SIG/aarch64).
- Flash the image to the micro SD card with Raspberry Pi Imager.
- Insert it into the Raspberry Pi and log in with the default user and password.
Let’s see this procedure in detail.
Flash the image on your SD card
Once you have downloaded the latest version of the Rocky Linux image on your computer, you can use your favorite tool to flash it on your storage (Imager, Etcher, etc.).

Join Our Community!
Connect, learn, and grow with other Raspberry Pi enthusiasts. Support RaspberryTips and enjoy an ad-free reading experience. Get exclusive monthly video tutorials and many other benefits.
Learn moreHere are the steps to do this with Raspberry Pi Imager:
- Start Raspberry Pi Imager.
- Click on “Choose OS”, scroll down to the bottom of the list, and click on “Use custom”:
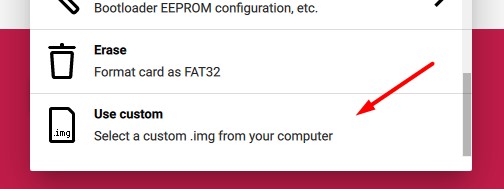
- Pick the image file you downloaded from the official website.
You can use the compressed image directly, you don’t need to extract the file. - Click on “Choose Storage” and pick your SD card or USB drive.
Make sure to pick the right one if you have several options, it will be formatted entirely in this process. - Then click on “Write” to start the installation.
The advanced options won’t work with Rocky Linux, so it doesn’t matter if you keep your usual configuration or not.
Wait a few minutes while Raspberry Pi Imager does its job:
It's a free PDF guide containing every Raspberry Pi Linux command you should know!
Download now
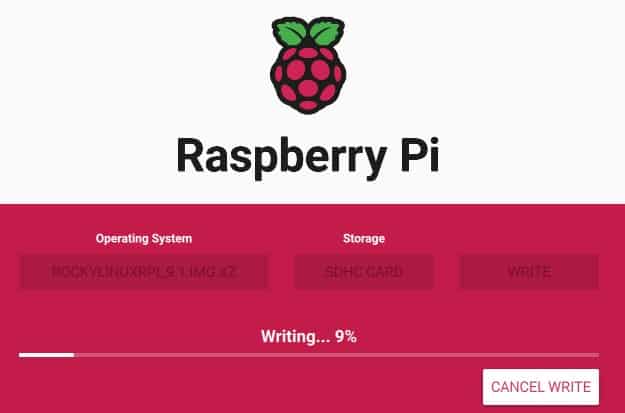
Once the writing process is completed, you can remove the SD card (or USB drive) from your computer, and plug it into the Raspberry Pi.
First boot with Rocky Linux
The only Rocky Linux image available for the Raspberry Pi currently is a minimal edition, meaning it’s command line only, no desktop environment is pre-installed on it.
On the first boot, you’ll get access to a terminal prompt, where you can log in with the default user:
- Username: rocky
- Password: rockylinux
From there, you have the base of your new system setup. If you’re used to any Red Hat distribution (Fedora, CentOS or even Rocky Linux on PC), you should be fine. After the initial installation, using Rocky Linux on a Raspberry Pi is not that different.
But I guess most of you are, like me, more familiar with Debian-based distributions or desktop environment tools, I will give you the first steps to complete the initial setup.
It's a free PDF guide containing every Raspberry Pi Linux command you should know!
Download now
Post-installation: Rocky Linux configuration for the Raspberry Pi
Before using your new Rocky Linux system, you may need to do a bit more configuration steps to make it more comfortable: keyboard layout, network, SSH access, etc. Let’s see how to do all of this in this section.
Change the keyboard layout
If (like me) you aren’t using a typical US keyboard with your Raspberry Pi, the first thing you’ll be interested in is changing the keyboard layout.
Note: For the first login, you have to use the QWERTY (US) layout. Hopefully, for most of us, there is no letter swap in “rockylinux” between QWERTY and AZERTY, so it should be pretty straightforward. Just be aware of this if you use a less traditional keyboard.
Here is how to change the keyboard layout on Rocky Linux, once logged in with the default user:
- You can check the current settings with:
localectl - Then list the other layouts available:
localectl list-keymaps
It’s a long list, but it’s better than guessing. Use the grep command if you can find the pipe symbol :-). - Set the new keyboard layout by using this syntax:
localectl set-keymap <keymap>For example, I did:localectrl set-keymap fr
And it’s ok now: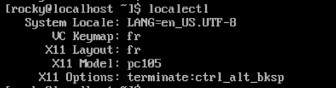
Are you a bit lost in the Linux command line? Check this article first for the most important commands to remember and a free downloadable cheat sheet so you can have the commands at your fingertips.
Connect to the network
If you have an RJ45 plugged in, on a network with a DHCP server enabled, there is nothing to do. It should connect automatically and get an IP address assigned by your DHCP server.
If possible, I would recommend doing this anyway, and using SSH to do all the configuration steps after that.
But if you don’t have other options, here are the steps to configure your network (especially the Wi-Fi):
- Open the network manager tool with:
sudo nmtui
Enter the “rockylinux” password if asked. - Choose “Activate a connection” with the arrows, and press Enter.
- Find your wireless network name in the list, select it, and press Enter again.
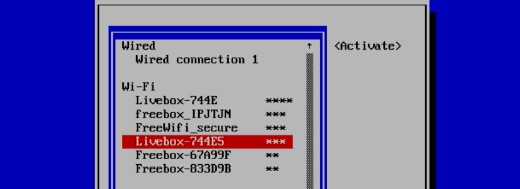
- Enter your Wi-Fi password, and you should be connected directly.
- Press “ESC” to exit this tool.
You can use this command to verify that you’re now connected to your network:ip a
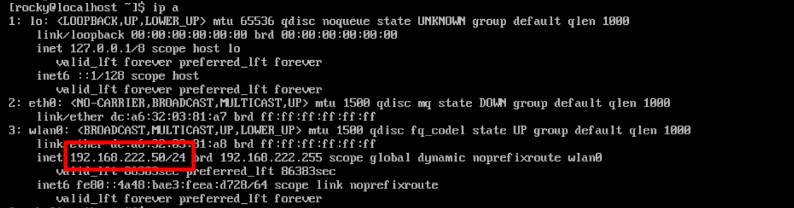
If there is an IP address set for your interface (wlan0 is the wireless interface), it should be ok.
SSH connection
SSH is enabled by default on Rocky Linux, so it’s perfect for a headless setup (no monitor). If you can plug the Pi into an RJ45 cable with a DHCP server online, you can directly access it via SSH a few minutes later;
And in any case, once the system is installed and the network is set up, you can now use SSH to continue the system configuration.
Use your favorite client for this, connect with the “rocky” user account, and in most cases, it will be much more comfortable from your computer than working on the Pi directly.
It's a free PDF guide containing every Raspberry Pi Linux command you should know!
Download now
I have a detailed guide about SSH here if you don’t know what I’m talking about.
Expand the partition
You’ll quickly realize that the disk size doesn’t match your SD card or USB drive capacity.
The main partition on Rocky Linux is set to use the minimum required, but it won’t be enough to install new applications.
Hopefully, there is a command available to fix this quickly:sudo rootfs-expand
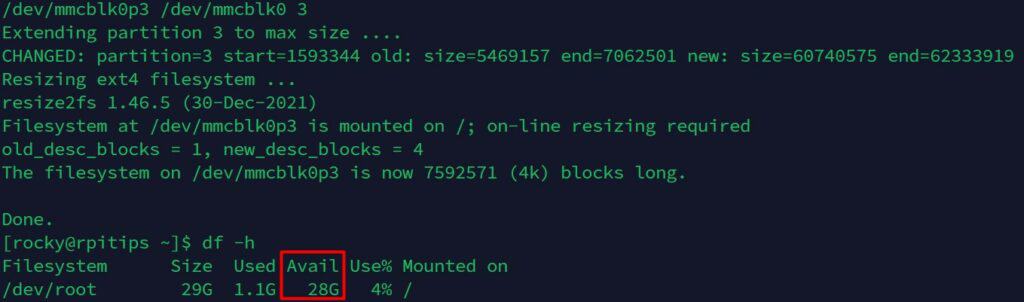
A few seconds later, your root partition will use all of your hard drive capacity, making it ready to install new applications.
Most distributions do this automatically on the first boot. I don’t know why Rocky Linux is not, but now that you have the command, it’s not a big deal.
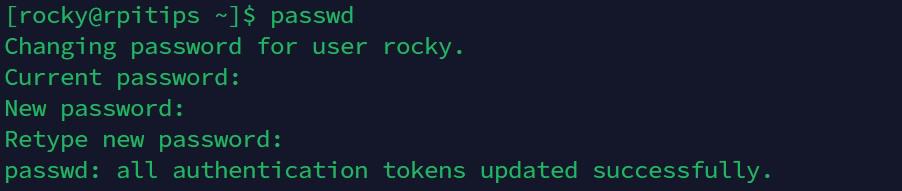
Change the default password
Before moving any further, I think now is a good time to change the default password (at least). It’s not a good idea to have default users and passwords, and even less to keep them forever. That’s why this has been changed recently on Raspberry Pi OS.
Like with any distribution, you can easily set a new password with the command:passwd
Enter the current password (“rockylinux”), and then the new password twice.
Anything non-obvious will be much better than keeping the default one.
If you lack inspiration, you can use this password generator that gives you a password easy to remember but hard to crack.
And if you’ll be hosting critical applications or data on your system, it’s probably better to create a new user, delete this one, and follow the best practices in terms of security (link to my checklist). Keeping a default username is never a good idea.
Packages management on Rocky Linux
If you use a Raspberry Pi, you’re probably used to Debian-based distributions and APT for the package manager. Well, Rocky Linux is from the Red Hat family, so it’s not using APT or DPKG.
The package manager on Rocky Linux will be DNF, handling RPM packages (instead of DEB).
It basically works the same way:sudo dnf <action> <parameters>
With these actions, you’ll use most of the time:
- search: Search packages available and their details for a given string.
dnf search python - upgrade: Will do the repository sync + suggest the installation of available upgrades.
It’s like a combo of “apt update” and “apt upgrade”.sudo dnf upgrade - install: Install a specific package.
sudo dnf install python3-qt5
Some minor changes here if you are used to apt, but you’ll quickly get used to it.
Related: How to Fix the ‘apt-get command not found’ Error on Linux
It's a free PDF guide containing every Raspberry Pi Linux command you should know!
Download now
If you are looking for exclusive tutorials, I post a new course each month, available for premium members only. Join the community to get access to all of them right now!
Install a desktop environment on Rocky Linux
As I mentioned earlier, Rocky Linux is only available as a server edition for now. But it’s possible to install a desktop environment on it. I did it and it works pretty well.
I didn’t mention this in the previous paragraph about package management, but groups of packages are available with dnf:sudo dnf group list
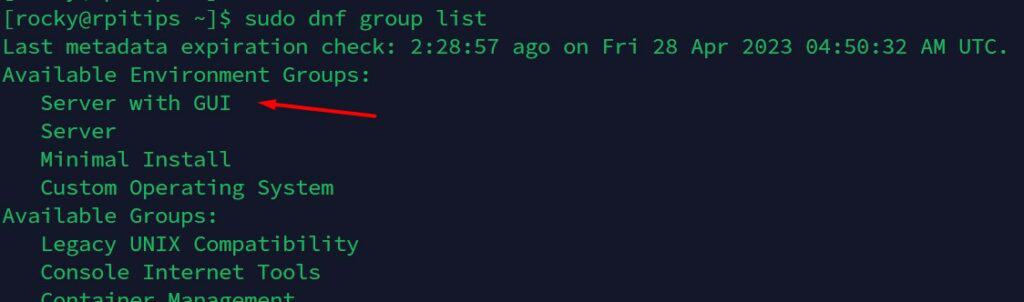
And there is one for the desktop environment, so I used it. I guess, you can manually select all the packages you want to install (especially if you don’t want to use GNOME), but I chose the easy way.
So, if you would like to install the GNOME desktop environment on Rocky Linux for Raspberry Pi, with all the accessories and default applications, use this command:sudo dnf group install "Server with GUI"
It will need to download around 1 GB of packages, so it’s maybe not the best idea on an old model or if you want to keep something as light as possible. It’s the easiest, perhaps not the smartest.
Take a coffee, don’t go too far though, you need to answer a few questions after the download phase (pressing “y” and enter). Come back a moment later (it took me between 15 and 20 min on the SD card with a Raspberry Pi 4) to see the result.
A reboot is required at this point:sudo reboot
And you should then get the full desktop environment on the next boot. Login with the default user (or the new one if you changed it), and the new password (I hope you changed it!).
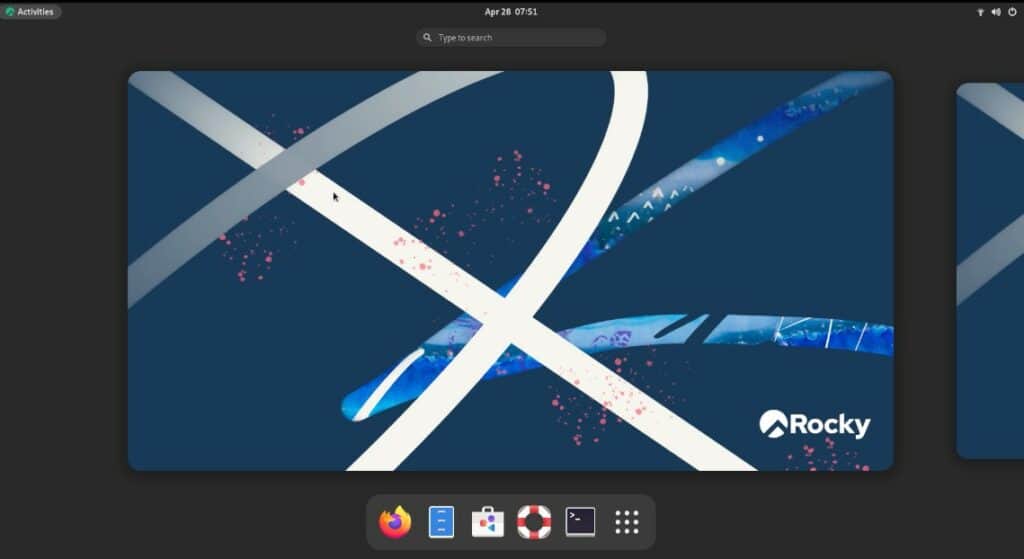
After that, it’s the classic GNOME, so you’ll quickly find the apps and tools you’re used to.
If you are starting to use Rocky Linux or want more Red Hat tutorials, I already have a few for you on this website, here are some good starting points:
- How To Install And Use Fedora On Your Raspberry Pi?
- How to Start Using CentOS on your Raspberry Pi?
- How To Use YUM on Ubuntu: Problem & Solutions
Whenever you’re ready, here are other ways I can help you:
The RaspberryTips Community: If you want to hang out with me and other Raspberry Pi fans, you can join the community. I share exclusive tutorials and behind-the-scenes content there. Premium members can also visit the website without ads.
Master your Raspberry Pi in 30 days: If you are looking for the best tips to become an expert on Raspberry Pi, this book is for you. Learn useful Linux skills and practice multiple projects with step-by-step guides.
The Raspberry Pi Bootcamp: Understand everything about the Raspberry Pi, stop searching for help all the time, and finally enjoy completing your projects.
Master Python on Raspberry Pi: Create, understand, and improve any Python script for your Raspberry Pi. Learn the essentials step-by-step without losing time understanding useless concepts.
You can also find all my recommendations for tools and hardware on this page.