

17 Security Tips To Protect Your Raspberry Pi Like A Pro
By default, Raspberry Pi has poor security. If you use it at home or in a small network, it isn’t a big deal. However, if you open ports on the Internet, use it as a Wi-Fi access point, or install it on a larger network, you need to take security measures to protect your Raspberry Pi. In this article, I’ll show you everything I do with my Linux servers at work to keep them safe.
Improving the security of a Raspberry Pi is similar to any other Linux device. There are logical steps, such as using a strong password. And there are also more complex steps like detecting attacks or using encryption.
In this article, I share 17 security tips to follow to get higher security for your Raspberry Pi (and they mostly apply to all Linux systems). If you are just using your Raspberry Pi at home, try to apply the first tips at the very least. Follow all of the tips included for a more critical setup, with Internet access or on a larger network.
If you’re looking to quickly progress on Raspberry Pi, you can check out my e-book here. It’s a 30-day challenge where you learn one new thing every day until you become a Raspberry Pi expert. The first third of the book teaches you the basics, but the following chapters include projects you can try on your own.
Introduction
Should I follow all of these tips?
As mentioned at the beginning of the article, if your Raspberry Pi is at home, with a few services and no forwarded ports in your Internet box, you are already pretty safe.
The risk level of your Raspberry Pi depends on how it’s exposed to the “real” world. You won’t take the same measures for a Retropie game console at home, and for a DMZ in your network that is open on the Internet.
But the 17 tips are good to know, and easy to apply, so if you host a service opened to the Internet, take 30 min to read the article and apply what you learn.
How I wrote this article
I selected 17 main security tips, which apply to everyone who hosts a Raspberry Pi and shares services on it. I have been a system administrator for 20 years, and these are the tips I apply to any new server installation.
They are in order of risk level. If you think you are highly exposed, follow all the steps, and you’ll be safe.
If your risk level isn’t very much, you’ll only have to follow only the first steps.
Note: If you want to see all these steps in action, I have a video lesson available for the community members. You can join here and watch it directly if you are interested (with 10+ other lessons for Raspberry Pi and many other benefits).
It's a free PDF guide containing every Raspberry Pi Linux command you should know!
Download now
17 Tips to Secure your Raspberry Pi
1 – Keep your system updated
This may be obvious, but it’s important. With updates from the default Raspberry Pi OS repository, you not only get the latest features but mainly security fixes for your installed applications.
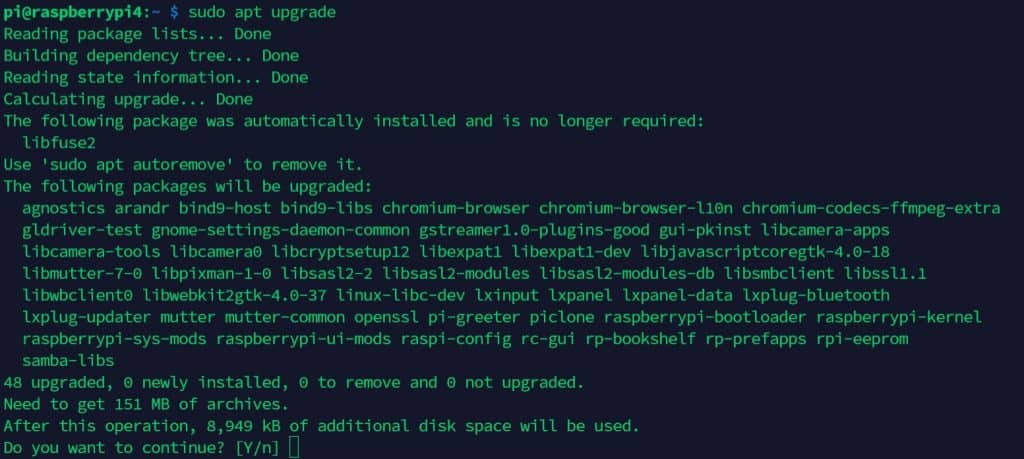
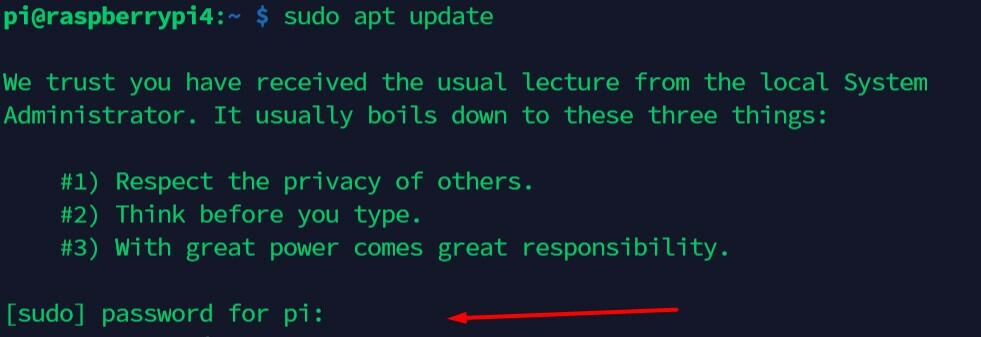
Try to update your Raspberry Pi regularly with: sudo apt update
sudo apt upgrade
You can also automate this process with the unattended-upgrades package.
This procedure allows you to install security fixes automatically every day:
- Install the unattended-upgrades package:
sudo apt install unattended-upgrades - Open the configuration file:
sudo nano /etc/apt/apt.conf.d/50unattended-upgrades - Change what you want in this file.
By default, it’ll download only security updates, but you can change this if you want to install all Debian updates or even updates from other repositories.
I recommend at least uncommenting this line://Unattended-Upgrade::Mail "";
And choose a local user to receive the notifications. For example:Unattended-Upgrade::Mail "root";
And even for local users, you might need to install the mail command, for example with:sudo apt install mailutils - Save and Exit (CTRL+O, CTRL+X).
- Then we need to set the periodic upgrade.
Open this file:sudo nano /etc/apt/apt.conf.d/02periodic - Paste these lines (the file should be empty if not, change the values):
APT::Periodic::Enable “1”;
APT::Periodic::Update-Package-Lists “1”;
APT::Periodic::Download-Upgradeable-Packages “1”;
APT::Periodic::Unattended-Upgrade “1”;
APT::Periodic::AutocleanInterval “1”;
APT::Periodic::Verbose “2”;
This will enable an automatic update every day.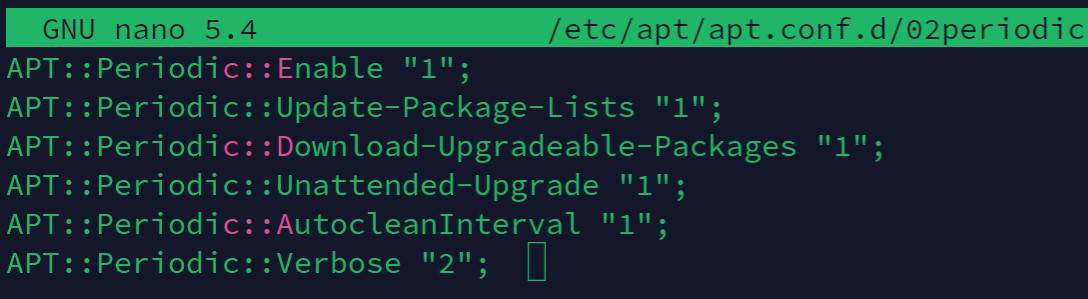
We ask apt to make: updates, download upgrades, install upgrades, and auto-clean every day.
The last line is the verbose level you’ll get in the /var/log/unattended-upgrades and email (1= low, 3=max). - Save and exit (CTRL+O, CTRL+X).
- This should be ok, you can debug your configuration with this command:
sudo unattended-upgrades -d
Don’t forget to check the log file and/or the emails received to make sure everything is working as expected.
Are you a bit lost in the Linux command line? Check this article first for the most important commands to remember and a free downloadable cheat sheet so you can have the commands at your fingertips.
2 – Don’t use auto-login or empty passwords
Passwords are a big part of system security.
First: make sure that all critical access asks for a password.
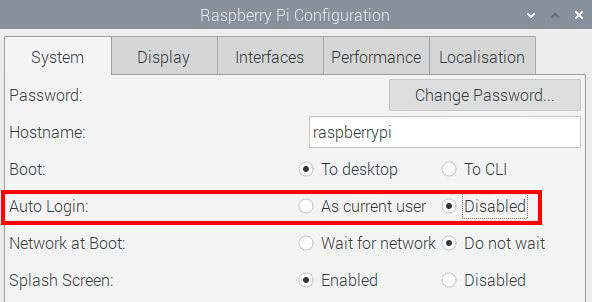
Don’t use auto-login and be sure to add a login step for each application you can access directly.
I won’t list all apps, but for example, if you have a web server, make sure that personal data or administration pages aren’t accessible without a password.
Make sure that nobody uses an empty password on the Raspberry Pi. If you have a few accounts, it’s easy to check all access.
It's a free PDF guide containing every Raspberry Pi Linux command you should know!
Download now
If you have a lot of user accounts, these commands could help you:
- Search for empty passwords:
sudo awk -F: '($2 == "") {print}' /etc/shadow
This will display only accounts with an empty password. - Lock unsafe accounts:
passwd -l <username>
3 – Change the default password for pi
A common mistake is to leave the default password on the pi user (raspberry). Anyone who has already used a Raspberry Pi will know this password. So many people are scanning SSH ports and trying to log in with pi/raspberry.
On recent installations of Raspberry Pi OS, there is no longer a default login/password set. So, there is a good chance you’re already safe, but just in case, if you have an old installation, make sure you’re not making this mistake.
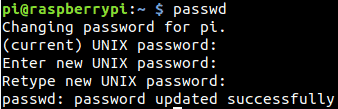
Changing the default password should be the first thing to do on a new installation.
Doing this is easy, log in as pi and enter this command: passwd
Try to use a sentence with over 15 characters to be safe against brute-force attacks, and to remember it easily (ex: iloveraspberrytips is a good password easy to remember). If you need some ideas, this website offers an easy-to-remember password generator (yes it’s mine, but I love that kind of password).
4 – Disable the pi user
As I said, the pi user is one of the most brute-forced logins with root. Hackers have a list of commonly used logins and mainly try these ones.
Even on new installations, it’s still possible to use it, but I strongly advise against it. Even using your first name or your company name is a better idea (and it’s far from the best choice).
If possible, create a new user and disable the pi user to prevent these kinds of attacks:
- Create a new user:
sudo adduser <username> - Give him the sudo privilege if needed:
sudo adduser <username> sudoThis will add your new user to the sudo group. - Check that everything is working correctly (ssh access, sudo, …).
- Copy files from the pi user to the new user if needed:
sudo cp /home/pi/Documents/* /home/<username>/Documents/ ... - Delete the pi user:
sudo deluser -remove-home pi
If you prefer, you can start by locking the account (like said previously), and delete it only after a few weeks, when you’re sure everything is working fine.
Related articles:

Join Our Community!
Connect, learn, and grow with other Raspberry Pi enthusiasts. Support RaspberryTips and enjoy an ad-free reading experience. Get exclusive monthly video tutorials and many other benefits.
Learn more5 – Stop unnecessary services
On Raspberry Pi, we try a lot of projects for everything, and it could be a bad habit for security.
Let’s say you installed PHPMyAdmin 3 months ago to try something, but you’re not using it anymore. This could create a breach for an attacker that will allow them to enter your system.
Try to stop or uninstall unneeded services and apps:
- List running services:
sudo service --status-all - To stop a service use:
sudo service <service-name> stopIf it starts automatically on boot, try:sudo update-rc.d <service-name> remove - Or to uninstall it, it should be something like:
sudo apt remove <service-name>
You can check my tutorial on how to uninstall packages on a Raspberry Pi here if you need more details.
6 – Make sudo require a password
As you should know, sudo doesn’t always ask for a password. Most of the time you don’t need to type your password again. It’s cool for productivity, but for security reasons, it’s not a good idea.
If someone succeeds to get terminal access to your Raspberry Pi main user, super-user privileges will be accessible without a password.
I recommend you ask for a password when you use sudo:
- Edit this file:
sudo nano /etc/sudoers.d/010_pi-nopasswd - Find this line:
pi ALL=(ALL) NOPASSWD: ALLOr any other users if you followed the previous steps. - Replace it with:
pi ALL=(ALL) PASSWD: ALL - Do the same for each user with sudo access.
- Save and exit (CTRL+O, CTRL+X).
7 – SSH: Prevent root login
As I said previously, root and pi users are often the main targets for brute-force attacks. It’s especially true when SSH is enabled.
So, you need to make sure that root doesn’t have direct SSH access. If you need root, log in with your normal user (not pi) and then use sudo to get super-user privileges (as explained in this article).
By default, root access is disabled.
You can check this:
- Open the SSH server configuration file:
sudo nano /etc/ssh/sshd_config - Find this line:
#PermitRootLogin prohibit-password - If you have something else, comment on this line (by adding # at the beginning).
- Save and exit (CTRL+O, CTRL+X).
- Restart the SSH server if you changed anything in the configuration file:
sudo service ssh restart
No idea what SSH is? Start by reading my complete guide about it.
8 – SSH: Change the default port
The SSH default port is 22.
So basically, attackers will create bots to make login attempts on this port.
To prevent this, you can change the default port and set another one:
- Edit the SSH server configuration file:
sudo nano /etc/ssh/sshd_config - Find this line:
#Port 22 - Replace the port with the one you want to use, and make sure to uncomment the line:
Port 1111Avoid port conflicts by using a free one, full list here:
List of known ports on Wikipedia. - Save and exit (CTRL+O, CTRL+X).
- Restart your server:
sudo service ssh restart
Don’t forget to adjust the firewall rules if you have one.
Make a new connection test before closing the current one, as it could help you if you made a mistake.
You need to update the used port in your connection settings, with Putty it’s just after the IP address: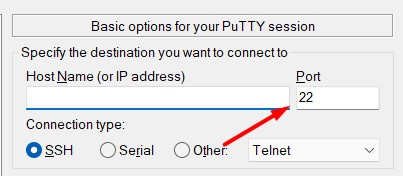
9 – SSH: Use SSH keys instead of passwords
With the previous steps, we already block most of the script kiddies with broad attacks to any responding IP address.
We are now moving to things that could protect you even if you are facing a strong hacker who is especially interested in accessing your system (and not any other system).
Using a strong password will slow the attack, but it’s always possible to find it, even if it takes weeks to get the correct password. What you can do to block this, is to use SSH keys instead of passwords for your SSH connections. An attacker can guess a 15-character password, but not an SSH key.
It's a free PDF guide containing every Raspberry Pi Linux command you should know!
Download now
The main idea is to generate a key on your computer, and then add it to the Raspberry Pi to allow a connection from your computer (with or without a password). I give you the step-by-step procedure at the end of this article.
Once this is working, you can only disable SSH connections with a password.
Change this line in the SSH configuration file we saw before:PasswordAuthentication no
10 – Install Fail2ban
Fail2ban is a tool that detects brute-force attacks and blocks them.
In the previous steps, I said that an attacker could try to find your password for months, and maybe they can succeed. The main purpose of Fail2ban is to avoid this.
Fail2ban will block attackers’ IP addresses if they fail to log in more than X times. You can configure the number of tries before a ban, and the ban duration.
Follow these steps to install Fail2ban on your Raspberry Pi:
- Install the package:
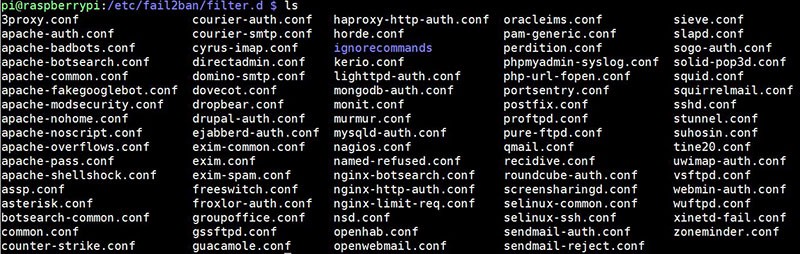
sudo apt install fail2ban - By default, fail2ban will ban the attacker 10 min after 5 failures.
I think it’s ok to start, but if you want to change this, all the configuration is in the /etc/fail2ban folder.
Mainly in /etc/fail2ban/jail.conf:sudo nano /etc/fail2ban/jail.conf - Restart the service if you change anything:
sudo service fail2ban restart
This should really slow down your attacker. 5 attempts every 10 minutes is 720 tries a day. If your password is something more difficult than “password” or “123456789” it should take a long time for the hacker to find it.
Here is a link to my tutorial on how to use Fail2ban on your Raspberry Pi. Feel free to check it if you need more details or want to go deeper with the configuration of this useful service.
11 – Install a firewall
If you don’t know, a firewall allows you to block all ports except the ones you need and filter access by IP. For example, you can block everything, and just allow SSH access from your computer IP address.
As explained in this in-depth article, an antivirus is not mandatory on Raspberry Pi, and Linux in general, but a firewall is a good practice if you host some critical services on it.
I’m used to installing iptables for my firewall rules, but maybe for a beginner, it’s not the easiest route to take. So, I’ll explain to you how to install ufw (Uncomplicated FireWall), which is more straightforward, and then allow only what you need.
It’s a basic configuration with HTTP access for anyone, and SSH only for you, but you need to adapt this to what you want to do.
- Install the firewall package:
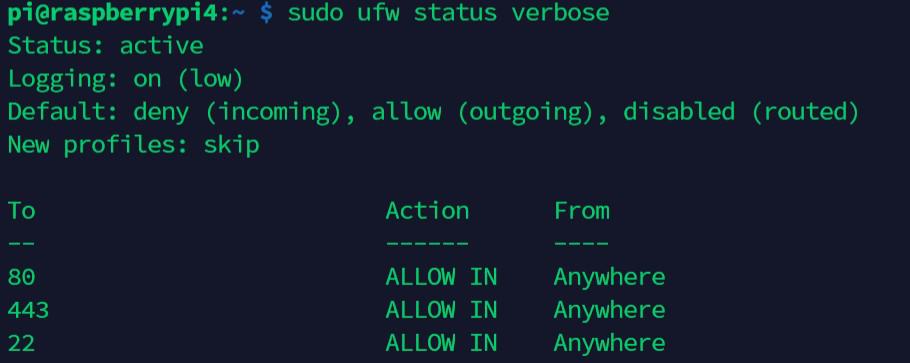
sudo apt install ufw - Allow Apache access for anyone:
sudo ufw allow 80
sudo ufw allow 443 - Allow SSH access for your IP address only (not mandatory, just to give you another example):
sudo ufw allow from 192.168.1.100 port 22
Don’t forget to replace values with your own settings.
On a local network, you can get your IP address with ipconfig (Windows) or ifconfig (Linux/Mac).
If you change the SSH port in the previous step (by 1111 or anything else), replace it here. - Enable the firewall:
sudo ufw enableBe careful, this will enable the firewall now, and also on boot.
If you lose access to your device, you won’t be able to fix this, even after a reboot.
You’ll need to change the configuration directly on the Raspberry Pi (physically). - Check that everything is fine.
To display your current rules once ufw is enabled, use this command: sudo ufw status verbose
For more complex configurations, check the man page.
My other tutorial about building a wireless router with firewall features can also help you.
This video can also be a good starting point if you need more visual guidance:
12 – Backup your system
One of the worst consequences of an attack is to lose data.
If you back up your files correctly and regularly, you’ll be safe even if the hacker destroys your SD card.
I already wrote an article on how to back up and restore your Raspberry Pi, so I won’t repeat it here.
But the second part is critical, make sure that you can read your backup and that all of your important files are inside; otherwise, it’s useless. Testing your backup files regularly is a good practice.
13 – Crypt your connections
This is a vast topic, and I won’t give many details about this, but I’ll give you an example.
With basic protocols, data flows in clear on the network. That’s to say, if you type your password, a hacker could get it while listening to the network. Luckily, there are often other protocols that work safer by encrypting all the data.
The first thing is to stop using unsafe protocols (FTP, Telnet or HTTP for example). And then try to replace them with safer ones (SFTP, SSH, HTTPS).
The procedure depends on which protocols you are using with your Raspberry Pi. Let’s take the HTTP example.
HTTP is cool if you only use it for static content, you never type a password, and don’t have sensitive data on your server. But take the time to switch your application to use the HTTPS protocol anyway, it’ll be safer.
It’s pretty simple to do, you just need a certificate and change a few lines in the Apache or Nginx configuration. You’ll find a lot of helpful tutorials on the Internet.
And most of the time it’s easy. You can directly switch from FTP to SFTP as your Raspberry Pi already has SSH enabled. The same thing with Telnet users, why do you need Telnet while SSH is available?
Then look for all the protocols you are using (especially with sensitive data) and what you can do to improve the overall security of your system.
14 – Use a VPN
A more radical option is to access your Raspberry Pi through a VPN. VPN stands for Virtual Private Network and allows you to access remotely all services on your Raspberry Pi as if you were in the local network.
All flows between you and the Raspberry Pi will be encrypted by a strong protocol.
This is a good option to prevent opening many ports on the Internet without security.
I have an article on how to use a Raspberry Pi as an OpenVPN server, and you can easily find more help on the Internet. Recently, I switch to WireGuard, but it’s the same idea (you can find more about WireGuard here).
You can also install NordVPN or any other provider (my top VPN provider for Raspberry Pi here) if you want to use a secured tunnel to access the Internet from your Raspberry Pi (same idea in the other direction).
15 – Protect physical access
The last protection is obvious but often ignored when we talk about security.
You can configure any security protocols, firewall, and VPN from all the steps before.
If your Raspberry Pi is physically accessible by anyone, it’s useless.
Make sure that the Raspberry Pi can’t be stolen easily (or the SD card), and that nobody could come and plug in a keyboard and screen and be logged in automatically. The steps to implement to protect against that kind of attack will depend on your system.
Maybe you’ll need an auto logoff after X minutes, a password in the grub boot menu, or encrypt the data on the SD card.
Think about it, what could be the worst thing that could happen if someone gets access physically to your Raspberry Pi? Then find solutions to prevent this from happening.
16 – Check your logs regularly
The last two items from this list are not really protections, but more of a commitment to follow. Most of the time, attacks are visible in the log files. So, try to read them regularly to detect any suspicious activity.
All logs are in the /var/log folder, but the main log files to check are:
- /var/log/syslog: main log file for all services.
- /var/log/message: whole systems log file.
- /var/log/auth.log: all authentication attempts are logged here.

- /var/log/mail.log: if you have a mail server, you’ll find a trace of recent emails sent here.
- Any critical applications log file, for example,/var/log/apache2/error.log or /var/log/mysql/error.log
Some solutions are available to simplify this work. For example, you can configure syslog to send logs to a master server, with an interface to read them, filter, etc.
You can also use logwatch to get daily reports about the system’s operation.
17 – Read the news
To keep a good security level in your projects, try to stay constantly updated.
I see new vulnerabilities in a lot of major software packages every day, and it could take weeks or more to have the fix available in the Raspberry Pi OS repository.
If you read security news regularly, you can act faster to stay protected.
Here are some good websites to follow:
You could also use a vulnerability scanner like Nessus to find only the vulnerabilities that apply to your system. But if your project requires a high level of security, you probably should not stay on Raspberry Pi.
It's a free PDF guide containing every Raspberry Pi Linux command you should know!
Download now
Want to chat with other Raspberry Pi enthusiasts? Join the community, share your current projects and ask for help directly in the forums.
Conclusion
That’s it, you now know the main security steps to protect your Raspberry Pi.
I know these are only the first steps, and that there are other important ones too, but we are talking about Raspberry Pi, not high-availability servers with tons of confidential data.
I think you will have good protection if you implement the 17 ideas from this article.
Whenever you’re ready, here are other ways I can help you:
The RaspberryTips Community: If you want to hang out with me and other Raspberry Pi fans, you can join the community. I share exclusive tutorials and behind-the-scenes content there. Premium members can also visit the website without ads.
Master your Raspberry Pi in 30 days: If you are looking for the best tips to become an expert on Raspberry Pi, this book is for you. Learn useful Linux skills and practice multiple projects with step-by-step guides.
The Raspberry Pi Bootcamp: Understand everything about the Raspberry Pi, stop searching for help all the time, and finally enjoy completing your projects.
Master Python on Raspberry Pi: Create, understand, and improve any Python script for your Raspberry Pi. Learn the essentials step-by-step without losing time understanding useless concepts.
You can also find all my recommendations for tools and hardware on this page.


I have never been fortunate enough to read an in-depth article of this type before now. My computers are always broken into for the last 15 years! I move regularly, I always think I’m trying all kinds of things to prevent it. Obviously it is an ongoing project to keep it from happening. I’m terrified of systemd, broadband, ssh, and Ubuntu, they give me nightmares, plus I get angry.
I use Bionic Puppy Live and feel like I’m sneaking around. I get all kinds of hassles from web browsers and pages. I try not to sign in.
Thank you so much for enlightening me about this, especially in a format and style that I can understand. I am really looking forward to getting a Raspberry Pi but I was wondering what new problems I would have to counter so that I could enjoy moderate personal computing again. I was starting from the main concern first and am fortunate to find your website and articles. I hope all the misfits like me find their way to privacy and security.
Hi Lydia,
Thanks for your feedback
I’m glad this post was useful to you
Patrick
Hello Patrick,
I am doing a research project on the raspberry pi. I found your article very helpful for data concerns. I don’t see the date this article was published so could you tell me the date.
Thankyou.
Hi Alexander,
January 2019
But most of the things explained here are still relevant
Thx for the good article!
I am currently investing some time in my raspberry that i got as a gift
Would you consider a Mailserver, Nextcloud, a git, things that are viable?
Is it easy to upgrade from ufw to iptables or should one use it from the start?
Thank you in advance
Thomas
Hi Thomas,
Yes, these are good projects to try
You can find a few tutorials on RaspberryTips about them
I think you’ll need the same time to do it directly with iptables or to upgrade later, so do it when it’s better for you
Patrick
Hello,
Very interesting article. I own a raspberry that I never used yet because I am trying to understand how it works first, not to make mistakes from the beginning. For the usage I am considering security is very important and I am still wondering which option is better between a raspberry, with all or most of the tips found in this article, or using a VPS with a linux system. In both cases security measures will be required anyway. My concern about those 2 different solutions are about how I should setup a VPN in a way that protects the client computer the most efficiently. Would it be safer to use Rasp Pi as an open VPN server or connect to a VPS using a commercial VPN (e.g. Express VPN, or any other) from client side ? If Pi is used as an openVPN server, I understand that the tip n° 13 would be unnecessary/redundant, is that correct ? In the same case, would an SSH access (tips 7, 8 & 9) still be useful ?
Hi Fred,
The security tips in this article can be used on a VPS as on a Raspberry Pi
You can also install OpenVPN on both
So, the choice is probably more on what you want to do with it, rather than security only
In my case (and I guess I’m not the only one), I needed to use:
sudo ufw allow from 192.168.x.xxx to any port xxx
if the “to any” part is missing, the ufw won’t let you in
For #1, if I have CLAWS mail configured, what changes in the command is needed to send mail to root? When I debug, it says “No /usr/bin/mail or /usr/sbin/sendmail,can not send mail. You probably want to install the mailx package.” BUT I think this is irrelevant to my case.
Very Good! Bought the book and the boot camp.