Use SSH To Remote Control Your Raspberry Pi: A complete guide
Being able to control your Raspberry Pi from another computer remotely is an important part of the Raspberry Pi’s learning curve. SSH is generally the protocol we use to do this, even if it’s not the only option. If you are new to Linux, Raspberry Pi, or just SSH, you’ve come to the perfect place: I created this guide for you, to answer all of your questions about this method.
SSH is a protocol available on Linux systems to execute commands on a Raspberry Pi from another computer. You need to enable it first in the Raspberry Pi configuration, then use an SSH client on your computer to connect to the Raspberry Pi.
I will guide you through the whole process, showing you how to activate SSH, find your IP address and connect to the Raspberry Pi from your computer. But first, let’s introduce what an SSH connection is.
If you’re looking to quickly progress on Raspberry Pi, you can check out my e-book here. It’s a 30-day challenge where you learn one new thing every day until you become a Raspberry Pi expert. The first third of the book teaches you the basics, but the following chapters include projects you can try on your own.
What is SSH in Raspberry Pi?
Let’s start at the beginning. If you have no idea what SSH is, I probably need to introduce a few things before giving you the procedure to use it.
SSH stands for Secure SHell. It’s a common network protocol that’s used to connect from one computer to another safely. The communication between the two computers is encrypted, and authentication is required.
It’s generally used by system administrators to access and manage remote servers. As a sysadmin, I had around 20 servers to monitor, and I could work on them for a few days without having to go into the server room. Everything was done via SSH or a similar protocol. It’s very convenient in this case.
But even at home, it can be really useful to access your Raspberry Pi, run a few commands, and disconnect. If your Raspberry Pi is mounted in a robot, hidden somewhere, or if you are just too lazy to plug in all of the accessories, SSH is a time saver.
And it’s not complicated. You just need to have your Raspberry Pi powered on, connected to the network and SSH enabled. I will explain how to use it in the following sections.

Join Our Community!
Connect, learn, and grow with other Raspberry Pi enthusiasts. Support RaspberryTips and enjoy an ad-free reading experience. Get exclusive monthly video tutorials and many other benefits.
Learn moreStep 1: Enable SSH on a Raspberry Pi
Note: If you want to see all these steps in action, I have a video lesson available for the community members. You can join here and watch it directly if you are interested (with 20+ other lessons for Raspberry Pi and many other benefits).
On Raspberry Pi OS, SSH is disabled by default. So, the first step is to enable it. There are different methods, depending on your current setup and at which stage you are in the installation process.
It's a free PDF guide containing every Raspberry Pi Linux command you should know!
Download now
Here are the main ways to enable SSH on a Raspberry Pi:
- On the desktop version: Enable SSH in the Raspberry Pi Configuration tool, in the “Interfaces” tab.
- On the lite version: Use raspi-config and go to the “Interfaces” submenu.
- With Raspberry Pi Imager: by using the advanced options when creating the SD card.
I will now explain all these methods (and more) in detail.
Raspberry Pi OS with desktop
If you use Raspberry Pi OS with desktop, SSH isn’t enabled by default. You can enable it easily via the Raspberry Pi configuration tool:
- In the main menu, find the Raspberry Pi Configuration tool under Preferences.
- Click on the “Interfaces” tab.
- You’ll get something like:
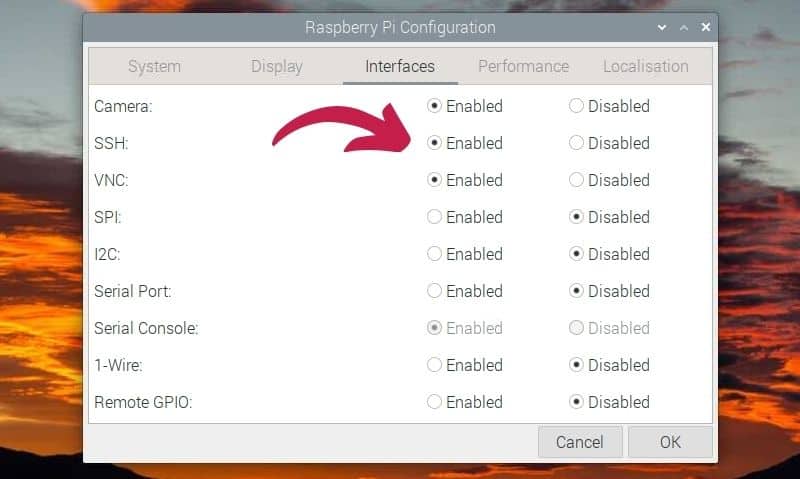
- Click to enable SSH.
- Close the window, SSH is now enabled and ready to use.
By the way, if you have a desktop environment installed, you can use graphic remote access instead of SSH. VNC is one method that you can see on the screenshot, but there are many other options listed in this other article. It will give you access to the full interface, not only the command line.
Raspberry Pi OS Lite
If you are running the Lite version of Raspberry Pi OS, there is no desktop environment, so you can’t use the configuration tool. But there is something similar you can use in the command line:
- On your Raspberry Pi, type the command:
sudo raspi-config - You’ll get a wizard to configure many things on your device. You can use it to easily enable SSH.
- Go to “Interfaces Options”:
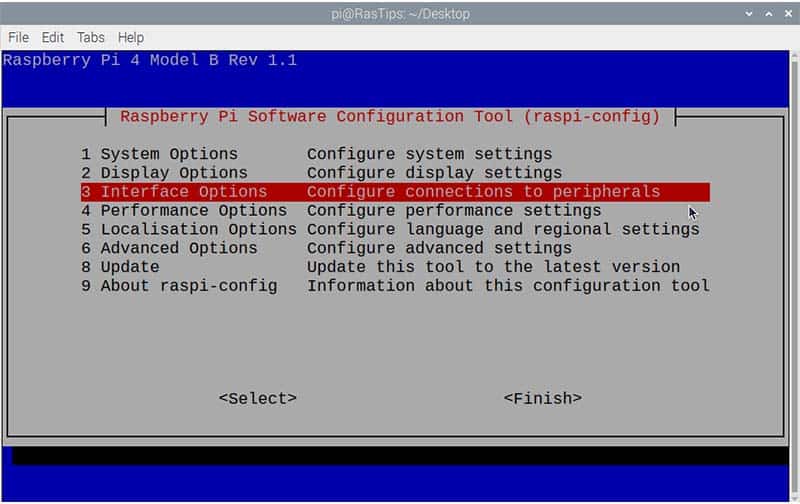
You can use the arrows on your keyboards to move from one item to another, and the TAB key to access the action below. - Then, select “SSH” and choose “Yes” to enable it.
- Close raspi-config. SSH is now enabled.
During the SD card creation
If your system is not yet installed, it’s possible to install it with SSH already enabled. I have a complete tutorial on this (Install a Raspberry Pi without monitor, keyboard and mouse), but I’ll give you the short version here.
Raspberry Pi Imager
If you are installing Raspberry Pi OS with Raspberry Pi Imager, you can use the advanced options to enable it:
- Run Raspberry Pi Imager (if you don’t have it, you can download it from there).
- Pick any version of Raspberry Pi OS in the OS list.
- Select your SD card or USB drive in the middle.
You should get a button for advanced settings in the bottom right of the window. Click on it to open this form: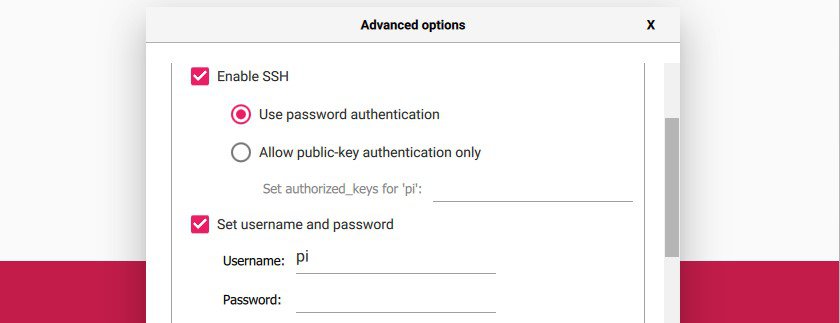
It may also work with other distributions like Ubuntu. If it’s not supported, the button won’t show up. - Check the box “Enable SSH” and choose a username and password (this is mandatory for security reasons).
- Once done, close the popup and flash your system as usual. SSH will be enabled on the first boot.
You can find my complete guide about Raspberry Pi Imager here, to learn all the tips and tricks for this very useful tool.
Manually
If you are not using Raspberry Pi Imager, or want to enable SSH on an SD card you flashed previously, you can also do this manually:
- Insert your SD card into your computer.
- Browse to it with your file explored (generally named “boot”).
- Create a new file in it, named “ssh” without extension.
If you are on Windows, make sure it doesn’t create “ssh.txt” or something like that. You need to enable the extensions display in your explorer settings. - Safely remove the SD card, and SSH will be enabled on the next boot.
Other distributions
If you are not using Raspberry Pi OS, most of these solutions won’t work, so you’ll need to do it differently. In most cases, SSH is either enabled by default, or you can enable it easily.
If not, you can generally get it running easily with a few commands:
- Install SSH on a Debian based distribution:
sudo apt install ssh - Start the SSH service (if needed):
sudo service ssh start
If your distribution is not based on Debian, use the corresponding package manager to do the same thing. You’ll surely find this in the distribution documentation, as it’s one of the most common steps after a system installation.
Step 2: Prerequisites to SSH into a Raspberry Pi
Now that SSH is enabled on the Raspberry Pi, we only need a few more things before connecting to it.
Find the Raspberry Pi IP address
An IP address is the identifier of your device on the network. You need it to establish the SSH connection, as your computer needs to know how to access the Raspberry Pi.
If you have a desktop environment installed, you can generally find it by hovering to the network icon (top-right corner on Raspberry Pi OS), or in the system settings.
On Raspberry Pi OS Lite (or any other minimal distribution), the following command should display it:ip a
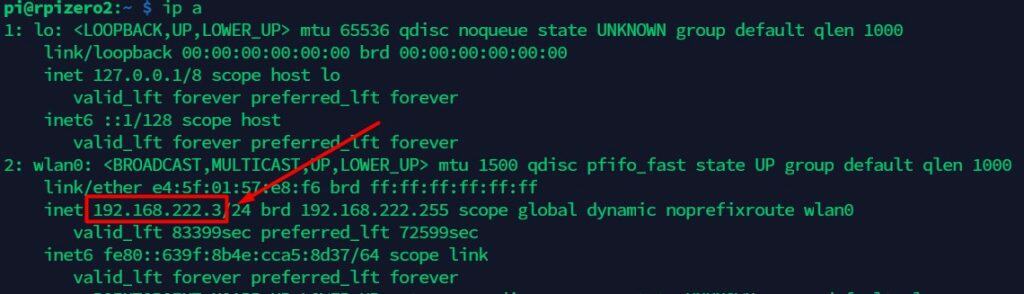
The IP address format is something like A.B.C.D with each number having a value between 1 and 254. In my example, the IP address of my Raspberry Pi is 192.168.222.3. Take note of it, as you’ll need it later.
If you can’t find it or need more explanations, please check this article.
It's a free PDF guide containing every Raspberry Pi Linux command you should know!
Download now
Get your Raspberry Pi login and password
The other thing you’ll need to do is to authenticate. By default, you can connect with your username and password, so it shouldn’t be complicated.
The default login and password on Raspberry Pi OS are “pi” and “raspberry”.
If you changed this in the advanced options of Raspberry Pi Imager, the welcome wizard on the Raspberry Pi configuration tool, you need to use your new password. It will be the same to connect with SSH.
As Raspberry Pi OS opens the session automatically by default, you may not remember it. In this case, go to the Raspberry Pi Configuration tool, under Preferences in the main menu, to set a new password. You can find more details here on how to change the password on Raspberry Pi, if needed.
It's a free PDF guide containing every Raspberry Pi Linux command you should know!
Download now
Step 3: Connect to the Raspberry Pi via SSH
We now have everything we need to connect to the Raspberry Pi via SSH for the first time. There are several methods you can use. You can either use the command line for a quick test or install an SSH client for more convenience.
Use the command line on your computer
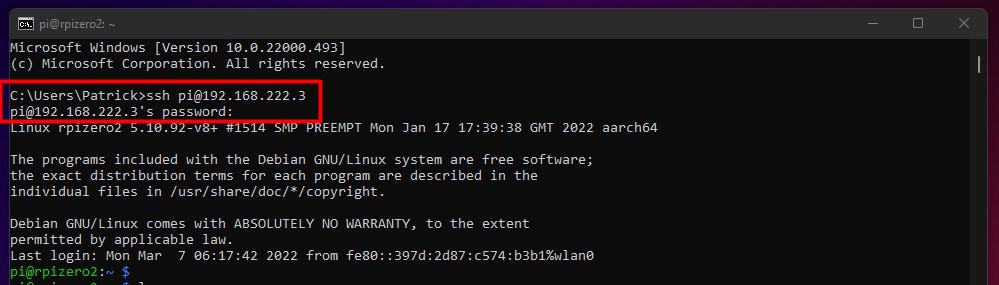
SSH is well integrated with most modern operating systems, so it’s generally possible to use it directly from the command line. The command syntax is the same, whatever your operating system is (Windows, macOS, Linux):ssh <username>@<ip_address>
So, in my example:ssh pi@192.168.222.3
On Windows, find the command prompt in the main menu and type the command. It will ask for your password and give you remote access to your Raspberry Pi terminal:
If your computer is running on Linux, you may need to install SSH manually with your package manager (“sudo apt install ssh” or something like that), but in most distributions, it’s already installed by default.
Use an SSH client
Using the terminal or command prompt on your computer is the fastest way to test if SSH is working, but it’s not the most convenient or comfortable. There are many SSH clients that you can use for a better experience (more features, better look, etc.).
The most recommended one for Windows users is Putty, which you can download from there. It works great, and you can save your sessions, to allow you to simply connect to each device in one click, without having to remember the IP address.
But my favorite currently is Termius. You’ll find it in the Microsoft Store or directly on their website. It looks great, saves your sessions and passwords, allows you to reconnect in one click where the connection is lost, etc.
On Linux and macOS, I generally create aliases for my servers and don’t use any specific client. But you can probably find some similar options (Termius is available on macOS and Linux, for example).
It's a free PDF guide containing every Raspberry Pi Linux command you should know!
Download now
Reminder: Remember that all the members of my community get access to this website without ads, exclusive courses and much more. You can become part of this community for as little as $5 per month & get all the benefits immediately.
Going further with SSH on Raspberry Pi
That’s it, you did the most complicated part and can now connect to your Raspberry Pi terminal from your computer. But in fact, it’s only the beginning. It gives you access to new work, and probably new projects if you are doing it right.
Raspberry Pi commands
Getting access to the Raspberry Pi terminal from your computer is fine, but you need to know some commands, or it’s useless.
Using a terminal is like speaking a different language, you’ll need to spend time learning and testing the Linux commands. Remembering the commands can be pretty difficult, but I’ve got you covered. You can read this article where I give you the most important commands, with a short explanation of the syntax and a few examples. You can even download my cheat sheet with all of them in a convenient PDF format.
Use SSH without password
If you only have one Raspberry Pi with a simple password that you remember easily, it’s fine. But when you have several of them running and need to access them regularly, it might be a mess.
It’s possible to use public-key authentication to access your Raspberry Pi without a password. In short, you’ll register your computer on the Raspberry Pi, to allow it remote access without any password in the future.
The process to do this is a bit long for this article, but I explain everything at the end of this other article. Read the article and test it out if you want to avoid using passwords (it’s even better for security).
Raspberry Pi security tips
If SSH is disabled by default on most distributions, including Raspberry Pi, there is a reason. As soon as you enable it, there is a risk that someone accesses your Raspberry Pi content without your permission.
For example, if you kept the default user and password, and someone gets access to another device on your network, they can easily get access to the Raspberry Pi too. But even if you changed the password, there are risks involved with this service enabled.
I won’t go into much detail here, but I have a full guide to improve security on a Raspberry Pi. I highly recommend reading it and applying some of the tips I give. The first tips are not complicated and will protect you from most issues.
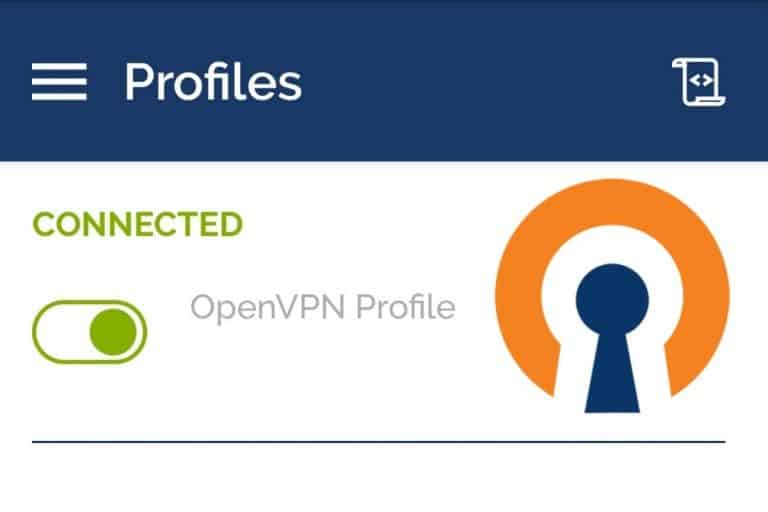
Use a VPN for remote access from another network
The last thing you may be interested in is how to access your Raspberry Pi terminal when you are not on the same network. Let’s say you are at work and want to check something at home, it won’t work directly.
The IP address you have on your Raspberry Pi is a private IP address, something local, that doesn’t exist in your company network (or is taken by another device, not your Raspberry Pi).
If you want to access your Raspberry Pi from elsewhere, the best method is to use a VPN. It will create a secure tunnel between your computer (anywhere in the world) and your Raspberry Pi at home. A VPN server needs to be installed on your Raspberry Pi (or another device on your home network), and a client on your computer (or even a smartphone).
The theory might seem a bit complicated, but the installation is pretty straightforward. Check this tutorial to know how to install OpenVPN on your Raspberry Pi in a few minutes.
It’s also possible to use port forwarding on your router, but it’s not the safest way, as anyone can access the opened port. You can try it, but a VPN is better in my opinion.
Whenever you’re ready, here are other ways I can help you:
The RaspberryTips Community: If you want to hang out with me and other Raspberry Pi fans, you can join the community. I share exclusive tutorials and behind-the-scenes content there. Premium members can also visit the website without ads.
Master your Raspberry Pi in 30 days: If you are looking for the best tips to become an expert on Raspberry Pi, this book is for you. Learn useful Linux skills and practice multiple projects with step-by-step guides.
The Raspberry Pi Bootcamp: Understand everything about the Raspberry Pi, stop searching for help all the time, and finally enjoy completing your projects.
Master Python on Raspberry Pi: Create, understand, and improve any Python script for your Raspberry Pi. Learn the essentials step-by-step without losing time understanding useless concepts.
You can also find all my recommendations for tools and hardware on this page.