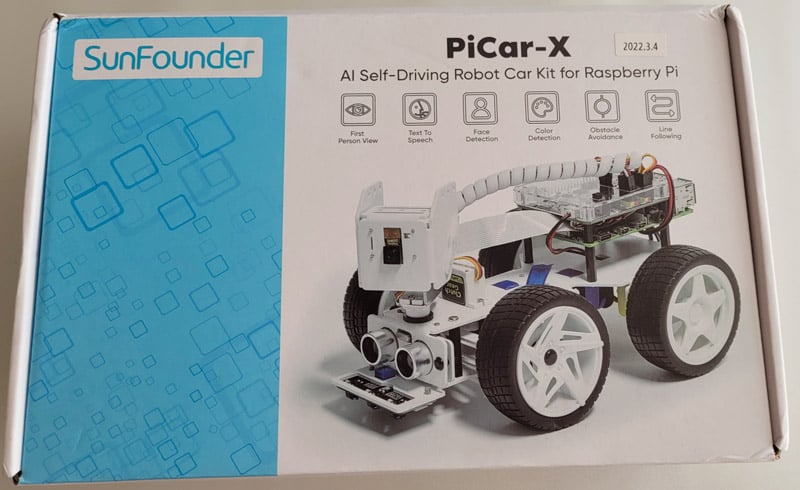
SunFounder PiCar-X Robot Kit Review: Is it for you? (Tested)
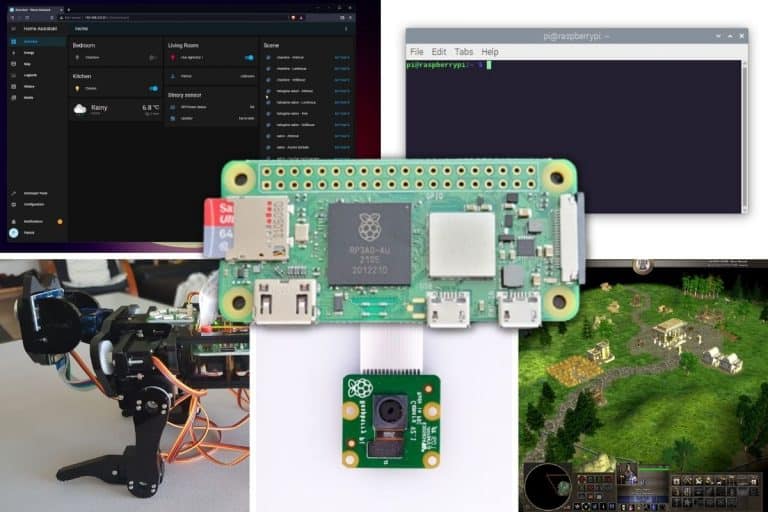
The PiCar-X from SunFounder is a robot kit, a car powered by a Raspberry Pi and loaded with various sensors. It can be controlled from your phone or your computer and programmed via Python or EZBlock (a visual language like Scratch).
I got the chance to play with it for a few weeks, and I will share my opinion of this kit with you so you can decide whether it’s the right pick for you or not.
Note: To be transparent, SunFounder sent me this product for free to test it and write a review. I’ll share my honest opinion in this article, but I also want to tell you this upfront.
Features
On paper, the SunFounder PiCar-X is sold as an AI self-driving car for Raspberry Pi. As with many other robot kits for Raspberry Pi, the Raspberry Pi will control everything (you’ll need to program it for this).
This kit is compatible with almost all standard format Raspberry Pi: 4B, 3B+, 3B and 2B. I used my Raspberry Pi 3B+ to test it. I don’t think it’s important which one you use. I suggest you take an old one that you no longer use for other projects :-).
The important pieces included in the SunFounder PiCar-X box are:
- 2 motors: the back wheels are powered by these motors to make the robot car move.
- 1 camera module: located in the “head” of the robot, it can be used for various applications (see later).
- 1 ultrasonic module: to measure the distance between the robot and the next front obstacle.
- 1 grayscale module: detect the ground color with 3 sensors. Can be used to follow a line on the ground or detect cliffs.
- 3 servos: small motors used to change the orientation of some pieces: 2 for the head/camera (up/down and right/left) and one for the car direction (steering).
- The Robot Hat: where you’ll plug everything (except the camera). It’s connected to the Raspberry Pi via the GPIO pins.
There is also a screwdriver and two other tools, an assembly guide (in color and big enough) and obviously all the other elements to build the car (body, screws, nuts, cables, etc.).
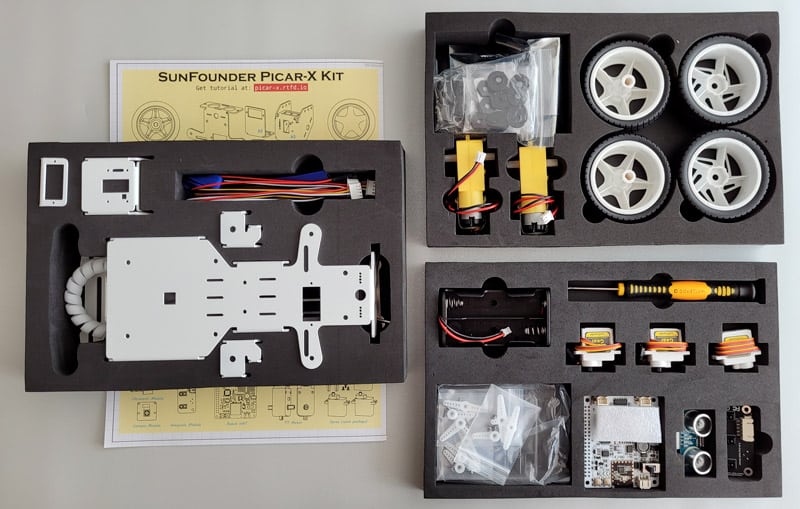
All the components are tidy and well protected inside the box, so you shouldn’t have any issues with delivery. Sunfounder did a good job with this. I tested a Freenove Robot Dog kit a few months ago (review) and the contents were messier, with everything in bulk, and you had to detach each element of the body from a plate.
Anyway, good point for SunFounder here, and I will add more to this later.
As with most robot kits, the batteries are not included. I had to wait a few days before I could play with it because I didn’t have my battery pack with me (I wasn’t at home), so I recommend buying batteries at the same time. I got mine on Amazon (like this one), they are standard 18650 batteries (don’t forget the charger). You need only two in the robots, but take at least four, so you can switch them out quickly.

Join Our Community!
Connect, learn, and grow with other Raspberry Pi enthusiasts. Support RaspberryTips and enjoy an ad-free reading experience. Get exclusive monthly video tutorials and many other benefits.
Learn moreNote: On the product page, SunFounder shows pictures of road signs, tape and colored signs you can use with the car, but nothing is included. You can download the pictures and print them, but there is nothing in the box.
Assembly
The assembly of the SunFounder PiCar-X is not complicated thanks to two main things:
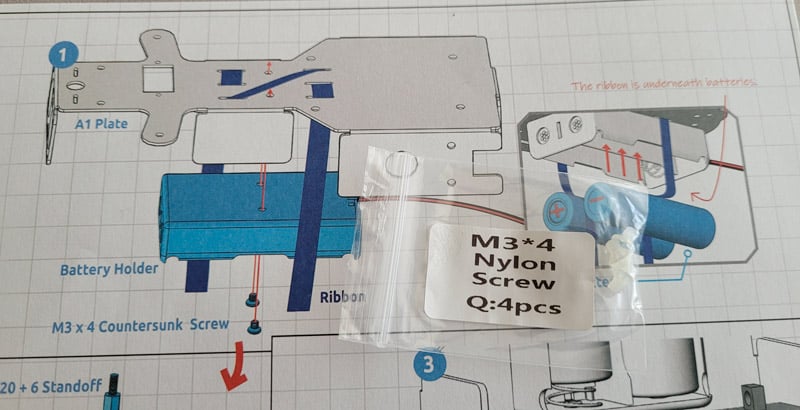
- First, they include a giant assembly guide, with colors and pictures for each step. Including each part, screws, or nuts that you have to use in each step. It looks like:
- Second, each element is identified on the assembly guide, but also in the packaging. For example, at this step, they tell you to use the M3 x 4 screws, and you have a little plastic bag identified with the same name:
You won’t find anything this well done in most robot kits. Once again, during the assembly of the Robot Dog, I had only one big bag of screws and nut, they weren’t identified like they were for this kit.
If you are lost in all these new words and abbreviations, request my free Raspberry Pi glossary here (PDF format)!
Download now
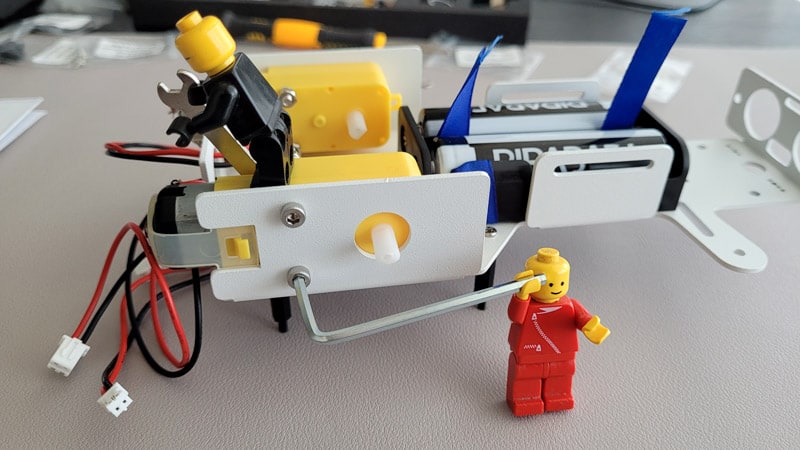
Once you figure that out, all you have to do is to follow the instructions to put everything together. I got some help from little guys, but it wasn’t that hard, even if I’m not a good handyman:
Some steps are a bit hard to complete with the included equipment, like the small screws on the camera servo. Another tool could have been more convenient. As you can see on this photo, the tiny screw + the screwdriver angle is not ideal:

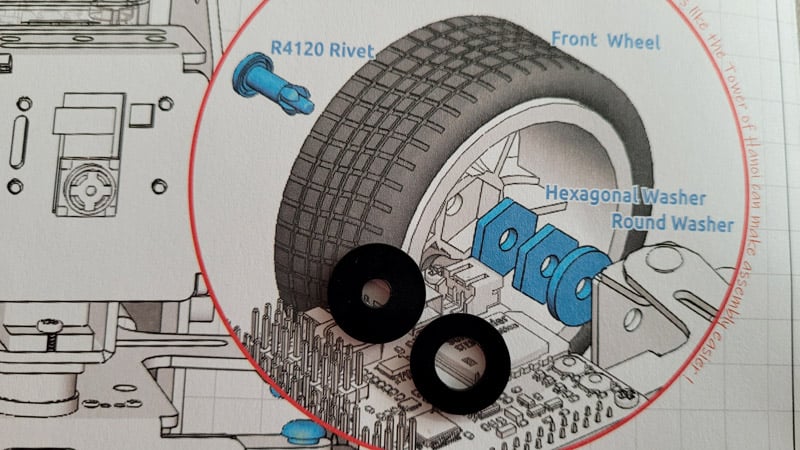
I also broke a rivet while assembling the wheels because there are two types of round washers that look similar. Hopefully, you won’t make the same mistake as me after reading this :-).
By the way, there are spare screws, nuts etc. for each sort, so you shouldn’t miss anything, even if you lose or break a few.
I had to use another (smaller) screwdriver to put the servo screws. The one included was too big to screw them correctly. Some steps were more complicated than others, but overall the ones with the servos were the most complicated for me (the steering servo step was a bit tough to understand for example).
Anyway, it took me around 3 hours to assemble everything (while taking photos and notes), but I guess many of you can do it faster (1.5 to 2 hours is probably a good estimation if you have some experience). But I completed it, it was fun, I liked it!
I don’t think it’s the perfect kit for kids, as the assembly is not so easy and there are some tiny pieces. But you can likely do it with them. Maybe half the steps are not hard, with bigger screws, and they can do it, I think. By the way, it can be handy to have some help to put everything together at some steps :-).
Getting started
Once the assembly done, it’s almost time to power it on, and start to play with it. I’m always stressed at this stage, if you did one mistake, you may have to dissassemble a bunch of things.
Luckily, I didn’t, but there are still a few additional steps before playing with it.
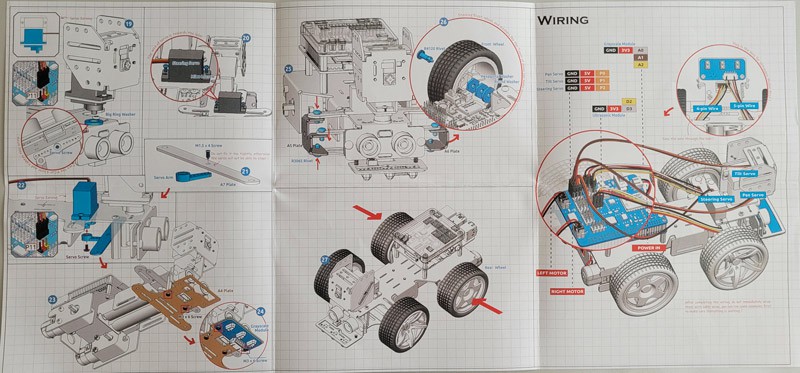
Wiring
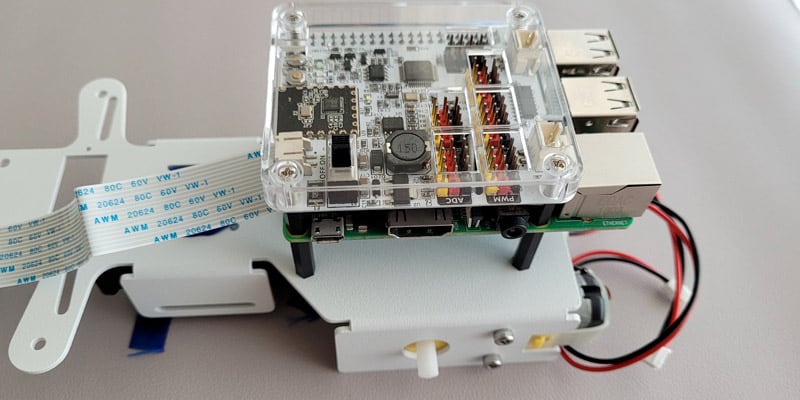
Once all the pieces are assembled, you can plug all the wires. I found this pretty easy compared to other robots I already built. As for the assembly, everything is explained on the guide, there are holes in the robot body to pass the cables.
For the servos, you have to plug them one by one on a specific pin to reset their position. I did it, even if I’m not certain that I understood everything, nor how important it was as the next step is the calibration, where you can adjust their position anyway. But in the end, everything is fine, so I guess it’s ok.
Raspberry Pi Installation
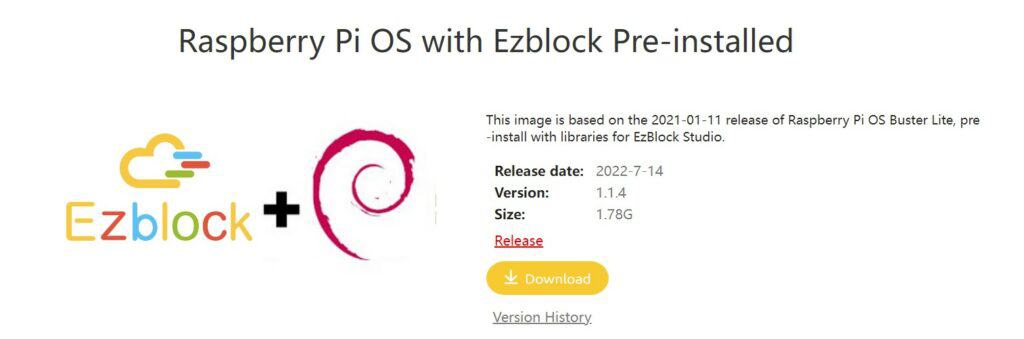
SunFounder recommends using their custom image of Raspberry Pi OS with EzBlock pre-installed. You can download the image from their website (here) and flash it on an SD card like any other operating system.
I’m not really a big fan of this solution. I already had Raspberry Pi OS installed on my Pi, and I would have preferred to just install the EzBlock service on it, but the instructions weren’t clear whether it was possible or not (I tried later unsuccessfully, but didn’t insist, maybe it’s possible).
It’s based on Raspberry Pi OS Buster, which is not the latest version, and it uses a Lite release, which means you can’t easily use the camera or remote desktop for example. I think providing a Debian package or even a source archive would be a good idea for advanced users.
Anyway, it’s an easy option for beginners. Just download, flash and boot the Raspberry Pi once the assembly done.
Connection
Then you need to use either your phone or a computer to connect to the robot.
The instructions at this stage started to be less clear for me. But if I get it correctly, here is how it works:
- On a smartphone, you have to install an app (EzBlock Studio), available for Android and iOS. The app will connect to the robot via Bluetooth. The robot needs to be powered on, and Bluetooth enabled on your phone and the Pi.
- On a computer, you can use the web version of EzBlock Studio. The Raspberry Pi has to be connected to your Wi-Fi. You’ll access the robot from the web interface via its IP address.
I had a hard time connecting to the robot the first time, but in the end it worked pretty well, so I don’t know exactly what happened. The first time, nothing worked. It said to enable Bluetooth on my phone (which was enabled), and connection unsuccessful via the web interface. I left it alone for one day, and the next day it finally worked, so I don’t know where the problem was.
My guess is that testing both connections method is not a good idea. I have the impression, that once I had connected once via Bluetooth, there was no way to access it via Wi-Fi. I had to reboot the Raspberry Pi or restart the EzBlock service. All of this was a bit confusing.
If you experience the same kind of issues, these commands saved me a few reboots:sudo service ezblock restart #restart the service
sudo ezblock-service #run the service in your terminal, so you can see the logs
If you are lost in all these new words and abbreviations, request my free Raspberry Pi glossary here (PDF format)!
Download now
Calibration
Once the connection is established, the next step is to do the calibration. The goal is to adjust the initial position of each servo so that your car moves in a straight line by default and the camera looks straight ahead.
You can do this either on the app (smartphone) or via the web interface. It looks like this:
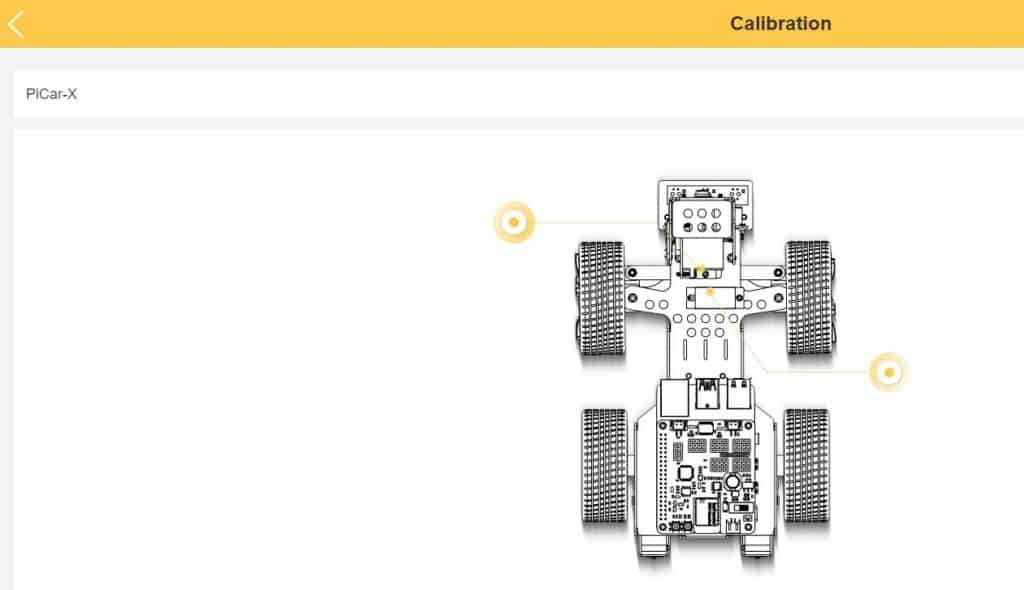
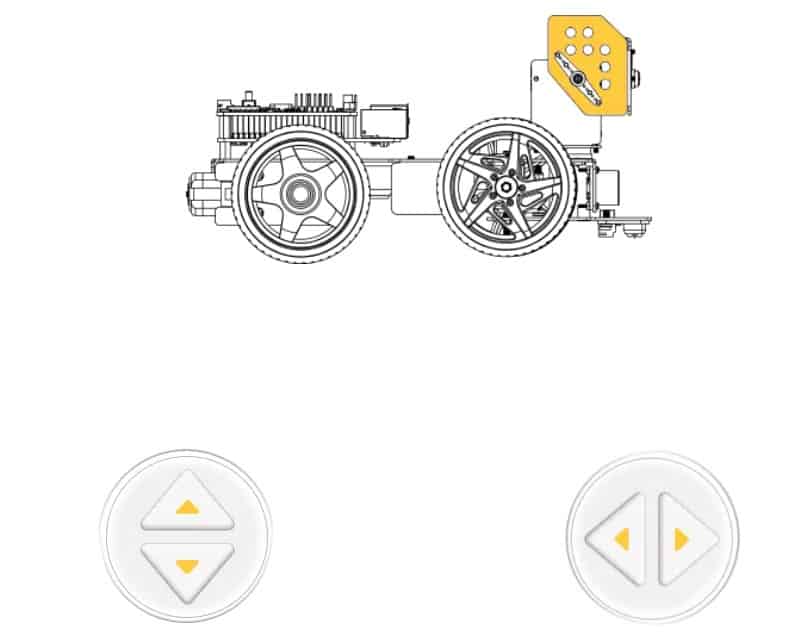
It’s well done and easy enough to understand. You pick one zone on the first screen (head or steering axe), and adjust the servos if needed. Click “Save” and the servos will always be at this position when you start the Raspberry Pi.
It's a free PDF guide containing every Raspberry Pi Linux command you should know!
Download now
Programming
So, assembly done, wiring done and calibration done. We are ready to start programming the beast.
Languages
EzBlock and Python are supported inside EzBlock studio.
If you started with the custom image (Raspberry Pi with EzBlock pre-installed), everything is ready to use. Once connected to your robot, you get an interface looking like the image below, where you can start using examples or create your own project from scratch.
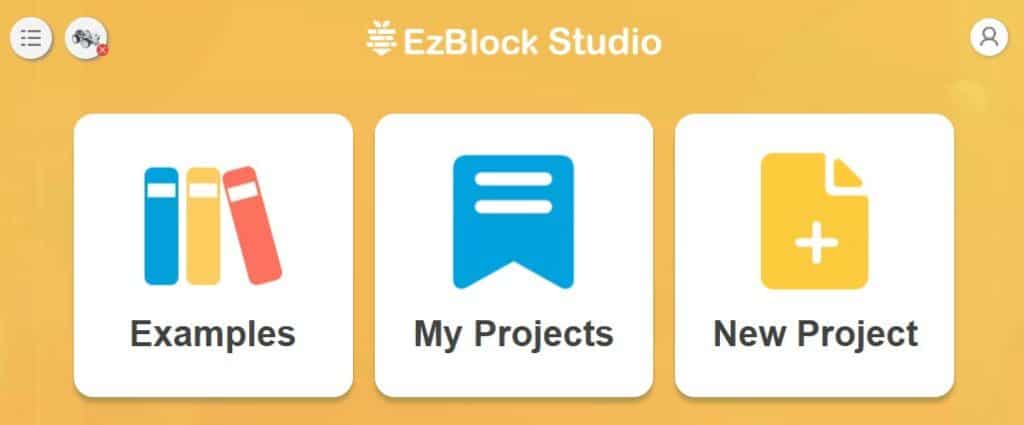
To save your projects inside the “My Projects” part, you have to create an account and sign in each time you use the web interface. I don’t really like the fact that you have to log in on an HTTP page. They say it’s because the connection to the robot can’t work in HTTPS, but at least the login form should use HTTPS.
By the way, you can’t access your account if the PiCar-X is not connected. It says something like “Check your connection”. It’s weird, I guess it’s a bug, it’s not the correct error message.
Honestly, I didn’t like the fact that they tell you that you HAVE to use this to control the robot, and I don’t like this interface either. I understand that it makes it easier for beginners, but personally, I would prefer to create my code on Raspberry Pi OS directly (in Python with Thonny, or with an EzBlock app similar to Scratch).
In fact, I finally find a way to make it work without the custom image and EzBlock studio, so I will explain how to do it later. But let’s first finish this tool introduction.
Examples
If you just want to test the included examples and edit them slightly, you can easily do this inside of EzBlock studio. Click on “Examples” on the home page, and you’ll get to this page:
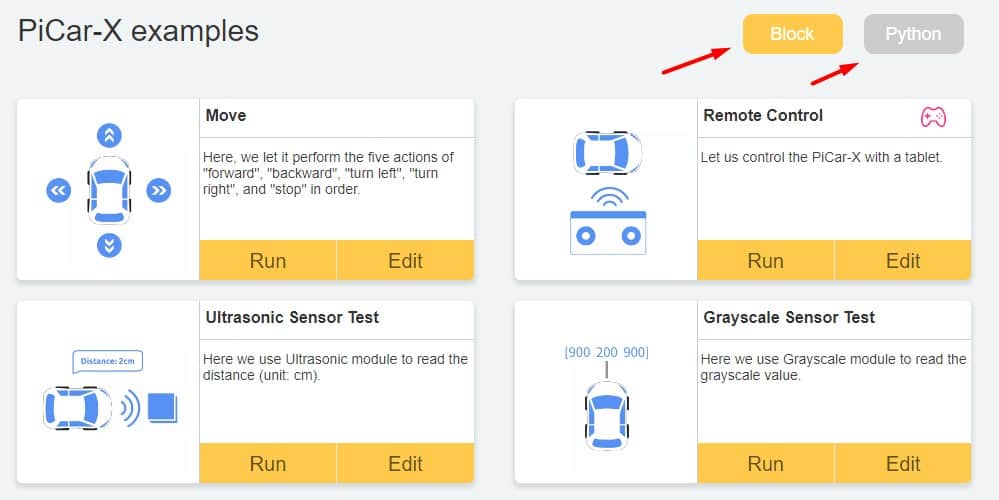
You can switch between EzBlock and Python in the top-right corner. You’ll find the same examples in both cases. When you click on “Edit”, it will open an example of code to do the thing it says. For example, the “Move” example in EzBlock looks like this:
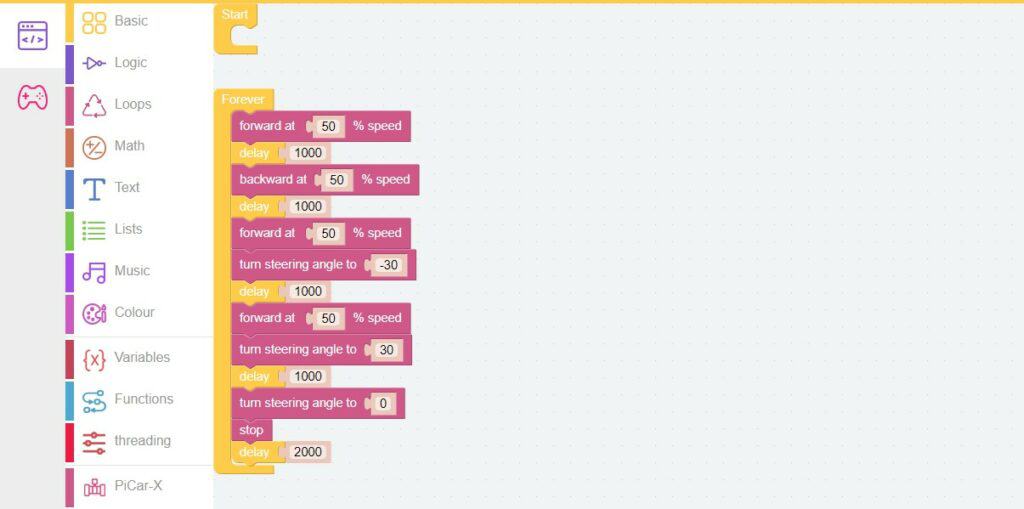
As you can see, it’s almost like Scratch. From there, you can easily play with this code, changing the value (speed, angle, etc.) or adding/removing some steps. Even if you have no experience in code, you can have fun with your robot, which is great.
I highly recommend playing with the first few examples directly after the assembly to make sure everything is working correctly. There is no testing script like with the Freenove kits, so you have to use these examples to test the sensors/motors.
There are 17 examples included that will help you to use the different sensors (and the camera), and give you a better idea of the possibilities.
Stepping up
Once you’re ready to do more complicated things, you’ll probably need to switch to Python, as EzBlock is pretty limited if you want to use other components or APIs. Python has a ton of libraries you can use to expand the possibilities of this kit.
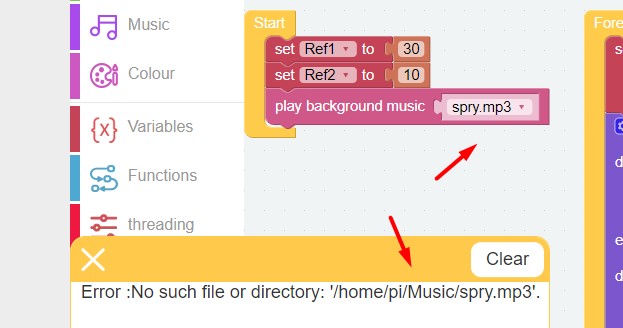
All the examples given for EzBlock worked correctly (except the missing audio files), but I experienced some issues in some Python examples. There are also differences between the functions used in the Python examples and the online documentation.
- Make sure you use the correct pins in your code.
For example, the examples use D0/D1 for the ultrasonic, while in the assembly they tell you to plug it on the D2/D3 pins. - There are two libraries in Python (picarx and ezblock) that can do the same things, which can be a bit disturbing when you try to create your own scripts. For example:
distance = Ultrasonic(pin_D0, pin_D1).read() #ezblock function
distance = px.ultrasonic.read() #picarx function - Some lines given in the examples are not working correctly.
For example, they do some comparisons between an integer and a list, which doesn’t work in Python.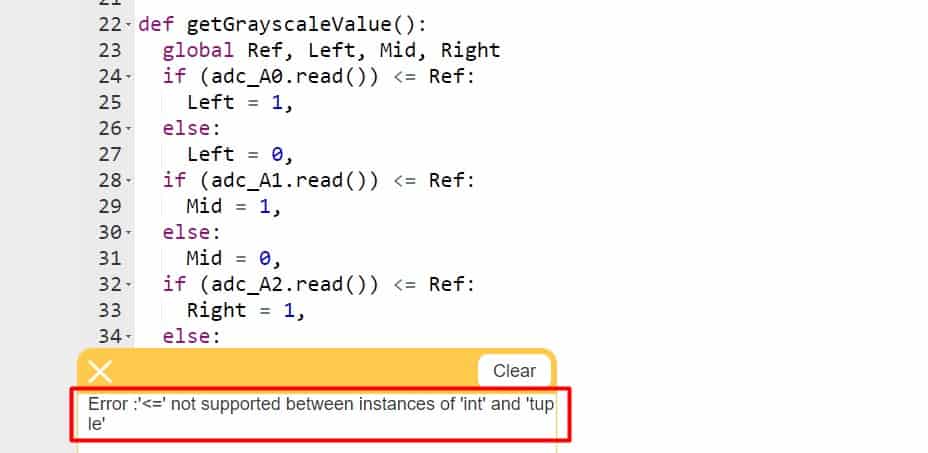
It’s not a big deal, but they could have fixed this easily with a few more tests. - I haven’t found any reference documentation for the picarx library (only for the ezblock one, here).
In short, everything works but expect to spend a bit more time getting started with Python.
Play/pause and download
I also have to explain something I didn’t get straight away. When you create your custom script, there are two buttons on the right to execute it:
- Download: Send the script to the Raspberry Pi, and run it.
- Play/pause: Start or stop the current script stored on the Raspberry Pi.

That seems pretty easy explained like this, but if you just use play/pause without pressing “Download” after each change, you may be using an outdated version of your script. It can be disturbing sometimes. And there is also a weird behavior related to this on boot.
Basically, when I power the robot on, I often have the car starting to move at random or doing some weird things I tried the last day because the script you last created will start on boot. And the only way to stop the car then is to create a new script that say “don’t move”. A bit annoying, no script should start on boot by default.
I literally created a script “Stop it!” in my projects to stop the motors and reset the servos if I forgot to stop the script the previous time.
I know, I’m once again complaining about the same thing: I would prefer just importing the PiCar-X library in my Python code and using any text editor, rather than using this custom Raspberry Pi OS version with EzBlock Studio.
Going further: skip EzBlock Studio
EzBlock Studio is an easy way to get started, but if, like me, you are used to Python and want to avoid all the issues that come with this interface (see above), there is a way to make it work directly.
Basically, you need to follow these instructions. But I have to change a few things to make it work, so I will give you the step-by-step procedure here:
- Install Raspberry Pi OS.
Tested on a fresh installation of Raspberry Pi OS Lite Legacy (Buster).
As it’s the version they use on their custom image, I played it safe. It doesn’t work with the custom image, by the way.
Maybe you can try a Desktop version if you want to play with the camera, it might be easier to debug your scripts later on. - Make sure you are connected to the Internet and update your system:
sudo apt update
sudo apt upgrade
Don’t hesitate to use SSH to do everything from your computer at this stage. - Install the prerequisites (not listed in the documentation):
sudo apt install git python3-pip python3-setuptools python3-smbus - Install robot-hat:
cd ~
git clone https://github.com/sunfounder/robot-hat.git
cd robot-hat
sudo python3 setup.py install - Install vilib:
cd ..
git clone https://github.com/sunfounder/vilib.git
cd vilib/
sudo python3 install.py - Install picar-x:
git clone -b v2.0 https://github.com/sunfounder/picar-x.git
cd picar-x/
sudo python3 setup.py install
sudo bash i2samp.sh - Reboot.
You should hear the speaker on the next boot. It’s ready to use.
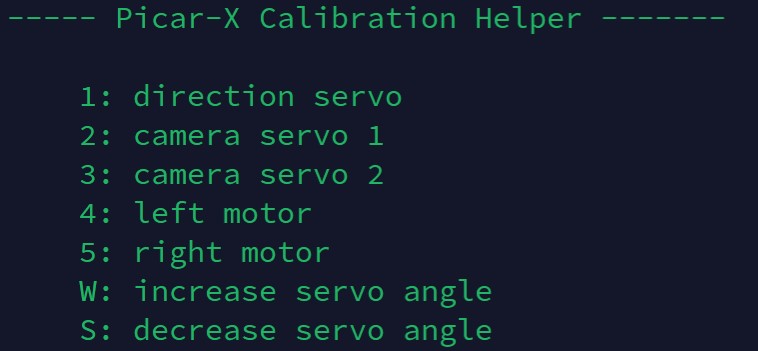
Then you can follow the documentation to reset the servos and do the calibration.
Just replace /home/pi with /home/<your-username> everywhere.
After that, you can create your scripts on the Raspberry Pi directly, and run them like any Python script:python3 <script-name>.py
It's a free PDF guide containing every Raspberry Pi Linux command you should know!
Download now
If you are looking for exclusive tutorials, I post a new course each month, available for premium members only. Join the community to get access to all of them right now!
Conclusion: it this kit for you?
As a whole, the PiCar-X from SunFounder is a great robot kit for a beginner. It’s easy to assemble thanks to the detailed guide and also easy to get started with their visual language (EzBlock). I highly recommend it as a first robot kit for any Raspberry Pi owner.
If you’re used to various robot kits and want to go further than the few examples included, it’s still a good choice. But the fact that you have to use their custom system and app, might not be ideal for you.
| Pros | Cons |
|---|---|
| Easy assembly, great guide. | A bit more expensive than some similar alternatives. |
| EzBlock is easy to get started. | Lack of documentation for the connection and programming parts. |
| Python support for more complex projects. | Unsecured EzBlock login form. |
| A good set of sensors. | |
| Good material that seems solid. |
In a nutshell, I think they did a fantastic job with the packaging, material, sensors included, and the assembly in general, but the programming part needs a bit more work to be perfect. Maybe they’ll upgrade this in the future, or at least improve their documentation.
Want to try it yourself? Get your kit directly on the official website.
Or if you are still unsure, you can check other options in my list of top robot kits for Raspberry Pi here.
Whenever you’re ready, here are other ways I can help you:
The RaspberryTips Community: If you want to hang out with me and other Raspberry Pi fans, you can join the community. I share exclusive tutorials and behind-the-scenes content there. Premium members can also visit the website without ads.
Master your Raspberry Pi in 30 days: If you are looking for the best tips to become an expert on Raspberry Pi, this book is for you. Learn useful Linux skills and practice multiple projects with step-by-step guides.
The Raspberry Pi Bootcamp: Understand everything about the Raspberry Pi, stop searching for help all the time, and finally enjoy completing your projects.
Master Python on Raspberry Pi: Create, understand, and improve any Python script for your Raspberry Pi. Learn the essentials step-by-step without losing time understanding useless concepts.
You can also find all my recommendations for tools and hardware on this page.