Getting Started With Ubuntu MATE on Raspberry Pi
Ubuntu MATE is a Linux distribution for desktop use. It’s based on Ubuntu but uses the MATE desktop environment instead of the latest GNOME versions. MATE is the continuation of GNOME 2, so if, like me, you preferred the old interface, you will love Ubuntu MATE. In this article, I’ll show you how to easily install it onto your Raspberry Pi.
Ubuntu MATE officially supports the Raspberry Pi, so with each new version, an image is released for the Raspberry Pi. It can be flashed on an SD card to start the installation.
I’m testing the installation for you on my Raspberry Pi 4 (4GB), but Ubuntu MATE is available for armhf and arm64 architectures, so it should pretty much work on any Raspberry Pi model. Check the compatibility here if you want to try with an old model (Pi Zero and Pi 1 are not supported, Pi 3 or 4/400 are recommended).
If you’re looking to quickly progress on Raspberry Pi, you can check out my e-book here. It’s a 30-day challenge where you learn one new thing every day until you become a Raspberry Pi expert. The first third of the book teaches you the basics, but the following chapters include projects you can try on your own.
How To Install Ubuntu MATE on Raspberry Pi
As I told you in the introduction, Ubuntu MATE has an official release for the Raspberry Pi, so installing it is pretty straightforward.
Here are the required steps to install Ubuntu Mate on Raspberry Pi:
- Download Ubuntu Mate for Raspberry Pi from the official website.
- Flash it on an SD card by using Raspberry Pi Imager or Balena Etcher.
- Insert it into your Raspberry Pi and follow the wizard.
I will now explain each step in detail.
Note: At the time of my last update of this tutorial, the Raspberry Pi 5 was not yet supported. If the image hasn’t been updated yet, your best bet to get MATE running on your Pi 5 is to follow something similar to this: Install Linux Mint on Raspberry Pi (install Ubuntu Server, then install the MATE environment on top of it).
Download Ubuntu MATE for Raspberry Pi
Ubuntu is included in the Raspberry Pi Imager, but this isn’t the case for all the different flavors available. So, you won’t find Ubuntu MATE in the OS list. The only way to install it on your Raspberry Pi is to go to the official website and download the image for your device.
On the home page of the Ubuntu MATE website, you’ll find a big logo of the Raspberry Pi with a link to a dedicated section. For once, it isn’t hidden under 12 levels of submenus!
So, start by downloading an image compatible with your Raspberry Pi:
It's a free PDF guide containing every Raspberry Pi Linux command you should know!
Download now
- Go to the Raspberry Pi section of the Ubuntu MATE website.
- Click on “Download” in the left menu.
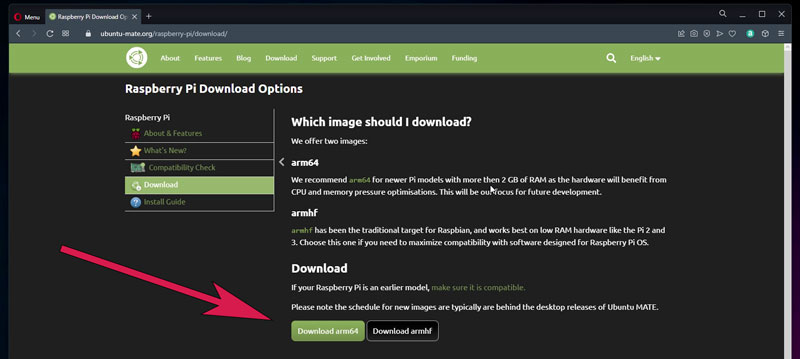
- Choose between ARM64 and ARMHF.
It’s the architecture of your system, and is dependent on the Raspberry Pi model you have. For Raspberry Pi 3 and 4/400, you can download the 64 bits version. For older models, check their compatibility list. - Then choose the version you want to install.
Like any Ubuntu system, MATE will give you the choice between the latest version available and the latest LTS version (Long-Term Support). In general, you’ll take LTS for critical systems that you don’t want to upgrade too often, if it’s just a test or even for desktop usage, you can download the latest version.
That’s it, you should receive a compressed file of the system image, and you are ready to move to the next step.
Flash Ubuntu MATE on a SD card
You can use Raspberry Pi Imager or Balena Etcher to flash the downloaded image on an SD card.
Here is how to flash Ubuntu Mate with Raspberry Pi Imager:
- Download and install Raspberry Pi Imager if you don’t have it yet (can even run on Raspberry Pi OS directly).
- Start the app and click on “Choose OS”. Find the “Use custom” option in the list:
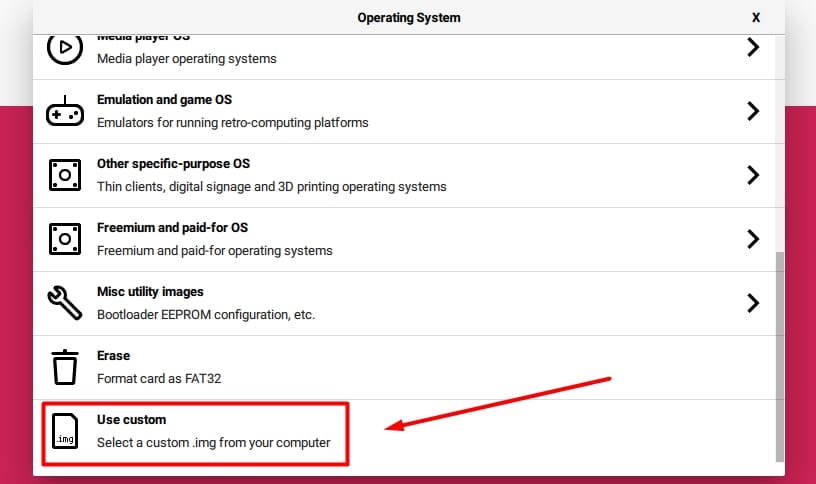
- Select the image file you just downloaded from the Ubuntu MATE website.
- Click on “Choose Storage” and select the media for the installation (can be a SD card or USB drive).
- Click “Next” to start the installation. The OS customization options are not mandatory.
That’s it! Nothing fancy here. If you are used to trying different operating systems, it should be pretty similar to any other installation.

Join Our Community!
Connect, learn, and grow with other Raspberry Pi enthusiasts. Support RaspberryTips and enjoy an ad-free reading experience. Get exclusive monthly video tutorials and many other benefits.
Learn moreIf you’re new to this, feel free to check my full guide about Raspberry Pi Imager for the entire step-by-step process.
Follow the first boot wizard
You can now insert your SD card (or USB disk) into your Raspberry Pi, and boot it for the first time. The first boot may take a long time before displaying anything, but don’t worry too much, I received several issues at the beginning that were fixed automagically after a while. Weird, but nothing to worry about.
As with any Ubuntu distribution, your first boot will start with a system configuration wizard looking like this:
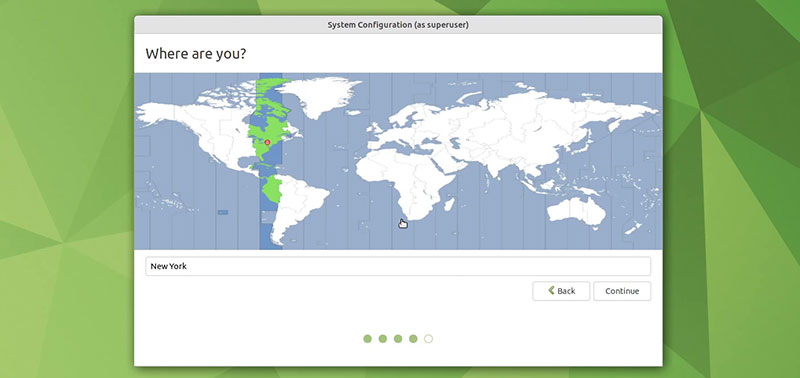
You’ll need to create the default user (which is a good practice for security reasons, so do it seriously). You’ll also get the usual questions related to the language, time zone, and network to pre-configure your system correctly.
Note: I got a weird bug while setting up my password (passwords don’t match). Don’t use “TAB” to switch to the next field, it seems like it records the tabulation in the password and tells you they don’t match…
Once your job is done, the system installation will start. I don’t really understand why every Ubuntu installation needs 20 to 30 minutes to install the system, while most others start directly. Regardless, you don’t have a choice and will have to wait for a bit.
At the end of the installation, your Raspberry Pi will reboot automatically, and you can enjoy your new system. Check the next part to get started with this distribution.
First Steps with Ubuntu MATE on Raspberry Pi
Ubuntu MATE is pretty intuitive once installed, but if you need some help to get started, here are the most important things you need to know.
It's a free PDF guide containing every Raspberry Pi Linux command you should know!
Download now
Interface overview
If you are used to Raspberry Pi OS, you shouldn’t be lost. MATE is similar to GNOME 2, so not too far from PiXeL/LXDE which is used by default on Raspberry Pi OS with desktop. The main menu is also in the top-left corner, and apps are also sorted by category:
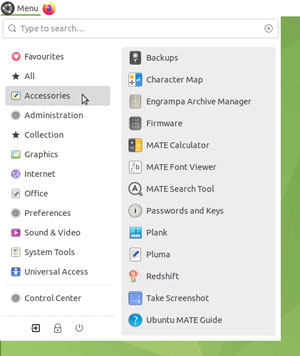
I’m always lost with similar categories like “Accessories”, “System Tools” and “Administration”, but what’s great is that there is a search engine at the top, that you can use to quickly find the terminal for example. You can also use the “Favourites” and “All” submenus to quickly find something.
In the top-right corner, you’ll find the notifications area, and a few additional widgets like on most systems (clock, sound, Bluetooth, network, etc.). Nothing that isn’t expected for a modern distribution.
In the bottom bar, you’ll see all the open apps and can quickly switch from one to another (a bit like on Windows), and the bottom-right corner is filled with virtual desktops and a shortcut to the trash.
System configuration
In the main menu, there is also a tool named “Control Center” that you can use to configure almost anything on your system. Here is how it looks like:

Most modern desktop environments have something similar. I don’t think this is the best one, but it’s really better than the multiple tools on Raspberry Pi OS. From there, you can configure everything, from the desktop appearance to your network settings or regional configuration.
By the way, my network wasn’t working on the first boot (Ethernet connected but not detected/used). I had to connect to my Wi-Fi to do the updates and sync the clock. Then, after a few reboots, it was connected via the Ethernet connection, so I don’t know if it’s a problem on my side or whatever, but if you experience the same issue, don’t worry too much, it will probably work after doing the updates.
To update your system, open the Software Updated in the Control Center. But you’ll probably get a notification asking you to update as soon as you are connected to the Internet.
Default apps & installing new ones
Once connected to the Internet and the first batch of updates done, you are ready to use your new system. Ubuntu MATE comes with a bunch of default apps:
- Firefox: the default browser on all Ubuntu distributions, I think. I prefer Chromium, but it’s a personal choice.
- LibreOffice: the most popular office suite on Linux (free alternative to Word/Excel/etc.).
- Celluloid: the media player preinstalled instead of VLC. I probably missed something, as I don’t really understand this choice, but you can watch video with it.
- A few nice tools: like the disk usage analyzer or a backup tool that are preinstalled by default. There is also the “Software Boutique” that we’ll see in a few seconds.
Obviously, you’ll also find many accessories, like a terminal, notepad, screenshot tool, etc. Overall, I’m pretty happy with the default apps, a beginner can start directly with them, nothing much is required for desktop usage.
Ubuntu is also known for its “app store”, which tries to replicate what you have on your smartphone. An application catalog to help you install anything with an intuitive interface instead of using the command line or a package manager.
And good news, it works really well on Ubuntu MATE, which wasn’t the case in my review of all desktop environments a few weeks ago. Here is how it looks like:
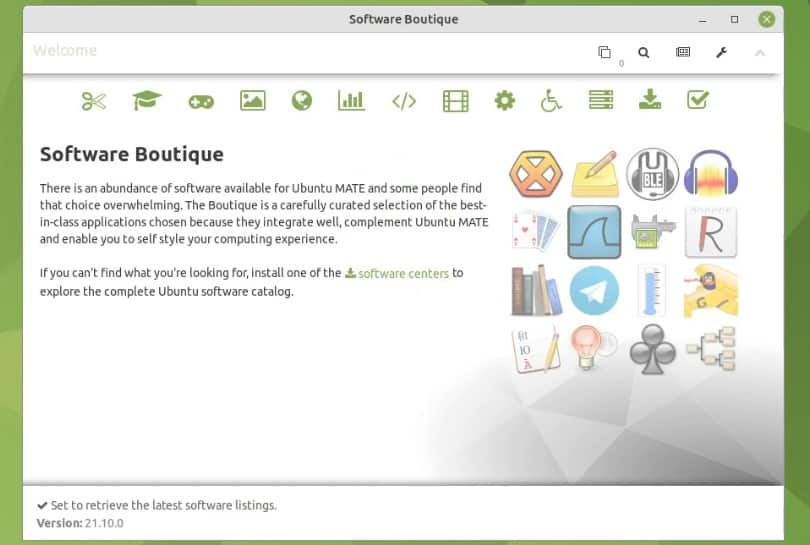
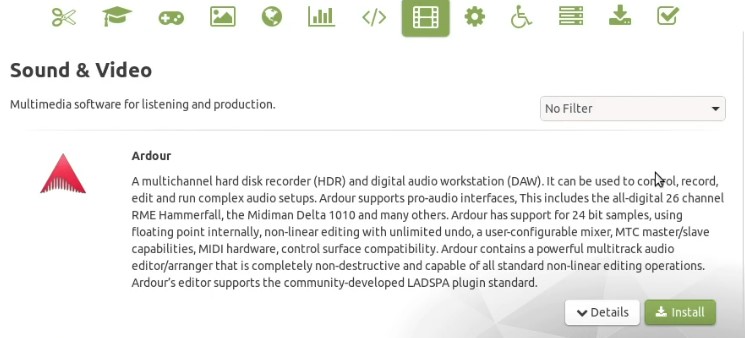
Basically, you can either browse the different categories to find interesting new apps to install, or just use the search engine to find something. For example, you can search for “VLC” to install it or click on the sound & video icon to access the corresponding category. For each app, you’ll get a description and a button to install it:
That’s really great and is something that’s missing on Raspberry Pi OS. The apps are almost the same, but finding them with the “Add/Remove Software” tool on Raspberry Pi OS is almost impossible if you don’t know the app name.
It's a free PDF guide containing every Raspberry Pi Linux command you should know!
Download now
Pros & cons of Ubuntu MATE on Raspberry Pi
As a whole, Ubuntu MATE is an interesting system, but I think MATE is not the best desktop environment (read this article to learn more about this) and I also got several weird issues while testing it. But it’s a personal choice, so I’ll give you a summary of my thoughts, and you can make a decision from there to see if it’s worth your time or not:
| Pros | Cons |
|---|---|
| Slightly more modern than Raspberry Pi OS. | Installation time. |
| Decent control center for system configuration. | Several bugs at the beginning (network, black screen, etc.). Fixed quickly. |
| Software Boutique to quickly install new apps. | The system is a bit slow in general. If possible, use a USB disk or a fast SD card. |
| 64 bits OS. | Not the best default apps choice (Firefox, no VLC, etc.). |
About the performance, I think the upgrade to a 64 bits version makes it bearable, but it’s not the fastest distribution. Ubuntu is still a bit slow on Raspberry Pi in general, and using apps like Firefox doesn’t really help. But I did some tests like YouTube full screen in HD, and there was no loss, so it’s improving with the newer versions at least.
In my opinion, Ubuntu MATE is a decent alternative to Raspberry Pi OS for desktop usage. It will make a few things easier for beginners, and add powerful features for more advanced users (access to Ubuntu repositories and snaps, for example).
But I’m uncertain if it deserves all the fame that many people give it. For me, it’s not the best distribution available for the Raspberry Pi (you can find my top 15 here). I always find Ubuntu-based distributions a bit slow on Raspberry Pi, and the default apps are not chosen with the hardware limitation in mind.
It would be a different conclusion with a Raspberry Pi 5 and the latest Ubuntu version, but unfortunately, it’s not yet available for Ubuntu MATE.
But you know what? The best way to make up your own mind is to try it by yourself 🙂
So follow the steps in this tutorial to install it on your Raspberry Pi, try it for a few days, and see what you think about it!
If it’s not for you, here are a few other great alternatives you should try:
If you really want a distribution based on Ubuntu, then Pop!_OS on Raspberry Pi can also be a great choice.
It's a free PDF guide containing every Raspberry Pi Linux command you should know!
Download now
Reminder: Remember that all the members of my community get access to this website without ads, exclusive courses and much more. You can become part of this community for as little as $5 per month & get all the benefits immediately.
Video
Whenever you’re ready, here are other ways I can help you:
The RaspberryTips Community: If you want to hang out with me and other Raspberry Pi fans, you can join the community. I share exclusive tutorials and behind-the-scenes content there. Premium members can also visit the website without ads.
Master your Raspberry Pi in 30 days: If you are looking for the best tips to become an expert on Raspberry Pi, this book is for you. Learn useful Linux skills and practice multiple projects with step-by-step guides.
The Raspberry Pi Bootcamp: Understand everything about the Raspberry Pi, stop searching for help all the time, and finally enjoy completing your projects.
Master Python on Raspberry Pi: Create, understand, and improve any Python script for your Raspberry Pi. Learn the essentials step-by-step without losing time understanding useless concepts.
You can also find all my recommendations for tools and hardware on this page.