Safely Removing MySQL from Ubuntu: The Right Procedure
Whether you want to completely get rid of MySQL to try something else, or reinstall it manually from scratch, this tutorial will help you safely uninstall MySQL on any Linux server. It’s not that complicated if you are used to Linux, but it’s better to follow these steps to not miss anything or lose data.
After checking where MySQL is installed and performing a full backup, it can generally be uninstalled using the Ubuntu package manager: APT. Options are available to remove everything related to MySQL (e.g. purge, auto-remove and regular expressions).
Before jumping into the removal process, it’s wise to take a few seconds to check the current installation and perhaps do a full backup. Then, I’ll explain all the steps to uninstall MySQL safely, and how to check that everything has been properly deleted on your server.
Before uninstalling MySQL Server
Check if MySQL is installed on your system
Before doing anything else, it’s probably safe to start by checking what exactly is installed on your system. On Linux, there are often many dependencies for each package, and even if you just installed the MySQL server, there are most likely other packages linked to it.
Please note that MySQL is generally replaced with MariaDB on recent systems. So, even if you can’t find anything related to MySQL installed on your server, it might just be MariaDB.
The easiest way to list all of the packages installed is to use dpkg, with this command:sudo dpkg -l | grep "mysql\|mariadb" | grep server
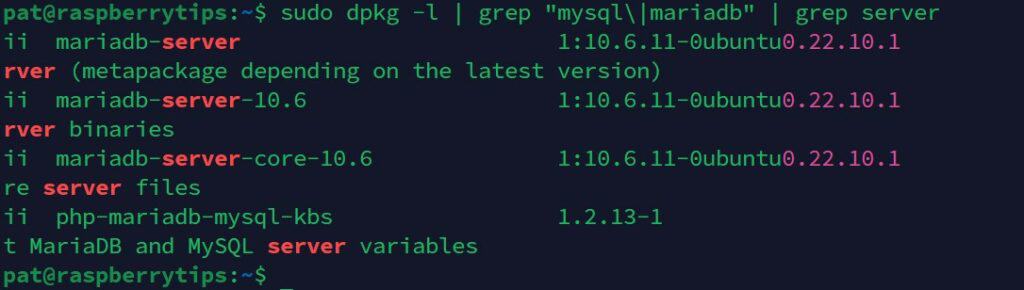
- dpkg -l: lists all packages installed on the system.
- grep “mysql\mariadb”: display only the lines with either “mysql” or “mariadb”.
- grep “server”: display only the lines with “server” in them.
It’s not perfect, but it’ll give you a good overview of the packages installed on your system. If you also want to remove everything related to MySQL (even the client part), you can remove the last part (“grep server”) to see everything.
In my screenshot, you can see that MariaDB server is installed, with all the dependencies. That’s the main package I want to remove while testing this tutorial for you.
Note: If you don’t have anything listed here, but you are certain that MySQL is installed, it may have been installed from the sources. In this case, this tutorial doesn’t apply. You can generally remove MySQL by going back to the source folder and using the command:make uninstall
Download your exclusive free PDF containing the most useful Linux commands to elevate your skills!
Download now
If you need more guidance for this step, I already have a complete tutorial on this topic, you can find it here: How To Check If MySQL Is Installed On Linux (Command line).
If you’re new to the Linux command line, this article will give you the most important Linux commands to know, plus a free downloadable cheat sheet to keep handy.
Get the current installation path
By default, the MySQL configuration files are stored under /etc/mysql and the data folder is /var/lib/mysql.
If you have any doubts, you can check the content of the configuration to see if a specific configuration has been made. With MariaDB, it’s in /etc/mysql/mariadb.conf.d/50-server.cnf, look for a line starting with “datadir”:

Join Our Community!
Connect, learn, and grow with other Raspberry Pi enthusiasts. Support RaspberryTips and enjoy an ad-free reading experience. Get exclusive monthly video tutorials and many other benefits.
Learn more
You don’t really need this to uninstall MySQL or to create a backup, but we’ll check in the end that these folders are removed entirely.
Backup data and configuration
If you have anything useful in your database or plan to reinstall MySQL later, it’s probably a good idea to do a full backup of your server before going further. Even if you want to switch to another database management system, I would recommend doing a backup at this point.
It’s not complicated, pretty fast, and you’ll have your data available to import into your new system later on.
To create a full backup of all the databases, you can use this command:mysqldump -u USERNAME -p --all-databases > backup.sql
Then keep the “backup.sql” safe, or copy it to another computer. You can also keep a copy of the configuration files if you want.
I have a complete guide on how to create good backups on Linux, that you might be interested in for more advanced options.
Stop the MySQL service
The last preparation step is to stop the MySQL service if it’s still running.
You can check the current status with the following:sudo service mysqld status

Or stop it with:sudo service mysqld stop
Download your exclusive free PDF containing the most useful Linux commands to elevate your skills!
Download now

It’s the same command whether you use MariaDB or MySQL server directly.
Download your exclusive free PDF containing the most useful Linux commands to elevate your skills!
Download now
How to uninstall MySQL server on Linux / Ubuntu
If MySQL was installed with the package manager (APT), removing it completely won’t be that complicated. We just need to use the remove command carefully, to only remove what we want.
List all the installed packages
This is optional, especially if you already did this in the first part, but if needed, you can get a list of the packages installed, with MySQL or MariaDB in their name, by using this command:dpkg -l | grep "mysql\|mariadb"
It’s particularly useful if you don’t want to remove everything, just some specific packages.
Use APT to remove the MySQL packages
To remove a package on Ubuntu and all Debian-based distributions, you probably already know the syntax:sudo apt remove <package-name>
An interesting option, in this case, is to use “–purge” to remove all the files related to this package.
For example, you can use:sudo apt remove --purge mariadb-server

It will completely uninstall it, and also remove the files linked to it. But as you can see on my screenshot, only the main package is deleted, and all the dependencies remain installed.
If you want to completely remove everything, you can use the wildcard “*” to remove everything that matches your pattern.
For example, if you want to uninstall everything, a better command would be:sudo apt remove --purge mariadb-* mysql-*
In this case, I get all the packages matched and removed:

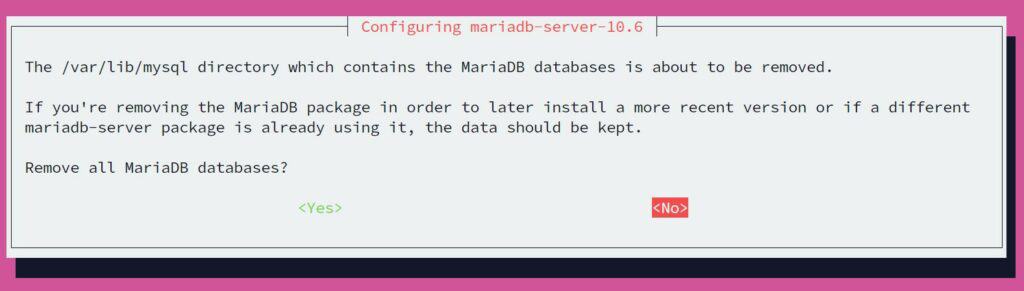
During the process, you can choose if you want to remove the data folder content or not:
Verify if everything has been removed
Whatever the options you used, we can now take a few seconds to check what is still installed on the system. For example, you can run the same command again:dpkg -l | grep "mysql\|mariadb"
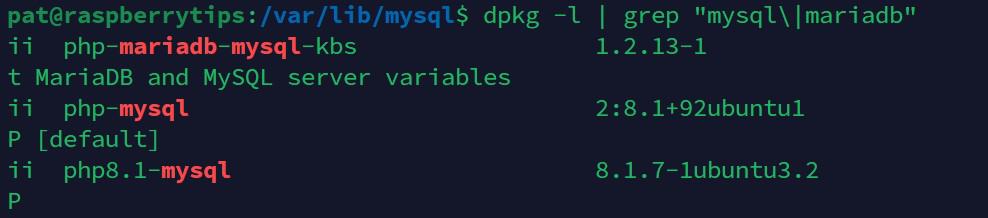
In this case, I still have PHP modules for MySQL (that I can remove or not), but I don’t have anything left related to the MariaDB server. Great.
Another thing you can do is use autoremove. It will uninstall all the dependencies that were used by your MySQL server but are no longer required on your system.
Here is the command:sudo apt autoremove
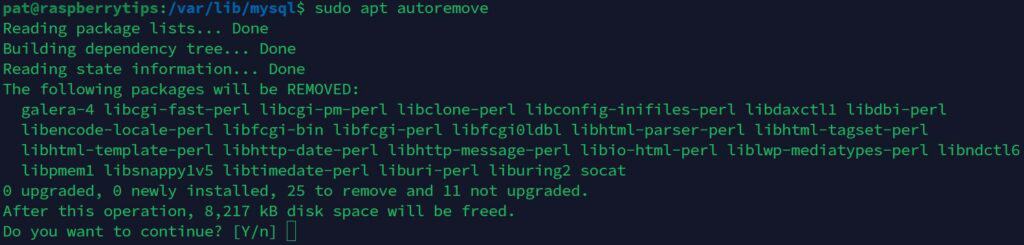
For example, Galera is used to build MySQL clusters. If you don’t have MySQL installed anymore, there is no need to keep it on your system (but the wildcard we used previously didn’t match it).
Finally, you can also do a full search on your system to check if there is any file left related to MySQL or MariaDB, something like:sudo find / -iname *mysql*It will list all the files containing “mysql” in their name (case-insensitive).
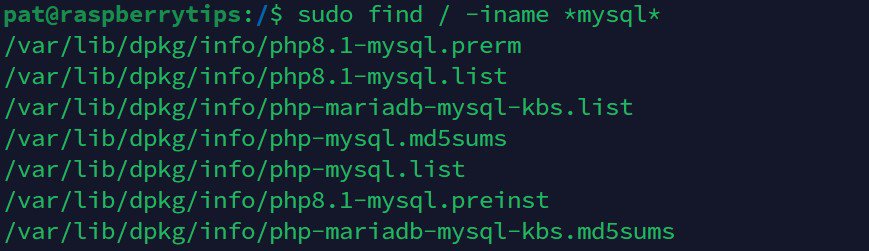
The only results I get here are the files related to the PHP modules, so it’s fine for me. But you can do some cleaning if you find other files that were only used by your MySQL server.
I hope this tutorial was useful, and if you need more help managing your Ubuntu and Linux servers, remember that I have many articles on this website just for you. Here are a few recommendations:
- Ubuntu Server in Production: Expert Insights To Consider
- How To Safely Install Bitwarden On Linux (Debian/Ubuntu)
- Install Nextcloud on Debian: The Ultimate Guide
Download your exclusive free PDF containing the most useful Linux commands to elevate your skills!
Download now
Want to chat with other Raspberry Pi enthusiasts? Join the community, share your current projects and ask for help directly in the forums.
Additional Resources
Overwhelmed with Linux commands?
My e-book, “Master Linux Commands”, is your essential guide to mastering the terminal. Get practical tips, real-world examples, and a bonus cheat sheet to keep by your side.
Grab your copy now.
VIP Community
If you just want to hang out with me and other Linux fans, you can also join the community. I share exclusive tutorials and behind-the-scenes content there. Premium members can also visit the website without ads.
More details here.
Need help building something with Python?
Python is a great language to get started with programming on any Linux computer.
Learn the essentials, step-by-step, without losing time understanding useless concepts.
Get the e-book now.