
How to Use a USB SD Card Reader on Raspberry Pi?
A USB card reader can be convenient if you need to read or write on a different SD card than the one running your system. For example, if you need to create a backup of your Raspberry Pi or transfer photos from a camera. But as many things on Linux, it’s not especially easy to use it. In this article, I’ll show you how to do it.
On most operating systems, a USB SD card reader will be detected as a USB key. On Raspberry Pi OS with Desktop, it will be mounted automatically and accessible via the file explorer (left menu). With a minimal version, the mount command can be used to access the files manually.
In this article, we’ll learn how to use a USB card reader, whatever your operating system is. And I’ll give you a few ideas of things you can do with that kind of adapter.
If you’re looking to quickly progress on Raspberry Pi, you can check out my e-book here. It’s a 30-day challenge where you learn one new thing every day until you become a Raspberry Pi expert. The first third of the book teaches you the basics, but the following chapters include projects you can try on your own.

Join Our Community!
Connect, learn, and grow with other Raspberry Pi enthusiasts. Support RaspberryTips and enjoy an ad-free reading experience. Get exclusive monthly video tutorials and many other benefits.
Learn moreHow do I use a USB card reader?
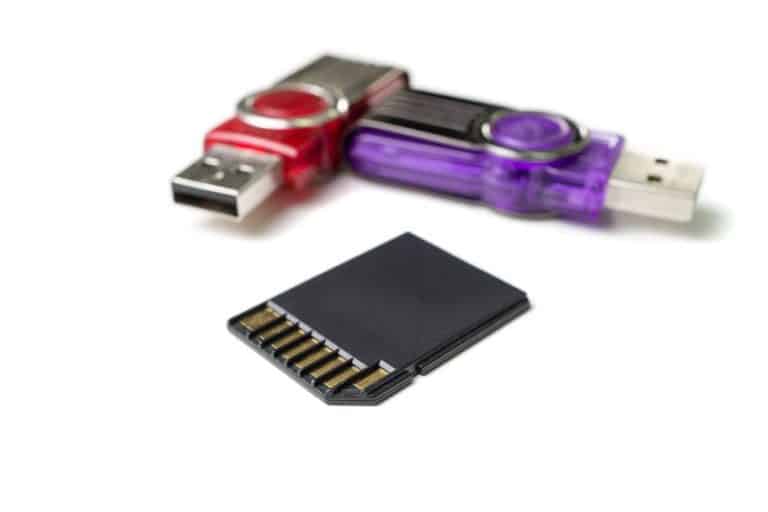
A USB card reader is a small device, like a USB key, with a Micro-SD card slot on it. The storage is on the SD card, the USB part is just an adapter. So, it can be used the same way as a USB drive (plug & play).
If you are lost in all these new words and abbreviations, request my free Raspberry Pi glossary here (PDF format)!
Download now
The basics
Just to be clear, I’m talking about a device like this one, which looks like a standard USB key. But on Raspberry Pi, I would recommend an SD card reader with a USB cable (like this other one) because we don’t want to block access to the other USB ports while using this adapter.
So, start by inserting your Micro-SD card in the USB card reader, and plug it on a free USB port on a powered Raspberry Pi. Then, follow one of the next sections depending on the operating system you are using.
Use a card reader on Raspberry Pi OS with Desktop
We’ll start with the easiest part. If you have an operating system with a desktop GUI, like Raspberry Pi OS, using your SD card reader won’t be very complicated.
On Raspberry Pi OS with Desktop, the system will mount your SD card reader automatically. Once plugged in, open your file explorer, you’ll see something like this:
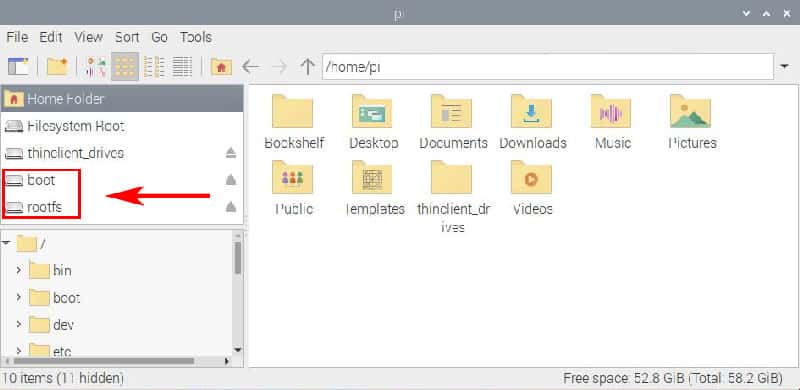
As you can see, the system detected the SD card reader and automatically mounted the partitions. You can access your files from there. It should be accessible with read-write permissions (if not, there is probably an issue with your SD card or a security lock on your adapter).
If your SD card is not formatted, you can use a tool named “Gparted” easily format it from your Raspberry Pi. I explain all the steps in this article if you need some help. You can also prepare the SD card on your computer if you prepare, any operating system includes tools to do this.
Before unplugging your USB card reader, use the eject symbol in the file explorer to unmount it properly. This will prevent any file corruption if an operating was still in progress.
If you are lost in all these new words and abbreviations, request my free Raspberry Pi glossary here (PDF format)!
Download now
Use a card reader on any Linux distribution
If you are connected via SSH, or use a minimal distribution, it might be a more complicated process. But no worries, I’ll show you how to do it step-by-step in this section.
In fact, the process will be the same as with any USB drive. Your system will detect a new drive connected, and you have to mount it yourself before using it.
The first step will be to identify the drive name:
- Use fdisk to display all the detected devices on your Raspberry Pi:
sudo fdisk -l - In general, the USB card reader will be the last one. You should get something like this:
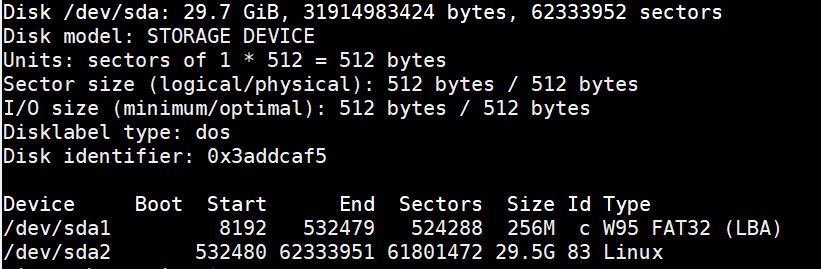
- So, my USB card reader is /dev/sda and there are two partitions on it: sda1 and sda2.
I can also check the file system used on each partition.
We have everything we need to mount the partition:
- If you don’t have one yet, start by creating a temporary file folder to mount the partition. For example:
sudo mkdir /media/sdcard - Then mount the SD card on this folder, in my case:
sudo mount /dev/sda2 /media/sdcard
Replace the first parameter with the partition name you found in the previous step.
You can now read and write on your SD card:ls /media/sdcard
sudo touch /media/sdcard/test
This is the basic way to do this, there are more options available, depending on the file system, user permissions, etc. You can find more details in this article if you need.

It's a free PDF guide containing every Raspberry Pi Linux command you should know!
Download now
How To Use ‘mount’: The Complete Linux Command Guide
It's a free PDF guide containing every Raspberry Pi Linux command you should know!
Download now
Want to chat with other Raspberry Pi enthusiasts? Join the community, share your current projects and ask for help directly in the forums.
What can you do with a USB SD-card reader?
You now have access to your files via your SD-card reader, great. But what’s the next step? What can you do with it?
Transfer files
I think the most common goal to use a USB card reader is to transfer files.
As I told you in the introduction, most cameras use SD cards. So, if you need the files on your Raspberry Pi, a USB card reader will be perfect.
You can also use the same adapter to transfer files from one Raspberry Pi to another, or even to your computer.
Basically, you can use it like a USB key.
Create a backup of your Raspberry Pi
Another thing that can be really useful, is to create backups of your Raspberry Pi with this USB card reader.
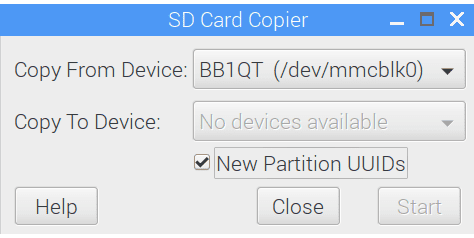
You can use it like a USB key and copy the critical files on it, but there is also a great tool on Raspberry Pi OS : SD card copier.
It allows you to duplicate the current SD card (running your operating system) to another one (plugged into your USB card reader).
I have an entire article about the best strategies to create backups of your Raspberry Pi, and it’s one of the most powerful ways to create a backup. If anything happens to your system (even losing the SD card), you can use the copy and start with the same setup as the day you created the copy.
Extra storage
Using an USB card reader is also a good way to add extra storage to your Raspberry Pi installation. In general, it’s also a good practice to keep your files on a different partition (or drive) as the main system. This way, if anything corrupts the system, your data should be safe.
So, you can have Raspberry Pi OS running on the main SD card, and your documents on the SD card reader. If you are doing this, I would recommend using this kind of disk instead, as it’s way faster and more reliable. But as a budget solution, a USB card reader is not so bad.


Useful article, thank you the interesting article