

How to Use Geany on Raspberry Pi? (Full guide with pictures)
Geany is a lightweight text editor that is pre-installed on Raspberry Pi, and can be used to code in Python or any other language. I’ve used Geany for years on my Ubuntu PC at work, so I’ll share with you a few tips in this article to get started with Geany on Raspberry Pi.
Geany is a solid editor to use on Raspberry Pi as it’s pre-installed with Raspberry Pi OS and perfect for coding in Python or C/C++. There is a built-in terminal to compile and run scripts directly in it, and many other settings to save time while coding (like shortcuts and productivity options).
In this article, I’ll start with the basics, and give you other cool tips along the way in order to do more with Geany on Raspberry Pi.
By the way, if you get overwhelmed as soon as Python is required for a project, I recommend checking out my e-book “Master Python on Raspberry Pi“. It will guide you step-by-step to learn the essential concepts (and only the essential concepts) required to achieve any project in the future. Raspberry Pi without Python is like a car without an engine, you miss all the fun parts. Get 10% off by downloading it today!
How to Install Geany on Raspberry Pi?
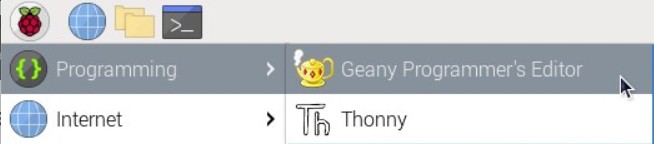
Geany is pre-installed on Raspberry Pi OS with Desktop. It can be found in the main menu, under Programming, with the other developer tools such as Thonny Python IDE, Scratch and BlueJ Java IDE. So, there is nothing to do, with this version it’s available directly.
Open the main menu (top left of your screen), click on programming and then Geany Programmer’s Editor.
Install Geany on other distributions
If you are using another distribution based on Debian, you should find it in your packages manager. If apt is available on your distribution, you can install Geany with:sudo apt install geany
If you are on another system, another option is to go directly to the official website and download an installer or the source code from there. Geany is available on Windows and macOS as well, so you can also use it on your computer if you like it.
Getting started with Geany
We’ll see the interface in more detail later in this article, but on first start, the Geany interface looks like this:
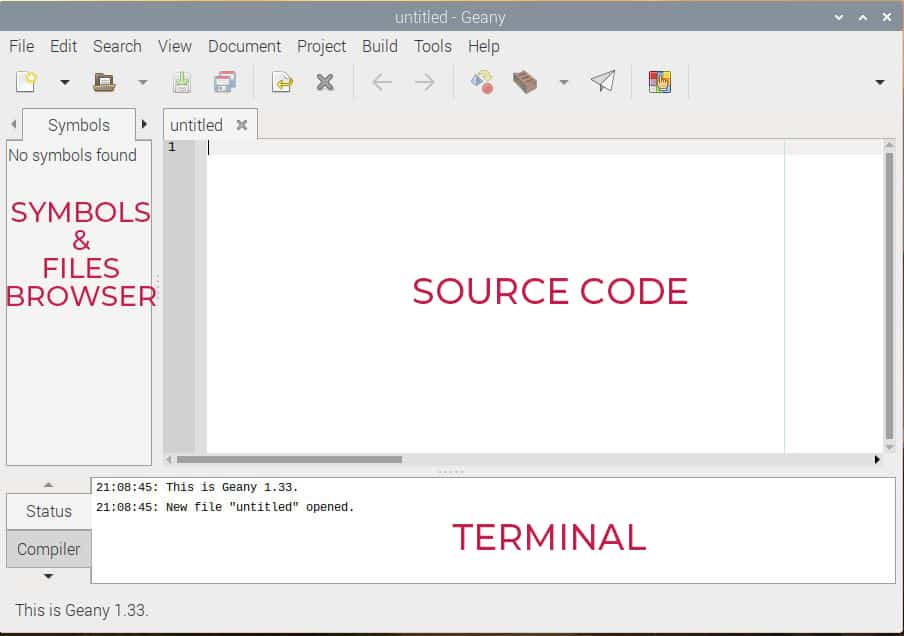
This is standard for a code editor. You’ll type the source code in the main section. On the left there is a browser to see your files and variables. On the top you have the main menu, with essential shortcuts (you can customize this). And what’s interesting is the bottom part, where you can see the logs, and have a terminal on hand to run your scripts (perfect for Python for example).
What is Geany used for?
Geany is a lightweight text editor that supports over 50 programming languages, so it can be used for almost anything related to coding.
If like me, you always mix the languages syntax, download my cheat sheet for Python here!
Download now
On Raspberry Pi, you can also use it as a text editor for anything else, as it’s more powerful than the default text editor (that can be found in the main menu > Accessories).
Is Geany a good IDE?
Geany is a robust IDE that can be used with the most common programming languages (Python, C, PHP, Java, etc.). It’s more powerful than basic text editors and less heavy than other solutions like PyCharm or Eclipse. As a whole, it’s a great solution for most programmers.
As I mentioned at the beginning of the article, I have used Geany for several years at work. I was a PHP developer back then, working on Linux. I’ve tried several solutions, and Geany could do whatever I needed. Stability and performances were my main criteria, and Geany was perfect for this.
I stopped using it after that because I switched to Windows and tried other solutions at the same time (like SublimeText and PHPStorm). When you are programming 8 hours a day, a heavier solution can add interesting features aren’t available in Geany, but in the case of usage on Raspberry Pi, Geany is great.
Today, I’m using mostly Visual Studio Code, so I would prefer to use it on Raspberry Pi, but it’s mainly based on habit and isn’t a feature limitation with Geany. VS Code can do more with all the additional packages, but you don’t necessarily need them to create a simple Python script on Raspberry Pi.

Join Our Community!
Connect, learn, and grow with other Raspberry Pi enthusiasts. Support RaspberryTips and enjoy an ad-free reading experience. Get exclusive monthly video tutorials and many other benefits.
Learn moreIn short, if you are used to another editor, try it first, you’ll save time. If you are looking for a new editor, start your first scripts with Thonny (mono files), then switch to Geany for bigger projects (several files). If you mainly use your Raspberry Pi for coding, you can then look for other alternatives by reading this article with the best text editors available on Raspberry Pi.
Is Geany a good solution to code in Python?
Geany IDE can run Python scripts natively, and as it’s pre-installed on Raspberry Pi OS it’s a great solution to code in Python, especially for beginners.
Here is a basic example:
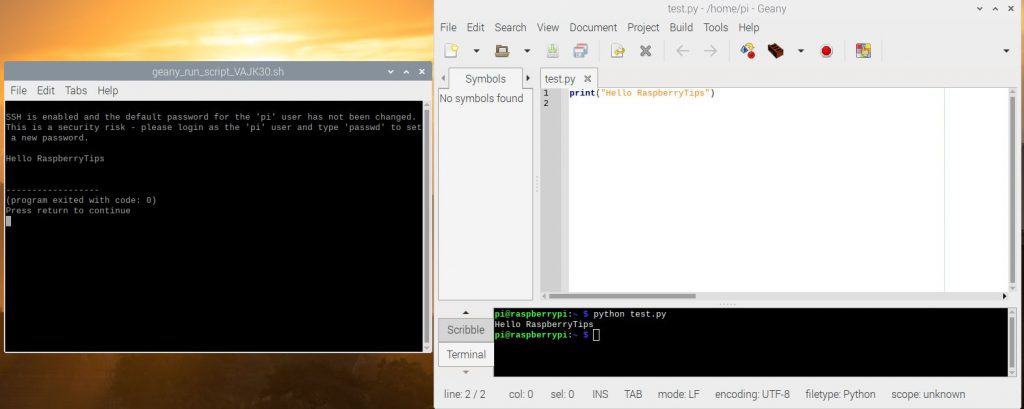
You can either use the “Run” shortcut in the menu to open your script in a new terminal, or use the handy terminal tab at the bottom of the editor to run it directly from there.
I recommend checking the option “Follow path of the current file” in the Preferences>Terminal, so that the terminal is always at the right place to run your scripts.
Geany is a good solution for Python! For example, autocomplete is available for this language, but you won’t get all the advanced features (by default at least). It’s a great tool for beginners, maybe not enough for advanced users.
Is Geany a good solution to code in C/C++?
Geany is a good solution for C and C++ programmers, it’s a simple IDE compared to the competition, but it includes the most important features like color highlighting, auto-completion and build/run in one click.
I don’t know if a lot of you are programming in C on Raspberry Pi, but you can absolutely use Geany for this. It has the same advantages as for Python. Here is what it looks like:
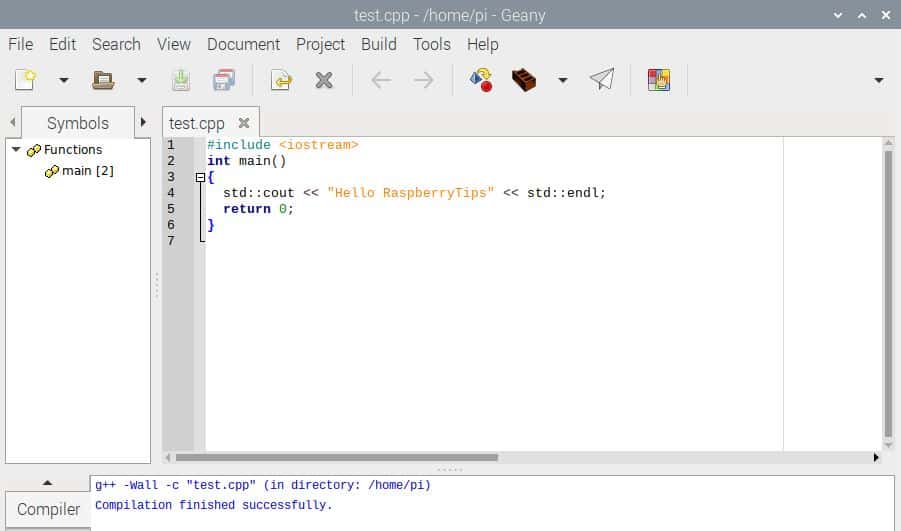
The three shortcut icons in the top bar will give you all the options you need to compile, build and run your code in one click. No need to remember and type the commands in the terminal, Geany can do everything for you.

The result of each action (and the errors that come with it^^) can be seen in the compiler tab at the bottom of the screen (as you can see on the first screenshot).
If like me, you always mix the languages syntax, download my cheat sheet for Python here!
Download now
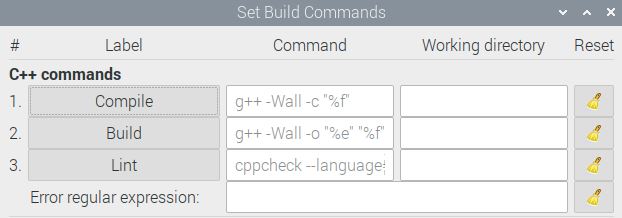
I don’t use C++ a lot, but I think the recommendation is the same as with the other languages. Geany is great for beginners, and will probably lack a few interesting features for experts. By the way, make sure you check the Preferences configuration, as there are many options you can set there (like the shortcuts for the main actions we’ll see later). You can also go to Build > Set Build Commands if you want to use different commands for this:
It's a free PDF guide containing every Raspberry Pi Linux command you should know!
Download now
Tips to Use Geany on Raspberry Pi
As explained several times now, Geany is a great text editor for beginners, it’s a light solution, and it can quickly do the most common features. If you are looking for more options, you are at the right place! Keep reading and I will give you a few tips that will allow you to do more with Geany.
Create a new project in Geany
The first thing you can do to push the limits is to create projects. Like with most other editors, you can group your files into the same folder. Here is how to do this with Geany:
- Open Geany.
- In the main menu, click on “Project” > “New”.
- Choose a Project name.
Geany will autofill the project path, but you can change it if you want:
- Click on “Create” to create the new project in Geany.
Then any new file you create will be stored in this project, which will be really useful to link all the files together, whatever language you use.
The left panel will also switch to display the files in your project:
Install plugins in Geany
I didn’t mention this previously, but there are a few plugins available that you can download and install on Geany. If you miss a specific feature, make sure to check the plugins list here before switching to another editor.
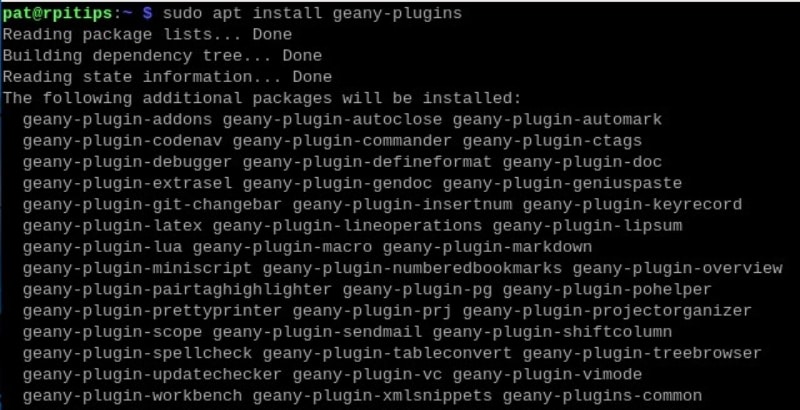
The easiest way to install all Geany plugins is to do this with APT in a terminal on Raspberry Pi OS:sudo apt install geany-plugins
It’s also possible to install only one plugin, by using the following syntax:sudo apt install geany-plugin-<name>
For example:sudo apt install geany-plugin-autoclose
You can use this command to list all the plugins available:sudo apt search geany-pluginOr use the “Add / Remove software” tool in the main menu.
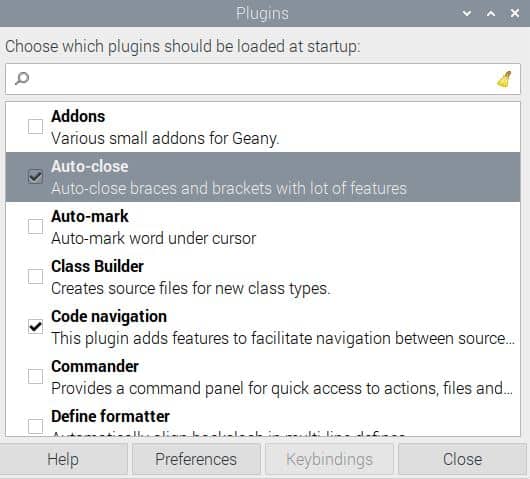
Once installed, you can switch them on or off from the Tools menu > Plugins manager.
Dark mode and themes in Geany
Geany also supports themes, so it’s possible to enable dark mode by using a dark theme. It will also change the default color highlighting, so you can find something you like better.
The themes list is also available on the official website here.
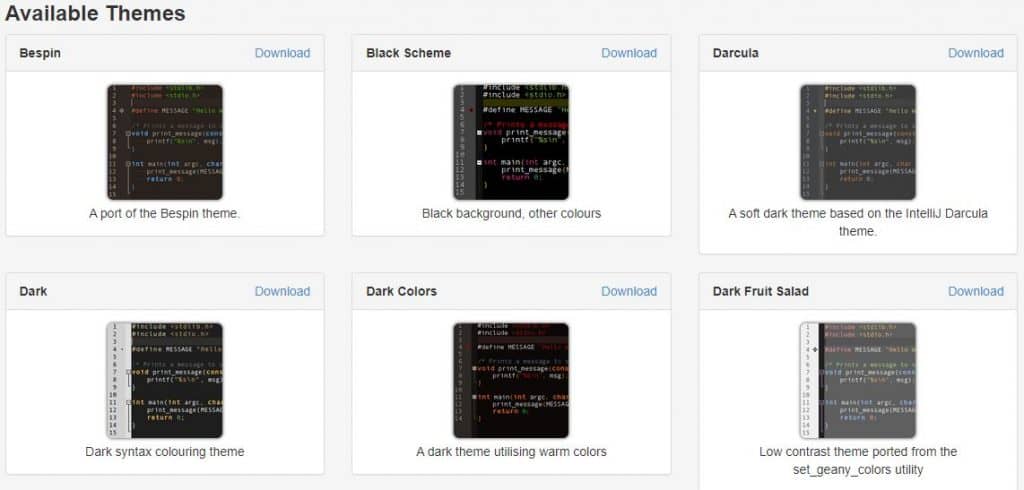
Here is how to install a theme on Geany:
- Go to the Themes download page on the Geany website.
- Click on “Download” next to the theme you want to install.
- It will open the configuration file in your browser, do a right-click and then “Save as”.
- Save the theme.conf file in the /home/pi/.config/geany/colorschemes folder.

You need to use CTRL+H to display hidden folders (.config), and you’ll probably need to create the “colorschemes” folder for the first one. - Once done, open Geany and go to View > Change Color Scheme.
- From there, you can select the Theme to use:
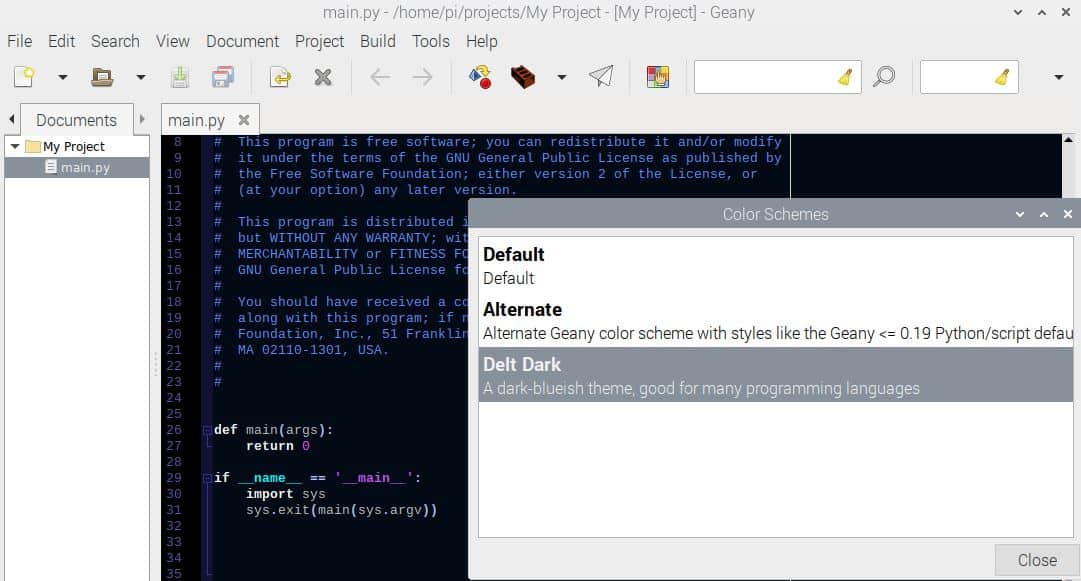
That’s it, you can do the same thing with another theme if you want, until you find the perfect one for you :).
You can edit the configuration file if there are one or two colors you want to change, but it shouldn’t be necessary.
Use the debug mode in Geany
This tip is not complicated, but it’s a bit hidden, so I think it’s better to tell you.
To enable the debug mode in Geany, open the Tools menu and Plugin Manager. Then check the Debugger plugin to enable it, as it isn’t enabled on default. If needed, the Debugger plugin can be downloaded here.
It seems that the Debugger plugin currently isn’t available in the Raspberry Pi OS repository, so the only way to make it work on Raspberry Pi is to install Geany and the plugin from source.
Configure keyboard shortcuts in Geany
An easy tip that you can easily miss. In the Preferences windows of Geany, it’s possible to configure keyboard shortcuts for almost any action of the editor. Open the Edit > Preferences window, and go to the Keybindings tab.
It looks like this:
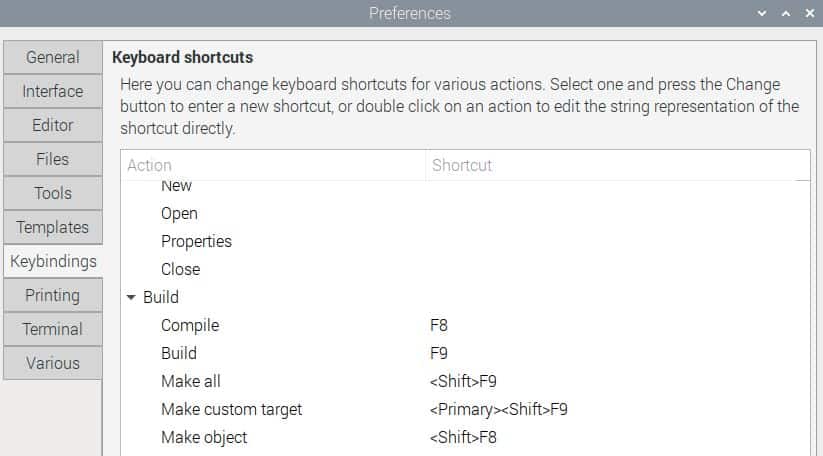
Take note of the keyboard shortcut for the actions you use the most, and feel free to add new ones for some other.
Other options to configure
In the same Preferences there are many other options you can configure to improve your experience with Geany. For example, you can change the default font, the template data or even the terminal appearance.
If you are regularly using Geany for code projects, I highly recommend taking the time to check all the available settings. You’ll save time on the long run, and enjoy this tool even more :).
It's a free PDF guide containing every Raspberry Pi Linux command you should know!
Download now
Want to chat with other Raspberry Pi enthusiasts? Join the community, share your current projects and ask for help directly in the forums.
Geany alternatives to code on Raspberry Pi
Geany is a great solution for most Raspberry Pi users. If you are a total beginner, Thonny might be better to get started with in Python. If you are more advanced, you might want to try something else.
Anyway, there are plenty of text editors available on Raspberry Pi. You can find my recommendations in this detailed article, and try another one!
If you prefer using the basic editors in command line, I also have great tips for you:
- 35 useful Nano Commands and Shortcuts for Raspberry Pi users
- How to Use Vim on a Raspberry Pi (Text Editor)
Whenever you’re ready, here are other ways I can help you:
The RaspberryTips Community: If you want to hang out with me and other Raspberry Pi fans, you can join the community. I share exclusive tutorials and behind-the-scenes content there. Premium members can also visit the website without ads.
Master your Raspberry Pi in 30 days: If you are looking for the best tips to become an expert on Raspberry Pi, this book is for you. Learn useful Linux skills and practice multiple projects with step-by-step guides.
The Raspberry Pi Bootcamp: Understand everything about the Raspberry Pi, stop searching for help all the time, and finally enjoy completing your projects.
Master Python on Raspberry Pi: Create, understand, and improve any Python script for your Raspberry Pi. Learn the essentials step-by-step without losing time understanding useless concepts.
You can also find all my recommendations for tools and hardware on this page.


I have been using Geany for many years on various computer systems and find it a very good program for editing files. The main thing I learned by reading this article is about using the built-in terminal to execute the code. I think I may have used it in the past but have forgotten about it. Will start using it again instead of going to my Terminator terminal program.
One problem I have discovered that to edit files owned by ROOT there a number of hoops to jump through to get it to be able to save the edited file.