Getting Started With VNC on Raspberry Pi (Bookworm update)
VNC is a tool that allows you to get access to the remote desktop environment from another computer. On Raspberry Pi, using VNC is one of the easiest ways to remotely access it. If you use Raspberry Pi OS, VNC is preinstalled so you only have to enable it to get started. Let’s see how to use it.
The first step is to enable VNC on Raspberry Pi OS (via the system configuration or raspi-config), then install the client on a computer, and type the IP address of the Raspberry Pi to get connected to it.
But don’t worry, I’ll explain all these steps in detail, so you won’t fail. You are in the right place – just keep reading to learn everything about VNC on Raspberry Pi.
If you’re looking to quickly progress on Raspberry Pi, you can check out my e-book here. It’s a 30-day challenge where you learn one new thing every day until you become a Raspberry Pi expert. The first third of the book teaches you the basics, but the following chapters include projects you can try on your own.
Enable the VNC server on your Raspberry Pi
Depending on the operating system and version you use, enabling VNC on your Raspberry Pi might be slightly different. Let’s start by making sure it’s enabled on your system.
On Raspberry Pi OS
If you have Raspberry Pi OS installed on your Pi, it will be straightforward, as VNC is pre-installed on any version so you’ll have to enable it to use it (it’s disabled by default, for security reasons).
From the desktop environment
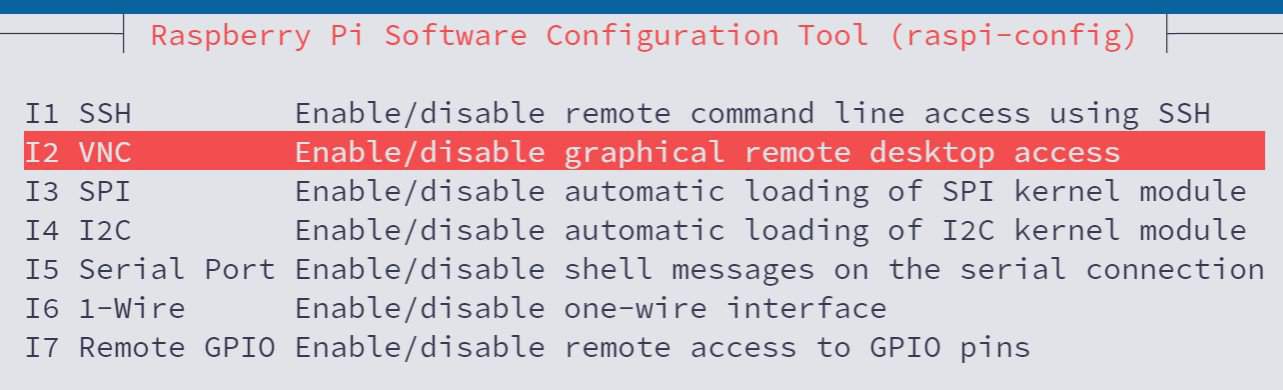
If you can get access to the desktop environment of your Raspberry Pi, here are the steps to enable VNC:
- Open the main menu.
- Go to Preferences > Raspberry Pi Configuration.
- In the Interfaces tab, find the line about VNC:
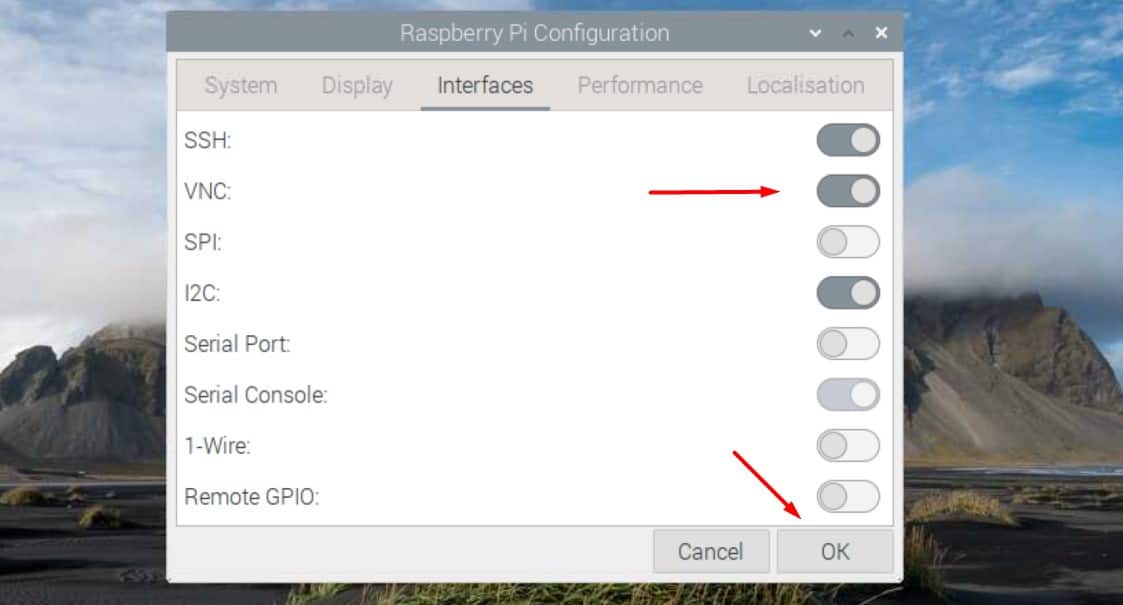
- The interface can be slightly different depending on your version, but basically, it’s just a checkbox to enable it.
- Once done, click on “OK” to apply the changes.
A few seconds later, VNC is enabled, and you can move to the next part to install VNC on your computer.
With raspi-config
If you don’t have access to the full interface currently (for example if you are using SSH, or don’t have a keyboard/mouse on the Pi), you can use raspi-config instead:
- Open a session on the Raspberry Pi, and get to the command line.
You can also use the terminal app on the desktop if you want, even if there is no real reason to do this instead of the previous method. - Type the command:
sudo raspi-config - Go to the Interfaces submenu and choose VNC:
- Confirm that you want to enable it.
- Quit raspi-config.
After doing this, VNC is enabled right away, and you can start using it (scroll to the VNC client installation part of this tutorial).
It's a free PDF guide containing every Raspberry Pi Linux command you should know!
Download now
On other systems
Just a quick word about the other systems. Raspberry Pi can run with many alternatives to Raspberry Pi OS (check my favorites here). It’s possible to use VNC on almost all of them, but the procedure is not as straightforward.
While many VNC tools are available for free, not all of them are. What I recommend is to use the package manager on your distribution and search for any VNC package included in the default repository.
Something like:sudo apt search vnc
If you can find a server package for VNC, use the same app on your computer. For example, on Ubuntu and Manjaro, you can easily install TightVNC on the Raspberry Pi and install TightVNC viewer on your computer to access it.

Join Our Community!
Connect, learn, and grow with other Raspberry Pi enthusiasts. Support RaspberryTips and enjoy an ad-free reading experience. Get exclusive monthly video tutorials and many other benefits.
Learn moreTigerVNC is another alternative you can try, especially for Red Hat and Arch-based distributions. As we’ll use it for Raspberry Pi OS, it might be a good idea to install this version too, so you can follow along in the next part.
The protocol and apps are similar, but they are generally not compatible with one another. So make sure to use the same client as your server in the next steps.
By the way, even if the Raspberry Pi doesn’t run on Raspberry Pi OS, it’s often possible to install TigerVNC on it anyway, like on Ubuntu: Setting Up TigerVNC Server on Ubuntu: A Beginner’s Tutorial.
Install the VNC client on your computer
Once the server part is installed and enabled on the Raspberry Pi, we can switch to the computer. We just need to install the VNC viewer app to remote access the Raspberry Pi from there.
Note: I’m giving you the instructions for TigerVNC, that seems the best option right now with the latest releases of Raspberry Pi OS. Just know that on older versions you can use RealVNC for free, and if you installed a specific server, you should use the client from the same editor (like TightVNC).
That said, let’s install TigerVNC on your computer.
Linux installation
If you’re lucky, TigerVNC might be available in your package manager or application store. You should probably start there.
For example, on Ubuntu, it’s available in the Ubuntu Software app: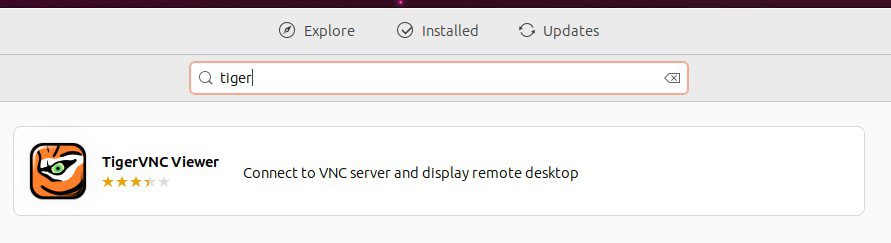
And on Debian, you should find it with APT:
It's a free PDF guide containing every Raspberry Pi Linux command you should know!
Download now
In these cases, simply install the TigerVNC viewer like any other app, and you’ll be ready to go.
So, for example:sudo apt install tigervnc-viewer
Windows & other systems
On Windows, it’s a bit less intuitive. The official website is not that user-friendly, and we can easily get lost in the Sourceforge folders.
Here are the steps to install TigerVNC binaries manually:
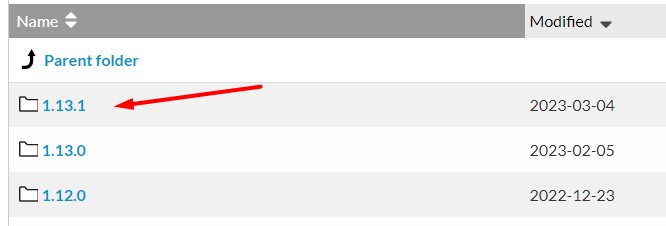
- Go directly to the Sourceforge project here.
- Find the latest version available and click on it:
- Now click on the file corresponding to your system and architecture.
For example, I downloaded “tigervnc64-<version>.exe”.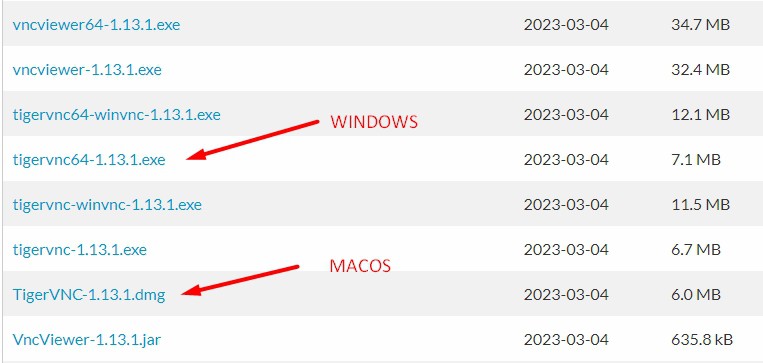
Several files are listed. You have the 32 and 64 bit versions, and then the ones with “winvnc” in the name are servers, adding the ability to take control of your computer.
If you just want to access the Raspberry Pi (not the computer), download the one named “tigervnc64-<version>.exe”. - Once the file downloaded, double-click on it to install it or start it, like any other executable.
Let’s see how to use this now that the prerequisites are installed.
It's a free PDF guide containing every Raspberry Pi Linux command you should know!
Download now
Use VNC to control your Raspberry Pi remotely
Once the VNC viewer is installed on your computer, you can enter the IP address of the Raspberry Pi, type your login and password and get access to the full interface remotely.
Let’s learn how to do this.
Find the Raspberry Pi IP address
Before anything else, you need the Raspberry Pi IP address.
If you don’t know what I’m talking about, I recommend reading this article first, where I explain everything and different methods to find it.
But the short version is that you can hover the network icon in the top-right corner, or use the following command to get it:ip a
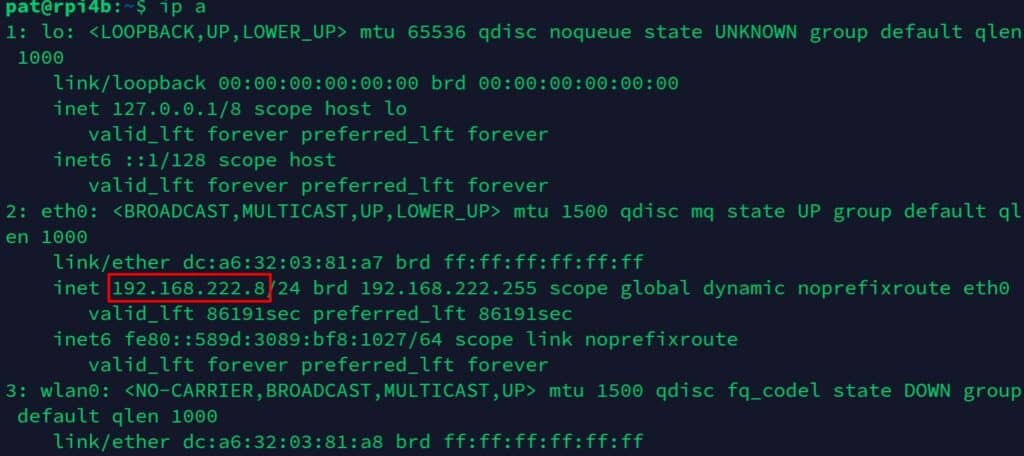
The format of the IP address is something like AAA.BBB.CCC.DDD. On my screenshot, it’s 192.168.222.8 for example.
Create a new connection
You can then open the VNC viewer to create a new connection.
The interface will be slightly different depending on your operating system (and the VNC client you use), but basically, the steps are:
- Open your VNC viewer application.
- Create a new connection by typing the Raspberry Pi IP address.

You can play with the “Options” section if needed, but in most cases the default are just fine. - Click on “Connect” to start the connection
- Click “Yes” to accept the server fingerprint on the first connection
- Then enter the username and password to access the current session:
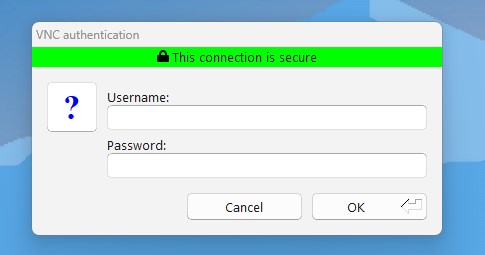
It’s the Raspberry Pi user and password, so it depends on your settings. - You should then get access to the full interface of the Raspberry Pi:
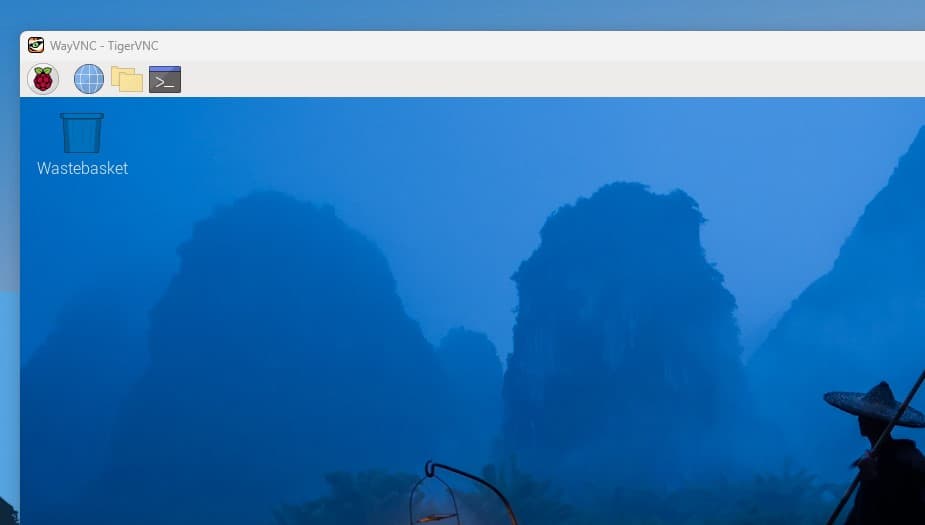
And that’s it. After that, you’ll get access to the full desktop environment of your Raspberry Pi, and can do whatever you want from the comfort of your main computer.
Check the following part if you experience any issues, I answer the most common questions.
Note: On older releases of Raspberry Pi OS, you might get an error related to the ZRLE compression, and get disconnected quickly. You can avoid it by disabling the compression in the settings, using “Raw” for example (see related question below).
It's a free PDF guide containing every Raspberry Pi Linux command you should know!
Download now
Want to chat with other Raspberry Pi enthusiasts? Join the community, share your current projects and ask for help directly in the forums.
Related questions
How to fix the error: “Exception on worker thread: ZRLE decode error”?
This error only happens on older releases of Raspberry Pi OS (“Bullseye” for example), and a workaround is to disable the compression in the connection options.
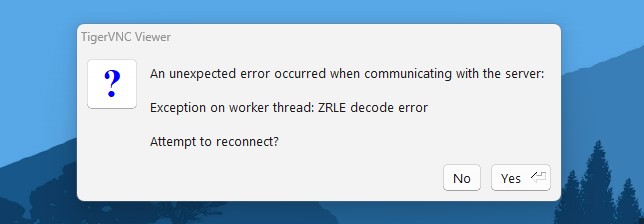
- Click on “Options” below the IP address field.
- In the “Compression” tab, uncheck “Auto-select” and select “Raw” instead.
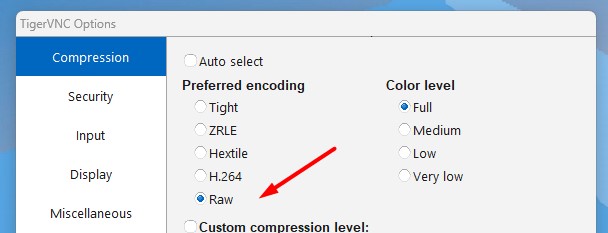
- Click on “Ok” to save the changes, and try again.
It should work fine after that.
What’s the default username and password for VNC?
The username and password for a VNC connection are the same as for a desktop connection. On an old Raspberry Pi OS version, it might be “pi” and “raspberry” for example. Or the user you created on the first boot in other cases.
If needed, you can check my other tutorials on how to recover a lost password, or how to create new users on Raspberry Pi.
How to fix the error: “Cannot currently show the desktop” with VNC?
Raspberry Pi OS doesn’t start the desktop environment if there is no HDMI cable plugged into the Raspberry Pi. If you boot without plugging one and try to access it via VNC, you’ll get this error: “Cannot currently show the desktop”.
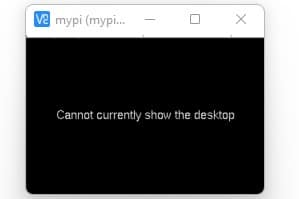
To fix this, keep a monitor plugged in all the time, or start VNC manually via SSH with:vncserver
You may need to specify a different port after that, for example: IP_ADDRESS:1 instead of IP_ADDRESS.
The port is mentioned in the command output:

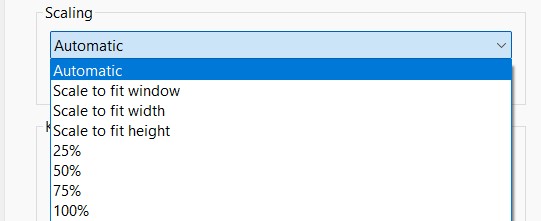
How to change the default resolution in VNC?
When a monitor is plugged in, the VNC server will start with the corresponding resolution. But it’s not always ideal, especially if you have a small screen on it, but a bigger screen on your computer.
To fix this, you can go to the system configuration and change the “Headless resolution” in the “Display” tab. You have the same thing in raspi-config, under “Display options” > “VNC resolution”.
Another thing you can try is to change the options on the VNC viewer. In the advanced settings for the connection, there is a list where you can choose to adjust the resolution to the window or use a percentage (scaling).
Whenever you’re ready, here are other ways I can help you:
The RaspberryTips Community: If you want to hang out with me and other Raspberry Pi fans, you can join the community. I share exclusive tutorials and behind-the-scenes content there. Premium members can also visit the website without ads.
Master your Raspberry Pi in 30 days: If you are looking for the best tips to become an expert on Raspberry Pi, this book is for you. Learn useful Linux skills and practice multiple projects with step-by-step guides.
The Raspberry Pi Bootcamp: Understand everything about the Raspberry Pi, stop searching for help all the time, and finally enjoy completing your projects.
Master Python on Raspberry Pi: Create, understand, and improve any Python script for your Raspberry Pi. Learn the essentials step-by-step without losing time understanding useless concepts.
You can also find all my recommendations for tools and hardware on this page.