What is Raspberry Pi Pico? Everything You Need to Know
The Raspberry Pi Pico is a recent addition to the Raspberry Pi family. It has almost nothing in common with the other models, so you might be a little confused as to what you can actually do with it. Well, let me give you an introduction.
The main difference between the Raspberry Pico and other models is that it is a microcontroller and not a single-board computer. That is why this model is smaller and cheaper. It cannot run an operating system, but can still be used in many electronic projects.
By the end of this article, you’ll know everything there is to know about the Raspberry Pi Pico. I’ll start with the hardware specifications, explaining the differences with the other Raspberry Pi, explain what you can do (or not) with it, and give you some tips to get started.
If you need help getting started on Raspberry Pi, I have an entire course to guide you through your first steps. I’ll help you use the perfect hardware, plug everything in and install your first system. You’ll also do your first projects with me, just to make sure you are ready for the next level. Get all the information on this page if you are interested.
What is a Raspberry Pi Pico?
Introduction
The Raspberry Pi Pico is a microcontroller board, created by the Raspberry Pi Foundation and released in January 2021. It’s a tiny electronic device that is available for less than $5.
It was a surprise, as it’s the first time the Foundation released a microcontroller, which is way different from the small computers we are used to. Smaller and cheaper than the Raspberry Pi Zero, it’s also a completely new product in their line-up.
You can see it as a competitor for the Arduino. As explained in detail in this article, a microcontroller is a chip that is optimized to control electronic devices. It is found in a single integrated circuit that is dedicated to performing a specific task.
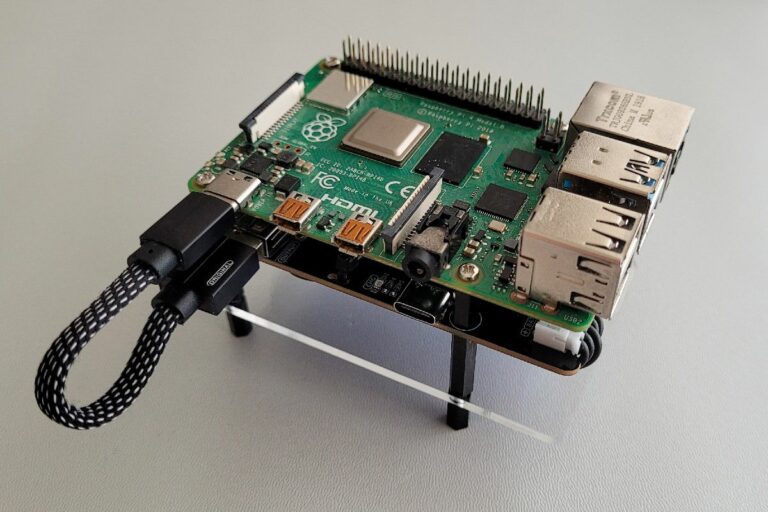
The other Raspberry Pi models come with a microprocessor, making them closer to a standard computer: you can install an operating system on them, and they have memory, storage and traditional ports (USB, HDMI, audio, etc.).
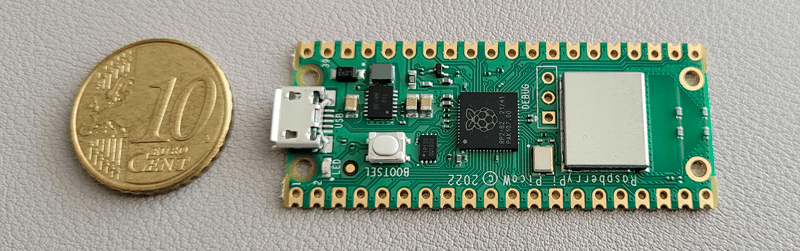
As an example, the Raspberry Pi Zero and Pico, even if they are almost the same size, are completely different (learn more here).

Join Our Community!
Connect, learn, and grow with other Raspberry Pi enthusiasts. Support RaspberryTips and enjoy an ad-free reading experience. Get exclusive monthly video tutorials and many other benefits.
Learn moreSpecifications
If you look at the specifications, you will feel as if you are reading the configuration of a computer from the last century. But don’t worry, it’s completely normal, and we don’t need more for the kind of tasks the Pico is designed for.
| Type | Component |
|---|---|
| Processor | RP2040, 2x Arm Cortex-M0+ (133 MHz) |
| Memory | 264 KB SRAM |
| Storage | 2 MB flash memory |
| Connectivity | 2x 20 GPIO pins (20 on each side), as: – 26x multifunction GPIO Pins – 2x UART – 2x SPI – 2x I2C controllers – 8x programmable I/IO (PIO) |
| Power | 1x Micro USB Support 1.8 to 5.5V DC |
| Dimensions | 21 mm x 51 mm |
To clarify, different versions of the Raspberry Pi Pico are available. The core components are the same, but there are some slight differences:
If you are lost in all these new words and abbreviations, request my free Raspberry Pi glossary here (PDF format)!
Download now
- Raspberry Pi Pico: The original version.
- Raspberry Pi Pico W: stands for “Wireless”, as it includes Wi-Fi support (802.11n).
- Raspberry Pi Pico H & WH: the H stands for “Header”, as it comes with pre-soldered headers on the GPIO pins. WH has Wi-Fi, while the H version doesn’t.
If you are used to the Raspberry Pi Zero model names, you shouldn’t be lost with these versions. The Raspberry Pi Foundation uses the same nomenclature for the Pico.
Differences with other models
The Raspberry Pi Pico is powered by a tiny processor (133 MHz), has almost no RAM (264 KB), very limited storage (2 MB) and can’t use most of the external accessories we are used to with other models: no SD card, no display, no keyboard, mouse or any other USB device.
The idea is not to build an extremely cheap computer that can do nothing. The typical use of the Pico is just entirely different from what you’d use another Raspberry Pi for.
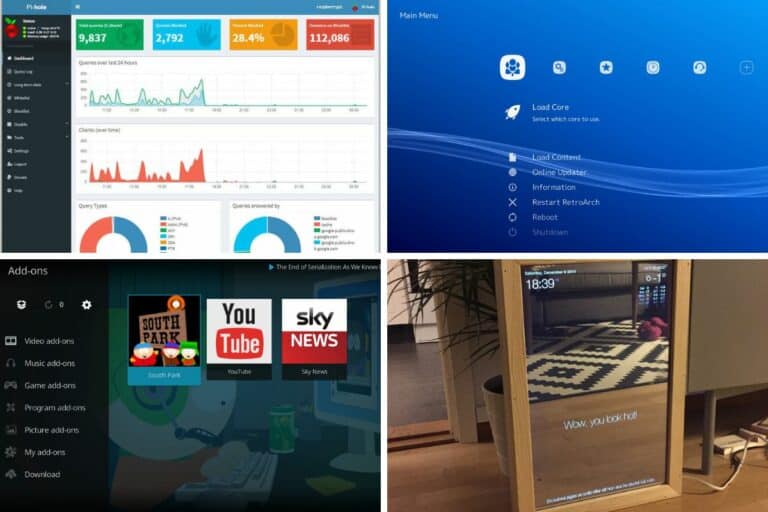
For example, with a Raspberry Pi 4, you’ll install an operating system (a Linux distribution in general), and install applications and services. It’s built for multitasking. You can use it as a desktop computer, a server or in electronic projects (robots, home automation, etc.).
The Raspberry Pi Pico will typically have only one tiny program (no operating system, no applications). The program is created to run a very specific task and can interact with external devices like sensors, lights and motors via the GPIO pins.
I will now give you a few examples of what you can do with the Raspberry Pi Pico, before explaining in more detail what you CAN’T do.
What can you do with a Raspberry Pi Pico?
Even if a Raspberry Pi Pico is limited due to its manufacturing, it can still be used in a wide range of projects. Basically, if an electronic device is available and can be controlled with a simple Python script, you can use a Raspberry Pi Pico for the project.
Start with simple GPIO projects
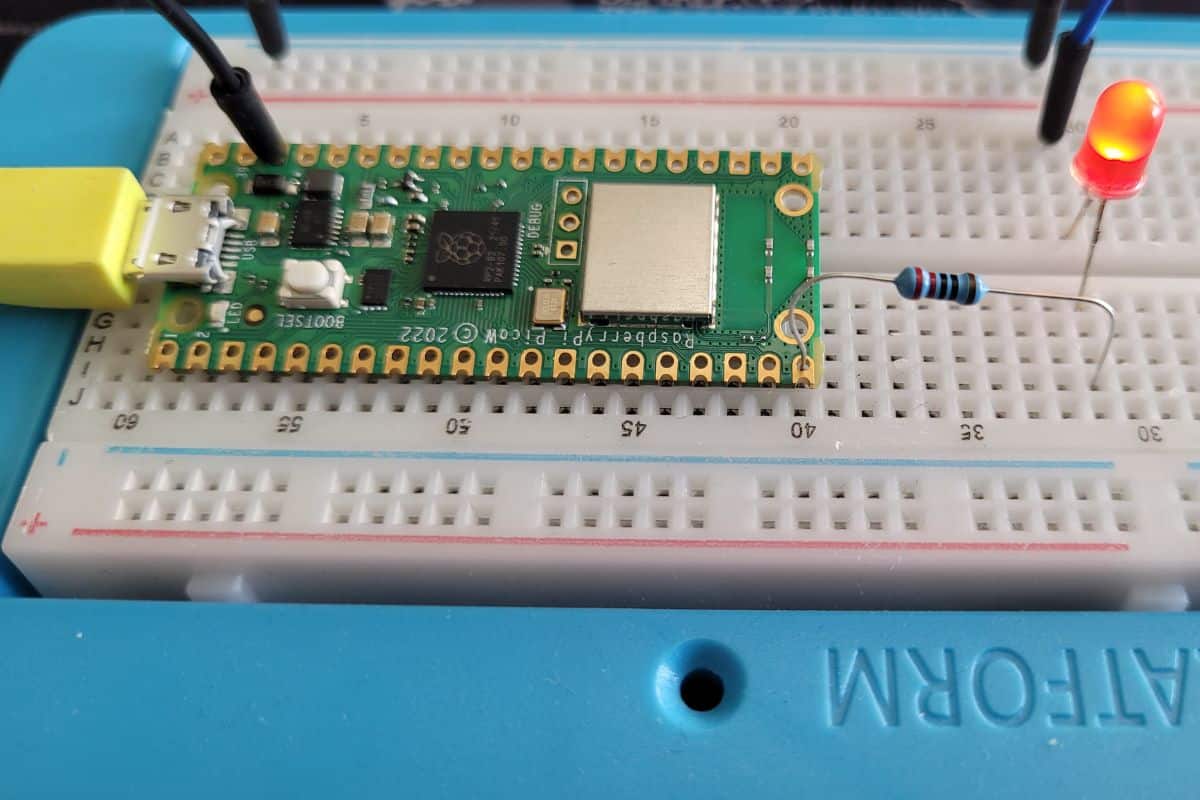
The best way to get started with a Raspberry Pi Pico is to learn via the same mini electronic project examples you may be used to with any Raspberry Pi model: light a LED, use a button, and get data from sensors.
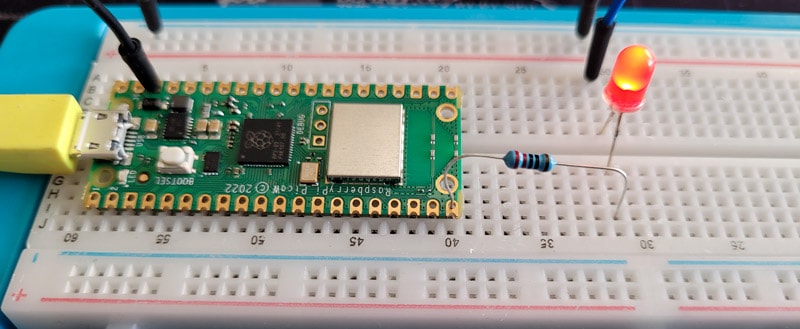
To get started, you’ll need a few additional components (I give my recommendations at the end of this article). If you are used to how the GPIO pins work on another Raspberry Pi model, it won’t be that different.
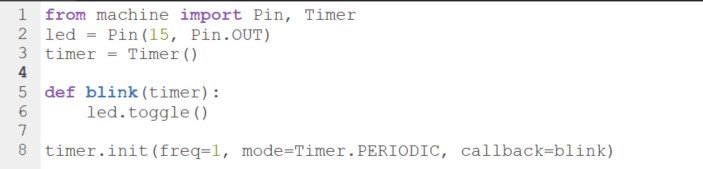
The main difference, though, is that the Raspberry Pi Pico uses MicroPython, a light adaptation of Python created to program microcontrollers. The libraries are slightly different, and you may need some time to get used to them, but if you know Python, it shouldn’t be that complicated.
I have an article on this website explaining how to get started with Raspberry Pi Pico. It includes the simple example you can see in the picture, so feel free to click on the link to see how it works or test it directly.
Perfect to learn electronics and experiment with programming
With the current situation in the supply chain, where it’s very hard to get any Raspberry Pi in stock at a decent price (more about this situation here), the Raspberry Pi Pico can be a solution if you want to learn programming and electronics. Or simply if you have a project where you don’t need a full computer.
- Get a Raspberry Pi Pico.
- Get a breadboard, a few wires, LED and resistors.
- Learn to program with concrete and visual projects.
- Then get a full Raspberry Pi when it’s back in stock at the normal prices.
This way, you won’t waste time waiting for the latest model. And when it’s finally available, you’ll already know Python and will enjoy even more the power of the other Raspberry Pi models, to build more complex projects.
I generally recommend learning Linux before Python (click on the link to read why I’m saying this). But given the situation, I think it’s not a bad idea to start with a Pico. Also, you’ll write the code on your current computer, so you don’t need to learn Linux to use a Raspberry Pi Pico.
By the way, if you get overwhelmed as soon as Python is required for a project, I recommend checking out my e-book “Master Python on Raspberry Pi“. It will guide you step-by-step to learn the essential concepts (and only the essential concepts) required to achieve any project in the future. Raspberry Pi without Python is like a car without an engine, you miss all the fun parts. Get 10% off by downloading it today!
Other Raspberry Pi Pico projects
Once you know the basics, you’ll understand that if there is a component available that you can plug into the GPIO pins and program in MicroPython, it’s a potential project you can build with a Raspberry Pico.
If you are lost in all these new words and abbreviations, request my free Raspberry Pi glossary here (PDF format)!
Download now
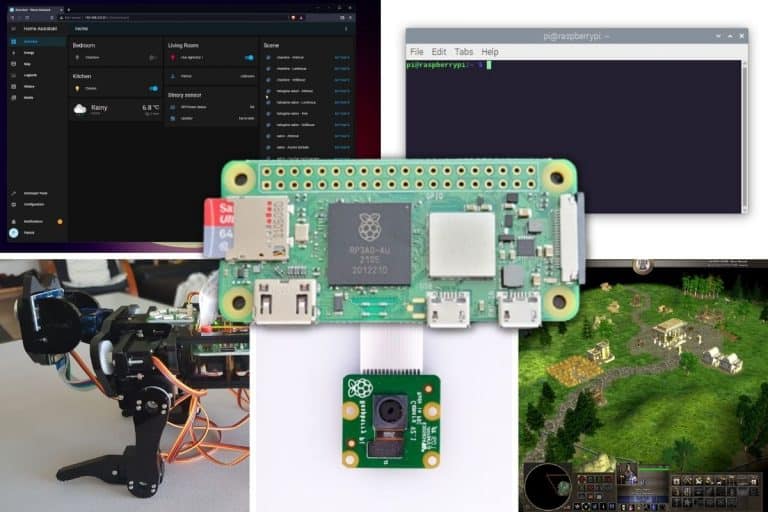
Here are a few examples to give you a better idea of the possibilities:
- Plant monitor or waterer: A Raspberry Pi Pico can be plugged into a soil moisture sensor and send you the data. But it can also act autonomously when the value goes below a certain threshold and releases water via a connected water pump. You can find an example on the official Raspberry Pi blog.
- Wearable: Given the size of the Raspberry Pi Pico and the low power input required, it’s the perfect choice for wearables. Whether you want to have lights on your caps, a small display on your t-shirt or anything else, it should do the job (examples here).
- Control lights: A typical use would be to control lights at home with it. In the RaspberryTips community, one of the members (Dimitar) explains how he lights up his hallway when somebody walks through it in the evening. He plugged an LDR photo-resistor, PIR motion sensors and LED strips into it. Amazing!
- Garage door opener: A more complicated project can be to use a Raspberry Pi Pico to open the garage door (project details here). Connected to the house’s Wi-Fi, the Pico receives the signal to open or close the door and sends it to the door motor via the GPIO pins. It’s more of an electricity project than a programming challenge, requiring different skills, but it’s completely doable.
- Weather station: The most common sensors are the ones measuring temperature and humidity. So, you can basically build a weather station with only a Raspberry Pi Pico, you don’t necessarily need to have a full Raspberry Pi for this (even if it might be easier to store the data on it). Plug in a display to get the info in real-time, or send the data via Wi-Fi to another device.
- Robot: Basically, Raspberry Pi robot kits listed on this website are just a computer connected to a bunch of sensors and motors running a Python script. That’s the definition of what a Raspberry Pi Pico can do. I guess there are some limitations in this case, but a simple robot can be controlled by a Pico (example here).
You can find other ideas in this short video:
The list can go on and on, but I hope you now have a better idea of the possibilities. If it’s simple enough, and the accessories you want to use are controllable via MicroPython, then you can use a Raspberry Pi Pico.
Let’s take a look at the downsides of the Raspberry Pi Pico now.
What are the limits of the Raspberry Pi Pico?
Even if the Raspberry Pi Pico has nice potential and can be used in many electronic projects, it’s not the magical solution for all situations.
If you’ve read the whole article, you may have this impression but I’m not trying to sell you the Raspberry Pi Pico. It’s a good choice in some specific cases, but a terrible choice in others. Here is why:
- You can’t install an operating system on the Raspberry Pi Pico.
There is no storage, no real processor and not enough memory.
So, another model is required if an operating system is needed for your use case. - The Raspberry Pi Pico resources are very limited.
Any project requiring heavy calculation won’t work well on it.
For the same reason, multitasking with a Raspberry Pi Pico is generally a bad idea. - The GPIO pins are the only ports available on a Raspberry Pi Pico.
If you need USB devices or a traditional display (via HDMI), the Pico is not a good choice.
You can’t plug anything into it (no mouse, no keyboard, no display).
Also, there is no SD card slot, so you can’t store anything more than the 2 MB of flash memory available (which is tiny).
If the Raspberry Pi Pico is not a good fit for your project given these limitations, the Raspberry Pi Zero (and especially the Zero 2W) is probably your best choice. With a similar size, the Pi Zero 2W is powered by a real microprocessor and can run an operating system with the usual applications and services.
Then a Raspberry Pi 4 needs to be considered if you need to plug in more USB accessories or require something even more powerful. It’s not the same price, but you won’t be limited. All projects can run with a Raspberry Pi 4.
It's a free PDF guide containing every Raspberry Pi Linux command you should know!
Download now
Getting started with a Raspberry Pi Pico
As with anything new in tech, you might need some guidance to get started with a Raspberry Pi Pico. Here are a few tips to help you start the right way.
Get your Raspberry Pi Pico
The normal price of a Raspberry Pi Pico should be between $4 and $7 depending on the version you want. Remember that they all look the same, but some have a Wi-Fi adapter or pre-soldered GPIO pins, so make sure to pick the right one.
As a general rule, it’s cheaper to get your Raspberry Pi from the official resellers, but the Pico is so cheap that it doesn’t really matter. Unlike the Raspberry Pi 4, if you have to pay 2 or 3 times the price, it’s not a big deal.
You can find it here on Amazon, for example, at a decent price (click on the link to see the actual price), and if you have free delivery it’ll be the same thing (and generally faster) than the other resellers.
Recommended software and tools
You don’t need that many things to get started with a Raspberry Pi Pico: no SD card, no display, no mouse or keyboard and so fewer cables overall. But you still need a few things:
- A computer: The Raspberry Pi Pico is not a computer, so you can’t program on it directly.
You’ll plug it into your computer and only store the script on it. So make sure you have a computer available for this (any OS is fine). - A micro-USB cable to power it: I use a USB to micro-USB cable (like this one on Amazon). I use the cable to plug the Raspberry Pi Pico into my computer and to transfer the code.
- Thonny: Thonny is the Python editor you’ll use with it. You can download it here, it’s available on all systems and will auto-detect the Raspberry Pi Pico when you plug it in.
- Breadboard, wires and sensors: Most projects require some electronic components you’ll use all the time. You can buy them separately, but I find the easiest solution is to get a kit with everything in it. I like the starter kit from SunFounder for example, as it’s more than 100 projects you can do with it, all documented.
You can find it here on Amazon, or directly on their website.
Note: A Raspberry Pi Pico W is included in the kit!
From there, you can go crazy and get even more accessories, but that’s the essentials you need to get started. I’d recommend starting small and ordering more when you have concrete ideas in mind. For now, the goal is just to learn the basics and discover the potential.
Learn the basics
As mentioned earlier, I have an article introducing how the GPIO pins work on a Raspberry Pi Pico. It’s slightly different from what you may be used to with other Raspberry Pi models. Reading this article would be a good starting point, as I also give an example with MicroPython.
On RaspberryTips, you’ll mostly find projects and tutorials for the other Raspberry Pi models, but I’ll try to add more Raspberry Pi Pico resources in the future.
The official website is also a good starting point to find simple projects you can try (direct link).
It's a free PDF guide containing every Raspberry Pi Linux command you should know!
Download now
Reminder: Remember that all the members of my community get access to this website without ads, exclusive courses and much more. You can become part of this community for as little as $5 per month & get all the benefits immediately.
FAQ
Can you run Linux on a Raspberry Pi Pico?
The Raspberry Pi Pico can’t run Linux. It’s a microcontroller, so no operating system can be installed on it.
If you need Linux for a project, another Raspberry Pi model, more powerful, should be used (like the Raspberry Pi 4).
Does the Raspberry Pi Pico have Bluetooth?
The Raspberry Pi Pico doesn’t have a Bluetooth adapter. The Pico W has a built-in Wi-Fi adapter, but for Bluetooth support, an external module must be added.
Here is an example on Amazon. You can plug this module into the Raspberry Pi Pico GPIO pins to get Bluetooth on it.
What’s the difference between the Raspberry Pi Pico and Arduino?
The Raspberry Pi Pico is a more recent product than the Arduino. So, the Arduino community is bigger, with more projects and libraries available. But the Pico is overall more powerful than most Arduino boards, and exclusive features like a built-in temperature sensor.
With the Pico, the Raspberry Pi Foundation is trying to compete with Arduino, while until now, it was a different market. We’ll see how Arduino reacts in the coming years, but it should be interesting.
I don’t have enough experience with the two platforms to recommend one over the other, but given the price of the Pico, I have the impression that it’s a safe bet to try it first when you have a doubt.
Where to buy Raspberry Pi Pico?
The Raspberry Pi Pico is available from official Raspberry Pi resellers, but also from big online stores like Amazon or Walmart.
You can find it here on Amazon, for example, at a decent price (click on the link to see the actual price), and if you have free delivery it’ll be the same thing (and generally faster) than the other resellers.
Whenever you’re ready, here are other ways I can help you:
The RaspberryTips Community: If you want to hang out with me and other Raspberry Pi fans, you can join the community. I share exclusive tutorials and behind-the-scenes content there. Premium members can also visit the website without ads.
Master your Raspberry Pi in 30 days: If you are looking for the best tips to become an expert on Raspberry Pi, this book is for you. Learn useful Linux skills and practice multiple projects with step-by-step guides.
The Raspberry Pi Bootcamp: Understand everything about the Raspberry Pi, stop searching for help all the time, and finally enjoy completing your projects.
Master Python on Raspberry Pi: Create, understand, and improve any Python script for your Raspberry Pi. Learn the essentials step-by-step without losing time understanding useless concepts.
You can also find all my recommendations for tools and hardware on this page.