

How to Install WordPress on your Raspberry Pi (Illustrated)
WordPress is an excellent tool for managing websites (I know what I’m talking about, this website runs on WordPress!). It’s possible to install it on a Raspberry Pi, and I will share the step-by-step guide to install a functional WordPress on your Raspberry Pi from scratch.
Before installing WordPress on a Raspberry Pi, 3 main services are required: Apache (web server), MySQL (database), and PHP (dynamic content). From there, installing WordPress is as simple as extracting the files to the right place and configuring the tool.
I’ll assume you’re starting with a blank SD card and give you all the steps to get there. Feel free to use the table of contents if you have already started the process.
If you’re looking to quickly progress on Raspberry Pi, you can check out my e-book here. It’s a 30-day challenge where you learn one new thing every day until you become a Raspberry Pi expert. The first third of the book teaches you the basics, but the following chapters include projects you can try on your own.
Prerequisites to install WordPress on a Raspberry Pi
Before installing anything on your Raspberry Pi, here are a few tips and requirements to ensure you have everything you need.
Hardware recommendations
You don’t need much in terms of hardware: a decent Raspberry Pi model connected to your network should do the trick.
While any Raspberry Pi will do (especially if you will be the only visitor), I recommend a Raspberry Pi 4 or better for this project. WordPress can sometimes be a bit heavy, and loading pages on an old Raspberry Pi model can be quite slow.
Then get a fresh SD card that you can prepare for the occasion (you can find the best SD cards reviewed here), and make sure you can connect your Pi to your local network (either via Wi-Fi as explained here, or with an Ethernet cable, which is even better for a server).
On my end, I’ll be using my Raspberry Pi 5 with my favorite SD card to test this tutorial for you.
A good keyboard, monitor and mouse can be useful if you use your Raspberry Pi during setup, but I generally use remote access from my computer for this (I’ll show you how).
Software requirements
In terms of operating systems, WordPress and the required services can be installed on basically any Linux distribution. I recommend using a Debian-based system like Raspberry Pi OS or Ubuntu so you can follow the steps exactly as described.
I’ll be using Raspberry Pi OS Lite for this tutorial, and I recommend you do the same if you’re starting from scratch. We don’t need a GUI (graphical user interface), and it will be the best distribution for you to get the most out of your WordPress setup.
If you need guidance to install Raspberry Pi OS, click the link to read my step-by-step tutorial.

Join Our Community!
Connect, learn, and grow with other Raspberry Pi enthusiasts. Support RaspberryTips and enjoy an ad-free reading experience. Get exclusive monthly video tutorials and many other benefits.
Learn moreIf you have a computer, I recommend enabling SSH so you can follow this tutorial from the computer and copy/paste the commands I give you directly to the Raspberry Pi. You can do this in the OS customization options with Imager, or via raspi-config directly once the system is installed:sudo raspi-config
Recommended read: Use SSH To Remote Control Your Raspberry Pi: A Complete Guide.
Before going further, it’s best practice to confirm your system is up-to-date. You can run these commands for this:sudo apt update
sudo apt upgrade
Are you a bit lost in the Linux command line? Check this article first for the most important commands to remember and a free downloadable cheat sheet so you can have the commands at your fingertips.
It's a free PDF guide containing every Raspberry Pi Linux command you should know!
Download now
Install the web server (Apache, PHP)
Once the system is installed (whatever option you choose), the first step is to install a basic web server on your Raspberry Pi.
Here are the main steps for this:
- Installing Apache to load static pages.
- Installing PHP to add dynamic page support.
- Testing that both Apache and PHP are responding properly.
Let’s do it.
Install Apache
Apache is the most popular web server on the Internet. Its job is to serve HTML files to visitors, which are then interpreted by web browsers.
Here is how to install Apache with APT on a Debian-based distribution:sudo apt install apache2
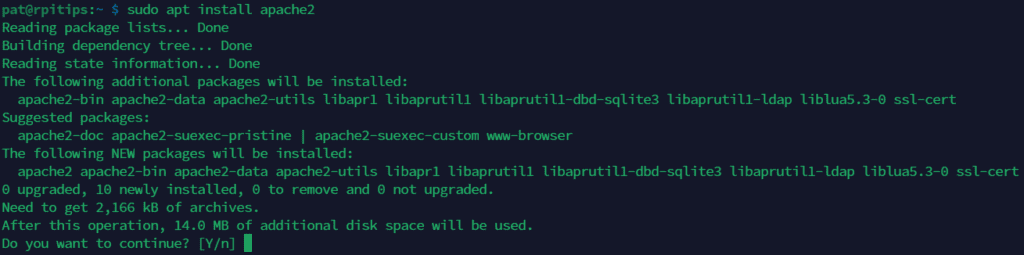
Press “Y” or “Enter” to start the installation. After a few seconds, the web server should be running on your Raspberry Pi.
Get your Raspberry Pi IP address if you don’t have it yet, and try accessing it in your web browser (http://IP_ADDRESS). You should see the default Apache page, something like this:
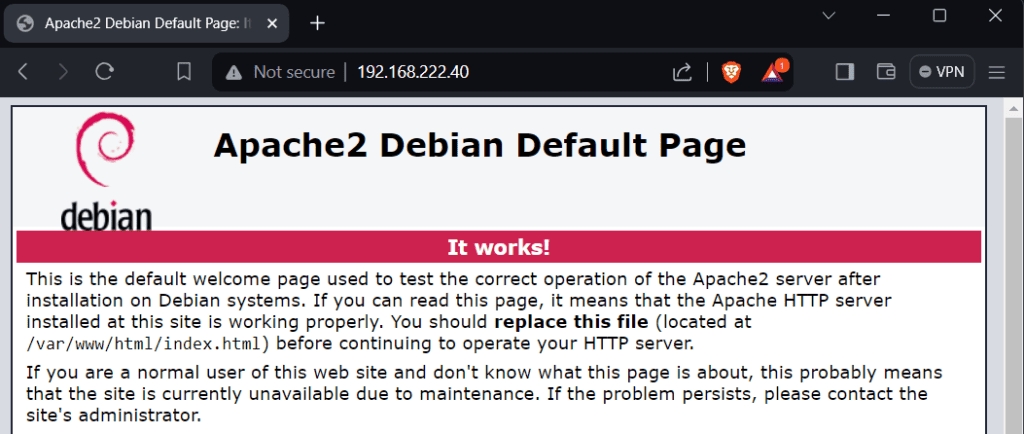
The first brick of our server is working (a web server loading static pages), we can now move on and add PHP support to it.
Install PHP
As a reminder, PHP is a programming language, designed to create dynamic content.
By dynamic content, I mean showing a different page based on different parameters (for example, whether you’re logged in or not).
PHP is also generally used to interact with a database, but we’ll see that later. For now, we need to install the PHP support for your Apache web server.
To do this, we need to install another package with APT:sudo apt install php
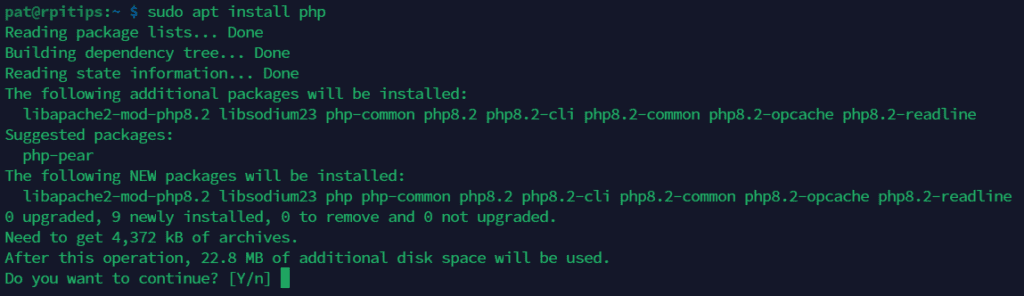
As you can see, it doesn’t just install the main packages for PHP, there is also a package called “libapache2-mod-php” that makes both work together.
Testing PHP support with Apache
To make sure that PHP is active, we will create a simple PHP file, and check if it’s loading properly with our web server:
- Go to the web folder, by default it’s:
cd /var/www/html - Create and edit a new PHP file in it:
sudo nano test.php
Not familiar with nano? Check this article for all the shortcuts and commands. - Paste the following PHP code into this file:
<?phpecho "Hello World!";?>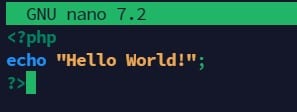
- Save and close (CTRL+O, CTRL+X).
Then go to http://IP_ADDRESS/test.php and see what happens.
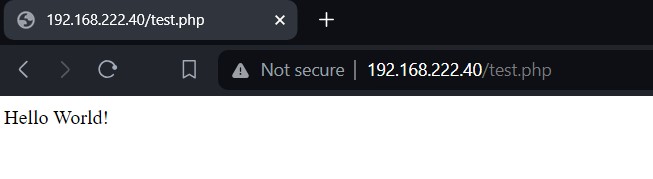
If you get something similar, it means Apache and PHP are working and you’re ready to move on. If you see the entire PHP code or nothing at all, it means something is wrong, double-check the previous steps before going any further.
Install a database server (MariaDB)
We can now create a website in HTML and PHP. But WordPress needs a little more. It uses a database to store all the posts, pages, and configurations.
For this, we will install our third service: MariaDB. It’s a free fork of MySQL, a database server commonly used in this type of setup.
Installing MariaDB on your Raspberry Pi
To install it, let’s use APT again:sudo apt install mariadb-server
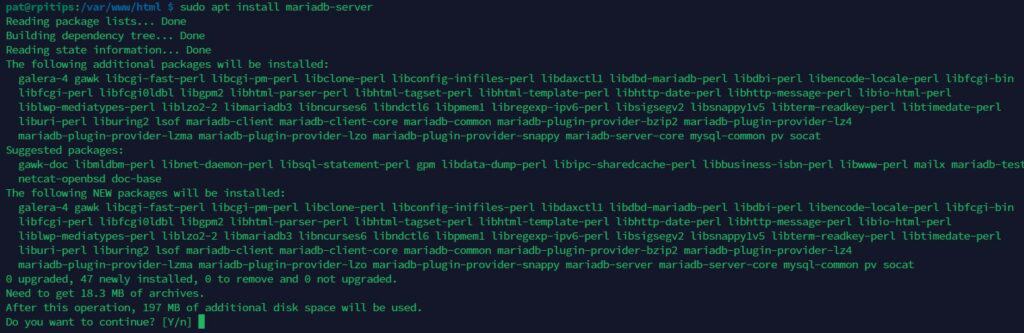
After a few seconds, all the dependencies and services should be installed and running, but we need a bit of configuration before using it for WordPress.
Configuration
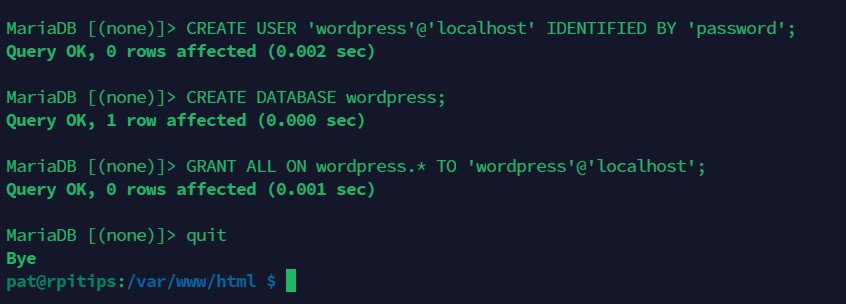
You can read my full tutorial on configuring a MySQL server on Raspberry Pi for the long version, but at the very least we need to create a new database and user for WordPress on the database server.
By default, only the root user has access without a password from their account. So, we will connect to it and create a new account for WordPress:
- Connect to the MySQL CLI:
sudo mysql -uroot - Create a new user:
CREATE USER 'wordpress'@'localhost' IDENTIFIED BY 'password';
You obviously can (and should) replace the username and password with your own credentials. This is just an example. - Create a new database:
CREATE DATABASE wordpress; - Give WordPress user all privileges on the new database:
GRANT ALL ON wordpress.* TO 'wordpress'@'localhost'; - Quit the MySQL CLI:
quit
PHP MySQL package
Another package we need before going further is the link between PHP and the MySQL server. It will allow PHP code to connect to the database server (required for WordPress).
Here is the command line to install this package with APT:sudo apt install php-mysql
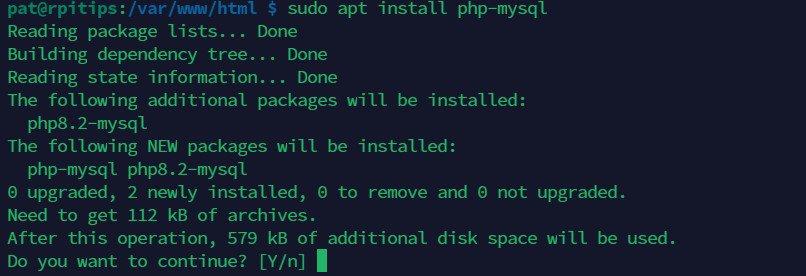
You’ll need to restart the webserver to apply the changes:sudo service apache2 restart
It's a free PDF guide containing every Raspberry Pi Linux command you should know!
Download now
Test
Again, let’s do a quick test to make sure the connection is functional:
- Try to connect to MySQL:
mysql -u wordpress -p - Enter the user password.
- Check if the user can view the new database:
SHOW DATABASES; - Quit:
quit
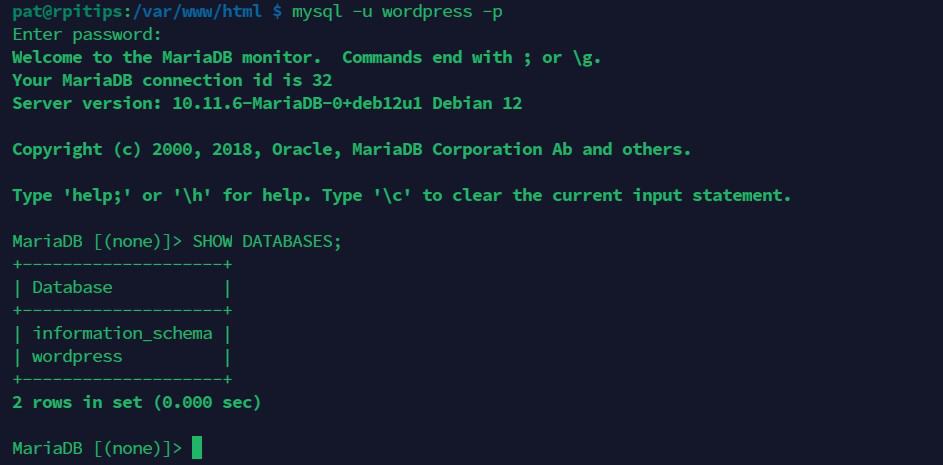
If you see at least the WordPress database, then you can continue and move to the WordPress installation itself.
Install WordPress
Everything is ready to host WordPress now, the hardest part is done. The “only” remaining step is to download and extract the WordPress files to the web server directory.
There’s nothing to install, just a bunch of PHP files to put in the same folder.
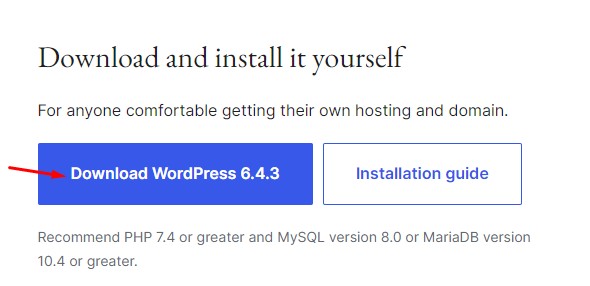
Download WordPress
WordPress offers its software in two versions:
- A version hosted on their servers, WordPress.com.
- A version to download, WordPress.org.
We are not interested in the first version, so go to the right website to download the files.
- Open the official website.
- Copy the link (right-click > copy link address).
- Use this command to download the archive to the Raspberry Pi:
sudo wget https://wordpress.org/latest.zip -O /var/www/html/wordpress.zip - Move to the web folder with:
cd /var/www/html - Extract all the files to the current folder:
sudo unzip wordpress.zip
It will create a new folder, named “wordpress”, with all the files in it.
Fix the permissions
To avoid permission problems with WordPress, and to avoid using the sudo later, we can modify the rights on the WordPress files:sudo chmod 755 wordpress -R
sudo chown www-data wordpress -R
This will give full permissions to Apache, and read/execution to other users.
Configuration
With the WordPress code extracted to the webserver’s main directory, we are now ready to access the configuration wizard. This step will help us:
- Configure the connection to the database.
- Create a login for the administration of WordPress.
Access the installation wizard by pointing your browser at http://IP_ADDRESS/wordpress:
- If asked, select your default language in the list, and click on “Continue”.
- You should then get a welcome message:
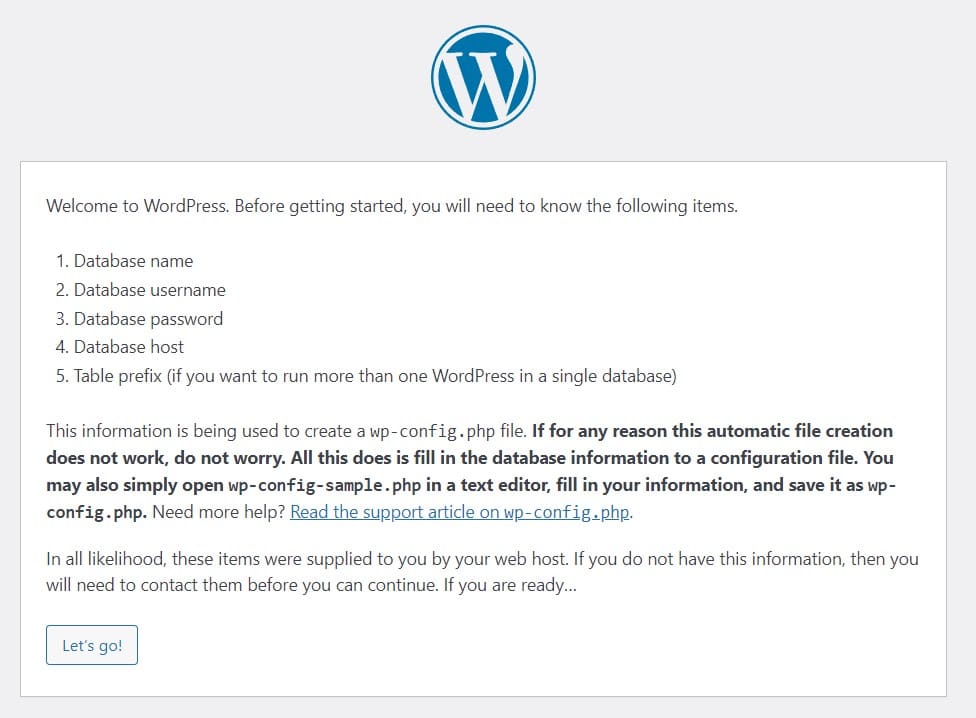
Click on “Let’s go!” to continue. - Then, fill out the form with your database name and credentials:
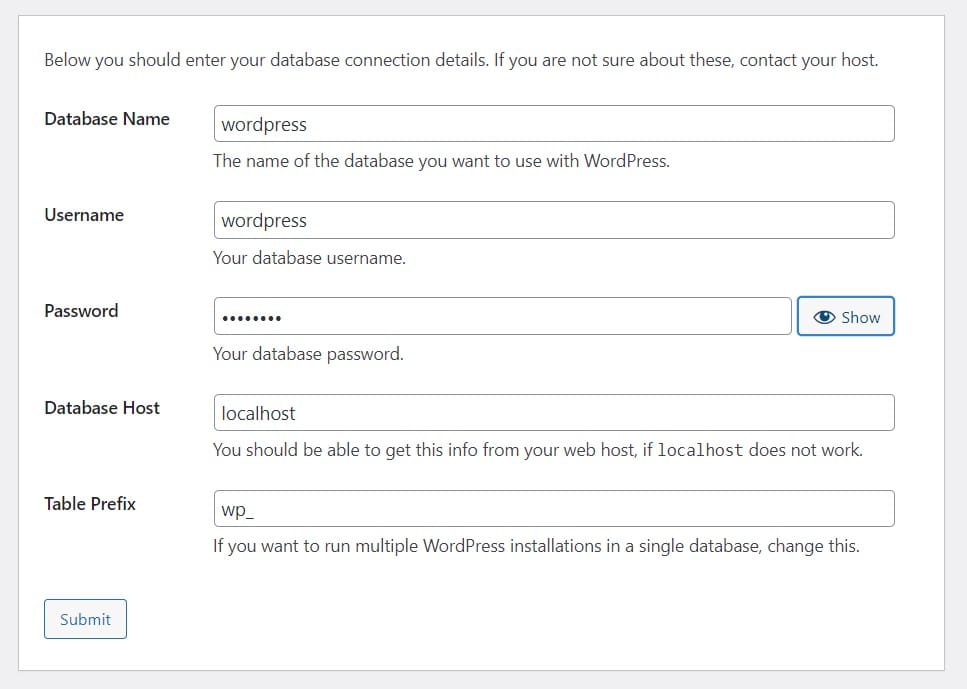
Click on “Submit” to continue. - Then click on “Run the installation”:

- On the last screen, you can fill out the website name and create the first user to access the WordPress backend (the administrator account):
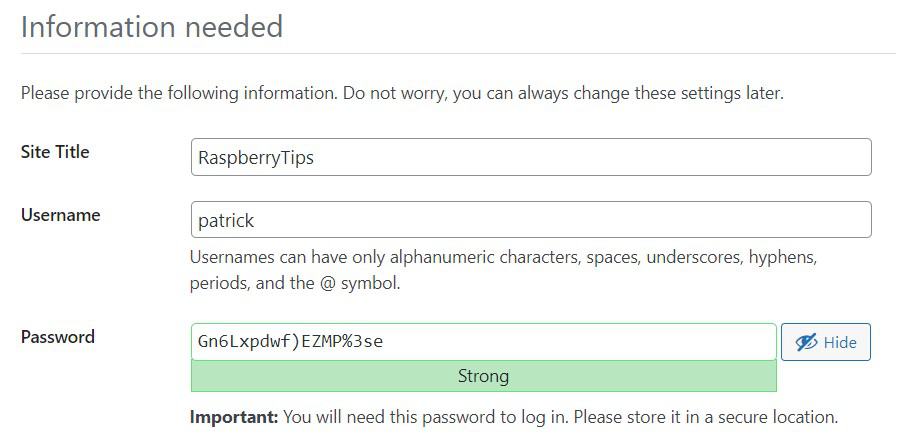
Click on “Install WordPress” once ready.
If everything works as expected, you should get a success message, with a link to access the WordPress administration page.
The configuration is complete! You can return to the address http://X.X.X.X/wordpress to see your WordPress website live!
It's a free PDF guide containing every Raspberry Pi Linux command you should know!
Download now
Extra Tips for WordPress
WordPress Introduction
I won’t go into much detail on using WordPress; this is not the goal here.
But now that it’s installed, I will give you two or three tips to get started.
Admin and Front
WordPress is composed of two parts:
- Administration: accessible by adding /wp-admin to the URL and protected with a login and password, it allows you to configure your site and add content.

- Front: this is the part visible to all visitors.
When you are logged in, the top bar allows you to switch from one to the other easily.
Appearance
WordPress comes with a basic design, but it’s possible to customize your site as you wish.
To get started, go to Appearance> Themes.
Here you can add free themes from the list.

In the Appearance menu, you can also manage your site menus and widgets.
A widget is a block that can be integrated into the sidebar. For example, to display a search engine or an image.
Plugins
Similar to Raspberry Pi, WordPress provides a scalable foundation.
You can install plugins, to add additional features to your website or your admin.
Go to Plugins > Add new to see a list of all plugins available.
Pages and Posts
Once your site is personalized, it’s time to add content.
For this, you can create two types of content:
- Pages: These are static pages, which contain content. For example your homepage or a contact form.
- Posts: that’s all the rest of the content, they are grouped into categories to make it easier for users to search later.
You will be able to add your pages and categories to your menus, and the posts will appear automatically.
Services management
Let’s go back to our services that allow you to run WordPress: Apache, PHP, and MySQL.
You need to know that there are commands to start or stop these services.
This may be useful in case of a crash, or if you want to stop them to cut access to the site.
Here are the commands:
sudo service apache2 start | stop | restart | reload
sudo service mysql start | stop | restart | reload
As I said above, PHP is a module of Apache, so there is no particular command to manage it.
If Apache is running, the PHP pages should be displayed correctly.
For more details about the webserver management, I encourage you to read this article: Set Up a LAMP Web Server On A Raspberry Pi.
Services configuration files
I will also tell you where to find the configuration files if you ever want or need to make changes:
Apache: /etc/apache2
PHP: /etc/php
MySQL: /etc/mysql
In a typical WordPress installation, you normally don’t need to touch the configuration.
But if this article makes you want to try other things, it could be useful.
PHPMyAdmin
PHPMyAdmin is a handy tool that you can use on a LAMP installation.
This web interface allows you to access your MySQL databases more intuitively.
You will be able to view and modify the data, create users, manage rights and supervise the MySQL server.
To install it, use the following command:sudo apt install phpmyadmin
Choose apache2 as your web server when asked (press “Space” to check the box).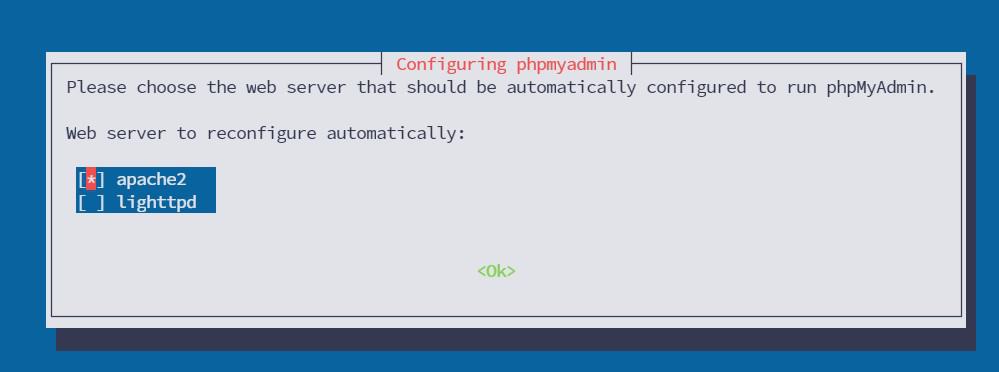
You can skip database configuration.
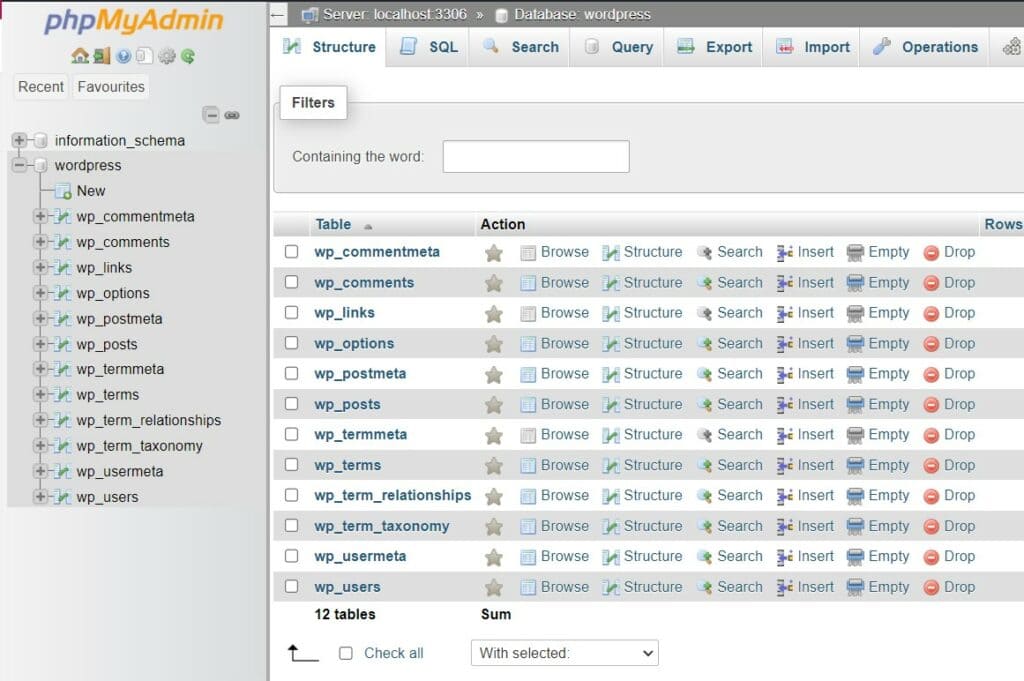
Once the installation is complete, the interface is available at http://X.X.X.X/phpmyadmin.
Log in with your WordPress account to see the WordPress database.
Share the website on the Internet
If you want to share this newly created website on the Internet, it’s not necessarily easy, but it is possible.
You have to redirect a port from your internet box to port 80 of the Raspberry Pi.
It will allow you to connect to the site by using the public IP address of your Internet connection, something like:<Public IP>:<PORT> => <Raspberry Pi IP>:80
That’s what we call port forwarding.
This way, you can access the website with: http://Y.Y.Y.Y:PORT/wordpress.
Y.Y.Y.Y is your public IP, and PORT is the port you configure on your router.
If you do not have a fixed IP address, you can look into dynamic DNS services, which allow you to use a Web address that is constantly updated with your new IP address.
This post goes into more detail: How to Install and Use No-IP on Raspberry Pi? (Dynamic DNS).
A VPN can also be a good option, especially if it’s not a website built for the public. WireGuard can be set up on a Raspberry Pi in a few minutes.
It's a free PDF guide containing every Raspberry Pi Linux command you should know!
Download now
Want to chat with other Raspberry Pi enthusiasts? Join the community, share your current projects and ask for help directly in the forums.
Conclusion
So you learned to install a LAMP server on Raspberry Pi and to install WordPress to use it.
You were also given tips to go further with your installation of WordPress.
I was pleasantly surprised to see that WordPress works pretty well on Raspberry Pi, while it happens to be rather slow on some professional web hosting. It can be a project idea to think about!
If your WordPress site is important, like with real traffic from remote users (not only you), it’s probably a good idea to put something in place to monitor it. You can read my article on the topic here: The Definitive Guide To Monitor A Website On Raspberry Pi
Whenever you’re ready, here are other ways I can help you:
The RaspberryTips Community: If you want to hang out with me and other Raspberry Pi fans, you can join the community. I share exclusive tutorials and behind-the-scenes content there. Premium members can also visit the website without ads.
Master your Raspberry Pi in 30 days: If you are looking for the best tips to become an expert on Raspberry Pi, this book is for you. Learn useful Linux skills and practice multiple projects with step-by-step guides.
The Raspberry Pi Bootcamp: Understand everything about the Raspberry Pi, stop searching for help all the time, and finally enjoy completing your projects.
Master Python on Raspberry Pi: Create, understand, and improve any Python script for your Raspberry Pi. Learn the essentials step-by-step without losing time understanding useless concepts.
You can also find all my recommendations for tools and hardware on this page.


Hi,
Thanks for the notes. everything worked as expected but if I try to access the web server WordPress site on the local LAN I seem to get the webpage but without any formatting. Do you have any suggestions as to what I’m doing wrong?
Hi Howard
I don’t know if this is it, but I googled a bit (“broken wordpress site serves pages without formatting”) and found this page with a few tips as the first hit. There are more hits that might help. Also, as you’re on a local LAN maybe a firewall rule on your LAN client or router or WordPress server is blocking remote content from the WAN or your WordPress server to your LAN client, or blocking insecure content while letting secure content through, or maybe SSL is required to send/receive secure content but you don’t have SSL working.
https://docs.wp-rocket.me/article/138-my-site-has-no-styles-and-looks-broken
* Find out what the error is
* Insecure content from CDN
* Security restriction
* 404 on minified files
Perfect!!! Thank you.
Hi,
Thank you for taking the time and the trouble to produce this guide. Glad you included the MariaDB instructions that while probably transparent to the user using MySQL, making it explicit helps reduce anxiety.
I had an issue with “Your PHP installation appears to be missing the MySQL extension which is required by WordPress.” Searching for solutions for this problem was hard as the information available is for php5 or php7. Several attempts at apt-get update and install were unsuccessful. Only when I ventured into changing the CLI request to php7.3, the one running in my installation, was I able to get the installation going.
One question remains in my future, if you have the time. Is it possible to make this WordPress installation answer to traffic coming in via wifi? I plan to use it in areas of low economic resources an am hoping to this can serve as a communication tool in a small isolated community. I would appreciate if you shared how to do this.
Hi Eusebio,
Yes, it works the same via Wi-Fi
Just use the Wi-Fi IP address to access the WordPress website
If you have any issue let me know, I may have misunderstood your question
Hello,
Thanks again for your work and for the reply. I set up a new site using your instructions. Everything went well. Actually, you understood what I wanted to know, yet my question could have been more specific.
Cheers.
Thanks for your message Eusebio 🙂
How do I set this up so I can get the site to work without the /worpress?
I can remotely access the wordpress site from my domain name/wordpress.
I tired, with a fresh installation, following all the instructions, the only difference is I unzipped the wpfolder contents directly in /var/www/html.
Changed –
sudo chmod 755 html -R
sudo chown www-data html -R
In wp-admin I changed
WordPress Address (URL)= http://myowndomainname
Site Address (URL)= http://myowndomainname
But I cannot connect to it from the internet. Only on my LAN.
Please help
Hi Dan,
So http://IP is working but not http://domainname.com ?
Did you change your DNS and router configuration to make this works?
If this is ok, the issue probably comes from the Apache configuration (maybe it doesn’t respond on any IP address, or the domain name is not correctly configured in the sites-enabled folder
At “Install a database server (MariaDB)”
In “Connect to the MySQL CLI” is:
sudo mysql -uroot -p
Thanks.
Oups!
Thanks for your comment, it’s fixed 🙂
I have install like this guide for a few weeks ago and everything is working but wordpress say i run on an old php version of PHP (7.3.22-1+0~20200909.67+debian10~1.gbpdd7b72) and i have installed a new version (7.4.10) and my raspberry pi says it is installed but wordpress still say i have the old installed and i don´t know how i will get wordpress to take the new version!
I have try på restart raspberry, apache2 and mariadb but no change! What do ido wrong?
Hi,
Maybe if you still have both versions, you need to tell Apache which one to use
Something like:
sudo a2dismod php7.3
sudo a2enmod php7.4
Or uninstall PHP 7.3 if you don’t need it anymore
It´s works!
Now i have some other questions…
1) How to uninstall the php7.3 installations?
2) Now my wordpress alarming on missing php modules:
curl, mbstring, imagick, zip and gd is not installed or disactivated.
How can i installed them?
1/ “sudo apt remove php7.3 php7.3-common” should do the job
2/ if you added a repository for php7.4, you can install them with “sudo apt install php7.4-curl php7.4-zip etc.”.
If no repository, I recommended adding one, for example: https://deb.sury.org/
It works, now i have only php7.4 installed and all the modules are installed and running and wordpress don´t alarming anymore…
Thanx for quick and easy explained for a newbie on this!
The most guides here on internet are for thoose how already knows how the terminal is working and knows all commands.
Thanx again for doing this easy!
how can one change the index of the website… every time i do it it ether errors out or removes all the graphics on the wordpress website
Hi,
What do you mean by “change the index”? The design?
Examples of errors you get?
Thanks for this helpful tutorial! This will make it easy for me to put WordPress on a Pi.
I am concerned that it doesn’t mention how to keep WordPress up to date for security. WordPress plugins and themes have new security problems almost daily. A Raspberry Pi could save me some money (instead of paying someone monthly for WordPress hosting), but I don’t want to add yet another insecure machine to the Internet. There are already so many routers and IoT devices that are used by criminals (and even malicious governments) to launch their attacks (DDoS, ransomware, spam, infiltration, click-fraud, phishing, etc).
Do you have any tips on how to setup a Pi with WordPress in a way that won’t require a sysadmin to be constantly vigilant?
A good, basic guide, thanx!
One thing you might want to edit: after installing the php-mysql package you need to restart apache2 via sudo systemctl restart apache2. Otherwise you’ll get the “you’re missing a required extension” error from WordPress when you try to access the site to do the initial configuration. At least that’s what happened to me.