How to Generate & Use SSH Keys on Raspberry Pi
Using SSH keys is generally a good practice for security or convenience as it avoids using passwords when connecting to a remote computer via SSH. But understanding exactly how it works, finding the right commands, and putting everything into practice is another challenge. Let me explain everything about SSH keys!
On Raspberry Pi OS, SSH is installed by default and SSH keys can be generated with the command “ssh-keygen”. The public key generated can then be used to access remote servers without any password (once the Raspberry Pi is allowed on each server).
I’ll start by answering your main question on how to generate ssh keys on Raspberry Pi with more details. Then I’ll explain how to use them because I guess it will be your next question :-).
If you’re looking to quickly progress on Raspberry Pi, you can check out my e-book here. It’s a 30-day challenge where you learn one new thing every day until you become a Raspberry Pi expert. The first third of the book teaches you the basics, but the following chapters include projects you can try on your own.
How to Generate SSH Keys on Raspberry Pi
The first step, if you plan to use SSH keys to connect from the Raspberry Pi to another server, is to make sure SSH is installed and then use one command to generate the keys.
Make sure SSH is already installed
On Raspberry Pi OS (any version), SSH is pre-installed, so there is nothing more to do. But if you are using another operating system, it’s a good idea to check whether it’s installed or not.
You can check this by using the package manager command.
On Raspberry Pi OS and all Debian-based systems, it will be APT:sudo apt install ssh
If you get something like this as a result, it means it’s already installed:
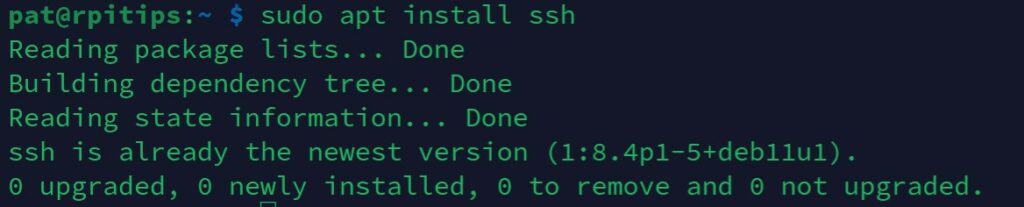
If it’s not installed, it will be added to your system when you execute the command (you may have to confirm the installation, but that’s all).
The main idea in this tutorial is to use the SSH client only (to connect from the Raspberry Pi to another server), but if you want to also enable the SSH server on the Raspberry Pi (to access it from another computer), you can follow this other tutorial that tells you everything about SSH. I will also address the other way at the end of this article.
It's a free PDF guide containing every Raspberry Pi Linux command you should know!
Download now
Are you a bit lost in the Linux command line? Check this article first for the most important commands to remember and a free downloadable cheat sheet so you can have the commands at your fingertips.
Generate SSH keys
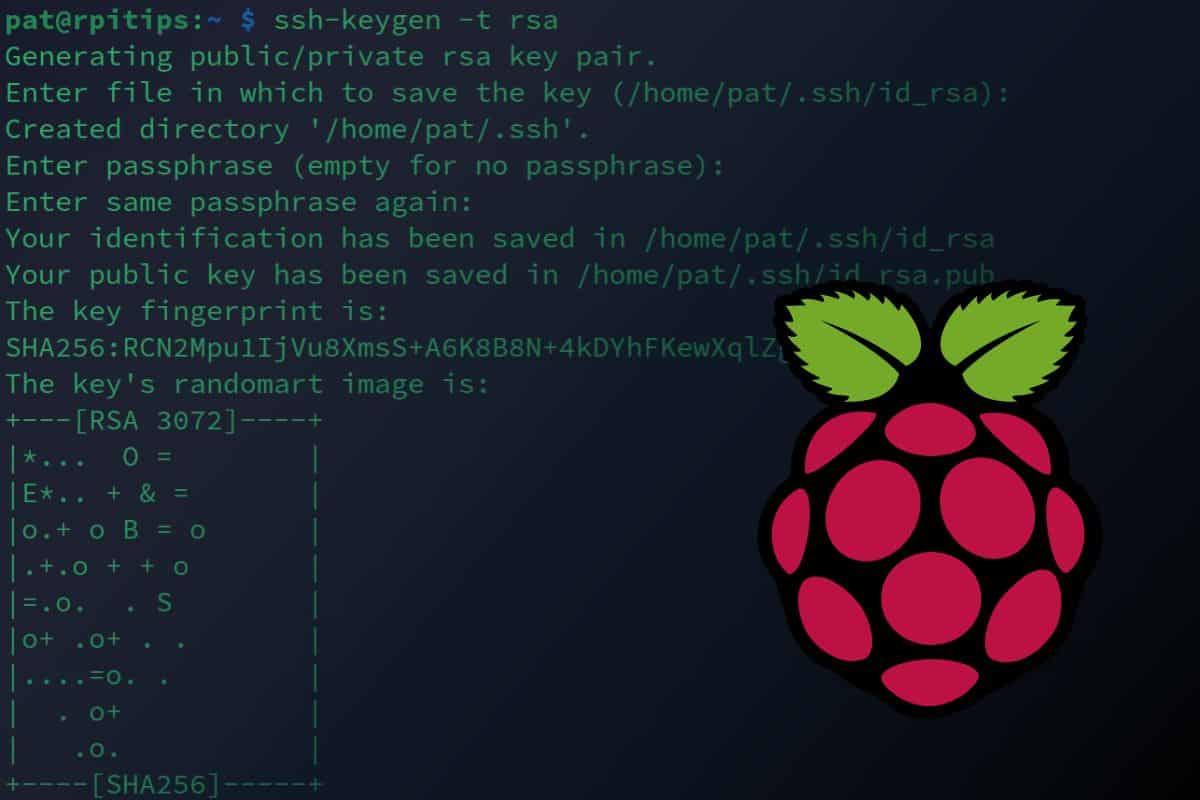
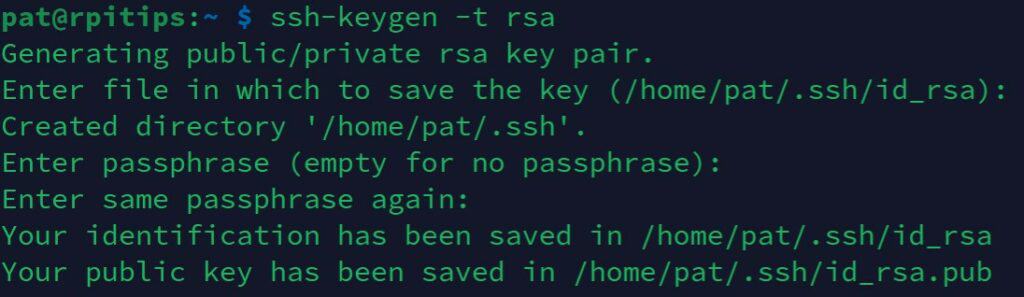
Once SSH is installed, this command becomes available to generate the SSH keys:ssh-keygen -t rsa
Note: The -t parameter is optional on Raspberry Pi OS, but on some systems, the default security is still DSA. RSA is recommended for its stronger security and broader compatibility.
You can keep the default file location (/home/$USER/.ssh/id_rsa) and no passphrase is required (so just press Enter three times to generate it with the default settings).
Note: Using a passphrase when generating SSH keys can provide an additional layer of security. Decide depending on the situation. For a basic home setup, no passphrase is safe enough and more convenient, but if you have different users, host critical data, or want extra protection, then go ahead and add a passphrase here.

Join Our Community!
Connect, learn, and grow with other Raspberry Pi enthusiasts. Support RaspberryTips and enjoy an ad-free reading experience. Get exclusive monthly video tutorials and many other benefits.
Learn moreYou’ll now have two files under /home/$USER/.ssh:
- id_rsa: The private key that will stay on the Raspberry Pi. Don’t share it, ever.
- id_rsa.pub: The public key that you will share with each server you want to access.
Let’s see how to use them now, but first, let me explain the theory behind it because it’s not obvious when it’s your first time using this.
It's a free PDF guide containing every Raspberry Pi Linux command you should know!
Download now
How to Use SSH Keys to Connect Without a Password
When using SSH keys on Raspberry Pi, the goal is often to access a server without a password, for example, in a script, or just for convenience. But as mentioned earlier, if you follow this tutorial for security reasons, it’s the same process.
The theory about SSH key usage
When I explained how SSH keys work to my colleagues in my team, I always used the analogy of a fingerprint reader.
For example, if your phone has this feature, you’ll need to configure it first and record your fingerprints into the system so it can detect whether it’s your finger or not the next time someone tries to unlock it.
SSH keys work the same way. It’s not like a key and a lock where you give the key to everyone that needs access to a server. It’s the other way around. Each future user needs to register first before they can get access without a password.
In summary:
- The first step is to generate a unique SSH key for the client (we already did this on the Raspberry Pi).
- Then we send the public SSH key to the server. The server will register it in order to recognize us when we try to log in after that.
- Finally, we can then use the SSH key to access the server without a password, the server already knows us, so the password is unnecessary.
How to use SSH keys
To simplify, we’ll consider you are trying to connect to a Linux server, which will be the case 99% of the time when you use SSH. It can be another Raspberry Pi or any server running any Linux distribution. The steps are the same.
Test the SSH connection with a password
Before trying something more complicated, let’s try something basic, which is connecting from the Raspberry Pi to the server manually by using the traditional SSH command:ssh <user>@<ip_address>
It's a free PDF guide containing every Raspberry Pi Linux command you should know!
Download now
So, you need two things at this step:
- The username: on a Linux server, it might be “root” or any user created on the server for this usage. If it’s another Raspberry Pi, maybe it’s “pi” for an old setup or the user you created on the first boot.
- The IP address: For Linux servers, you can follow this tutorial on how to get the current IP address.
Once you have both and run the command, you may need to confirm the connection (type “yes” and press “Enter”), and then it will ask for the user password.
For example, in my test I did:ssh pat@192.168.222.10
Once connected, you can type this command to get back to the Raspberry Pi prompt:exit
Transfer the public key to the server
Now, we need to transfer the public key you generated to the remote server. As SSH is enabled and working, the easiest way will be to transfer the key via SFTP to the remote server.
I generally use SCP to do this. On the Raspberry Pi, follow this syntax format:scp <public_key> <user>@<ip>:<remote_path>/<remote_file>
- Replace <public_key> with the complete path to the file we just generated.
- Replace <user> and <ip> with the same values you used to test the SSH connection.
- <remote_path> and <remote_file> can be anything, I generally put the public key in the home directory with a name mentioning which client it is for.
To clarify, here is what it looks like in my example:scp /home/pat/.ssh/id_rsa.pub pat@192.168.222.10:/home/pat/id_rsa_rpi.pub
I now have the file “id_rsa_rpi.pub” in the home directory on the remote server and can use it in the next step to allow the Raspberry Pi to access this server.
Add it to the authorized keys for the user
The last step is to tell the remote server to allow connection from the Raspberry Pi by using the public key as a fingerprint. Here are the steps to do this:
- Open a terminal on the remote server. You’ll generally use SSH from the Pi once again to do this:
ssh <user>@<ip_address> - Add the public key to the authorized_keys file.
The public key is where you sent it in the previous step (/home/pat/id_rsa_rpi.pub in my example), and the authorized_keys file is under .ssh in the remote folder home directory (the next command will create it if it doesn’t exist).
The command syntax is:cat <public_key> >> /home/$USER/.ssh/authorized_keysIn my example, I used:cat id_rsa_rpi.pub >> .ssh/authorized_keys - Get back to the Raspberry Pi.
You can disconnect from SSH with:exit
Test it
If everything works as expected, you can now connect from the Raspberry Pi to the remote server without a password (or by using the passphrase used when generating the key, if you used one).
You can try it with:ssh <user>@<ip_address>
It’s the same command as in the first step, but now the SSH keys have been exchanged, so it shouldn’t ask for a password.
And you should be connected directly. In my example, it looks like this:
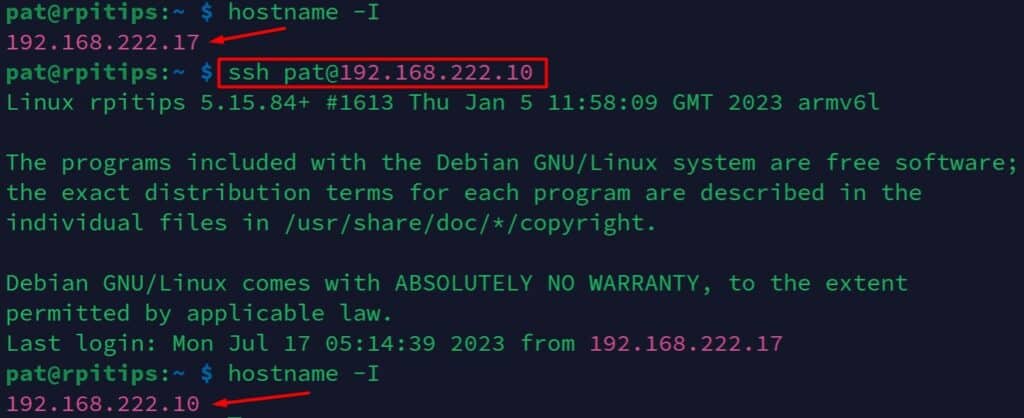
I know, my two Pis have the same hostname, which is bad practice. But as you can see, I get connected directly without typing any password, which was the goal.
Note: If for any reason you have several public keys on the Raspberry Pi (sometimes the server host provides one), you can specify which file to use in your SSH command with the option “-i”, like this:ssh -i <public_key> <user>@<ip_address>
It's a free PDF guide containing every Raspberry Pi Linux command you should know!
Download now
Want to chat with other Raspberry Pi enthusiasts? Join the community, share your current projects and ask for help directly in the forums.
The Other Way: Using SSH Keys to Access a Raspberry Pi
If your goal is to access a Raspberry Pi via SSH by using SSH keys instead of a password, the theory is basically the same. What is different is how you generate SSH keys on your computer, and it depends on the operating system you use on it.
From a Linux or Mac computer
If your computer, the client, is running Linux or macOS, the steps and the commands are the same.
You need to have SSH installed on it. Then you can use ssh-keygen to generate the keys, and scp or any SFTP client to send the file to the Raspberry Pi.
On the Raspberry Pi, follow the same steps to add the public key to the authorized keys file and it should be working right away.
From a Windows computer
If your computer runs a recent version, there is a good chance that you can follow the same steps. To be honest, I rarely do this and I was amazed to discover that all the commands (ssh, ssh-keygen and scp are now available on Windows 11).
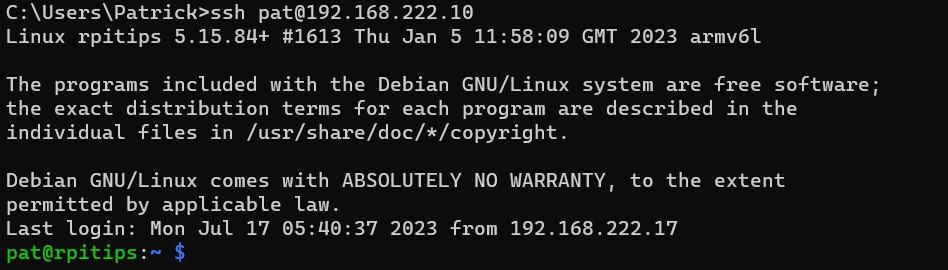
So, if you use Windows 11 (and maybe 10), you can follow the same steps as in the Raspberry Pi procedure:
- Open the command prompt on Windows (Win+R, type “cmd”, press Enter).
- Generate the keys with:
ssh-keygen
- Send the file to the Raspberry Pi with scp:

- Copy the key to the authorized_keys, and you’re good to access the Pi without a password:
On older versions of Windows, you will need to install the full suite of the Putty client (or any other client that can handle SSH keys). You’ll have to use PuttyGen to generate a new SSH key, and then add it to the Pageant tool to use it when you connect via the usual Putty client.
This is a different file format and an entirely different process, so I recommend finding a detailed tutorial specifically about Putty SSH keys if it doesn’t work this way.
Or you can use Termius, my current SSH client, which does it natively with a more intuitive interface (you can import or generate keys when you create a new identity).
Whenever you’re ready, here are other ways I can help you:
The RaspberryTips Community: If you want to hang out with me and other Raspberry Pi fans, you can join the community. I share exclusive tutorials and behind-the-scenes content there. Premium members can also visit the website without ads.
Master your Raspberry Pi in 30 days: If you are looking for the best tips to become an expert on Raspberry Pi, this book is for you. Learn useful Linux skills and practice multiple projects with step-by-step guides.
The Raspberry Pi Bootcamp: Understand everything about the Raspberry Pi, stop searching for help all the time, and finally enjoy completing your projects.
Master Python on Raspberry Pi: Create, understand, and improve any Python script for your Raspberry Pi. Learn the essentials step-by-step without losing time understanding useless concepts.
You can also find all my recommendations for tools and hardware on this page.