3 Simple Ways to Disable IPv6 on Raspberry Pi
Be it network simplification or compatibility issues with older hardware, there are several use cases which would require disabling IPv6 on the Raspberry Pi. However, the question is how exactly do we achieve that? Well, this tutorial is a comprehensive guide that answers that very question!
There are three ways to disable Raspberry Pi running the Latest Bookworm OS. The simplest option is to use “nmtui” to disable it through a user interface. Apart from this, we can use the “sysctl.conf” and the “cmdline.txt” boot file to disable IPv6.
I’ll explain everything in detail in this article, starting with a brief introduction to IPv6 and the implications of disabling it on your Pi. Before that, let’s take a look at why we need the IPv6.
Every device connected to the Internet needs a unique address to communicate with other devices. The Internet protocol provides these addresses. However, the older generation IPv4 protocol is running out of addresses because of the exponential rise in the number of devices. That is why the IPv6 Standard came into existence.
If you’re looking to quickly progress on Raspberry Pi, you can check out my e-book here. It’s a 30-day challenge where you learn one new thing every day until you become a Raspberry Pi expert. The first third of the book teaches you the basics, but the following chapters include projects you can try on your own.
IPv6 – A Gentle Introduction
What is IPv6 standard?
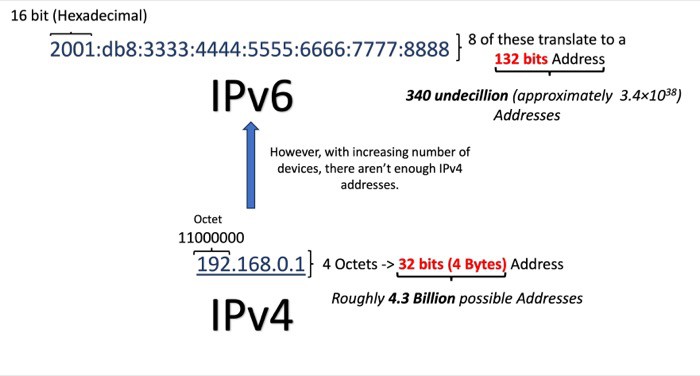
IPv6 is the next-generation Internet protocol that has been designed to eventually replace the legacy IPv4 protocol and resolve this issue. It provides a much larger address space, allowing a virtually unlimited number of unique IP addresses.
It's a free PDF guide containing every Raspberry Pi Linux command you should know!
Download now
Implications of Disabling IPv6
Although it is possible to disable IPv6, there are several things we need to consider. Let’s take a look at some of the implications of doing this:
Positive Implications
- Simplified Network Management: Disabling IPv6 can simplify network management and troubleshooting, as managing just a single IP protocol reduces the complexity of the entire network.
- Improved Security (in specific scenarios): If an organization has not configured or secured IPv6 properly, it might be vulnerable to security risks through the IPv6 standard. Disabling IPv6 can help prevent these risks.
- Compatibility Issues: Some older applications or systems may not support IPv6. Disabling IPv6 means better compatibility for these systems.
- Reduced Network Traffic: Disabling IPv6 can reduce the amount of unnecessary network traffic on a network. If both IPv4 and IPv6 are enabled but only IPv4 is in use, IPv6 traffic can still access the network, consuming both the bandwidth and processing resources.
Negative Implications

Join Our Community!
Connect, learn, and grow with other Raspberry Pi enthusiasts. Support RaspberryTips and enjoy an ad-free reading experience. Get exclusive monthly video tutorials and many other benefits.
Learn more- Connectivity and Compatibility: Disabling it can lead to compatibility concerns with networks that require or prefer IPv6 connectivity.
- Impact of Performance: IPv6 offers advanced features like more efficient routing and packet processing. Hence, disabling it can take a toll on the performance of your existing network.
- Impact of Security: IPv6 includes mandatory support for IPsec, a protocol suite for securing internet protocol communications. Disabling it might limit these built-in security features.
- Future Proofing and Scalability: The internet is steadily moving towards an IPv6 due to the vast address space it offers. Disabling IPv6 may offer a short-term solution to specific issues but will result in problems over long-term scalability and future-proofing of a network.
- Difficulty in Adopting Recent Services: Numerous applications are incorporating advanced IPv6 features like direct device-to-device communication facilitated by the large address space. So disabling IPv6 will impact the support and efficiency of these applications greatly.
It’s important to do a detailed evaluation before actually disabling IPv6. Now that we have an idea of what IPv6 is, let’s get started with the actual tutorial. We will now take a deep dive into the three methods that can be used to disable IPv6 on the Raspberry Pi.
It's a free PDF guide containing every Raspberry Pi Linux command you should know!
Download now
How to Disable IPV6 on Raspberry Pi
This section discusses the following three methods:
- Disabling IPv6 through Network Manager.
- Disabling IPv6 using etc sysctl.conf file.
- Disabling IPv6 on boot through the cmdline.txt file.
Please note that the first method will only work for Bookworm. However, the rest of the methods will work for older OS versions as well.
Method 1: Disabling IPv6 through Network Manager
Network Manager comes installed by default since Raspberry Pi Bookworm. I like this new tool for network management, it makes everything intuitive for most configuration changes.
In this section, we will cover two ways to disable IPv6 through Network Manager in two different ways:
–Through the Network Manager’s Desktop Interface.
–Through the Network Manager’s Terminal Interface.
It's a free PDF guide containing every Raspberry Pi Linux command you should know!
Download now
So, let’s start the actual tutorial. We will start with the Desktop interface first.
Network Manager Desktop Interface
Let’s first take a look at how to disable IPv6 through the Desktop Interface.
- The first step is to boot into your Raspberry Pi’s Desktop. Make sure that you are connected to a wireless or wired network as you will be able to disable IPv6 for that particular network with this tutorial.
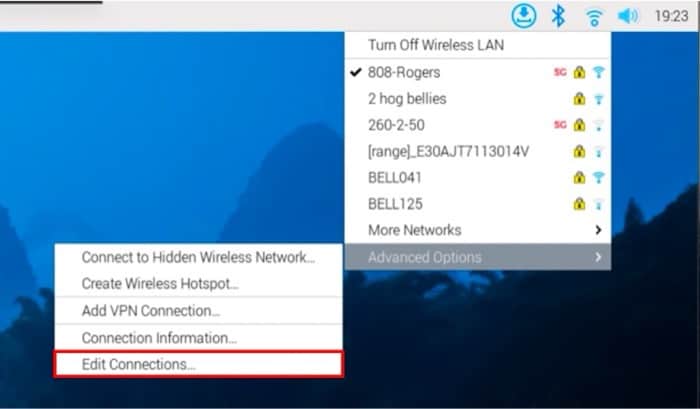
- First, click on the Wi-Fi icon situated on the top right side of your screen. You should see a menu showing all the networks available. Go to Advanced Options >> Edit Connections.
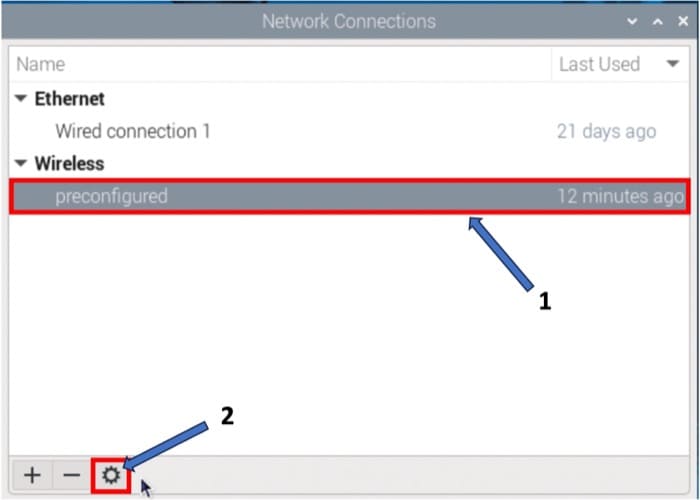
- This will open a new window. Now, you have to choose the network for which you would like to disable IPv6. Click on the name of the network (it will be named pre-configured if you have set it before the first boot through Raspberry Pi Imager) and press the cog icon on the bottom to open its configuration window.
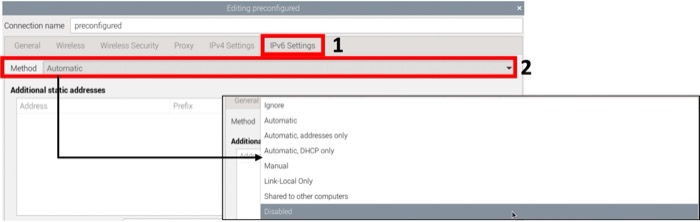
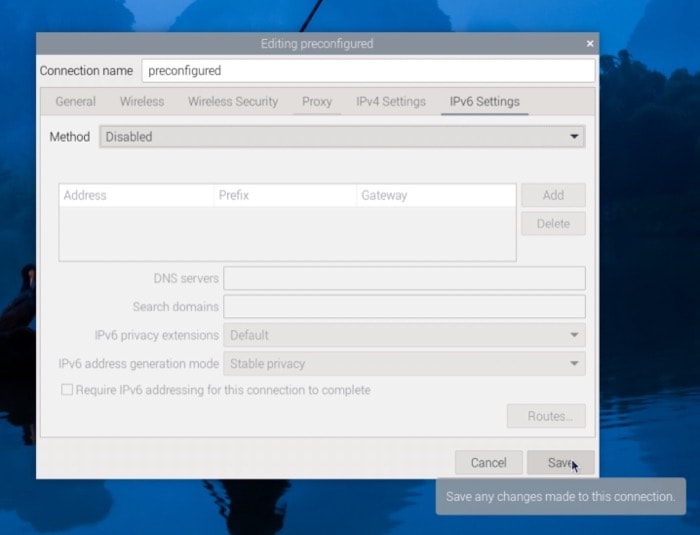
- This will open a new window displaying all the different configurations for your selected network. Navigate to the IPv6 Settings tab and then select “Disabled” from the Method dropdown to disable this network.
- Then, simply save these changes by pressing the Save button situated on the bottom right side of the window.
- That was all! You have successfully disabled IPv6 for this network. However, for these saved changes to come into effect, you will need to reboot your system. Once you have done that, you can see that the inet6 addresses will disappear from the
ifconfigcommand output.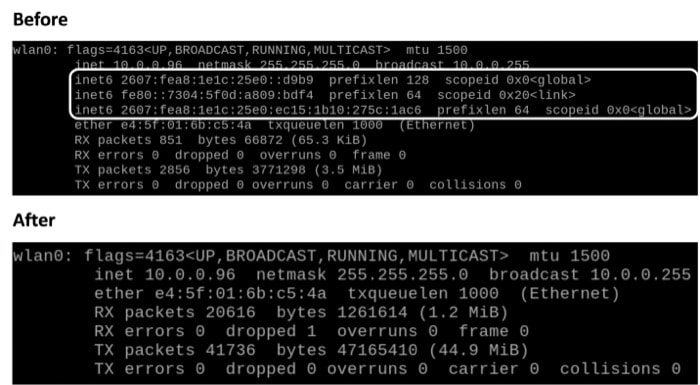
- To re-enable IPv6 through this method, all you need to do is set the Method dropdown to Automatic again and reboot your system.
Next, we will learn how to do the same thing through the terminal interface provided by Network Manager.
Network Manager’s Terminal Interface
There are several use cases when you don’t have a Desktop Installation or only SSH access for Raspberry Pi OS. This option is really useful in that case. Network Manager provides a great terminal user interface that is easy to navigate. So, let’s see how to use it to disable IPv6.
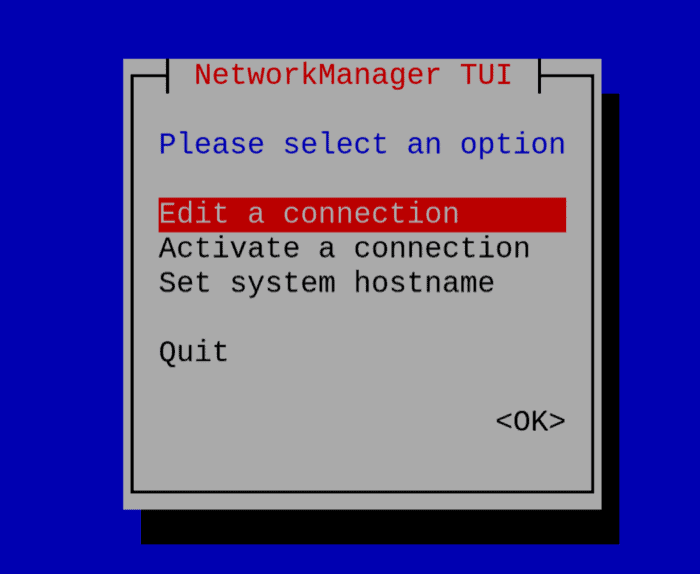
- The first step is to access this UI. For that, just type the following command on a terminal window:
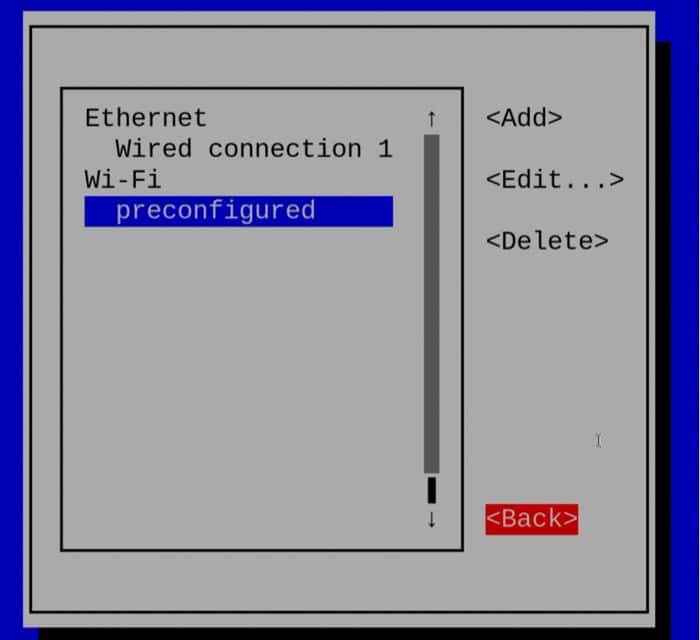
nmtui - This will open the Network Manager interface created for a terminal window. Select Edit a Connection and press Enter.
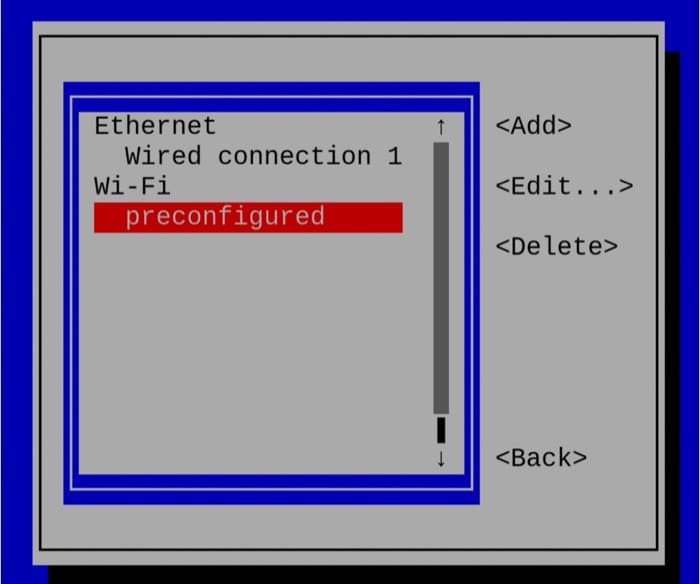
- This will open a new screen listing all the saved networks on your system, which is very similar to what you see in the previous section. Just choose the network for which you would like to disable IPv6 and press Enter (preconfigured in my case).
- Once you see the Edit connection window for your network, navigate to the IPv6 CONFIGURATION section and then select “Disabled” from the drop-down menu and press Enter.
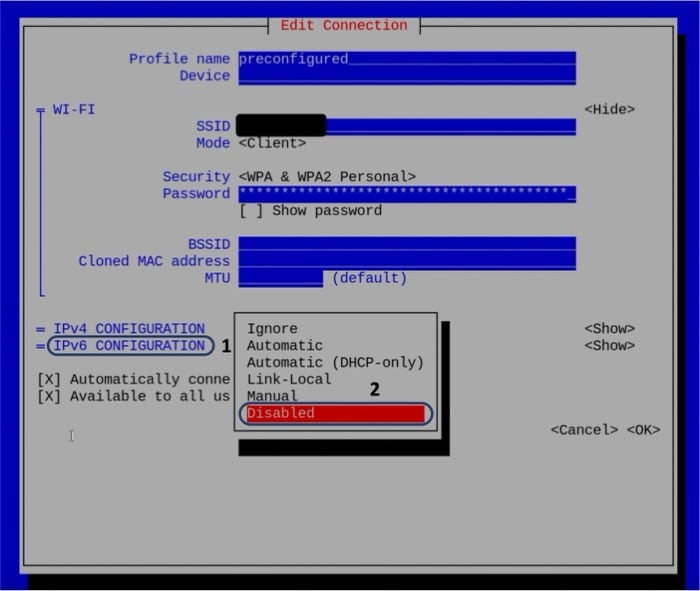
- Finally, go to the <OK> option and press Enter to save the changes you just made. This will take you back to the networks screen, where you can get back to the home screen by navigating to the <Back> option and pressing Enter.
- Finally, from the home screen, go to the Quit option and press enter to exit the UI. Now, similar to the previous step, reboot your Pi for these changes to take effect. You can validate the same using the ifconfig command.
- To re-enable IPv6, all you need to do is set the Method dropdown to Automatic again and reboot your system.
Great! You just learnt the first way to disable IPv6 on your Pi. In the next section, we will explore another method to disable IPv6 on the Raspberry Pi – through the sysctl.conf file.
Method 2: Disabling IPv6 with sysctl.conf File
This section will showcase how to make changes to certain flags in the sysctl.conf file to disable IPv6 permanently. Moreover, it will also cover how to revert to the original settings (enabling IPv6). So, let’s get started.
- “sysctl.conf” is a configuration file in Debian systems that can used to modify kernel parameters on runtime. We will use this to disable certain flags responsible for the IPv6 configuration of the system.
- To edit this file, open a new terminal window on your Pi and execute the following command:
sudo nano /etc/sysctl.conf - This will open a nano editor window for you. Go to the end of the file and add the following line:
net.ipv6.conf.all.disable_ipv6 = 1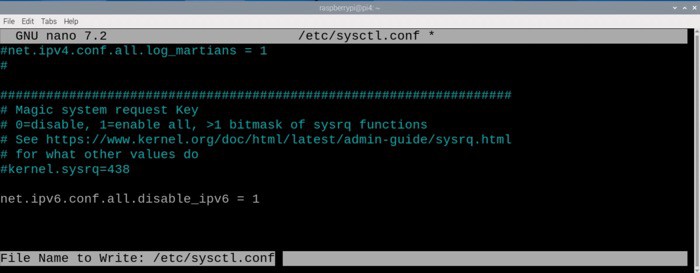
Now, just press Ctrl + X and when prompted if you want to save the changes, press Y and then the Enter key. - Next, to apply the changes made, execute the following command on your terminal window:
sudo sysctl -p
This command output will show you all the flags that you have added or changed in your configuration file as shown below.
- That is it! This should disable IPv6 for all your networks. To verify, we can just check the ifconfig command output as we did for the previous method.
- Re-enabling IPv6 is very easy, particularly with this method, as it does not require you to reboot your system. Edit the line that you just added in sysctl.conf file to make the flag value 0 and save the file.
net.ipv6.conf.all.disable_ipv6 = 1 - Now, just rerun the following command:
sudo sysctl -p
This will reenable IPv6 on your system, which you can again verify using the ifconfig command.
Now, we will see how we can disable IPv6 before we even boot into our Raspberry Pi. For this, we will set a flag in the boot’s cmdline.txt file.
If you’re new to the Linux command line, this article will give you the most important Linux commands to know, plus a free downloadable cheat sheet to keep handy.
Method 3: Disabling with cmdline.txt File
In this method, we will take a look at how you can disable IPv6 permanently on boot by setting a single flag in the boot’s cmdline.txt file. Note that you can do this before even booting into your Raspberry Pi for the very first time.
- You have two options to disable IPv6 through this method – do it after or before booting into the Pi. We have covered two methods that show you how to do this after starting the Pi, we will cover the second option in this section.
- To change the cmdline.txt file before boot, you need to take the SD card on which you have the Raspberry Pi OS burned and then access it through your system.

- Open this file in any text editor of your choice (FYI – I use VS Code) and edit the content of the file to add the following at the end:
ipv6.disable=1
Save this file and then eject the SD card from your system and reinsert it into your Pi. - Now, after booting into your Pi, you will see that IPv6 has been disabled! Again, we will use the ifconfig command to verify this.
You can easily revert this to the original behaviour by removing the ipv6_disable flag you added in the cmdline.txt file.
This marks the end of this section and in turn, this article. Let’s review everything we learnt from this guide.
It's a free PDF guide containing every Raspberry Pi Linux command you should know!
Download now
Want to chat with other Raspberry Pi enthusiasts? Join the community, share your current projects and ask for help directly in the forums.
Conclusion
In this article, we started with an introduction to what IPv6 is and the implications of disabling it on any system. Then, we covered three ways to disable IPv6 on the Raspberry Pi. Not only that, we also went through the steps to revert the changes we made to re-enable it.
Next, We learnt how to disable IPv6 on the Pi in three different ways:
- Disabling IPv6 through Network Manager User Interface.
- Disabling IPv6 using etc sysctl.conf file.
- Disabling IPv6 on boot through the cmdline.txt file.
Finally, we also learnt how to revert to the original state (i.e. re-enabling IPv6) for each of the covered methods.
Whenever you’re ready, here are other ways I can help you:
The RaspberryTips Community: If you want to hang out with me and other Raspberry Pi fans, you can join the community. I share exclusive tutorials and behind-the-scenes content there. Premium members can also visit the website without ads.
Master your Raspberry Pi in 30 days: If you are looking for the best tips to become an expert on Raspberry Pi, this book is for you. Learn useful Linux skills and practice multiple projects with step-by-step guides.
The Raspberry Pi Bootcamp: Understand everything about the Raspberry Pi, stop searching for help all the time, and finally enjoy completing your projects.
Master Python on Raspberry Pi: Create, understand, and improve any Python script for your Raspberry Pi. Learn the essentials step-by-step without losing time understanding useless concepts.
You can also find all my recommendations for tools and hardware on this page.