Installing Zabbix on Ubuntu Server: A Step-by-step Guide
Zabbix is an all-in-one monitoring tool for servers, networks and applications. I have more experience with Cacti and Nagios, but Zabbix is a good alternative. With everything in one interface, it can be installed on Ubuntu Server to monitor your network.
Zabbix requires an LTS version of Ubuntu Server, and a custom repository must be added for that specific version. A package can then be installed using APT and integrated with a typical LAMP server (Apache, MySQL and PHP).
It’s not a complicated installation, but it does require that you follow the prerequisites and do the steps in the right order. In this tutorial, I will show you everything, hopefully in a more comprehensive way than the official documentation.
Zabbix introduction and prerequisites
Before typing a command, I want to make sure you understand the vocabulary I’ll be using (especially the different elements of a Zabbix server) and the prerequisites, which are more important than usual.
Understanding Zabbix Components
The official documentation mentions a few elements that may not be clear to everyone, and I will mention them in this article as well. To make sure everyone is on the same page, here are the key components of a typical Zabbix setup:
- Zabbix Server: The central component to which agents send data. It processes and stores data, and can send notifications (typically your Ubuntu server).
- Zabbix Frontend: A fancy name for the web interface used to access Zabbix (configuration and data visualization).
- Zabbix Agent: Installed on monitored hosts, it collects data and sends it to the Zabbix server.
I hope this clears up any potential confusion. Let’s move on to the (important) prerequisites.
Prerequisites to install Zabbix on Ubuntu
I tested the Zabbix installation for you on my Ubuntu server, running the latest version, and quickly understood my mistake and why it was a waste of time. I don’t want you to make the same error, so be sure to read this part carefully.
- Ubuntu Server LTS installed: Obviously, you need a server running Ubuntu to follow this tutorial. It’s important to make sure you’re using a supported version.
Zabbix only supports LTS releases. This process won’t work on other versions. - Enable SSH access: This is optional, but I generally find it more comfortable to use SSH for installations like this. It allows you to do everything from your usual computer (read this tutorial, copy/paste commands, check the official documentation, etc.).
- Complete the system updates: Like any new installation, make sure your system is up-to-date before going any further:
sudo apt update && sudo apt upgrade
In short, make sure your server is running Ubuntu LTS and is up-to-date. You can get your system version with this command:lsb_release -a
If LTS is mentioned in the output, you are good to go. Up to this point, Ubuntu released an LTS version in April every two years (18.04, 20.04, 22.04, etc.).
If you’re new to the Linux command line, this article will give you the most important Linux commands to know, plus a free downloadable cheat sheet to keep handy.
How to install Zabbix on Ubuntu
Once the prerequisites are checked, Zabbix can be installed on your Ubuntu Server by following these steps:
Download your exclusive free PDF containing the most useful Linux commands to elevate your skills!
Download now
- Adding a custom repository to the package manager (APT).
- Using APT to install the main packages.
- Installing and configuring the database server for Zabbix.
- Completing the initial configuration and starting the service.
Let’s see how to do this in detail.
Step 1: Add Zabbix Repository
The first step to installing Zabbix on Ubuntu is to add the repository to your package manager. It can be done with a few command lines given in the documentation.
Unfortunately, there isn’t a generic command I can give you with the latest release of the package, so I think it’s best to start with a quick visit to the download page so that you can pick the up-to-date command line there.
Anyway, it should look like this:

Join Our Community!
Connect, learn, and grow with other Raspberry Pi enthusiasts. Support RaspberryTips and enjoy an ad-free reading experience. Get exclusive monthly video tutorials and many other benefits.
Learn more- Open a session (locally or via SSH) to get a prompt on your server.
- Download the deb file with:
wget https://repo.zabbix.com/zabbix/6.4/ubuntu/pool/main/z/zabbix-release/zabbix-release_6.4-1+ubuntu22.04_all.deb - Use dpkg to install the package:
sudo dpkg -i zabbix-release_6.4-1+ubuntu22.04_all.deb - Run apt update to sync APT with this new repository:
sudo apt update

Just make sure to update these commands with the latest version available on the download page. You can also choose to use another web server (Apache or Nginx) or a database server (MySQL or PostgreSQL) if you prefer. It’s all in the download page menu.
Step 2: Install the Zabbix Package
Once the repository is added to APT, you can simply install all the required packages with:sudo apt install zabbix-server-mysql zabbix-frontend-php zabbix-apache-conf zabbix-sql-scripts zabbix-agent
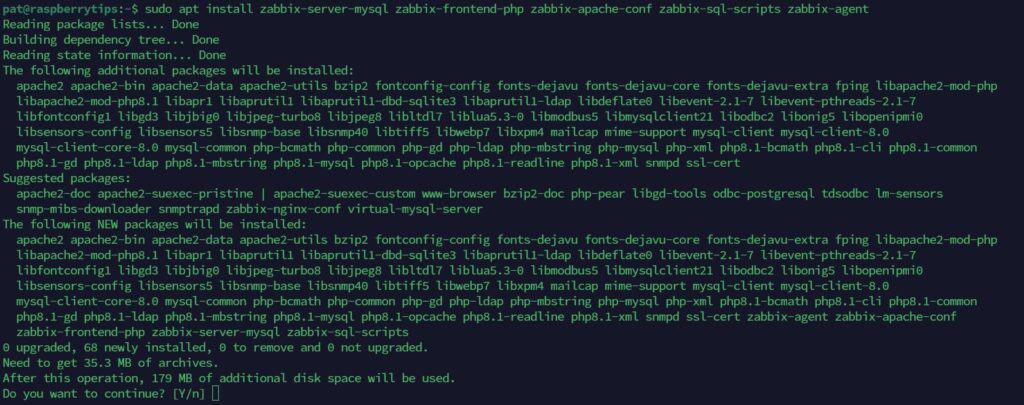
You don’t need more packages in this command, APT will handle all the dependencies, like installing Apache, PHP and the MySQL client for you.
Step 3: Configure the Database
What the previous command doesn’t do is set up a MySQL server for Zabbix. If you already have a MySQL server on your network, you can use it, or you can install a new one on the same server by following the steps described below.
If you need one, here is how to install the MySQL server on the same machine:
- Install MariaDB server with:
sudo apt install mariadb-server
- Run the initialization script to complete the server configuration (and set a root password):
sudo mysql_secure_installationMake sure to change the root password, remove the anonymous user, test the database and reload the privileges. - Once done, you should be able to access the MySQL server CLI with:
sudo mysql -uroot -p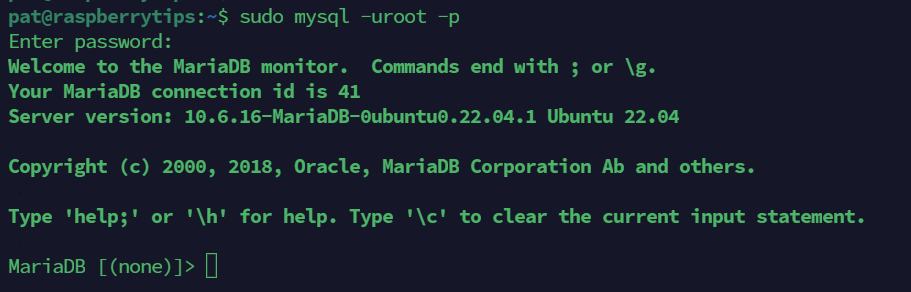
Once done, the next step is to create the database and MySQL user for Zabbix. If you just accessed the CLI on your Zabbix server, you can continue. Or if you already have a MySQL server somewhere else, that’s where you start.
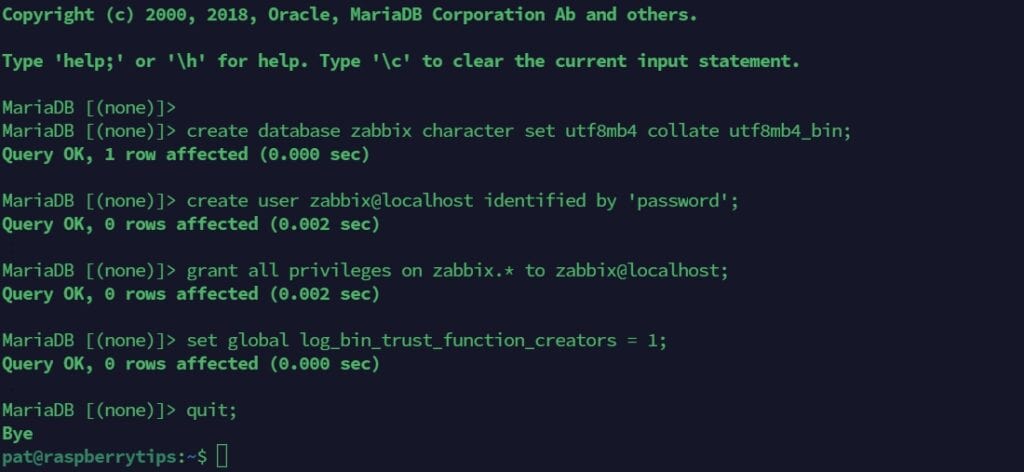
To create the Zabbix database and main user, do this:
- Create the database:
create database zabbix character set utf8mb4 collate utf8mb4_bin; - Create the first user (make sure to change the password in this command):
create user zabbix@localhost identified by 'password'; - Give all privileges to the new user to the Zabbix database:
grant all privileges on zabbix.* to zabbix@localhost; - Change this config value and exit:
set global log_bin_trust_function_creators = 1;
quit;
Your log should look like this:
Download your exclusive free PDF containing the most useful Linux commands to elevate your skills!
Download now
Now, the last thing to do related to the MySQL server is to populate the database with the initial data. This can be done with:zcat /usr/share/zabbix-sql-scripts/mysql/server.sql.gz | mysql --default-character-set=utf8mb4 -uzabbix -p zabbix
It will ask you for the password you just used for the MySQL user. If you changed the username and database name, make sure to update this command accordingly.
Once the initial set of data is inserted, it’s recommended to disable the previous configuration option with:sudo mysql -uroot -p
set global log_bin_trust_function_creators = 0;
quit;
That’s it, the database server is ready. Just a few more configuration steps, and you’ll be ready to use your Zabbix server ;-).
Step 4: Configure Zabbix Server
We then need to edit the server configuration file to store the MySQL user and password.
- Open the file with Nano:
sudo nano /etc/zabbix/zabbix_server.conf - Find the lines DBUser and DBName, and edit them if needed.
- Then add a new line next to them, with the MySQL password:
DBPassword=passwordSomething like: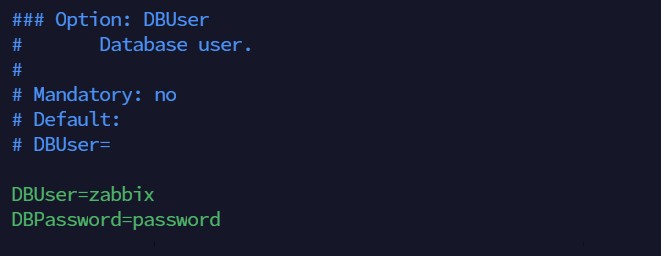
- Save and exit Nano (CTRL+O, CTRL+X).
In theory, there is no need to change anything else in this file. All the configuration will be done via the web interface. You might need to switch the database from localhost to your IP address if you use another machine to host the MySQL server.
Step 5: Restart and Enable Zabbix Service
Once everything is installed and the configuration is updated, you can now restart the Zabbix service to apply changes:
- Restart both Zabbix and Apache services with:
sudo systemctl restart zabbix-server zabbix-agent apache2 - Enable the service to make them start automatically on boot:
sudo systemctl enable zabbix-server zabbix-agent apache2 - You can use the “status” option to check if services are running. For example:
sudo systemctl status zabbix-server
But we’ll quickly know if everything is fine when trying to access the web interface.
Download your exclusive free PDF containing the most useful Linux commands to elevate your skills!
Download now
Getting started with Zabbix
Accessing Zabbix Web Interface
As mentioned previously, everything with Zabbix is done via a nice web interface. So the first step is to make sure we can access it, this will confirm that the setup has been done correctly.
- Open a web browser from a computer on the same network, and type this URL:
http://<IP_ADDRESS>/zabbixYou can check this article if you don’t know the IP address of your Linux server. - You should be welcomed by a wizard looking like this:
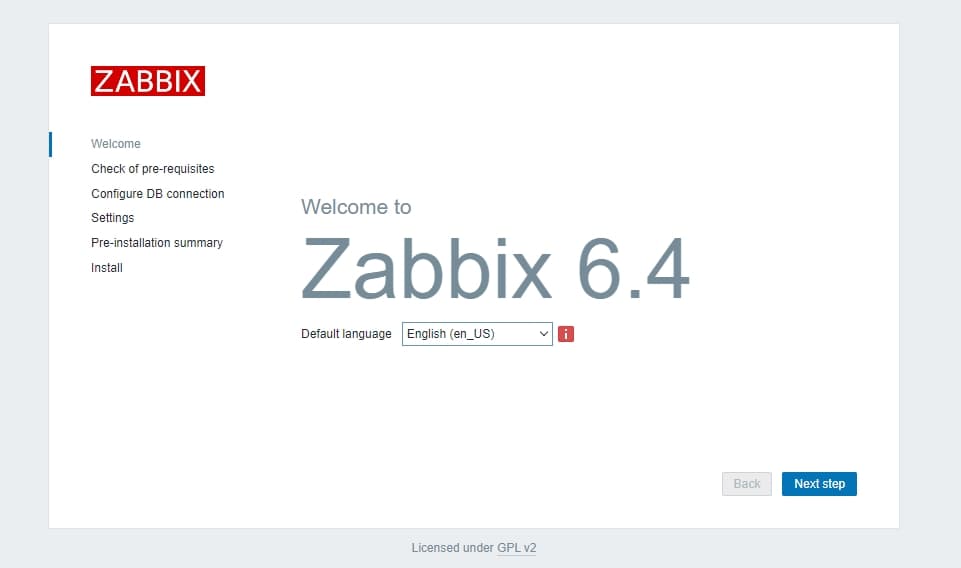
- Follow the steps to check the prerequisites (should be fine), and ensure you fill out the form for the database connection. It may seem redundant with the previous step, but we’re configuring the front end here, not the server.
- You can then give the server a name and set the default time zone and theme.
Once the installation is complete, you’ll be prompted with a login form.
The default login and password for a new Zabbix server are:
- Login: Admin
- Password: zabbix
Once logged in, you’ll get access to the full Zabbix interface that you’ll use all the time from now on:

Initial Configuration
From there, the basic configuration is pretty easy to find, but I would recommend changing the administrator password.
You can either go to “User settings” > “Profile” and click on “Change password”, or even create a new user with a custom name, before disabling the default account.
Aside from that, you can take the time to explore the interface to understand the different elements. During the installation, the local server was added automatically, so you can also see the different things monitored, check graphs, etc.
Adding Your First Host
While it’s nice to have access to the local Ubuntu Server right away, I guess the goal is to monitor other hosts on your network. Here is how to do it.
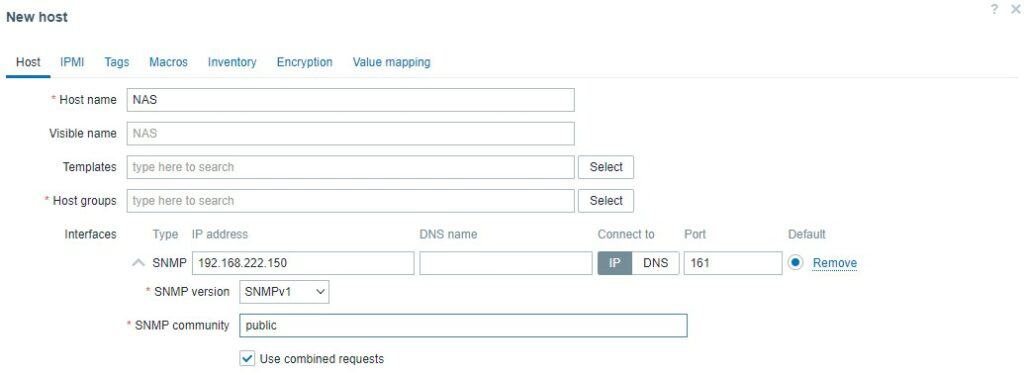
You can add as many hosts as you want via the web interface. Just click on “New host” from the Monitoring > Hosts page.
You’ll need a way to access the new host information remotely. In most cases, SNMP is used for applications like this, but other methods are also supported with Zabbix. Using the Zabbix Agent can also be an alternative if needed.
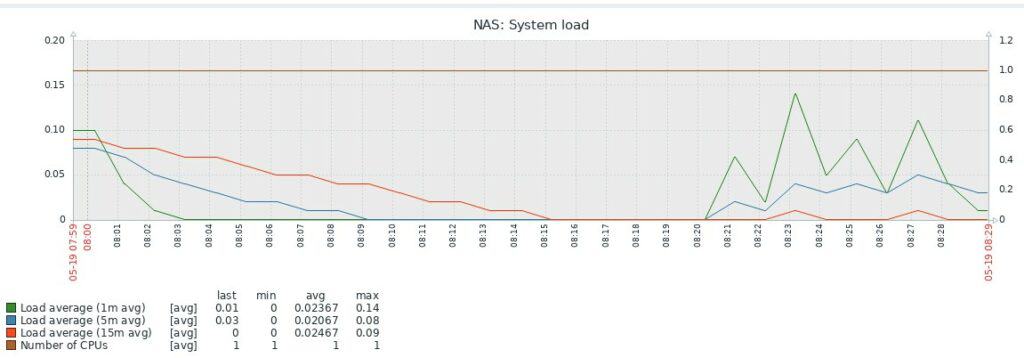
I tested this with my NAS, which has SNMP enabled, and it worked perfectly fine on the first try. I just filled in the new host form with the IP address and SNMP configuration:
A few minutes later, I had my data collected, and the first graphs showed up, like the system load illustrated below (showing the load average history for this NAS):
Going further
As mentioned earlier, the Zabbix website is really well laid out, and the documentation is good enough to get started.
And once the monitoring system is in place, here are some project ideas and tips you might be interested in:
- How To Install UniFi Controller on Ubuntu
- Ubuntu Server in Production: Expert Insights To Consider
- 50 Most Useful Linux Commands You Need To Know (Cheat Sheet)
Download your exclusive free PDF containing the most useful Linux commands to elevate your skills!
Download now
Want to chat with other Raspberry Pi enthusiasts? Join the community, share your current projects and ask for help directly in the forums.
Additional Resources
Overwhelmed with Linux commands?
My e-book, “Master Linux Commands”, is your essential guide to mastering the terminal. Get practical tips, real-world examples, and a bonus cheat sheet to keep by your side.
Grab your copy now.
VIP Community
If you just want to hang out with me and other Linux fans, you can also join the community. I share exclusive tutorials and behind-the-scenes content there. Premium members can also visit the website without ads.
More details here.
Need help building something with Python?
Python is a great language to get started with programming on any Linux computer.
Learn the essentials, step-by-step, without losing time understanding useless concepts.
Get the e-book now.