Installing an FTP Server on Raspberry Pi (2 safe options)
FTP stands for “File Transfer Protocol” and is the first option many of us think about when it comes to transferring files to a Raspberry Pi or any Linux server. But it’s a bit like HTTP on the web, it’s not a safe protocol. The purpose of this article is to explain how to set up an FTP server safely.
The easiest way to set up a safe FTP server on a Raspberry Pi is not to use any FTP server software, but use SSH instead and the SFTP protocol. SSH can be enabled in one simple step, and you can then use any FTP client to access the Raspberry Pi files.
I highly recommend following this advice, as I guess most of you are single users on a home network, because it’s just easier to use SSH. But don’t worry, I will also explain the second option, which is to use a traditional FTP server for this project.
If you’re looking to quickly progress on Raspberry Pi, you can check out my e-book here. It’s a 30-day challenge where you learn one new thing every day until you become a Raspberry Pi expert. The first third of the book teaches you the basics, but the following chapters include projects you can try on your own.
FTP Server prerequisites
As always, let’s start by taking a look at what you need to get started in terms of hardware and software.
Hardware requirements
There are no mandatory requirements in terms of hardware to set up an FTP server on Raspberry Pi.
I’m using a Raspberry Pi 4 for all my projects because it’s the best option currently, so I don’t think about it that much. But if you only have a Raspberry Pi Zero, it’s fine.

Storage is more important in my opinion, so try to guess how much disk space your server will require, especially if you have many users or want to keep large files. It might be a good idea to invest in an external hard drive right from the beginning (here is my top pick currently).
A wired network connection is also recommended for more stability (it will be a terrible experience if the connection is slow or disconnected all the time). I have a guide here on how to set up a static IP if needed.
Warning: current prices are all over the place for a new Raspberry Pi. Make sure to check this article to pay the right price when buying a Raspberry Pi. I also give a few tips to find one in stock (which currently isn’t that easy).
Software recommendations
Here are my recommendations in terms of software before installing an FTP server:
- Operating system: The instructions in this tutorial should work on most distributions, but I recommend using Raspberry Pi OS if you start from scratch. Some of the steps are easier with it, and it just works as well as any other option. A Lite version is enough, you don’t need a desktop environment for an FTP server.
You can read my guide on how to install Raspberry Pi OS here if you need some guidance. - Up-to-date system: To avoid any conflict later on, make sure your system is up-to-date first. You can do this with these commands:
sudo apt update
sudo apt upgrade -y
Reboot the Raspberry Pi after the installation if there are a lot of updates available. - SSH enabled: as for most of my tutorials, I recommended using SSH to follow the tutorial on your computer while you run the commands (remotely) on the Raspberry Pi. It’s just more convenient, especially with the Lite image (copy/paste).
I will give more details for the first option below, but you can read my SSH guide if you don’t know what I’m talking about here.
For your information, I tested this tutorial on my Raspberry Pi 4 (4 GB), with the Lite edition of Raspberry Pi OS Bullseye (64-bits).
Option 1: Using SFTP (FTP via SSH)
As explained in the introduction, my recommendation is to use SSH instead of FTP when it’s possible. This is my favorite option because it’s fast, it’s secure, and as I enable SSH on all my installations, it’s available directly.
Configuring SFTP access to a Raspberry Pi can be done in a few simple steps:
- Enabling the SSH server (can be done with raspi-config on RPI OS).
- Testing that SSH is working.
- Using SFTP from a compatible client.
Let’s see all these steps in detail.
Enable SSH
To enable SSH on Raspberry Pi OS, you can do this via the Raspberry Pi software configure tool (raspi-config):
In a terminal, type the command:sudo raspi-config
It's a free PDF guide containing every Raspberry Pi Linux command you should know!
Download now

A wizard shows up, go to Interfaces > SSH, and choose “Yes” to enable the service.
If you are using another distribution, you may need to install the SSH server first. This can generally be done during the system installation, or via the package manager, for example:sudo apt install ssh
Note: If you use Raspberry Pi Imager to install Raspberry Pi OS, it’s also possible to enable SSH directly on the first boot via the advanced options (more details here).
Are you a bit lost in the Linux command line? Check this article first for the most important commands to remember and a free downloadable cheat sheet so you can have the commands at your fingertips.
Testing the SSH connection
Once the SSH server is installed and started, just do a quick test to make sure the SSH access is working. Use any SSH client for this, it’s just for a test.
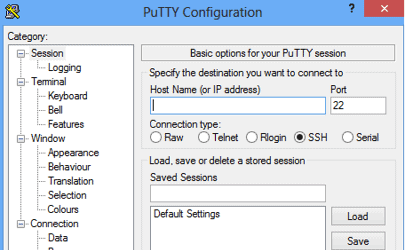
On Windows, it’s generally recommended to use Putty for this, but on all systems, you can now use the command line directly to connect to another computer via ssh:ssh <user>@<ip_address>
If you use Putty, the screen looks like this:
- Enter the IP address in the “Host Name” field (here is how to find the current IP address of the Raspberry Pi).
- Click on “Connect”.
- Enter the user and password when asked.
If it’s working as expected, you should get access to a prompt like this:

Join Our Community!
Connect, learn, and grow with other Raspberry Pi enthusiasts. Support RaspberryTips and enjoy an ad-free reading experience. Get exclusive monthly video tutorials and many other benefits.
Learn more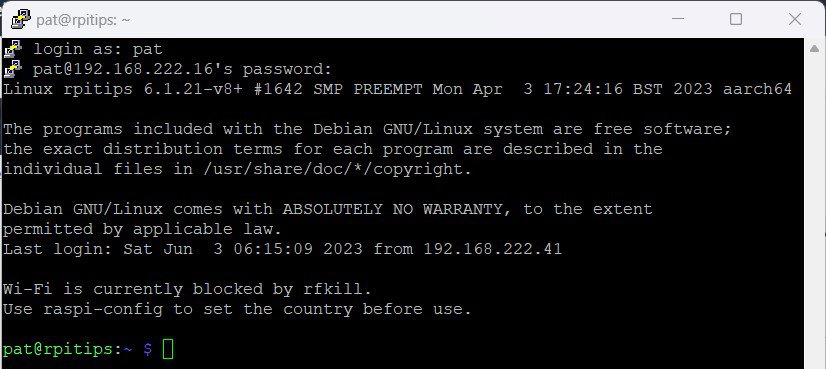
If it’s your first time using SSH you probably need more guidance, so I recommend reading my complete SSH guide for Raspberry Pi here. I explain the theory, these steps in more detail, and my favorite client to access all my servers in one click.
Optional: Creating a specific user
On a traditional FTP server, we’ll generally create a new user for each person, client, or access type. It’s possible to do the same thing with SFTP if needed.
It’s even easier than with some FTP software, as you just need to create new systems users for each case and use the standard system permissions to restrict their access if needed.
I say it’s optional because I guess most of you reading this just want to access their Raspberry Pi via an FTP client, not necessarily have 50 users with different access and permissions. If it’s just for you, you already have an account and can simply use this login and password to connect via SFTP.
If you need to create a new user on your Raspberry Pi, click on this link to check my guide on this topic. I explain all the steps to do it in a few commands.
Testing the SFTP connection
We are now ready to make a test with an FTP client supporting SFTP and see if we can access the Raspberry Pi files from it.
I use Termius (an SSH client) to connect to all my servers, and there is a feature where you can use SFTP. It’s not necessarily the best SFTP client, but as I already have it set up for SSH access, it’s the simplest way for me.
Other options include FileZilla (the most popular FTP client), or WinSCP if you are on Windows. FileZilla is probably the tool I would recommend, especially if you have normal users connecting to your servers. You can configure it once, and it’s easy for the end-user after that.
When I say “normal users”, I’m thinking about family members, customers, etc. Anyone who doesn’t have an IT degree or spends weekends playing with a Raspberry Pi :-).
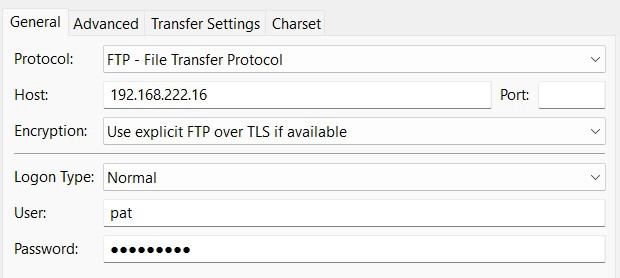
In most FTP clients, you’ll find somewhere to manage several servers’ access. In FileZilla, there is a “Site Manager”, where you can add a new site, filling in the host IP address, user, and password. Here is how to fill in this form for your Raspberry Pi SFTP server:
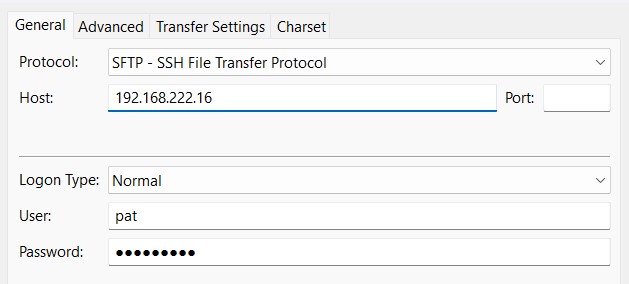
Just switch the protocol from FTP to SFTP, and fill in the form with the Raspberry Pi IP address and your user login and password. You can then click on “Connect”. If it works as expected, you should see your home directory on the right side:
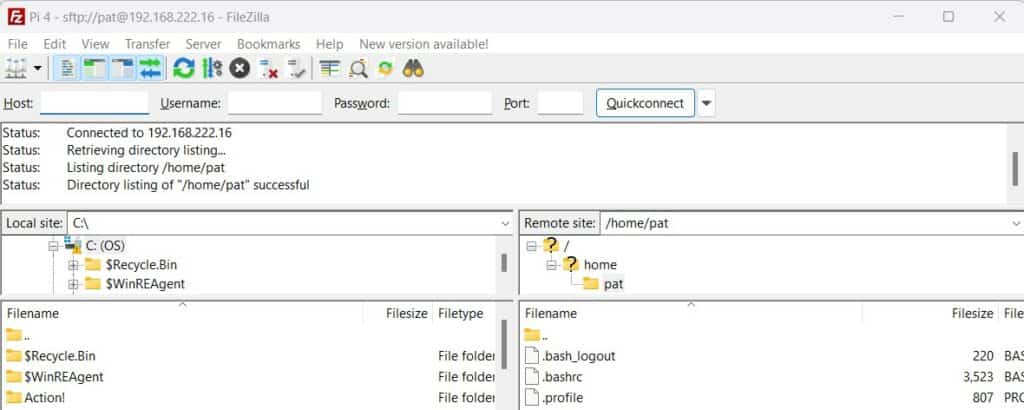
From there, you can transfer files from one side to another. On the left, it’s your computer files, on the right the Raspberry Pi files.
If you have other users, they will just need to understand how to use this view. They will never have to fill in the IP address, login, and password again. It’s saved in the site manager with a friendly name, they can just connect with this name and don’t need to know more.
It's a free PDF guide containing every Raspberry Pi Linux command you should know!
Download now
Option 2: Setting up a traditional FTP server
If for any reason you prefer to use a traditional FTP server on your system, here’s the guide you’re looking for.
Just remember that option 1 is safer, and not that complicated to set up, even if you have many users who are not used to that kind of technology. The user’s view will be the same with options 1 and 2.
Pick an FTP server software
When it comes to installing an FTP server on a Linux server (Raspberry Pi or not), many options are available:
It's a free PDF guide containing every Raspberry Pi Linux command you should know!
Download now
- ProFTPD: The do-it-all solution, with many features available and advanced configuration options.
- Pure-FTPd: A lighter alternative to ProFTPD, with more security options.
- vsftpd: Very Secure FTP Daemon. A lightweight and secure FTP server that is easy to install.
- Etc.
To be honest, I don’t have enough experience with all these solutions to recommend one of them more than the other, but after reading a few articles on this topic, it seems to me that for Raspberry Pi users, vsftpd is probably the best combination of security, simplicity, and performance.
So, I’ll show you how to install vsftpd in this guide, but please don’t hesitate to switch to another option if for any reason it doesn’t fit well with your needs.
Install the FTP server
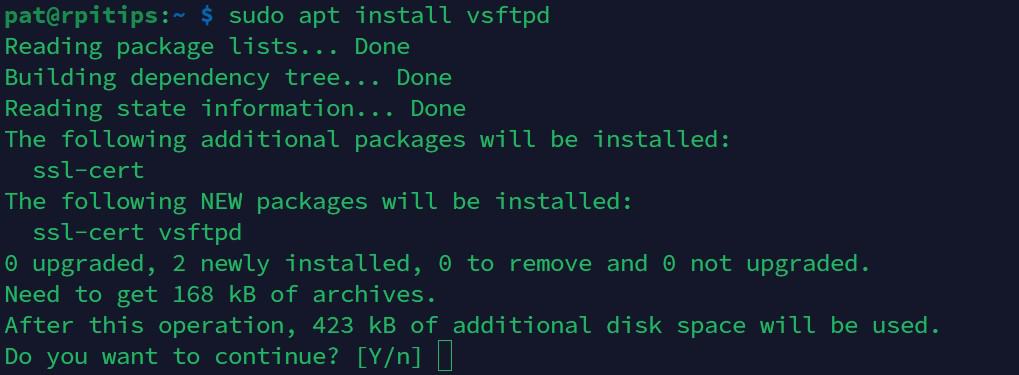
vsftpd is available in the default repository on Raspberry Pi OS and most Linux distributions. It can be installed in one command via the package manager:sudo apt install vsftpd
If any dependencies are required, the package manager will install them at the same time, so it’s pretty straightforward. Copy/paste the command and you’re done.
Configure the FTP server
From there, we need to configure a few things before using our new FTP server.
I’m giving you the steps to use system users as FTP users, and restricting them to access their home directory. If you plan to do something else, you may need to check the vsftpd documentation to change the configuration accordingly.
Start by editing the server configuration file, which is located under /etc/vsftpd:sudo nano /etc/vsftpd/vsftpd.conf
Uncomment these three options in the file (remove the # character at the beginning of each line):write_enable=YES
local_umask=022
chroot_local_user=YES

Add this line (after the chroot option, for example):allow_writeable_chroot=YES
By doing this, we contain users to their home directory, allowing them to create new files (even in the home directory root). For example, the user “pat” I have will only see files under /home/pat, can create files here, but won’t be able to access system files or other users’ files.
Once done, save and exit (CTRL+X if you use Nano).
Restart the service to apply changes:sudo service vsftpd restart
Optional: create a new user
Our FTP server will use system users by default. If you need to create specific access for different users, simply create new system users on the Raspberry Pi.
You can check my tutorial on how to create new users on a Raspberry Pi here if needed.
Give them a strong password and create a home directory for all of them, with the files they’ll see once connected via FTP.
You only need to do that if you’ll have several users accessing your FTP server. If it’s just for you, you most likely already have a personal account and can use it for FTP access.
Test the connection
Now that the FTP server is installed, you can use any FTP client to access the files remotely.
As explained in option 1, my recommendation is to get FileZilla for all users. It’s the most popular option, and it’s easy to use for any user, even if they don’t know anything about FTP.
Open the “Site Manager” and add the configuration for your FTP server:
It’s almost the same as the first option. We keep “FTP” for the protocol, fill in the Raspberry Pi IP address, and the username and password.
Once done, use the shortcut to quickly access your server from the site manager (you can also click on “Connect” once the configuration is saved), and you’ll get access to the Raspberry Pi home directory:
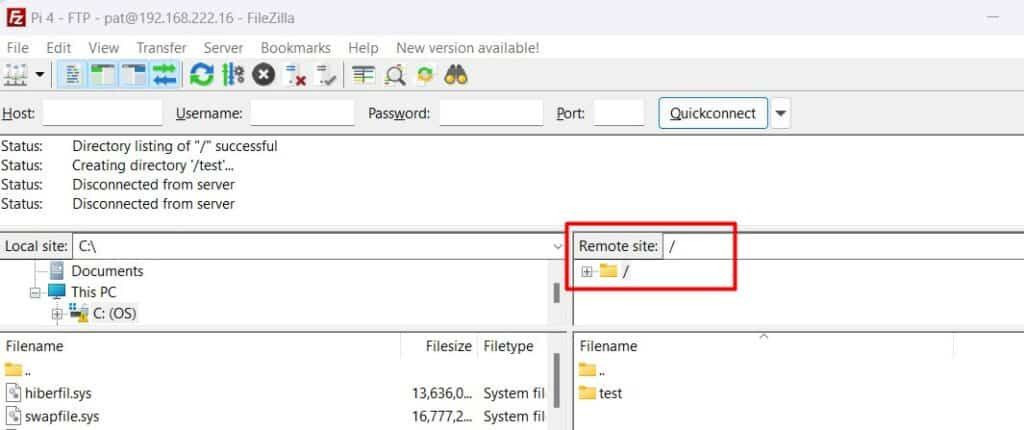
Note that the user sees “/” instead of “/home/pat” because according to our configuration, the user can only create files and directories in their home folder.
I created a “test” folder, that I see as “/test” in FileZilla, but that is “/home/pat/test” on the Raspberry Pi. From the user’s point of view, I have no idea where this folder is, and you may have 50 other users on the same FTP server.
It's a free PDF guide containing every Raspberry Pi Linux command you should know!
Download now
If you are looking for exclusive tutorials, I post a new course each month, available for premium members only. Join the community to get access to all of them right now!
Additional considerations (in both cases)
Your FTP (or SFTP) server is now installed and ready to use. Whichever option you picked, it’s a good time to think a bit more about the future of your project, especially if you are not the only user.
If the goal was just to transfer Python files from your computer, and you’re the only user, you can probably stop there. But if you have any concerns about security or storage usage, you should keep reading this section.
Implement security measures
As long as you have a random username and a strong password, FTP is already pretty safe for home usage. But if you host critical data, personal information, and especially if you have several users, it might be a good idea to think about security.
As with any server hosted on a Raspberry Pi, there are a few things to keep in mind, which you should probably set up to protect your server. I have summarized them in this article you should read now:
17 Security Tips To Protect Your Raspberry Pi Like A Pro
It goes from using safe passwords to installing an app to detect and block brute-force attacks. You don’t necessarily have to follow all of them, it depends on your situation. It’s good to at least know the list and set up what you find useful in your case.
If you use an FTP server (like vsftpd), it’s possible to use an SSL certificate to encrypt the connections. I checked the procedure and it looks complicated, so switching to SFTP is probably a better idea.
Schedule regular backups
This is not related to the project in itself, but if you have several users using your new FTP server to share files, they may expect the files to stay there forever. It’s not necessarily the case, especially when the server is a Raspberry Pi and if you don’t have a good backup schedule in place.
As soon as you host a server of any kind, especially with several users accessing it, thinking about backup and restoration is a requirement.
If all users are uploading files to their /home folders, I would at least do a daily backup of /home to another computer. I explain how to do it in this tutorial: The Ultimate Guide to Backup and Restore your Raspberry Pi.
Once again, if you are the only user and just transfer files you have on your computer to the Raspberry Pi following this method, you don’t have to worry about that (the computer is already your backup in a way).
Improve the storage location and hardware
If you followed this tutorial, you probably have the system set up on the Raspberry Pi SD card, and all files stored under /home for your FTP users. That’s fine, but it’s not necessarily the best option.
An SD card is not the most reliable storage method at all, and it’s not necessarily big enough either. Switching to an external hard drive might be a good idea if you have several users accessing your FTP server.
In terms of hardware, I generally recommend this external drive from SanDisk, which is fast, tiny (the same size as the Raspberry Pi), and not that expensive. Using it instead of the SD card is a good idea, even if you are the only user.
The SD card can also be limited in size. Even if you start with 16 or 32 GB as I currently recommend (more details here), you can quickly run out of space if your users upload large files every day.
So, not only is using an external drive safer, but it’s also easier to keep a few TB of disk space available to avoid issues in the long term. If you do this, you need to mount the external drive on the Raspberry Pi and set the home directories on this drive instead of the default /home/user (do this directly when you create the users, even if it’s possible to change the home directory afterward).
I hope this project is a success on your side, and if you are looking for more network projects, check out my other articles:
- 15 Raspberry Pi Network Projects for Home and Office Use
- Set Up a LAMP Web Server On A Raspberry Pi
- How to turn a Raspberry Pi into a file server?
Whenever you’re ready, here are other ways I can help you:
The RaspberryTips Community: If you want to hang out with me and other Raspberry Pi fans, you can join the community. I share exclusive tutorials and behind-the-scenes content there. Premium members can also visit the website without ads.
Master your Raspberry Pi in 30 days: If you are looking for the best tips to become an expert on Raspberry Pi, this book is for you. Learn useful Linux skills and practice multiple projects with step-by-step guides.
The Raspberry Pi Bootcamp: Understand everything about the Raspberry Pi, stop searching for help all the time, and finally enjoy completing your projects.
Master Python on Raspberry Pi: Create, understand, and improve any Python script for your Raspberry Pi. Learn the essentials step-by-step without losing time understanding useless concepts.
You can also find all my recommendations for tools and hardware on this page.