How To Mount a USB Drive On Ubuntu Server (2 Ways)
We are used to USB drives being “plug and play” all the time. Most systems detect these drives automatically, and we don’t even think about the underlying processes that make it so easy. When you’re on a server, with just a black screen staring at you, waiting for your commands, it’s a different story. Let’s see how it works.
On Ubuntu Server, we can either use the “mount” command manually to access a USB drive or add the device identifier to the file system’s configuration file to have it automatically mounted during the system boot.
In this tutorial, I’ll show you how to find your USB drive identifier and make it accessible by using only command lines step-by-step. It’s not that complicated, but there are a few prerequisites and commands you need to know.
Prerequisites to use a USB drive on Ubuntu Server
Hardware requirements
Aside from your server with Ubuntu installed on it and a USB drive, you don’t need much to follow this tutorial.
I’m testing this with a USB stick (this one on Amazon), so I recommend doing the same. I mean, it’s best to do some tests first with a non-essential drive. Don’t start with your critical backup drive right away if you’ve never done this before.
Ideally, take a USB drive formatted in FAT32 or format it first.
You can use Gparted from a Linux computer if it’s not yet formatted, and Windows can do it too.
I won’t cover the formatting part in this tutorial, but you can check this article if you need some guidance to do this. FAT32 works right away, but formats like EXT4 or NTFS should be fine too if it’s already formatted.
Software requirements
In terms of operating system, I’m writing this tutorial for Ubuntu Server, but mounting a USB drive works the same way on most distributions (especially Debian-based systems). Feel free to follow this on any Ubuntu, Debian, Kali Linux or similar ones.
If you don’t have a GUI to follow the steps, I highly recommend using SSH from your computer. You can read this tutorial on your computer and copy/paste the commands via SSH, it’s much more convenient and efficient.
You’ll need root access or sudo privileges for some commands. Make sure you have the right permissions to do this.
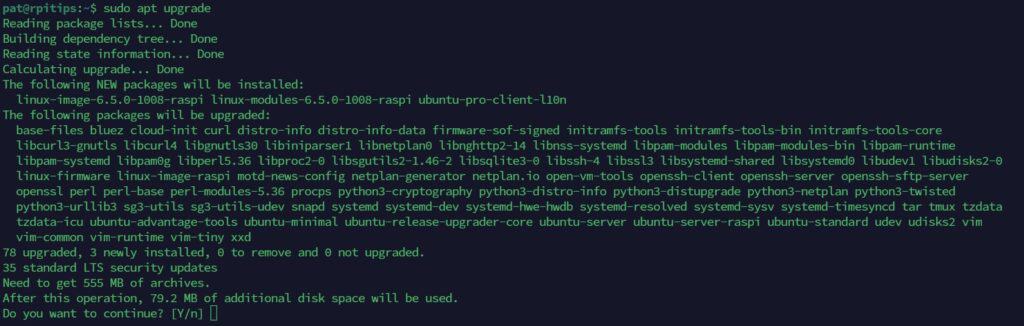
And as for any tutorials, I recommend doing the system updates first, so we avoid any kind of conflicts or problems later on:sudo apt update
sudo apt upgrade
Download your exclusive free PDF containing the most useful Linux commands to elevate your skills!
Download now
Depending on the file system used on your drive, you may need to install additional drivers. But even NTFS is preinstalled on Ubuntu Server, so I think you can try to follow this tutorial right away, and only look for additional packages if it doesn’t work.
Now that you have all that taken care of, let’s gather some information about the USB drive you’re using.
If you’re new to the Linux command line, this article will give you the most important Linux commands to know, plus a free downloadable cheat sheet to keep handy.
Find the USB drive name on Ubuntu
Before going any further, we need to plug the USB drive and find some information about it.

Join Our Community!
Connect, learn, and grow with other Raspberry Pi enthusiasts. Support RaspberryTips and enjoy an ad-free reading experience. Get exclusive monthly video tutorials and many other benefits.
Learn moreIn short, “mounting” a USB drive on Linux means associating a device name to a local folder. Once “mounted” the USB drive can be used the same way as any other folder on the main storage drive.
So the first step is to find the device name. In general, it’s something like /dev/sda or /dev/sdb, with a number added for each partition (like /dev/sda1).
To find this name and number, one option is to use the fdisk command:sudo fdisk -l
Read the output carefully to find the information related to your USB drive:
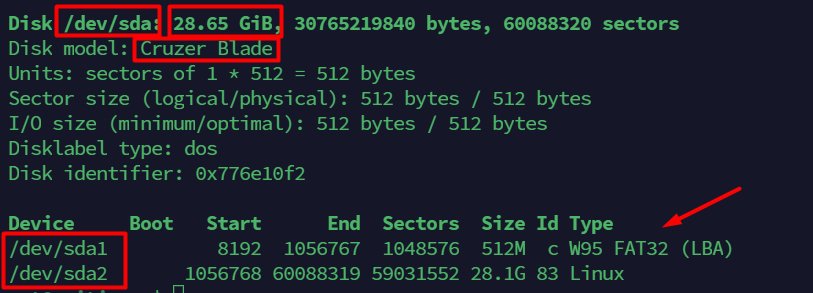
In this example, I have my USB drive detected (Sandisk Cruzer Blade 32 GB). The device name is /dev/sda and there are two partitions on it (/dev/sda1 in FAT32 and /dev/sda2 using the Linux file system).
I have everything I need to move forward. Make sure you find this information for your own device because you’ll need it in the next section.
Find the USB drive ID on Ubuntu
Another piece of information that might help us later is the UUID.
The problem with the device name you just noted is that it can change at any time. If you use multiple USB drives, or plug them into different ports, it may become /dev/sdb or /dev/sdc the next time you use it. It’s not convenient, especially if you want to automate things for this drive.
One solution is to work with IDs instead. When you format a disk, the system assigns an ID to the disk. We call this a UUID. It’s a unique identifier that will always be associated with that device, whenever and wherever you plug it into your server.
Download your exclusive free PDF containing the most useful Linux commands to elevate your skills!
Download now
To get this UUID, run this command:sudo ls -l /dev/disk/by-uuid/
You’ll get something like this:

The command output will give you both, the partition name (/dev/sda1) and the UUID (EF6E-C078 in this example).
You don’t necessarily need this for a temporary drive, but keep it in mind if you plan to configure automatic mounting for this USB drive, or leave it plugged in and run scripts on it.
Create a mounting point
We’re almost done with the prerequisites. The last step here is to create a mounting point, you know, the temporary folder I was referring to earlier.
Generally, we create it in /mnt or /media. But you can also use something in your home folder if it’s your personal drive. For this example, I’ll use /media/usb.
You can create it simply with:sudo mkdir /media/usb
Note: Don’t use sudo if you create it in your home directory. It will create permission problems you don’t want to deal with. Sudo is only needed for mount points outside your home folder.
Now, there are two ways to mount your USB drive:
- Manually: type a command line and get access to it quickly (perfect for temporary devices).
- Automatically: this needs more configuration to start, but this will be accessible automatically after a reboot.
I’m explaining the two methods in the next sections, so you can pick the one you prefer.
Option 1: Mount the USB drive manually
If it’s for temporary use, like copying files from a USB stick to your server once (or vice versa), this is the easiest option. You’ll get access to them in one command, and can then use the usual commands to move files between the server and the USB drive.
The command syntax to connect your USB drive to the mount point is:sudo mount <PARTITION> <FOLDER> -o <OPTIONS>
So in my case:sudo mount /dev/sda1 /media/usb -o uid=pat,gid=pat
Make sure to change these values according to your system and user.
The UID and GID options I added allow the current user to read and write files on the USB key.
Once done, I can now see the file from the USB drive with:ls -latr /media/usb

From there, I can use it like any other folder on the main drive. Use Linux commands like “cp”, “mv” or anything else to copy files from one drive to the other.
For advanced options and different file systems, look at this tutorial about the mount command.
Download your exclusive free PDF containing the most useful Linux commands to elevate your skills!
Download now
Option 2: Configure automatic mounting of your USB drive
While the previous option with the mount command is fine for temporary devices or for a first test, it’s not convenient for a device you use regularly, or even keep plugged on the server.
It’s possible to configure the system to automatically mount this USB drive each time it’s detected. It will always use the same mounting point, so you can use it right away when you plug it, the same way as it works on systems with a desktop environment.
The file we use to configure this is ‘/etc/fstab’. It’s a text file, with a list of all devices and mounting points, as well as all the other options required.
Follow this procedure to add your USB drive to this file:
- Open /etc/fstab:
sudo nano /etc/fstab - Add this line at the end:
UUID=EF6E-C078 /media/usb vfat uid=pat,gid=pat 0 0
Replace the UUID with your UUID you get in the prerequisites.
Replace “vfat” (FAT32) with your file system if needed (“ntfs” or “ext4” for example).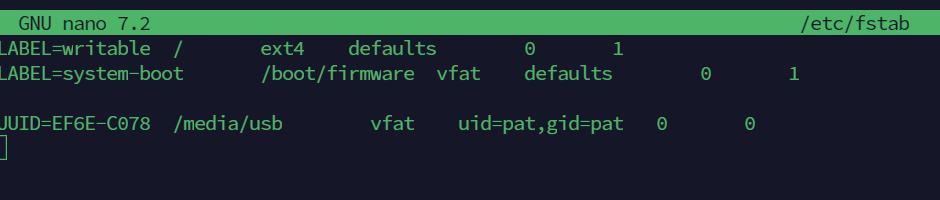
As you can see, the options column with uid and gid plays the same role as for the manual mount, this gives access to our main user (“pat” in my example). - Save and exit (CTRL+O, CTRL+X).
- Reboot or try it directly with:
sudo mount -a
Your USB drive should now be available in the /media/usb folder.
And Ubuntu Server will mount it automatically at each boot.
If you want to add it after the boot, just run “mount -a” again, or mount /media/usb.
You no longer need to put all the options in the command line, the system remembers it.
Using the UUID rather than the device name (/dev/sda1) allows us to be sure it is the correct device.
And if you’re using Ubuntu Server, you might be interested in some of the other tutorials I have on the site:
- Ubuntu Backup Essentials: Tips and Tricks from a sysadmin
- 17 Security Tips From A Pro To Protect Your Linux Server
- Ubuntu Server in Production: Expert Insights To Consider
Download your exclusive free PDF containing the most useful Linux commands to elevate your skills!
Download now
Reminder: Remember that all the members of my community get access to this website without ads, exclusive courses and much more. You can become part of this community for as little as $5 per month & get all the benefits immediately.
Additional Resources
Overwhelmed with Linux commands?
My e-book, “Master Linux Commands”, is your essential guide to mastering the terminal. Get practical tips, real-world examples, and a bonus cheat sheet to keep by your side.
Grab your copy now.
VIP Community
If you just want to hang out with me and other Linux fans, you can also join the community. I share exclusive tutorials and behind-the-scenes content there. Premium members can also visit the website without ads.
More details here.
Need help building something with Python?
Python is a great language to get started with programming on any Linux computer.
Learn the essentials, step-by-step, without losing time understanding useless concepts.
Get the e-book now.