Clone Your Raspberry Pi SD Card: 3 Simple Methods
Cloning your Raspberry Pi SD card can be useful in many situations. Maybe you want to make a backup or migrate your whole system to a new SD card. This procedure may sound quite complex, but it is easy. In this article, I will give you a comprehensive guide on how to clone your Raspberry Pi SD card.
There are three main ways to clone the Raspberry Pi SD card.
– Using the SD Card Copier utility available on Raspberry Pi OS.
– Using the Win32DiskImager for Windows users.
– Using the DD command for macOS and Linux systems.
Although these tools are often pre-installed, they can be quite tricky to use. Disk cloning requires a great deal of care to avoid accidentally formatting drives or partitions. So in this article, I will show you how to use each of the tools listed above.
If you’re looking to quickly progress on Raspberry Pi, you can check out my e-book here. It’s a 30-day challenge where you learn one new thing every day until you become a Raspberry Pi expert. The first third of the book teaches you the basics, but the following chapters include projects you can try on your own.
Why do you need to clone your Raspberry Pi?
But before we get started, let’s have a quick look at some of the reasons why you might need to clone your Raspberry Pi SD card.
If you are reading this post, there is a high probability you have decided that you want to clone your Raspberry Pi SD card. But, is your reason right or could you have solved your problem by just creating a disk image of your Raspberry Pi SD card?
It's a free PDF guide containing every Raspberry Pi Linux command you should know!
Download now
Well, below are some of the reasons why you might need to clone your SD card.
Easy System Transfer
Thinking of upgrading to a new Raspberry Pi model on another SD card? Cloning makes the process a breeze! You can simply clone your current SD card onto a new one and voila! Everything – from your OS to your files and configurations – is transferred over to the new SD card.
You want to make a backup
Have you ever had your Raspberry Pi crash or suddenly stop working? It’s quite frustrating, right? Well, by cloning your SD card, you create a backup of your entire Raspberry Pi setup. So, if something goes wrong, you can quickly insert the working SD card and get going.

Join Our Community!
Connect, learn, and grow with other Raspberry Pi enthusiasts. Support RaspberryTips and enjoy an ad-free reading experience. Get exclusive monthly video tutorials and many other benefits.
Learn moreExperimentation without Risk
I love tinkering with my Raspberry Pi and trying out new stuff. Cloning your SD card allows me to do just that without the fear of messing up my current setup.
If you are like me, you can create a clone, play around with different configurations, and test out new software, and if things don’t work out, no worries – just revert to your original setup with the clone.
Sharing Projects
Do you have an awesome Raspberry Pi project you want to share with a friend or colleague? Instead of explaining every step they need to take to set it up, just hand them a cloned SD card! They can pop it into their Raspberry Pi, and they’re good to go – no fuss, no muss.
Hardware requirements to clone your SD card
Below is some of the hardware you will need for this project.
It's a free PDF guide containing every Raspberry Pi Linux command you should know!
Download now
- A reliable spare SD card: Since you want to clone the existing SD card, you will need an additional SD card which will be the destination for your clone. Also, this SD card should not be smaller than the SD card you are cloning. In my case, I always opt for a larger SD card. Alternatively, you can also opt for a USB drive. This is one USB drive I can recommend, and you can find the best SD cards for Raspberry Pi tested here.
- A USB reader/adapter: If you are using the Raspberry Pi OS to clone, you will need one SD card reader to connect your other SD card via the USB ports. However, if you are on a laptop, you might need two SD card readers for your two SD cards.
You can find cheap USB to SD card adapters on Amazon if your computer doesn’t have one.
Clone SD card on the Raspberry Pi OS
If you already have your Raspberry Pi up and running, there is no need to look for a laptop to clone the SD card, follow the steps below:
- Insert the spare SD card into the Raspberry Pi.
The Raspberry PI has only one SD card port, therefore you will need an adapter to connect the other SD card to one of the USB-A ports. You can also use a USB drive but remember, if you are to use it on a Raspberry Pi, you will need to enable “boot from USB” on the Pi. - Open the SD card copier.
SD Card Copier is a tool the Raspberry Pi team developed to clone the SD card to another bootable USB drive or SD card.
On your Raspberry Pi desktop, click the “Menu” icon, select “Accessories” then “SD card copier.”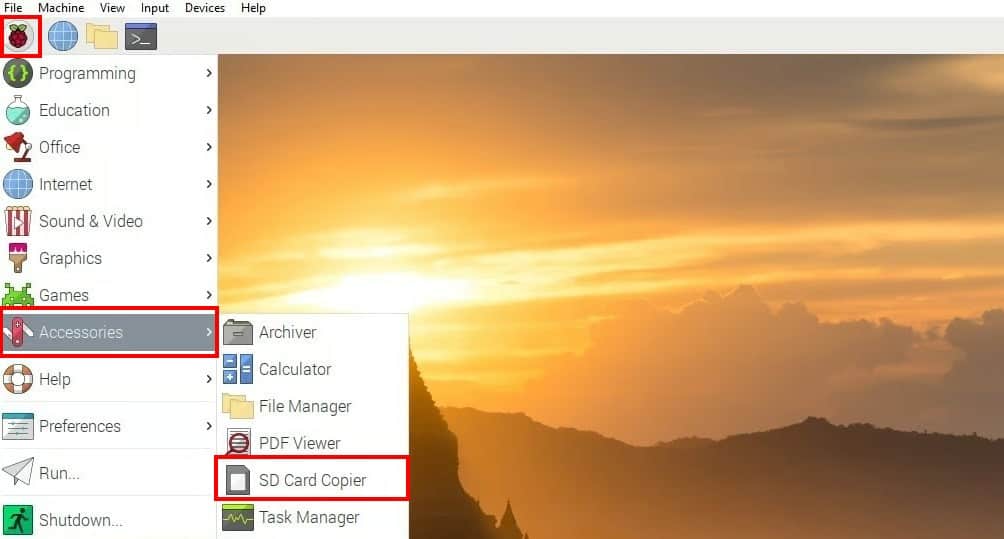
- Select your SD cards.
You will see two options in the SD card copier window. The first is “Copy from device.” This should be your existing SD card that you want to clone. Most of the time, it will be automatically selected. The other option is “Copy to device.” This should be the spare SD card or USB drive that you want to use.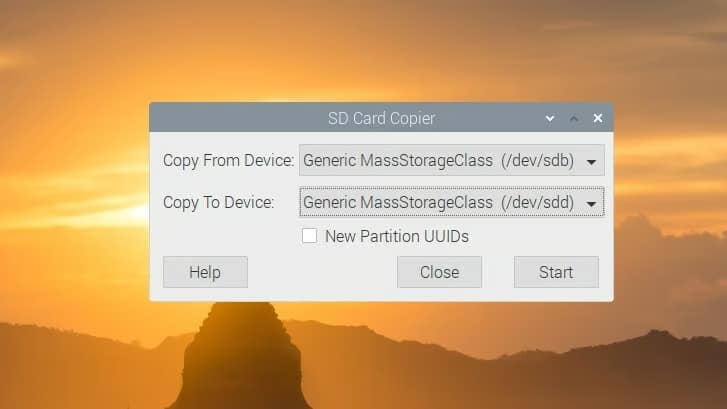
- Clone SD card.
You will see the option “New Partition UUIDs.” Leave that unchecked and click “Start” to get started with the cloning process. You will see a warning prompt: “All the data in the destination SD card will be erased.” Click “Yes” to start.
Once the cloning process is complete, you can now use the new SD card in another Raspberry Pi.
It's a free PDF guide containing every Raspberry Pi Linux command you should know!
Download now
Clone SD card using the DD command (Linux and macOS)
Another option you can use to clone the SD card is the DD command available in most Linux distributions and macOS.
The DD (disk dump) command is used for copying and converting files and data on Unix-like operating systems. Essentially, DD reads data from a source and writes it to a destination, allowing you to create backups, clone disks, or manipulate data at a low level.
The DD command comes in handy in various situations.
- Maybe you have installed a different Linux distribution or OS on your Raspberry Pi (Kali Linux, Kodi, Windows 10 IoT Core, etc.) and it doesn’t come with the SD Card Copier app. In my case, I had set up Windows 10 IoT Core and needed to run the project on another Pi.
- You don’t have a Raspberry Pi board nearby, but you have the SD card with you and your laptop.
Clone Raspberry Pi SD card on Linux (Ubuntu)
Even though I am using Ubuntu for this tutorial, these steps will work for any other distribution including Debian, CentOS, Arch Linux, etc.
- Insert the two SD cards into your PC:
Here you may need to use an SD card reader or adapter since most laptops don’t come with an SD card slot. - Identify SD Card:
From this step, you will need to get a little bit techy. Don’t worry if you aren’t well-versed with the Linux command line as I will keep everything plain and simple.
Launch the Terminal from the applications menu and execute the command below:sudo lsblk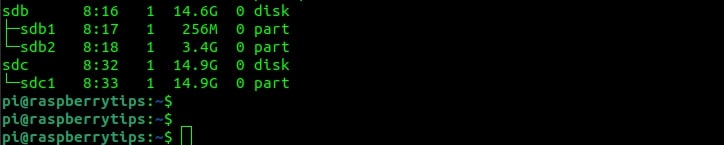
The lbslk command lists all the devices connected to your PC, including the SD cards. Scroll to the bottom and you will see devices with the label /dev/sdb or /dev/sdc and so on depending on the number of external drives connected.
In my case, /dev/sdb is the SD card we want to clone and /dev/sdc is my spare SD card. - Unmount SD Cards:
Before proceeding, unmount any partitions on both the source and target SD cards. You can do this using the umount command followed by the device names of the partitions. For example:sudo umount /dev/sdb1 /dev/sdb2 /dev/sdc1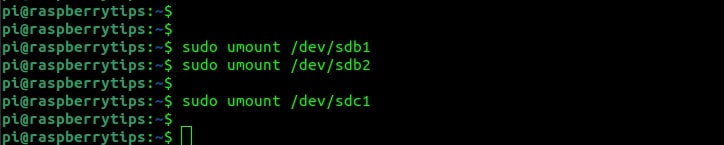
Replace /dev/sdb1 /dev/sdb2 and /dev/sdc1 with the appropriate partition device names if necessary. - Clone SD Card:
Once the SD cards are unmounted, you can use the DD command to clone the entire contents of the source SD card to the target SD card.
Execute the following command, replacing /dev/sdb /dev/sdc with the device names of the source and target SD cards.sudo dd if=/dev/sdb of=/dev/sdc bs=4M status=progress
Here is a brief explanation of the parameters I used in the command above:
if= specifies the input file (source), which is the source SD card (/dev/sdb).
of= specifies the output file (destination), the target SD card (/dev/sdc).
bs= sets the block size to improve performance. In this example, it’s set to 4 MB.
status=progress shows the progress of the dd command. - Wait for Completion:
Depending on the size of your source SD card, the cloning process may take some time. Be patient and wait for the DD command to complete. - Eject SD Cards:
Once the cloning process is finished, you can safely eject both the source and target SD cards from your Ubuntu machine.
You now have a clone of your Raspberry Pi SD card on the target SD card. You can insert the target SD card into another Raspberry Pi and boot from it as you would with the original SD card.
If you’re new to the Linux command line, this article will give you the most important Linux commands to know, plus a free downloadable cheat sheet to keep handy.
Clone Raspberry Pi SD card on macOS
If you are on a macOS, follow the steps below.
- Insert SD Cards:
Insert both the source (original) SD card and the target (new) SD card into your Mac. Note the device names assigned to both SD cards. You can use thediskutil listcommand to identify the device names.
Here, I have /dev/disk2 (16GB) as the source drive and /dev/disk3 (32GB) as my new SD card.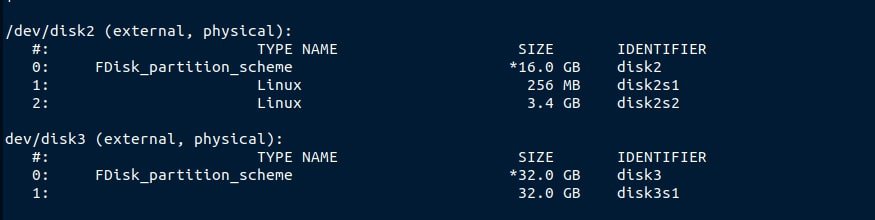
- Unmount SD Cards:
Before proceeding, unmount any partitions on both the source and target SD cards. You can do this using the diskutil unmount Disk command followed by the device names of the disks. For example:diskutil unmountDisk /dev/disk2
diskutil unmountDisk /dev/disk3
Replace /dev/disk2 and /dev/disk3 with the appropriate disk identifiers for your source and target SD cards. - Clone SD Card:
Once the SD cards are unmounted, you can use the dd command to clone the entire contents of the source SD card to the target SD card. Execute the following command, replacing/dev/diskxwith the device names of the source and target SD cards.sudo dd if=/dev/disk2 of=/dev/disk3 bs=4m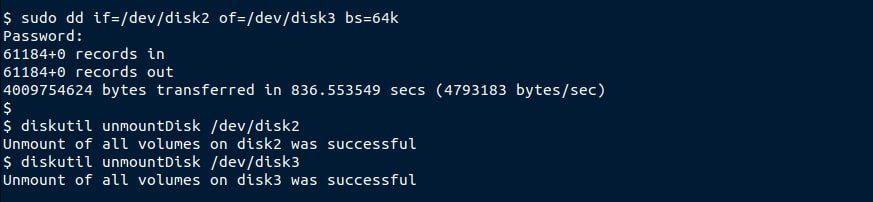
Here:
if= specifies the input file (source), which is the source SD card (/dev/disk2).
of= specifies the output file (destination), the target SD card (/dev/disk3).
bs= sets the block size to improve performance. In this example, it’s set to 4 MB. - Wait for Completion:
Depending on the size of your source SD card, the cloning process may take some time. Be patient and wait for the dd command to complete. - Eject SD Cards:
Once the cloning process is finished, you can safely eject both the source and target SD cards from your Mac.
It's a free PDF guide containing every Raspberry Pi Linux command you should know!
Download now
Want to chat with other Raspberry Pi enthusiasts? Join the community, share your current projects and ask for help directly in the forums.
Clone SD card using Win32 Disk Imager (Windows)
Are you a Windows user, well, I have you covered. I will show you how to use a tool called Win32DiskImager to clone the Raspberry Pi SD card.
Follow the steps below to get started.
- Download and install Win32DiskImager:
Win32DiskImager is available for download for free on most sites, but I highly recommend downloading it from their official website. You all know about viruses and ransomware. It’s best to download genuine software. - Open Win32DiskImager:
After a successful installation, proceed to launch Win32DiskImager. You should see a window similar to the image below.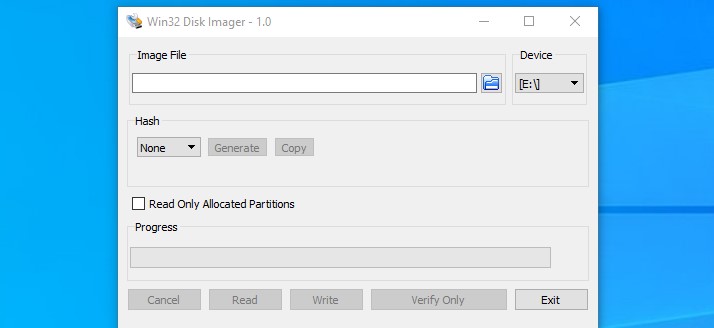
- Create an image file:
Unlike on Raspberry Pi OS, Linux or macOS where you can directly clone your SD card to another, you will first need to create a disk image and then write it to the target SD card on Windows.
On the Win32DiskImager window, click on the file icon next to the “Image File” field. Select the destination folder where you want to place the image file and ensure you add a name with a “.img” extension. In my case, I like placing the image file in the Documents folder with a name like “CloneImageOne.img.”
In the Device section, select the SD card that you want to clone. It should be the boot partition. To avoid confusion, I always first remove all connected USB drives and use the file manager to verify which letter is assigned to the “boot” partition.
Also don’t forget to tick the checkbox next to “Read Only Allocated Partitions.” That will enable Win32DiskImager to only copy the portions of the disk that are actively being used and have data stored on them. Otherwise, you will have an image of the same size as the SD card.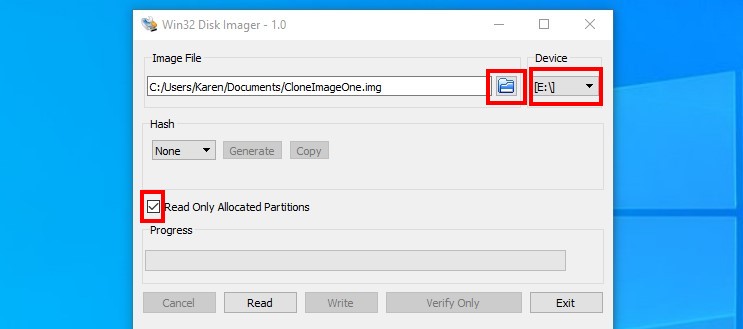
- Create a disk image:
After setting up everything correctly, click the “Read” button. Win32DiskImager will immediately start creating a disk image out of the SD card. This process might take a few minutes.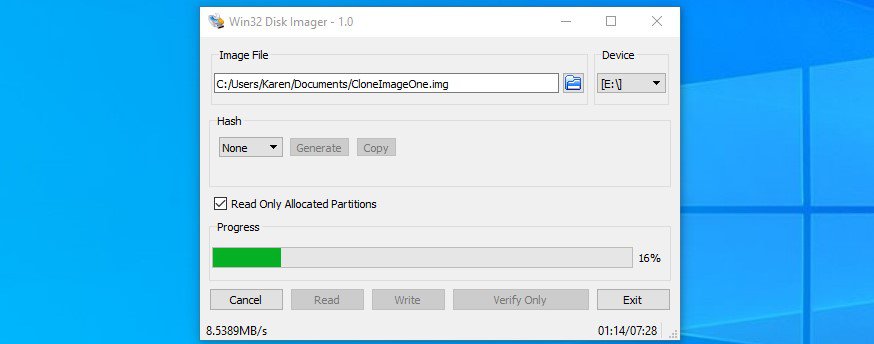
Once done, you will get a “Success” message and you can find the image file in the destination folder you selected. - Write the cloned image to an SD card:
Now that you have the disk image file, you can proceed to write it to your new SD card. You can use various tools like Raspberry Pi Imager or Balena Etcher. However, for this post, I will just stick to Win32DiskImager.
Launch the app. In the image file section, use the “file” icon to select the image you just created. In the “Device” dropdown menu, select your new SD card. Click “Write” to get started.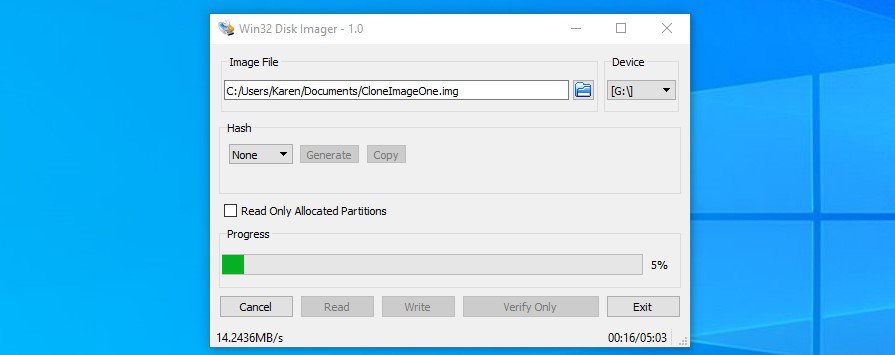
Once done you can eject the SD card and use it to boot your Raspberry Pi.
That’s it! I believe you now have a working spare SD card that you can use to boot your Raspberry Pi. Cloning comes in handy especially when working with complex Raspberry IoT projects. You wouldn’t imagine losing all your progress and starting from scratch.
By the way, don’t forget to explore our article showcasing a variety of projects suitable for Raspberry Pi enthusiasts of all levels, from beginner to expert. Whether you’re just starting or looking for a new challenge, there’s something for everyone.
Whenever you’re ready, here are other ways I can help you:
The RaspberryTips Community: If you want to hang out with me and other Raspberry Pi fans, you can join the community. I share exclusive tutorials and behind-the-scenes content there. Premium members can also visit the website without ads.
Master your Raspberry Pi in 30 days: If you are looking for the best tips to become an expert on Raspberry Pi, this book is for you. Learn useful Linux skills and practice multiple projects with step-by-step guides.
The Raspberry Pi Bootcamp: Understand everything about the Raspberry Pi, stop searching for help all the time, and finally enjoy completing your projects.
Master Python on Raspberry Pi: Create, understand, and improve any Python script for your Raspberry Pi. Learn the essentials step-by-step without losing time understanding useless concepts.
You can also find all my recommendations for tools and hardware on this page.