How to Run Blender on Raspberry Pi: A Complete Tutorial
Handling 3D objects is a requirement for numerous applications. Blender is a popular open-source software providing an entire 3D creation suit. However, it is not natively supported on the Raspberry Pi due to its hardware limitations. Fortunately, I have a solution for this problem.
While Blender isn’t natively supported on Raspberry Pi OS Bookworm, it can be installed via the APT package manager. It can then be run by enabling mesa3D software rendering.
I will start with a brief introduction to Blender before giving you all the steps for the installation process.
If you’re looking to quickly progress on Raspberry Pi, you can check out my e-book here. It’s a 30-day challenge where you learn one new thing every day until you become a Raspberry Pi expert. The first third of the book teaches you the basics, but the following chapters include projects you can try on your own.
Blender: Introduction and Prerequisites
What is Blender?
Blender is a popular open-source software for creating 3D models. It supports numerous functionalities for developing 3D artifacts that include rendering, modelling, animation, etc. It’s become an industry choice when it comes to 3D rendering.
However, these tasks are very compute-intensive and require a considerable amount of processing power from both the CPU and the GPU. Thanks to the upgraded hardware of the Raspberry Pi starting with the Model 4, it is possible to run Blender on the Pi as well.
Hardware and Software Requirements
First, we will go through the hardware and software requirements.
It's a free PDF guide containing every Raspberry Pi Linux command you should know!
Download now
You will need to have the following to use this tutorial:
- Regarding hardware, you will need a Raspberry Pi 3 with 1 GB RAM at minimum. I would recommend having a Raspberry Pi 4 with at least 2 GB RAM. You also need an 8 GB SD Card (preferably Class 10 or higher).
- The Pi should ideally be running on the latest version of Raspberry Pi OS Bookworm for the software, but older versions work as well. Buster and Bullseye versions have the older version of Blender, which will run without any workarounds.
- You will need access to the Raspberry Pi Desktop (terminal access will not suffice). So, I would suggest having a VNC setup on your Pi. Here is a tutorial which will help you do this: Getting Started With VNC on Raspberry Pi (Bookworm update).
Alternatively, you can use an HDMI-supported Monitor with a keyboard and a mouse to control your Pi.
Now that we ‘are square with these’ve reviewed these requirements, let’s install Blender on our Raspberry Pi.
Installing Blender on the Pi
To install Blender on the Raspberry Pi, we will use the in-built APT Package Manager that comes with Debian-based systems. Follow the steps given below to complete the installation:

Join Our Community!
Connect, learn, and grow with other Raspberry Pi enthusiasts. Support RaspberryTips and enjoy an ad-free reading experience. Get exclusive monthly video tutorials and many other benefits.
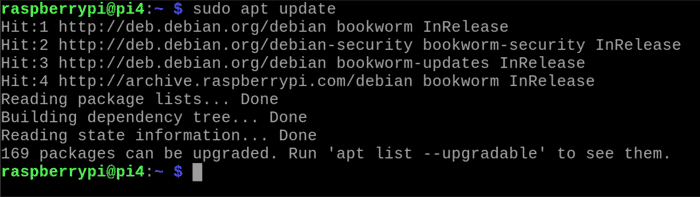
Learn moreStep 1: Updating the System Packages
Whenever I install a new package on my Pi, I always update and upgrade all the existing system packages to the latest version. The following two commands need to be executed in the given order to complete this step.sudo apt update
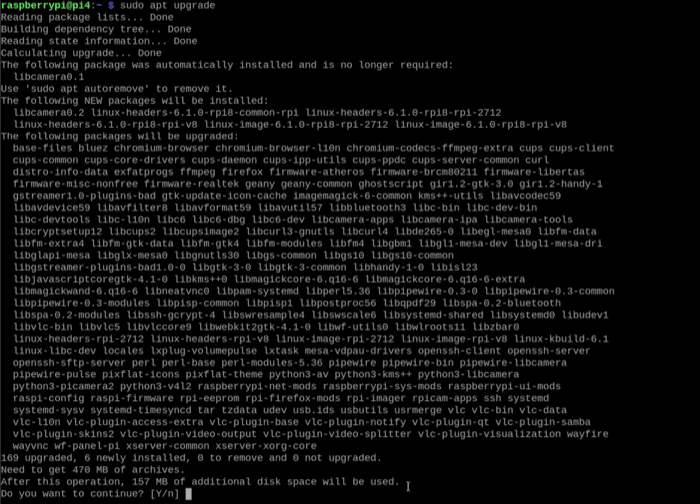
sudo apt upgrade
The first command will check how many packages can be updated.
Then, the second command will perform the actual process of updating the packages. This step should take a few minutes to complete. You will be asked to confirm that you are okay with updating these packages; just press Y and then the Enter key.
If you’re new to the Linux command line, this article will give you the most important Linux commands to know, plus a free downloadable cheat sheet to keep handy.
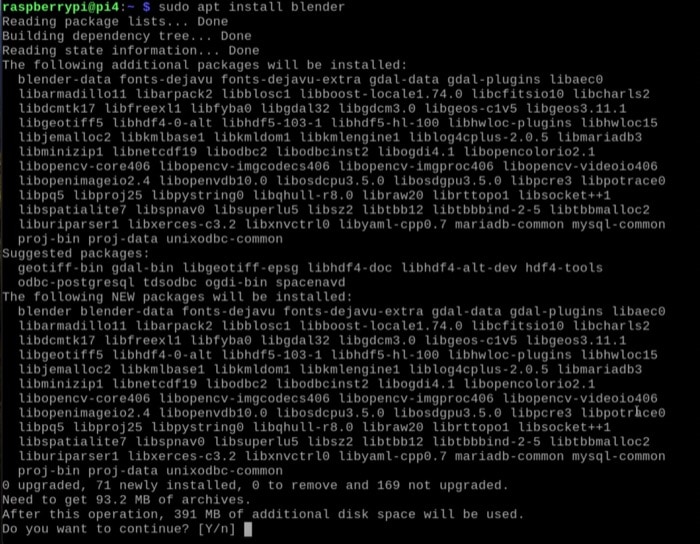
Step 2: Installing the Blender Package
Once the system packages are updated to the latest version, you can install the Blender package on the Pi. To do this, use the APT package manager mentioned earlier. Execute the following command to start the installation process:
sudo apt install blender
This is a very heavy package and hence will need a lot of dependent packages. Just press Y and then Enter to start the installation process.
It's a free PDF guide containing every Raspberry Pi Linux command you should know!
Download now
It will take a few minutes to complete the installation process. Great! You have successfully installed Blender on your Raspberry Pi. Next, let’s try to start this newly installed software.
Step 3: Starting Blender for the First Time
Now that we have Blender installed on our system, let’s start it. To do this, simply type the following command in the terminal window.
blender
Easy, right? However, when you execute this command, you will get an error that states the graphic card on our Pi is not supported.

This message clearly says that our Pi cannot run Blender. So, what is the solution? Fortunately, I have a workaround which will let us trick the software and run Blender.
Step 4: The Workaround – Mesa3D Software Rendering
Mesa3D is an open-source implementation of the OpenGL specification – a system for rendering interactive 3D graphics.
What it intuitively means is that when we have a system like the Raspberry Pi with limited hardware capabilities, we can use the software rendering capabilities of Mesa3D. It is really easy to enable this on the Raspberry Pi.
To enable this for Blender, modify the command you used to start Blender.LIBGL_ALWAYS_SOFTWARE=true blender
The flag “LIBGL_ALWAYS_SOFTWARE” tells the system whether to use software rendering. We set it to true so that the Pi always uses Software Rendering. Once you execute the above command, Blender will take a few seconds to start, so please be patient.
Now, let’s start using Blender on the Raspberry Pi.
It's a free PDF guide containing every Raspberry Pi Linux command you should know!
Download now
Blender, Running on the Raspberry Pi
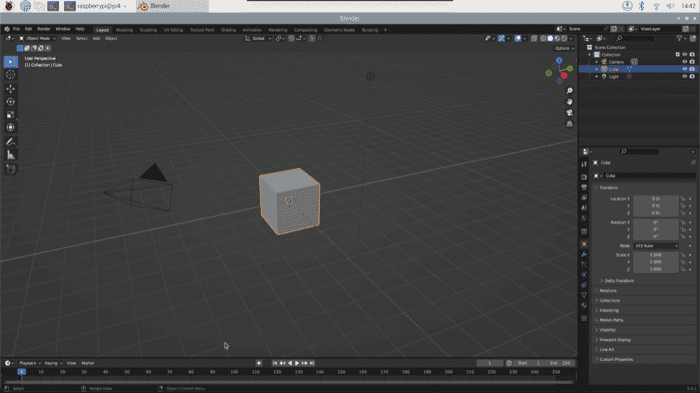
Let’s see Blender in action now. For this tutorial, I will render the image of the default cube which comes when you create a new project in Blender. I will explain how to do this in 2-3 simple steps. So, let’s get started.
Starting Blender
When you first start Blender, you will see the following window which prompts you to complete the setup. For now, I will keep all the default options and simply press the Next button.
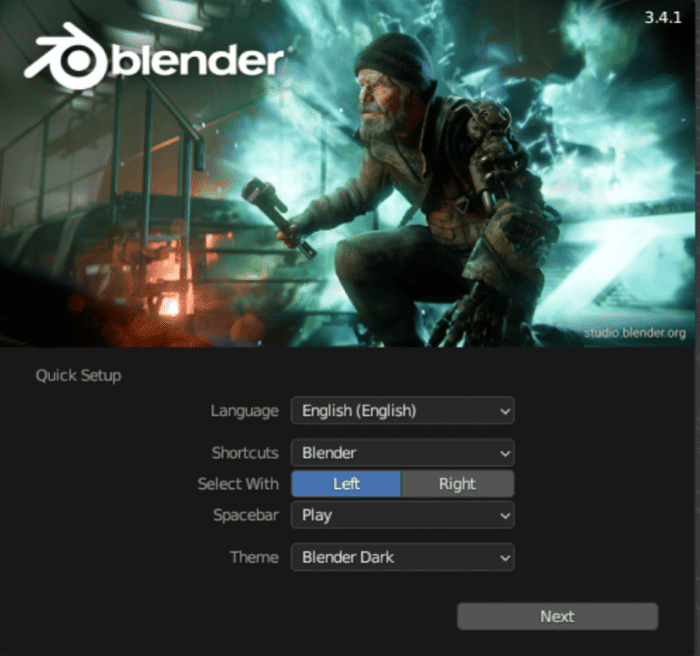
Once the next window pops, just click anywhere on the splash screen and you are good to go. Welcome to Blender! Let’s start with some basics.
A Brief Tutorial on Blender
Once you have a new empty project open on your screen, the first thing you will see is the huge number of interactive widgets and options! It was overwhelming for me when I saw it for the first time.
Let’s go through some of the important options together. Below is the Blender home screen with all the important sections marked.
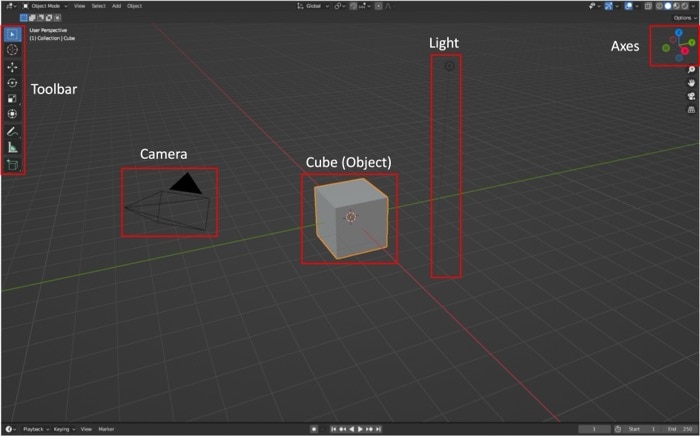
Here is some information about the marked items:
- 3D Viewport: The entire area visible in the image is called the 3D viewport. It is like the palette in paint. You will be working in this area most of the time you’re doing something in Blender.
- Objects: In the image, the Cube in the middle is the actual 3D object which you will be editing or working on.
- Camera: The 3D cone with the arrow is the Camera. It helps you decide from which angle will you see your 3D object when you render an image for it.
- Light: This option helps you handle the lighting for your 3D project. That means you can use this to play with things like shadows for your object.
- Axes: When you want to look at your object from a different perspective, you can use these axes on the top (the X, Y and Z axes from high school geometry).
- Toolbar: This is one of the menus which has the necessary tools you would need when interacting with the 3D objects.
I would personally suggest interacting with each of these on your own to get a better idea. Once you are done with that, let’s render something!
Rendering your First Object
This is a very straightforward step as we will be rendering the default cube object visible in the screen and nothing else. To do this, just render the image by navigating to “Render >> Render Image” or pressing the F12 key.

Please wait for a few seconds as it will take some time to render due to the hardware limitations of the Pi. After a few seconds, you will see the rendered cube on your screen.
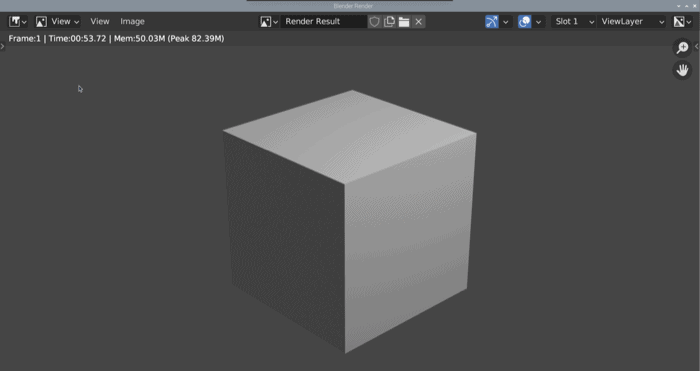
Congratulations! You just rendered your very first 3D object in Blender. That is all for this tutorial.
It's a free PDF guide containing every Raspberry Pi Linux command you should know!
Download now
Want to chat with other Raspberry Pi enthusiasts? Join the community, share your current projects and ask for help directly in the forums.
Conclusion
We learnt a lot of things in the tutorial. Here is an overview of everything we covered:
- How to install Blender on the Raspberry Pi
- Running Blender on the Raspberry Pi
- Rendering our first 3D Object in Blender
So, the question now is, what next? You have a lot of options: you could start by learning the basics of 3D rendering with Blender, for which the Pi would be enough. Apart from this, you could also use it for your projects by learning how to, say design a 3D case for your Raspberry Pi.
The possibilities are limitless. Thank you for reading this tutorial.
Whenever you’re ready, here are other ways I can help you:
The RaspberryTips Community: If you want to hang out with me and other Raspberry Pi fans, you can join the community. I share exclusive tutorials and behind-the-scenes content there. Premium members can also visit the website without ads.
Master your Raspberry Pi in 30 days: If you are looking for the best tips to become an expert on Raspberry Pi, this book is for you. Learn useful Linux skills and practice multiple projects with step-by-step guides.
The Raspberry Pi Bootcamp: Understand everything about the Raspberry Pi, stop searching for help all the time, and finally enjoy completing your projects.
Master Python on Raspberry Pi: Create, understand, and improve any Python script for your Raspberry Pi. Learn the essentials step-by-step without losing time understanding useless concepts.
You can also find all my recommendations for tools and hardware on this page.