How To Install Domoticz on Raspberry Pi (Step-by-step guide)
Domoticz is a home automation system, like Home Assistant or other similar tools. It can be installed on a Raspberry Pi to control and monitor most of the smart devices you may have at home (lights, sensors, robot vacuums, etc.) on a web interface. I tested it for you, and the installation process is not really straightforward, so I’ll take the time to explain every step in this article.
Domoticz has an official Docker container available, which works on Raspberry Pi OS. Once all the prerequisites are ready, it can be created with one command line: docker pull domoticz/domoticz.
But the installation process won’t be that easy if you are starting from scratch, so keep reading to do everything in the correct order and not miss any steps. I will give you the complete installation process, and the first steps to connecting to your smart devices.
If you’re looking to quickly progress on Raspberry Pi, you can check out my e-book here. It’s a 30-day challenge where you learn one new thing every day until you become a Raspberry Pi expert. The first third of the book teaches you the basics, but the following chapters include projects you can try on your own.
Domoticz Installation
In short, here are the required steps to install Domoticz on a Raspberry Pi:
- Install Raspberry Pi OS (Buster, 32-bit, is recommended by Domoticz).
- Install Docker on Raspberry Pi OS.
- Pull the docker image for Domoticz, and start the container.
Let’s see how to do this.
Introduction
The official website of Domoticz is not really clear. I was expecting an SD card image to get Domoticz on my Raspberry Pi, but this is not the case. In the download section, you’ll get an archive with the source code of Domoticz, without further explanation.
If you scroll to the bottom of the Download page, there is also a script you can run to install it on Raspberry Pi OS or Ubuntu, and finally, they also talk about a Docker image.
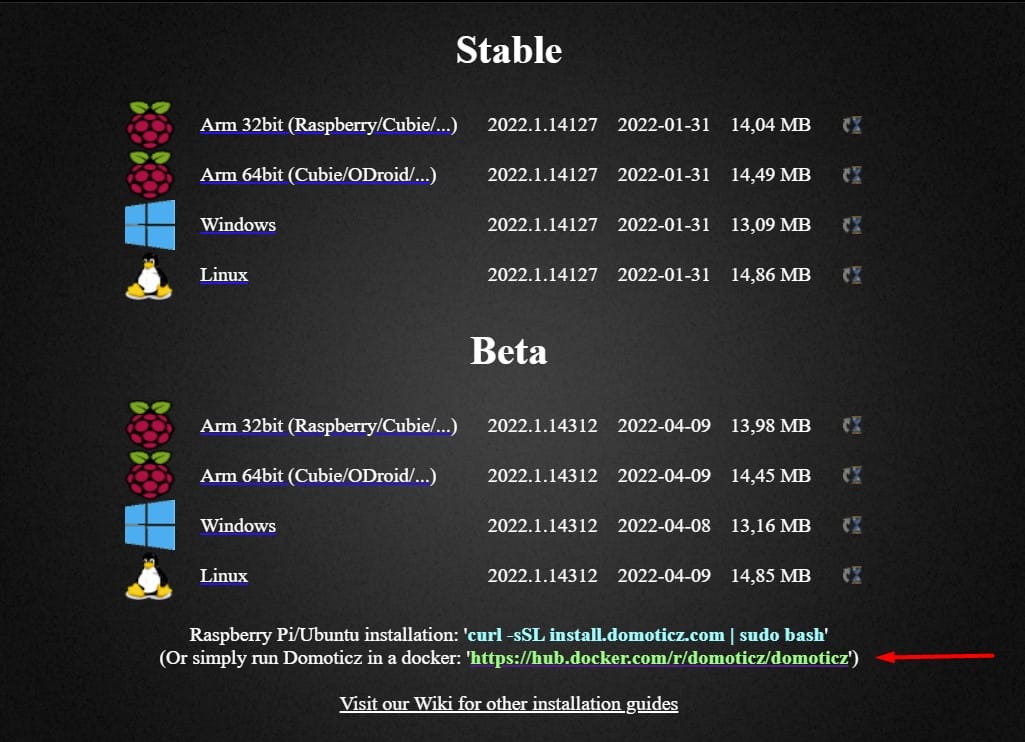
Overall, I feel that the Docker image is the best way to install Domoticz on your Raspberry Pi, and you should probably follow that path. That’s the one I’ll explain in this article.
It's a free PDF guide containing every Raspberry Pi Linux command you should know!
Download now
You can try to follow the Wiki if you prefer another option, but I did it and found myself a bit lost in the instructions, with unclear prerequisites and a download server that doesn’t exist anymore.
Prerequisites
As Domoticz is heavily based on Python plugins, it’s recommended to follow these prerequisites:
- Raspberry Pi OS Buster (Legacy), 32-bit.
64-bit is supported, but there wasn’t a stable release yet with Buster, so unless you absolutely need the 64-bit version, I would use the Legacy 32-bit.
The Lite version is enough, that’s the one I used for this tutorial. - Any Raspberry Pi Model.
I tested with a Pi 4, but it should work with any model. - At least 4 GB available on your SD card or USB drive.
If you are starting from scratch, I’ll let you install Raspberry Pi OS, configure it (Internet, regional configuration, etc.) and do the system updates before going further. You can find my Raspberry Pi OS installation guide here if you need help with this.
Install Docker on Raspberry Pi OS
The last prerequisite to run Domoticz on Raspberry Pi is to have Docker installed, which is not the case by default.
Join Our Community!
Connect, learn, and grow with other Raspberry Pi enthusiasts. Support RaspberryTips and enjoy an ad-free reading experience. Get exclusive monthly video tutorials and many other benefits.
Learn moreHere is how to install Docker on Raspberry Pi OS:
- Download the official installation script from Docker:
curl -fsSL https://get.docker.com -o get-docker.sh - Run it with sudo:
sudo sh get-docker.sh
That’s it, Docker is now ready to use with any project.
If you are new to this, I recommend reading my complete guide about Docker on Raspberry Pi first. Just to make sure you understand what you’re doing here.
Install Domoticz with Docker
Once Docker is installed, you can easily download the Domoticz container from the Docker hub with:sudo docker pull domoticz/domoticz
Note: If you want to try a beta version or a specific version, you can specify it in this command. For example:sudo docker pull domoticz/domoticz:beta
sudo docker pull domoticz/domoticz:2022.1
Start Domoticz
The last step is to run it for the first time, with all the mandatory options. There are a few mistakes in the official documentation, and sudo was required in my case. Here is the correct command:
sudo docker run -d \
-p 8080:8080 \
-p 8443:443 \
-v /home/pi/domoticz:/opt/domoticz/userdata \
-e TZ=Europe/Paris \
--device=/dev/mmcblk0p1 \
--name=domoticz \
domoticz/domoticz
You may need to adjust these values, depending on your setup:
- p: The ports used for the web interface. By default, it’s 8080 (HTTP) and 8443 (HTTPS). Make sure to use other ports if you have other web servers running on your system.
- v: Where do you want to keep the Domoticz files (plugins for example).
- e: Change the timezone to fit your location.
You can use this command to get a list of all timezones:timedatectl list-timezonesMore details and filter here. - device: Not sure about this, I set it with my SD card device name, but I don’t really know why it’s required.
Use this command to find yours:df -h | grep boot - name: The name of your Docker’s container.
Anyway, you can pick my command as it is, and change the settings later if needed.
It's a free PDF guide containing every Raspberry Pi Linux command you should know!
Download now
If you experience any issue at this stage, the official forum is probably a good place to ask for help.
First Steps With Domoticz
Web interface
If everything went well during the installation, you should now have access to the web interface.
Type the IP address of your Raspberry Pi, followed by the port you set in the previous command. It should be something like:http://<IP_ADDRESS>:8080
For example:http://192.168.1.20:8080
If you don’t know your IP address, you can follow this guide to get it, whatever your current setup is.

The interface is empty by default, you’ll need to set up your devices first. Unlike with Home Assistant, there is no wizard to help you with the first steps. I’ll give some general tips in the next paragraphs, but you’ll need to take a bit of time to find the best way to add your smart devices here, every hardware is different.
Settings
Before going further, I recommend checking the settings page of Domoticz, and changing anything that needs to be changed: language and location especially, and maybe setting a password for improved security.
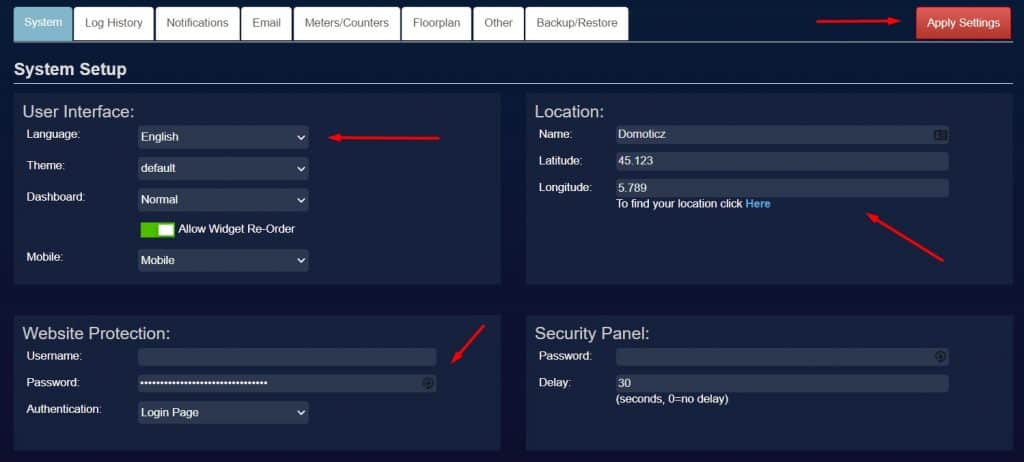
The location is used by various plugins, so you’ll save time later. Click on the link below the form to get your current latitude and longitude, and fill out the form. Click on “Apply Settings” to save the changes.
Once the location is saved, you’ll see a new line at the top of each page, with the current time, and sunrise and sunset times. It will also show the current weather forecast on the Weather page:

Add your first devices
The basic setup is now done, and you can move on to connect all the smart devices you want to manage with Domoticz. There are dozens of brands and devices supported by default, and you can also install add-ons to connect to other smart devices, so I won’t be exhaustive here, but let’s take a quick example.
As you may already know, I’m a fan of the Philips Hue smart lights, I often use them as an example in my articles and books. They are supported by default with Domoticz, so I’ll show you how to use them. But the procedure should be similar for most devices:
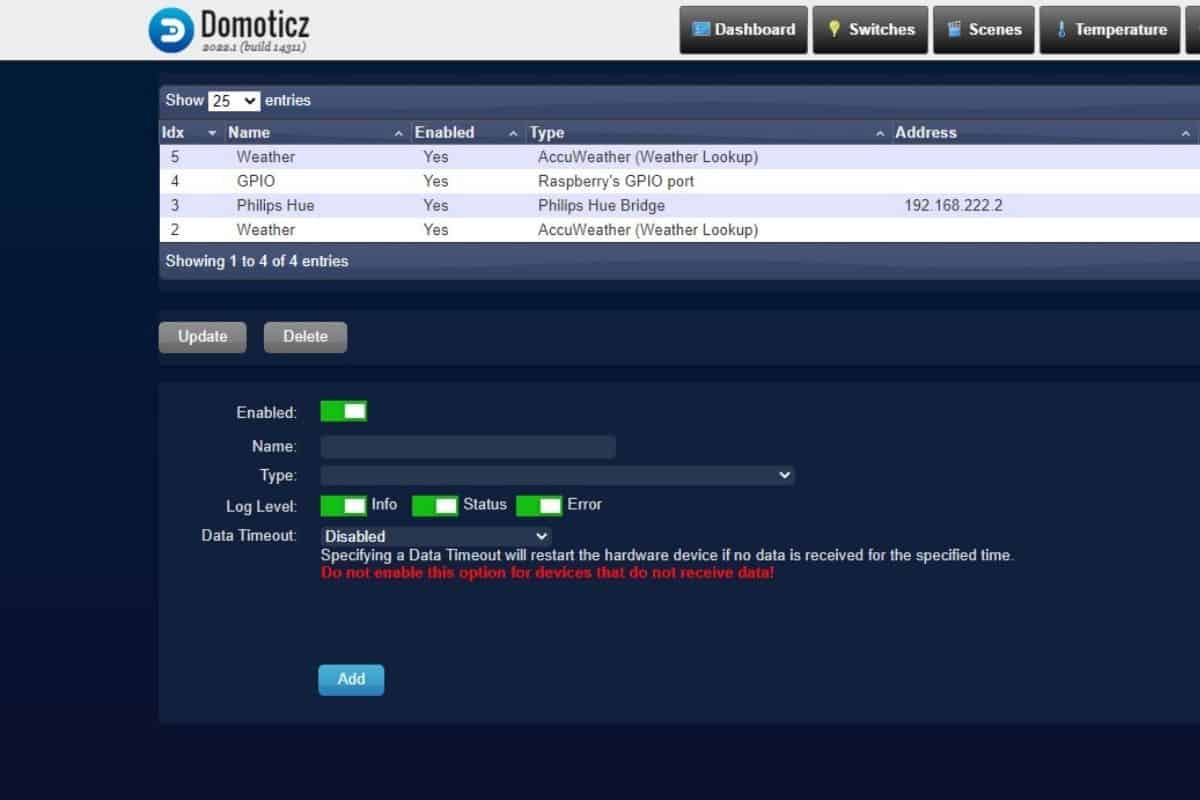
- Go to Setup > Hardware.
- Fill the Name field with what you want, for example: “Lights”.
- In the “Type” list, find “Philips Hue bridge”.
The form will be different with each device, for example, in this case, I have: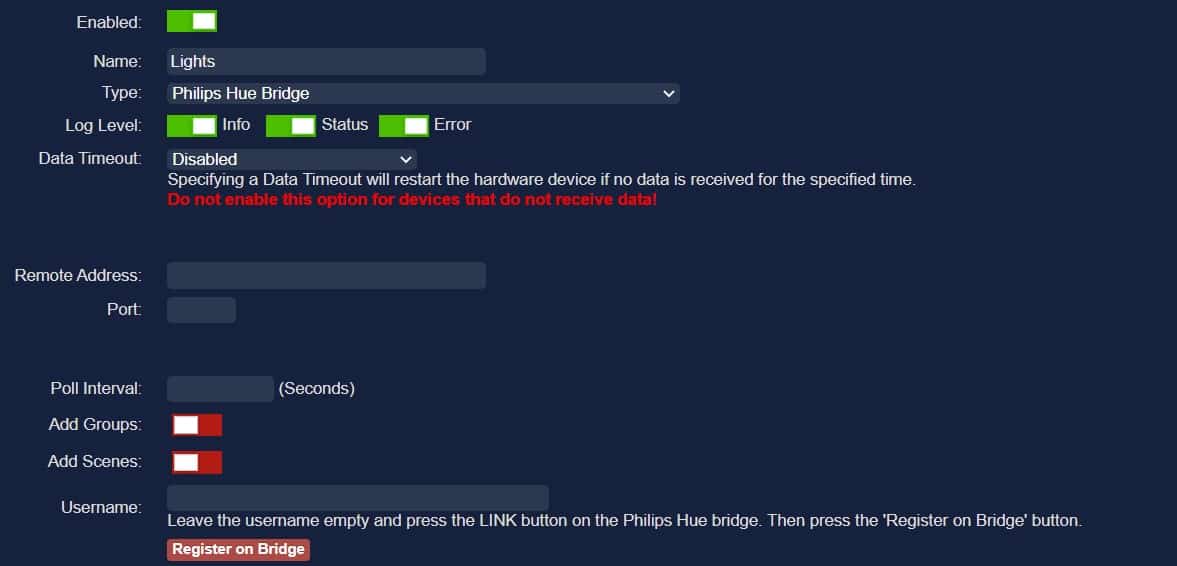
- Fill out the form with the requested values.
In my example, I especially need the Bridge IP address and port (80).
I then need to press the link button on it and click on register to allow Domoticz to interact with it.
Depending on the hardware you add, it can be a username, an API token, etc. - Click on “Add” to save and add the new devices.
You’ll then find them in Setup > Devices, and in some cases, they will be added to the corresponding page. For example, my lights are now available on the “Switches” page, and I can configure them directly from there:

Obviously, this goes way further, as you can create scenes and scripts to automate everything. This is not the goal of this article, but you are welcome to play with Domoticz once all your devices are installed. The fun part starts when you start to make them work together :-).
FAQ
Where is Domoticz installed on my Raspberry Pi?
The Domoticz folder is created during the installation, by default, it’s /home/pi/domoticz. But you can change it during the manual installation, and the first run of the docker container.
If you don’t remember where you installed it, you can use this command to find it:sudo find / -iname domoticz.db
How to update Domoticz?
The easiest way to update Domoticz is to do it from the web interface. Go to “Setup” > “Check for Update” and follow the wizard if an update is available.
If you use Docker as explained in this guide, updating Domoticz can also be done with docker-compose: docker-compose pull domoticz
docker-compose down
docker-compose up -d --remove-orphans
docker image prune
It's a free PDF guide containing every Raspberry Pi Linux command you should know!
Download now
Video
It's a free PDF guide containing every Raspberry Pi Linux command you should know!
Download now
If you are looking for exclusive tutorials, I post a new course each month, available for premium members only. Join the community to get access to all of them right now!
Final Thoughts
Domoticz is a nice tool for home automation, connecting all your smart devices in one interface, and trying to make them work together, via various scripts and scenes. But to be honest, after testing Home Assistant a few weeks before writing this tutorial (read the article here), I’m not really impressed by Domoticz, and I better understand the results of my survey on the YouTube channel:

I find the installation of Home Assistant easier, with a better website and an image ready to use. Then, there is a welcome wizard that automatically detects the devices on your network, and you can add them in a few clicks. And overall, the Home Assistant interface is way more enjoyable and intuitive than Domoticz.
HOOBS is another good alternative you might consider, check my tutorial here.
If you really need to use Domoticz for some reason, you now know how to install it, but if you are just looking for the best home automation tool, I would try Home Assistant first. I don’t use that kind of tool a lot, so I might be wrong, but these are my first impressions after testing both.
Whenever you’re ready, here are other ways I can help you:
The RaspberryTips Community: If you want to hang out with me and other Raspberry Pi fans, you can join the community. I share exclusive tutorials and behind-the-scenes content there. Premium members can also visit the website without ads.
Master your Raspberry Pi in 30 days: If you are looking for the best tips to become an expert on Raspberry Pi, this book is for you. Learn useful Linux skills and practice multiple projects with step-by-step guides.
The Raspberry Pi Bootcamp: Understand everything about the Raspberry Pi, stop searching for help all the time, and finally enjoy completing your projects.
Master Python on Raspberry Pi: Create, understand, and improve any Python script for your Raspberry Pi. Learn the essentials step-by-step without losing time understanding useless concepts.
You can also find all my recommendations for tools and hardware on this page.

