How to Set Static IP Address on Ubuntu Server (Step-by-step)
Most networks automatically assign IP addresses, which is quite convenient for desktop computers. But for a server, it’s recommended to configure it with a static IP, often outside the DHCP range, so it’s always available at the same address. How do you configure this without a GUI? Let’s find out.
On Ubuntu Server, the network configuration is managed by the netplan utility, with the configuration file located in /etc/netplan. It’s possible to set a static IP by editing this file.
Before making any changes, make sure you understand your network configuration and find a free IP address for your server (I will explain how to do this). Only then you can edit the netplan configuration file to assign a static IP address to your server.
Prerequisites: Understand the network configuration
I guess if you’re installing a server on your network, you already know your network pretty well. However, I want to make sure what we are doing is clear for everyone, so I’ll take a few minutes to explain what you need before changing anything.
Feel free to skip this section if you already know the exact network configuration you want to apply to your server.
Get your current IP configuration
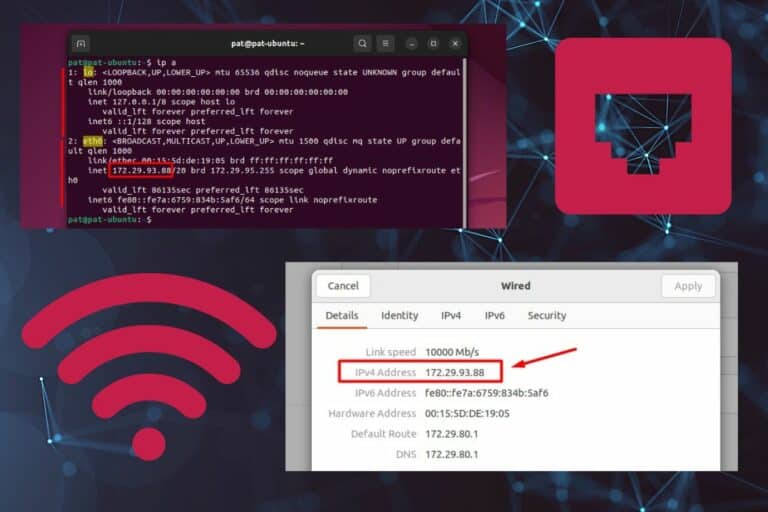
On Ubuntu Server, you can use the following command to get your current IP address:ip a
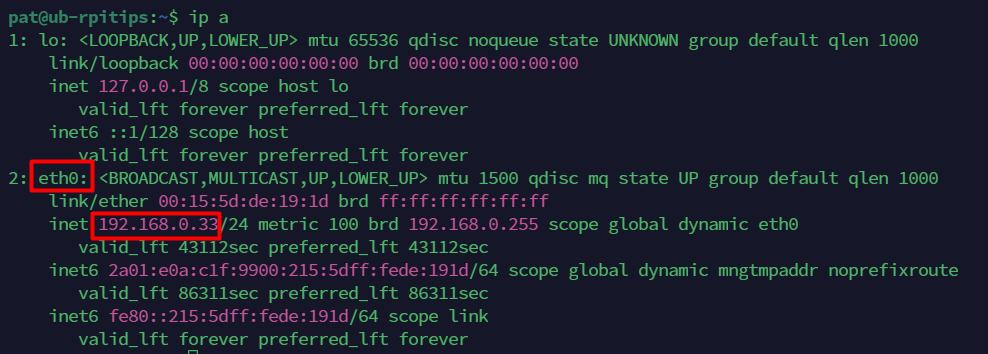
You’ll get a list of all the network interfaces, with their names, IP addresses and subnet mask.
In my example, I have:
- Interface name: eth0
- IP address: 192.168.0.33/24 (assigned by the DHCP)
To find the router or default gateway on your network, you can then use:ip r

I now have a better sense of my network configuration.
Download your exclusive free PDF containing the most useful Linux commands to elevate your skills!
Download now
If you’re new to the Linux command line, this article will give you the most important Linux commands to know, plus a free downloadable cheat sheet to keep handy.
(Optional) Find the DHCP range
If you have a DHCP server enabled on the network, it’s a good idea to access the router configuration and check the current DHCP range. If possible, you don’t want to set a static IP inside that range.
All router interfaces are different, so I won’t explain everything in detail here, but you should easily find a section with the start and end IP address for the DHCP range. Try to pick an IP on the same subnet but outside that range for your server.
In my example, the router is 192.168.0.254, the DHCP range is from 192.168.0.10 to 192.168.0.50. I can safely set my server to 192.168.0.150 if it’s not already used by another server.
Note: You can use a network scanner if you don’t have a list of all IP addresses already used on your network (most routers will list them). You can use the ‘nmap’ command on Linux or Advanced IP Scanner from a Windows computer on the same network.

Join Our Community!
Connect, learn, and grow with other Raspberry Pi enthusiasts. Support RaspberryTips and enjoy an ad-free reading experience. Get exclusive monthly video tutorials and many other benefits.
Learn moreSet the static IP to your Ubuntu Server
At this point, you must know which IP address you’ll use for your server, the network gateway, and probably the DNS server if one is required (on small networks, it’s often the same as the gateway).
In my case, I’ll use the following configuration:
- IP address: 192.168.0.150
- Gateway: 192.168.0.254
- DNS: 8.8.8.8
Make sure to change these values with yours in the following sections.
Open the network configuration file
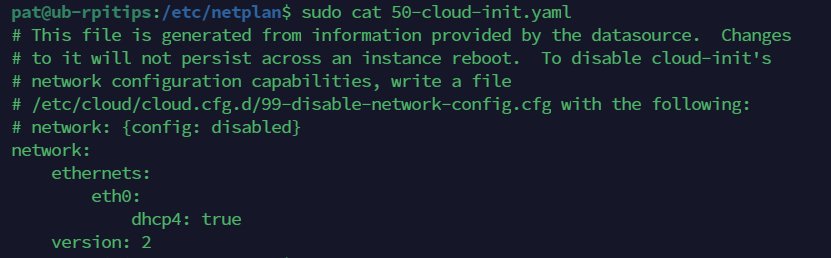
As mentioned in the introduction, the network configuration file on a fresh Ubuntu Server installation is now located under /etc/netplan.
I think the file name can be slightly different depending on your setup, so it’s probably best to go inside this folder and check what’s available. You can do it with:cd /etc/netplan
ls -l

In my case, the file name is “50-cloud-init.yaml” because I’m testing this on a virtual machine, but adapt the following commands to yours if it’s different.
You can see the current configuration with:sudo cat 50-cloud-init.yaml
And it’s probably a good idea to create a backup of this file just in case something goes wrong.sudo cp 50-cloud-init.yaml ~/50-cloud-init.yaml.default
You can now open the file in edit mode with:sudo nano 50-cloud-init.yaml
Download your exclusive free PDF containing the most useful Linux commands to elevate your skills!
Download now
Set your static IP address
To set the static IP address, we’ll slightly edit this file to add the IP address, gateway and DNS server information.
Once the file opens with Nano, or your favorite text editor, make the changes to make it look more like this:
network:
    ethernets:
        eth0:
            dhcp4: no
            addresses:
               - 192.168.0.150/24
            routes:
               - to: default
                 via: 192.168.0.254
            nameservers:
               addresses: [8.8.8.8]
version: 2Warning: this file is in YAML format. It’s essential to keep the file structure and indentation, or it won’t work. Make sure only to use spaces (no TAB).
Save your changes and exit Nano (CTRL+X).
You can test your configuration file without rebooting with:sudo netplan try
If it works, your IP address will change directly. But if there is any issue, it will give you the error message, without losing the connection (as with the next command).
Apply the changes
To apply the new network configuration persistently, you must run this command:sudo netplan apply
After doing this, your new network configuration will be applied automatically on boot, and you should always get the same IP address, gateway and DNS server used on this server.
Verify the new configuration
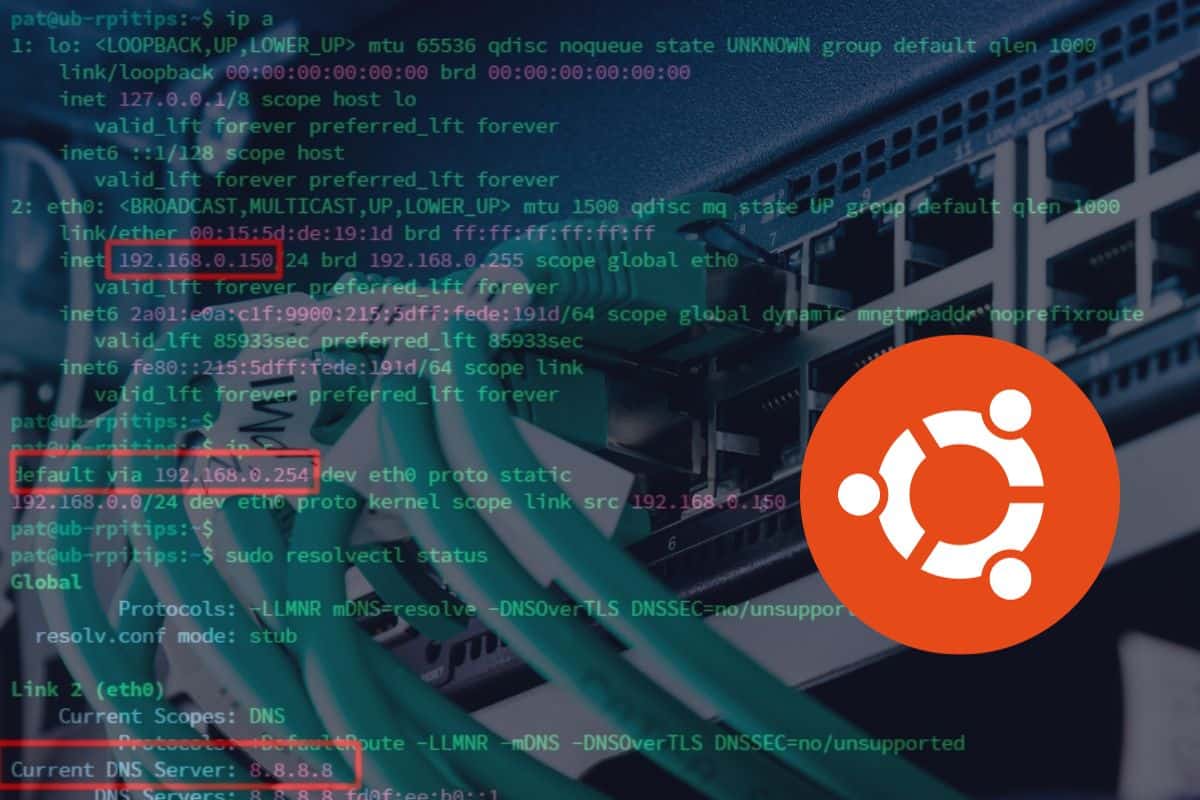
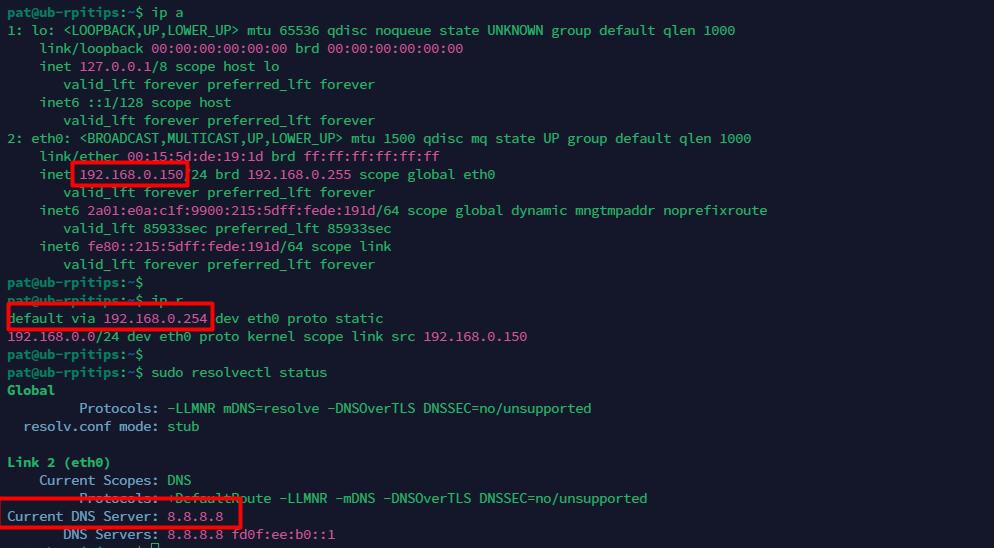
You can verify the new configuration with the same commands used at the beginning of the article:ip a
ip r
In my example, I now have:
Download your exclusive free PDF containing the most useful Linux commands to elevate your skills!
Download now
Related questions
How to set up a secondary DNS server in Netplan?
In the Netplan configuration, a secondary DNS server can be set by appending the server’s IP address to the addresses list under the nameservers section.
I recommend always having a backup DNS server in your configuration to make sure everything keeps working even if the main DNS server is unreachable.
To add this in Netplan, you just need to edit your YAML file and include the second DNS server’s IP address right after your primary one, separated by a comma.
nameservers:
               addresses: [8.8.8.8, 8.8.4.4]
Is it better to set a static IP on the router instead?
Setting a static IP on the router, often referred to as DHCP reservation, is considered more manageable and flexible compared to configuring a static IP on individual devices.
If you can, I recommend setting this static IP directly on the router, especially if you’re managing multiple devices. This way, your router automatically assigns the same IP to your server each time it connects.
It’s easier to configure, you keep track of all your servers in one place, and you avoid conflicts. The only requirement is that you have a router that handles this properly (and that the Ubuntu server you’re setting up now is not your DHCP server).
Can we use “nmcli” instead of editing the Netplan configuration manually?
nmcli, a command-line tool for Network Manager, presents an alternative to Netplan for network configuration on Ubuntu, offering a more interactive and user-friendly approach.
If you’re not a fan of editing YAML files for network settings, nmcli is your friend. It’s straightforward and interactive, making network configuration less intimidating. You can view, modify, and manage all your network connections just with simple commands.
Just keep in mind that on Ubuntu Server, nmcli is not included by default as it is part of the Network Manager package, that must be installed manually. This installation introduces a different network management tool that may override existing network configurations managed by Netplan.
To install NetworkManager, you just need to run:sudo apt install network-managerAfter installation, you can start using nmcli to change your network configuration in a more user-friendly way:sudo nmcli
How do you restore the original network configuration?
If you followed this tutorial, but something didn’t work as expected, or you want to get back the DHCP configuration (maybe to try to configure everything from the router instead), you can restore the backup configuration file we created.
- Restore the original file with:
sudo cp ~/50-cloud-init.yaml.default /etc/netplan/50-cloud-init.yaml
Make sure to change the file name if it was something else on your system. - Apply the configuration with:
sudo netplan apply
That’s it, you are now back to the default configuration, with the DHCP assigned IP address.
Download your exclusive free PDF containing the most useful Linux commands to elevate your skills!
Download now
If you are looking for exclusive tutorials, I post a new course each month, available for premium members only. Join the community to get access to all of them right now!
Additional Resources
Overwhelmed with Linux commands?
My e-book, “Master Linux Commands”, is your essential guide to mastering the terminal. Get practical tips, real-world examples, and a bonus cheat sheet to keep by your side.
Grab your copy now.
VIP Community
If you just want to hang out with me and other Linux fans, you can also join the community. I share exclusive tutorials and behind-the-scenes content there. Premium members can also visit the website without ads.
More details here.
Need help building something with Python?
Python is a great language to get started with programming on any Linux computer.
Learn the essentials, step-by-step, without losing time understanding useless concepts.
Get the e-book now.