Enabling UART on Raspberry Pi: A Step-by-Step Guide
There are many ways that a Raspberry Pi can send and receive information. The Universal Asynchronous Receiver/Transmitter protocol, or UART, enables communication between connected devices. On Raspberry Pi, this communication method is commonly referenced as the Serial Port.
On Raspberry Pi OS, the serial port (UART) can be enabled by using the graphical interface or the console command lines for terminal use. There is also an option that can be found in the config.txt file.
Before we discuss the different options to enable UART on the Raspberry Pi, let’s start with a brief introduction to what exactly UART is and how has it been set up for the Raspberry Pi.
If you’re looking to quickly progress on Raspberry Pi, you can check out my e-book here. It’s a 30-day challenge where you learn one new thing every day until you become a Raspberry Pi expert. The first third of the book teaches you the basics, but the following chapters include projects you can try on your own.
What is UART & the Serial Communication Protocol?
UART stands for Universal Asynchronous Receiver-Transmitter protocol. It is a popular communication protocol for hardware devices that involves data transmission on a bit-by-bit basis, serially.
It can be one or two wires based on the implementation.
It allows multiple configuration options for things, like data format and transmission speeds (often termed as baus rate, which is the number of bits transmitted per second). Overall, it is a very versatile and widely used communication protocol.
Regarding the Raspberry Pi, this protocol has been defined as the Serial Port. There is also an additional Serial Console option as well, which is configurable similarly to the latter option. We will discuss both these options briefly to get an idea of what they are.
It's a free PDF guide containing every Raspberry Pi Linux command you should know!
Download now
The Serial Port
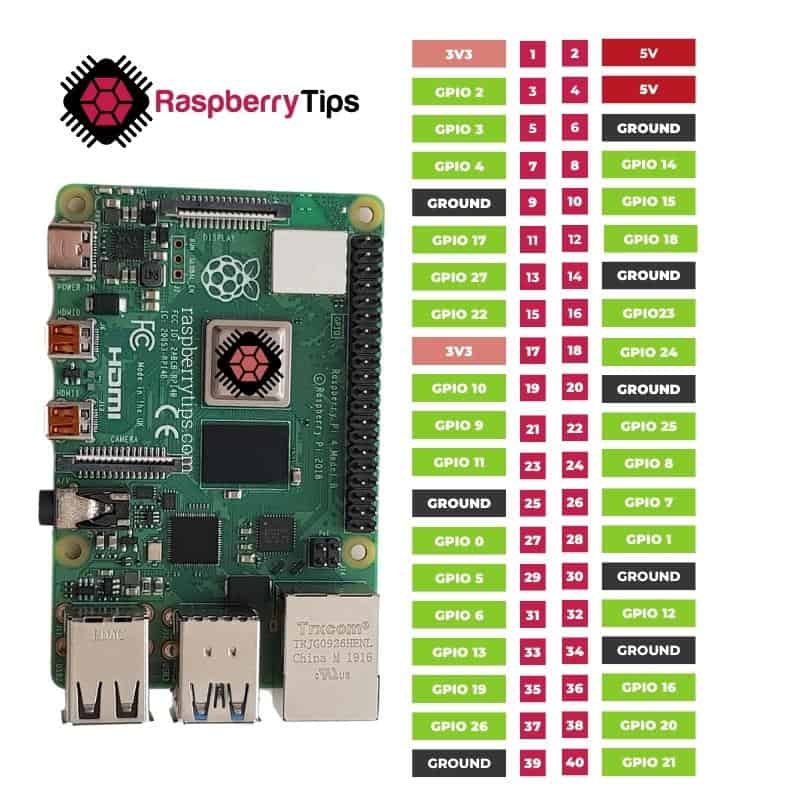
Serial Port is the actual UART interface which is available through the Raspberry Pi GPIOs 14 and 15 (termed as the TX and RX pins). This interface is disabled by default, so if we want to use UART on the Pi, we will need to enable it.
The different ways to do this will be discussed in this article in detail.
The Serial Console
Imagine a scenario where you cannot access an HDMI display or SSH access for the Pi. How would you access the Pi in this case? This is where the Serial Console comes to the rescue.

Join Our Community!
Connect, learn, and grow with other Raspberry Pi enthusiasts. Support RaspberryTips and enjoy an ad-free reading experience. Get exclusive monthly video tutorials and many other benefits.
Learn moreThe Serial Console allows you to access the Pi’s shell via UART. By default, this is disabled, as it’s a security risk for the Pi. Anyone with physical access to your Pi can access it, if this has been enabled. However, it is great for debugging purposes to figure out what is wrong with any existing interface.
We will take a look at how to access your Pi’s terminal via UART in the final section of this tutorial. Now that we have an idea of what UART is and how it has been set up for the Raspberry Pi, let’s see the different ways to enable UART on the Pi.
Configuring Raspberry Pi OS for UART Serial Connections
This section will cover the different ways we can enable UART on the Raspberry Pi (running Raspberry Pi OS Bookworm).
There are three primary ways in which one can enable UART on the Pi:
- Through the Raspberry Pi Configuration Application.
- Through the Raspberry Pi Terminal.
- By Changing the Boot Files to Enable UART.
So, let’s explore each method in detail now.
Note: this entire tutorial has been tested for a Raspberry Pi 4 running the latest version of Bookworm. However, the steps shown in this should work for older Pi models running legacy operating systems as well.
It's a free PDF guide containing every Raspberry Pi Linux command you should know!
Download now
How to Enable UART on Raspberry Pi using the GUI
Crafted by the Raspberry Pi Foundation, Raspberry Pi Configuration is an easy-to-use tool for configuring your Raspberry Pi. The configuration application gives you quick access to a host of configuration options available within the Raspberry Pi OS.
As previously discussed, two options found are for UART serial connections: Serial Port and Serial Console. Let’s take a brief walkthrough of the entire process of enabling them, step by step:
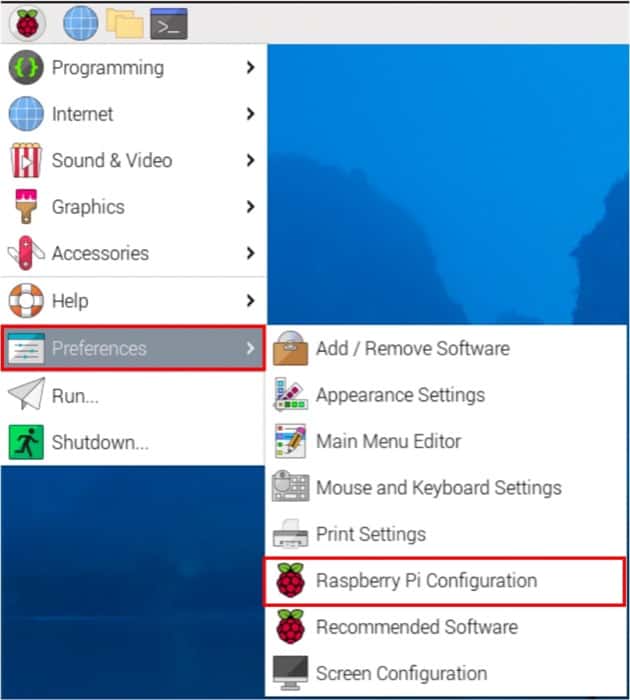
- Open the applications menu at the top left of the Raspberry Pi OS desktop environment. Select Preferences >> Raspberry Pi Configuration.
- This will open a new Raspberry Pi Configuration window, as shown below.
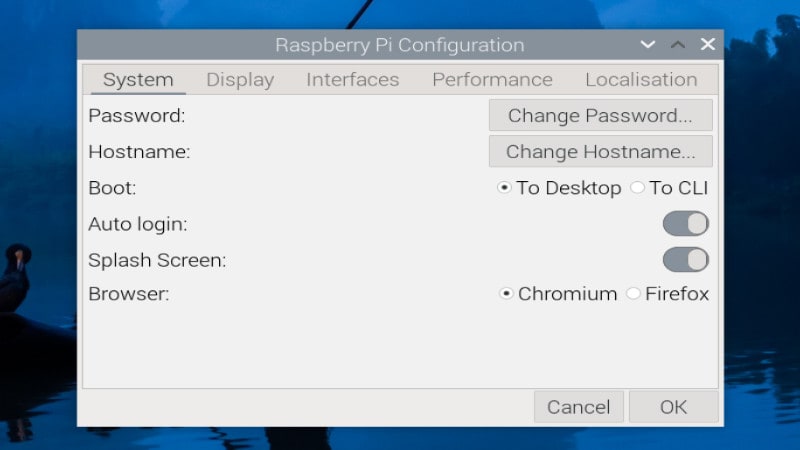
- Next, move into the “Interfaces” tab in the middle of the five option groups. Under this tab, you’ll find two options for the UART communication protocol: Serial Port and Serial Console.
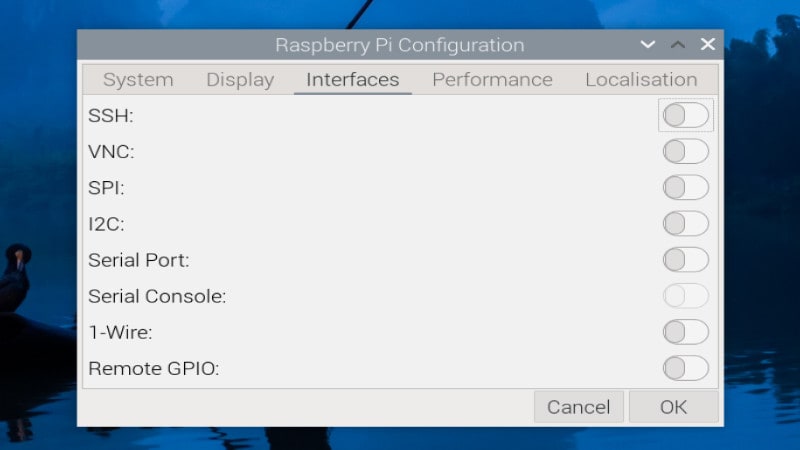
- When enabling the Serial options, you may have noticed that the Serial Console is disabled by default and you cannot enable it. This is because the Serial Console requires the Serial Port to operate. Once the Serial Port is enabled, the Serial Console option can be toggled.
- Toggle both options as it will allow us to access the terminal of the Pi, which is great for debugging as previously mentioned.
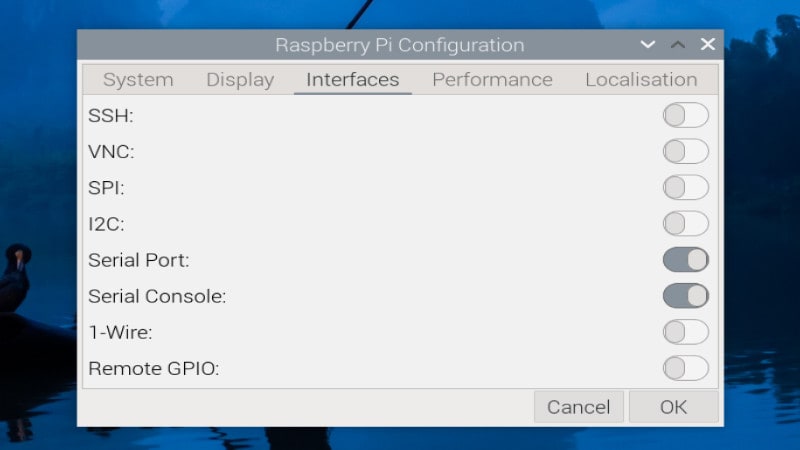
- Once you’ve finished with the Raspberry Pi Configuration application, click “OK” and allow your configuration to update. You will then be prompted if you’d like to restart your Raspberry Pi OS now or later. To solidify the changes, it’s always best to reboot immediately.
Great! You have enabled UART on your Pi and can now connect to supported devices serially via the Pi’s pinout interface for UART (Tx and Rx pins). We will learn more about this in the final section of this article.
How to Enable UART / Serial Interface in Raspberry Pi OS by Using Terminal Commands
Utilizing bash commands provides a different method of configuring your Raspberry Pi. The configuration screen inside your terminal roughly resembles the Raspberry Pi Configuration application – with an emphasis on rough.
The terminal configuration tool offers everything that the software application does, with a few more options. Enabling UART is just as easy and is quicker than the first option.
Enabling UART from the terminal is a breeze. Walking through the entire process, the steps for using the terminal configuration tool are:
- Click the shortcut for the terminal on the left side of the taskbar and type the shell command:
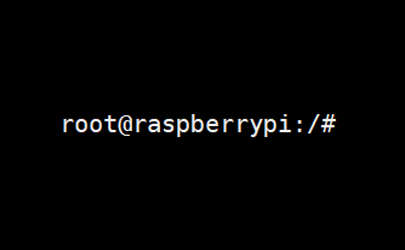
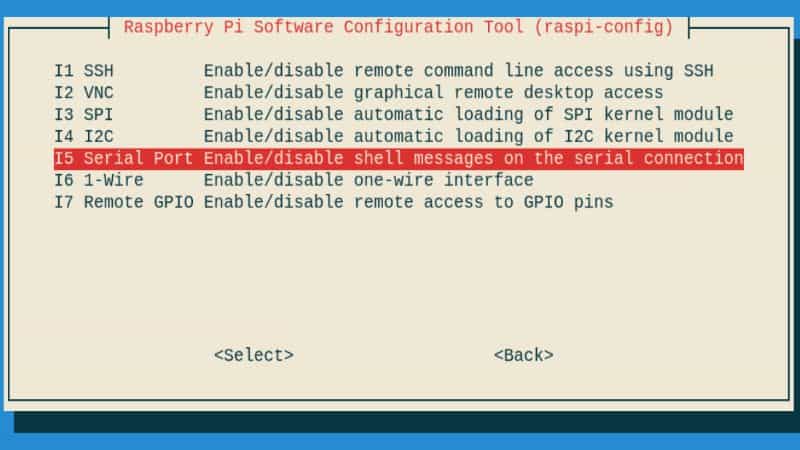
sudo raspi-config - This will immediately launch the Raspberry Pi Software Configuration Tool – showing the following window inside your terminal:

- Select “Interface Options” > “Serial Port” to enable UART. Unlike the Raspberry Pi Configuration application, both Serial Port and Serial Console are located within a single “Interface Options” group.
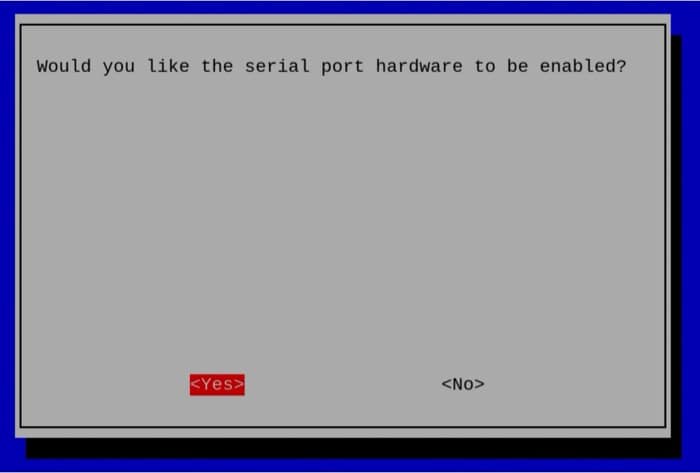
- Once “Serial Port” is selected, two to three windows will give you options and information for enabling UART. The first window will ask <Yes> or <No> to have a login shell accessible through UART. Selecting <Yes> enables both Serial Port and Serial Console.
- Note that if you answer <No> for the first window, a second window with a <Yes> or <No> question of enabling just the Serial Port pops up. Note that this will only be the case if you selected <No> for the first question.
- Based on the choice you make, you will see the output screen saying either both options are enabled (serial login shell and serial interface) or just the serial interface. For this tutorial, we have enabled both as shown in the figure below.
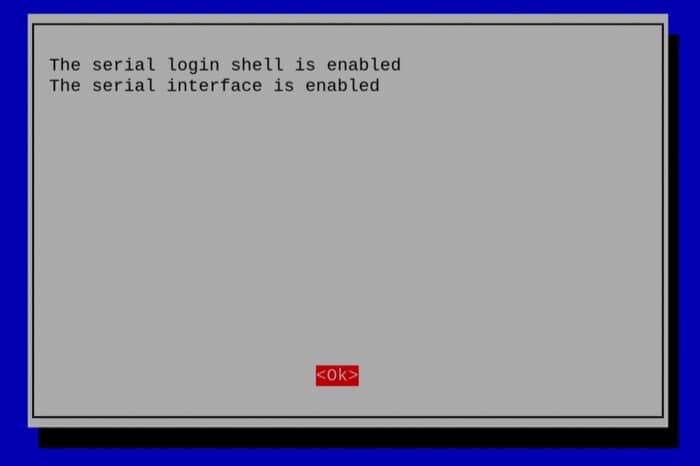
- Finally, the terminal will display what you had chosen as a way to present the interface changes.
You have successfully enabled UART on your Pi using the terminal! For this tutorial, enable both the Serial Port and Serial Console, as we will be taking a look into how you can access your Pi’s terminal serially in the final section.
Editing the Boot Files to Enable UART Without Starting the System
There may be cases where you neither have an HDMI monitor nor SSH access to your Raspberry Pi. In this case, how would you set up your Pi initially? Moreover, there may be some technical issues that don’t allow you to access your Raspberry Pi at all.
In these cases, having access to the Serial Console is the best solution. But for this, you need to enable the overall serial interface for your Pi. We will learn how to do just that in this bonus section!
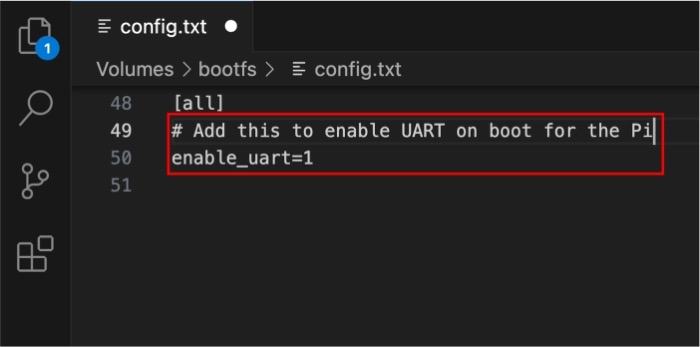
- You will need the SD Card that the Raspberry Pi OS for your Pi has been installed on. Insert it into your main system and then navigate to that particular directory. We are interested in two particular files:
– config.txt
– cmdline.txt
- First, we have to enable the serial interface. For that, open the file config.txt in your favourite text editor and add the following at the end of the file: “enable_uart=1”. This will tell our Pi to enable the serial interface while booting up. Do not forget to save the changes you made.
- Perfect, you have enabled UART for your Pi without even starting it! Great, right? Now, if you want to access the Serial Console, you have to make some additional changes in another boot file: cmdline.txt.
# Add this if it's not already added
console=serial0,115200
Once you have made these changes, save them and then you are good to go!
You now know three different ways to enable UART on your Raspberry Pi! Next, we will see this interface in action. For that, we will access the Pi’s terminal through UART in the final section of this tutorial.
It's a free PDF guide containing every Raspberry Pi Linux command you should know!
Download now
UART Interface in Action – Serial Console
Once you have enabled the UART interface on your Pi through any of the above-described methods, you should be able to use the Serial interface to access the Pi’s terminal. For this, you will need a USB to TTL converter device apart from your Pi, which looks something like this: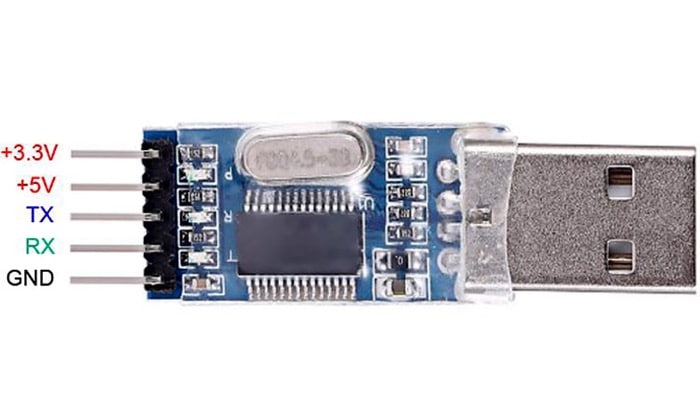
Once you have everything ready, follow the steps below to see the UART interface in action.
- The first step is to connect your Raspberry Pi to this USB-to-TTL converter board so we can access the Pi’s serial interface through other devices. Just follow the pinout diagram below to make the necessary connections.

The connections are as follows:
Raspberry Pi’s GND (Ground Pin) >> UART Board’s GND Pin
Raspberry Pi’s TXD Pin (GPIO14) >> UART Board’s RXD Pin
Raspberry Pi’s RXD Pin (GPIO15) >> UART Board’s TXD Pin - Once you have made these connections, you are ready to see this interface in action! Optional: By default, the boot logs on the console are disabled for security purposes. However, making one small change in the cmdline.txt boot file allows us to access them.
To print the boot logs on the console, we need to remove the following content from the cmdline.txt file:quite splash plymouth.ignore-serial-consoles
This will allow us to access the boot logs of the Pi, which can be very useful for debugging potential booting issues.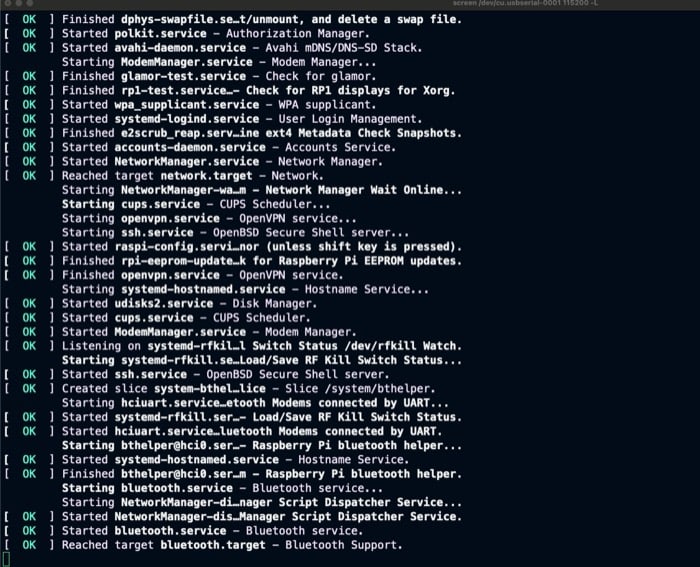
- Now the only thing left is to access our Pi’s terminal through the UART. Once you have connected the UART board to the Pi (which you should keep turned off) and connected the UART board to your PC/Laptop, just turn on the Raspberry Pi.
- To access the serial connection, you can do the following, depending on the system:
– Windows: You will need to perform some additional steps for Windows systems. First, you must download the UART module-specific drivers (CP210x drivers). Refer to the following video for this: How to install UART Module Drivers on Windows.
Once you have done this, you can use PuTTY to access the serial interface. Refer to this great article for a detailed step-by-step guide on this.
– Linux/Mac: For Linux/Mac systems, it is much easier and straightforward. Once you connect the UART module to your system, you will see an entry for it under the path /dev/cu.usbserial-xxxx (the xxxx is a number, which was 0001 in my case).
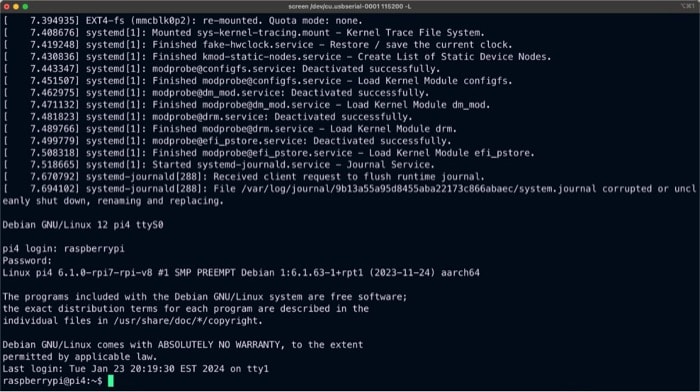
Open a terminal window and type the following command to access the serial console:screen /dev/cu.usbserial-0001 115200 -L - Great! You will now be prompted for your Pi’s username and password. Enter them and you will now have access to your Pi’s terminal via UART.
This marks the end of this tutorial. You now know the different ways to enable UART on your Raspberry Pi and how to use the UART interface on your Pi.
It's a free PDF guide containing every Raspberry Pi Linux command you should know!
Download now
Want to chat with other Raspberry Pi enthusiasts? Join the community, share your current projects and ask for help directly in the forums.
Conclusion
In this article, you learned what UART is and the different approaches to enable this Serial Interface on the Raspberry Pi. Let’s summarize the ways we explored:
- Through the Raspberry Pi Configuration Application.
- Through the Pi’s Terminal.
- Changing Boot Files to enable UART.
Then, we saw this interface in action when we used it to access the Serial Console. However, there are many more applications for this interface. For instance, you can connect UART-based sensors with your Pi and use them for various applications.
Overall, the possibilities are endless for this simple yet powerful communication interface paired with the Raspberry Pi.
Whenever you’re ready, here are other ways I can help you:
The RaspberryTips Community: If you want to hang out with me and other Raspberry Pi fans, you can join the community. I share exclusive tutorials and behind-the-scenes content there. Premium members can also visit the website without ads.
Master your Raspberry Pi in 30 days: If you are looking for the best tips to become an expert on Raspberry Pi, this book is for you. Learn useful Linux skills and practice multiple projects with step-by-step guides.
The Raspberry Pi Bootcamp: Understand everything about the Raspberry Pi, stop searching for help all the time, and finally enjoy completing your projects.
Master Python on Raspberry Pi: Create, understand, and improve any Python script for your Raspberry Pi. Learn the essentials step-by-step without losing time understanding useless concepts.
You can also find all my recommendations for tools and hardware on this page.